1. Introduzione
This manual provides essential information for the safe and effective operation, maintenance, and troubleshooting of your PreAsion ZF-ES009 Electric Chainsaw Sharpener. Please read all instructions carefully before use to ensure proper function and to prevent injury or damage.

Image 1.1: The PreAsion Electric Chainsaw Sharpener, highlighting compatible grinding wheel thicknesses (1/8" & 3/16") and chain pitches (1/4", .325", 3/8", .404").
2. Istruzioni di sicurezza
Osservare sempre le seguenti precauzioni di sicurezza per ridurre il rischio di scosse elettriche, incendi e lesioni gravi:
- Leggi l'intero manuale: Understand all instructions and warnings before operating the sharpener.
- Indossare adeguati dispositivi di protezione individuale (DPI): Always wear safety glasses, hearing protection, and gloves during operation.
- Ensure a stable work surface: Mount the sharpener securely to a workbench or other stable surface to prevent movement during use.
- Mantenere l'area di lavoro pulita e ben illuminata: Le aree disordinate o buie favoriscono gli incidenti.
- Evitare l'avvio accidentale: Prima di collegare l'utensile, assicurarsi che l'interruttore sia in posizione OFF.
- Non esagerare: Mantieni sempre una posizione e un equilibrio adeguati.
- Scollegare l'alimentazione: Always unplug the sharpener from the power source before making adjustments, changing accessories, or performing maintenance.
- Use the correct grinding wheel: Ensure the grinding wheel diameter (Φ145 mm) and inner hole diameter (Φ22.2 mm) match the sharpener's specifications.
- Controllare eventuali danni: Before each use, check for damaged parts. Do not operate if any part is damaged.
- Tenere lontani i bambini e gli astanti: Tutti i visitatori devono essere tenuti a distanza di sicurezza dall'area di lavoro.
3. Prodotto finitoview
Familiarize yourself with the components of your chainsaw sharpener:

Image 3.1: Detailed diagram showing the numbered components of the sharpener.
- manipolo
- Grinding disk lateral guard
- Depth of grind set screw
- Cutting edge angle det-up wheel
- Base
- Mean distance set screw
- Chiusura a viteamp culla
- Cutting angle setting wheel
- Chiusura a viteamp
- Clampleva di comando
- Chiusura a viteamp
- Vite di regolazione
- Guide position set screw
- Guide flap valve
- Grinding screw
- Grinding disk protective enclosure
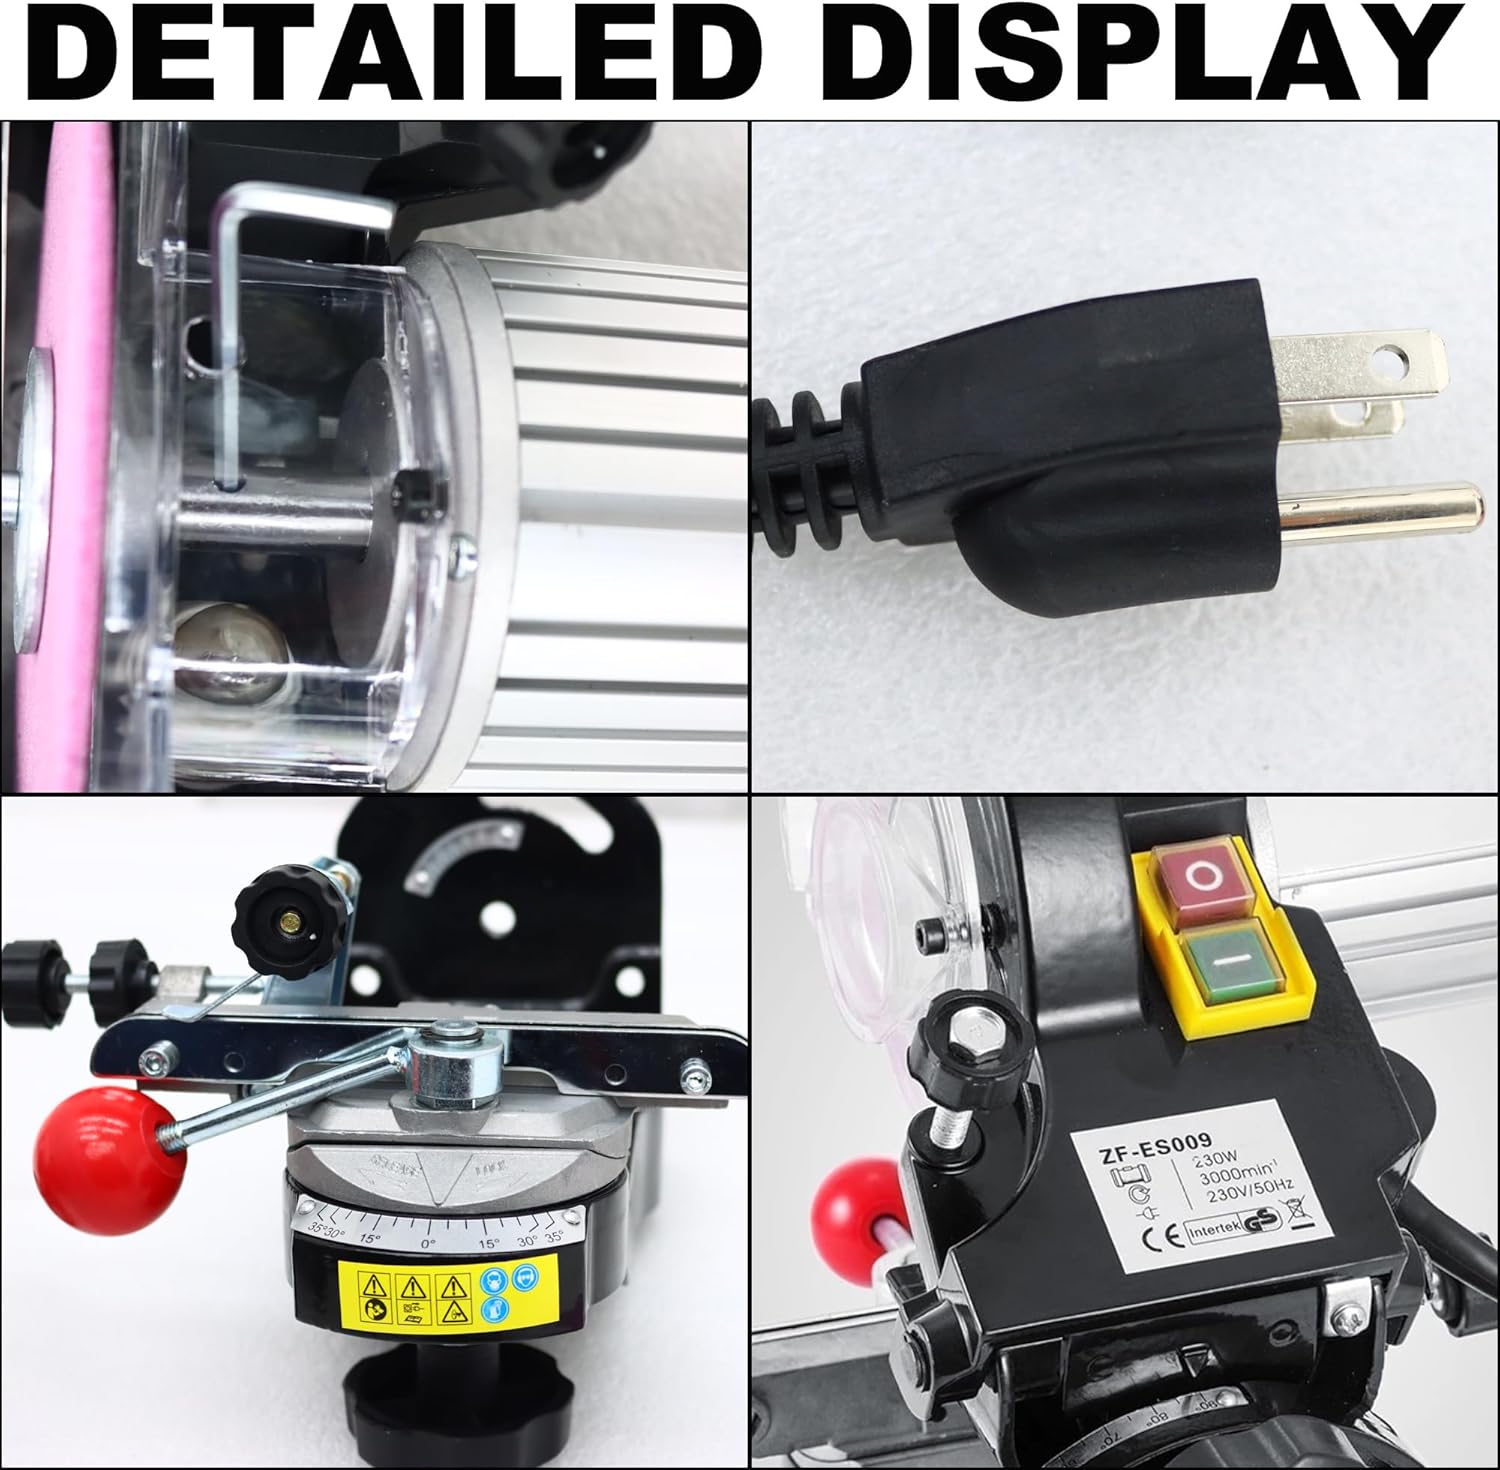
Immagine 3.2: Dettagliata views of the sharpener's power plug, control panel with ON/OFF switch, and the adjustable angle mechanism.
4. Impostazione
Follow these steps to set up your chainsaw sharpener:
- Mounting the Sharpener: Securely bolt the sharpener to a stable workbench using appropriate fasteners. This prevents vibration and ensures precise sharpening.
- Installing the Grinding Wheel: Carefully remove the grinding disk protective enclosure. Install the Φ145 mm grinding wheel onto the spindle, ensuring it is properly seated. Secure it with the provided fasteners. Replace the protective enclosure.
- Collegamento dell'alimentazione: Plug the sharpener into a standard 110V/60Hz power outlet. Ensure the power switch is in the OFF position before plugging in.
Video 4.1: This video demonstrates the assembly and initial setup of the electric chainsaw sharpener, including mounting the grinding wheel and securing the unit.
5. Istruzioni per l'uso
Proper operation is crucial for effective sharpening and safety:
- Regolazione dell'angolo: Use the cutting edge angle det-up wheel and cutting angle setting wheel to set the desired sharpening angle (0-35°). Refer to your chainsaw chain's specifications for the correct angle.
- Adjusting Grinding Depth: Utilize the depth of grind set screw and limit screw to control the grinding depth. This ensures consistent results and prevents over-grinding.
- Securing the Chain: Place the chainsaw chain into the screw clamp cradle. Use the clamping lever and screw clamps to firmly secure the chain in position. Ensure the chain is stable and will not move during sharpening.
- Starting the Sharpener: Press the green ON button. The grinding wheel will begin to spin at 3000 RPM.
- Affilatura della catena: Gently bring the chain cutter into contact with the spinning grinding wheel. Apply light, consistent pressure. Sharpen each cutter evenly.
- Stopping the Sharpener: Once sharpening is complete, press the red OFF button. Allow the grinding wheel to come to a complete stop before handling the chain or making further adjustments.

Image 5.1: The electric chainsaw sharpener in operation, demonstrating the grinding process and spark generation.
6. Manutenzione
Regular maintenance ensures the longevity and performance of your sharpener:
- Pulizia: After each use, disconnect the power and use a brush or compressed air to remove dust and debris from the sharpener, especially around the motor vents and grinding wheel area.
- Ispezione della mola: Regularly inspect the grinding wheel for wear, cracks, or damage. Replace worn or damaged wheels immediately.
- Cura del motore: The 230W all-copper motor is designed for durability. Keep its ventilation openings clear to prevent overheating.
- Magazzinaggio: Store the sharpener in a clean, dry place, away from moisture and extreme temperatures.

Immagine 6.1: Un primo piano view of the grinding wheel and its protective enclosure, emphasizing areas for cleaning and inspection.
7. Risoluzione Dei Problemi
In caso di problemi, fare riferimento ai seguenti problemi comuni e alle relative soluzioni:
| Problema | Possibile causa | Soluzione |
|---|---|---|
| L'affilatore non si avvia | Nessuna alimentazione; Interruttore di alimentazione spento; Cavo di alimentazione danneggiato | Check power connection; Ensure switch is ON; Inspect power cord for damage and replace if necessary. |
| Poor sharpening results | Incorrect angle/depth setting; Worn grinding wheel; Chain not secured properly | Adjust angle and depth according to chain specifications; Replace grinding wheel; Re-secure chain firmly. |
| Vibrazioni/rumore eccessivi | Loose mounting; Unbalanced grinding wheel; Damaged components | Tighten mounting bolts; Replace grinding wheel; Inspect for damaged parts and contact support if needed. |
| Surriscaldamento del motore | Ventilazione bloccata; uso continuo prolungato | Clear motor vents; Allow sharpener to cool down between uses. |
8. Specifiche
Technical specifications for the PreAsion ZF-ES009 Electric Chainsaw Sharpener:
- Voltage: 110 V/60 Hz
- Energia: 230 L
- Velocità massima: 3000 giri al minuto
- Livello di rumore: <85 dB(A)
- Diametro della mola: Diametro 145 mm
- Diametro del foro interno: Diametro 22.2 mm
- Slant Angle: 0-35 °
- Peso: 12.7 libbre (5.8 kg)
- Dimensioni della confezione: 17.8 x 12.5 x 9.7 pollici
- Peso dell'articolo: 16.37 libbre
9. Garanzia e supporto
For warranty information, technical support, or to purchase replacement parts, please refer to the product packaging or contact PreAsion customer service. Keep your purchase receipt as proof of purchase for warranty claims.


