1. Informazioni sulla sicurezza
Read all instructions carefully before beginning installation. Failure to follow these instructions may result in electric shock, fire, or serious personal injury. This product must be installed in accordance with the applicable installation code by a person familiar with the construction and operation of the product and the hazards involved.
- Prima di procedere all'installazione o alla manutenzione, scollegare sempre l'alimentazione dall'interruttore automatico.
- Assicurarsi che tutti i collegamenti elettrici siano sicuri e conformi ai codici e alle ordinanze locali.
- Il ventilatore è damp rated, suitable for indoor and covered outdoor use. Do not expose to direct water spray.
- Mount the fan to a ceiling joist or a securely anchored outlet box capable of supporting the fan's weight.
2. Contenuto della confezione
Verify that all components listed below are present before beginning installation. If any parts are missing or damaged, contact Hinkley customer support.

Figure 2.1: Included components for the Hinkley Swell Smart Fan.
- Baldacchino del soffitto
- Staffa appendiabiti
- Hardware di montaggio
- Pale del ventilatore (3)
- Fan Housing + Motor
- Light Kit Cover
- Kit luce
- HIRO Remote Control
- Wall Control Components (Face Plate Bracket, Decorative Face Plate, Wall Cradle, Switch Cradle)
- Equilibrio Kit
- Tappo antiumidità a sfera
- Istruzioni per l'installazione

Figura 2.2: Esploso view of Hinkley Swell Smart Fan components.
3. Configurazione e installazione
Si raccomanda l'installazione da parte di un professionista. Assicurarsi che l'interruttore automatico sia spento prima di procedere.
3.1. Considerazioni pre-installazione
- Dimensioni della stanza: For optimal performance, select the appropriate fan size for your room. This 56-inch fan is generally suitable for rooms between 100-150 sq. ft.
- Posizione di montaggio: The fan must be mounted to a structurally sound ceiling joist or an approved outlet box.

Figure 3.1: Guide for choosing the correct fan size based on room area.
3.2. Mounting the Hanger Bracket
- Secure the hanger bracket to the ceiling outlet box using the provided mounting hardware. Ensure the bracket is firmly attached and can support the fan's weight.
- For outdoor or damp locations, ensure the ball moisture cap is correctly installed to protect electrical components.
3.3. Collegamenti elettrici
- Connect the fan's electrical wires to the household wiring according to the wiring diagram in the full installation manual.
- Assicurarsi che tutti i dadi dei cavi siano fissati saldamente.
3.4. Assemblaggio della ventola
- Fissare le pale della ventola all'alloggiamento del motore.
- Install the integrated LED light kit and its cover.
- Carefully lift the fan assembly and hang it onto the hanger bracket.
- Secure the ceiling canopy to cover the wiring and mounting hardware.
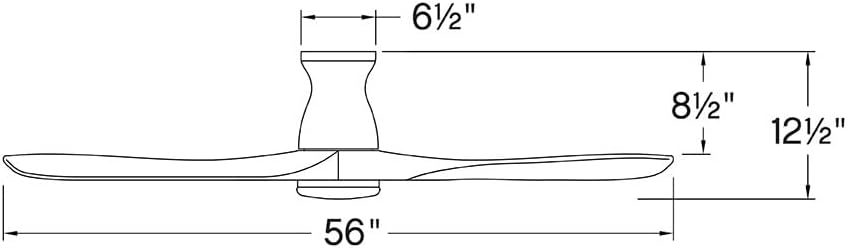
Figura 3.2: Dimensioni del prodotto per la pianificazione dell'installazione.
4. Istruzioni per l'uso
The Hinkley Swell Smart Fan offers multiple control options for convenience.
4.1. HIRO Remote Control
The included HIRO remote allows for direct control of fan speed, light, and direction.

Figure 4.1: HIRO Remote Control functions.
- Accensione/spegnimento ventola: Premere il pulsante con l'icona della ventola per accendere o spegnere la ventola.
- Velocità della ventola: Use the 'up' and 'down' arrow buttons below the fan icon to adjust between 6 speeds.
- Luce accesa/spenta: Press the light bulb icon button to toggle the integrated LED light.
- Oscuramento della luce: Use the 'up' and 'down' arrow buttons below the light icon to adjust brightness.
- Invertire la direzione della ventola: Press the circular arrow button to change the blade rotation direction.
4.2. Smart Home Integration (Wi-Fi, App, Voice Control)
The Hinkley Swell Smart Fan is Wi-Fi compatible, allowing integration with smart home systems for advanced control.

Figure 4.2: HIRO Smart Home features for the fan.
- Download the Hinkley smart app (refer to the full installation manual for app details and setup).
- Segui le istruzioni nell'app per connettere il ventilatore alla rete Wi-Fi di casa.
- Once connected, you can control the fan via the app, set schedules, and integrate with compatible voice assistants.
4.3. Seasonal Operation (Summer/Winter Modes)
Adjust the fan's direction to optimize air circulation for different seasons.

Figure 4.3: Understanding Summer and Winter fan modes.
- Modalità estiva: Le pale ruotano in senso antiorario, spingendo l'aria verso il basso e creando una brezza rinfrescante.
- Modalità invernale (reverse): Blades rotate clockwise, pulling air upwards to redistribute warm air trapped near the ceiling.
Video 4.1: This video from Hinkley Store provides an overview of various fan styles and features, which may offer visual context for fan operation and selection.
5. Manutenzione
Regular maintenance ensures optimal performance and longevity of your Hinkley Swell Smart Fan.
- Pulizia: Spolverare periodicamente le pale della ventola e l'alloggiamento del motore con un panno morbido e asciutto.amp panno. Non usare detergenti abrasivi o solventi.
- Bilanciamento della lama: If the fan wobbles, use the included balance kit to correct any imbalance. Refer to the full installation manual for detailed balancing instructions.
- Collegamenti elettrici: Periodically check all electrical connections for tightness. Ensure power is disconnected at the circuit breaker before inspection.
6. Risoluzione Dei Problemi
If you encounter issues with your fan, refer to the following common troubleshooting steps. For more complex problems, consult the full installation manual or contact customer support.
- La ventola non funziona: Check that the circuit breaker is on and the wall switch (if applicable) is in the 'on' position. Ensure all wiring connections are secure.
- La luce non funziona: Verify the light switch on the remote or wall control is on. Check wiring connections to the light kit.
- Oscillazione eccessiva: Ensure all blade screws are tightened. Use the provided balance kit to correct any blade imbalance. Confirm the hanger bracket is securely mounted.
- Il telecomando non risponde: Check the battery in the remote control. Ensure the fan's receiver is not obstructed.
- Smart Features Not Connecting: Verify your Wi-Fi network is active and the fan is within range. Re-attempt the pairing process via the Hinkley smart app.
7. Specifiche
| Marca | Italiano: |
| Nome del modello | Swell Flush Illuminated 56" LED Smart Fan |
| Numero di modello | 903456FBB-LDD |
| Colore | Matte Black with Black Blades |
| Dimensioni del prodotto | 56"P x 56"L x 12.75"A |
| Peso dell'articolo | 28.6 libbre |
| Numero di lame | 3 |
| Lunghezza della lama | 24.76 pollici |
| Tipo di motore | DC (6-speed) |
| Sorgente luminosa | Integrated 16W LED |
| Potenza luminosa | 1320 lumens at 3000K |
| Capacità del flusso d'aria | 4946 piedi cubi al minuto |
| Voltage | 120 Volt |
| Fonte di alimentazione | Elettrico con cavo |
| Metodo di controllo | App, telecomando, voce |
| Uso interno/esterno | Interno, Esterno (Damp Valutato) |
| Caratteristica speciale | Dimmable, Hardwired, Integrated, Smart Fan |
| Codice UPC | 640665025958 |
8. Garanzia e supporto
For warranty information, please refer to the documentation included with your purchase or visit the official Hinkley website. For technical support, replacement parts, or further assistance, please contact Hinkley customer service directly.
Hinkley Customer Service: Refer to your product packaging or the Hinkley websito per informazioni di contatto aggiornate.


