1. Introduzione
This manual provides detailed instructions for the assembly, operation, and maintenance of your Best Choice Products Pretend Play Corner Kitchen. Designed for interactive play, this wooden playset features realistic lights, sounds, and various kitchen components to enhance your child's imaginative experience. Please read this manual thoroughly before assembly and use to ensure safe and correct operation.
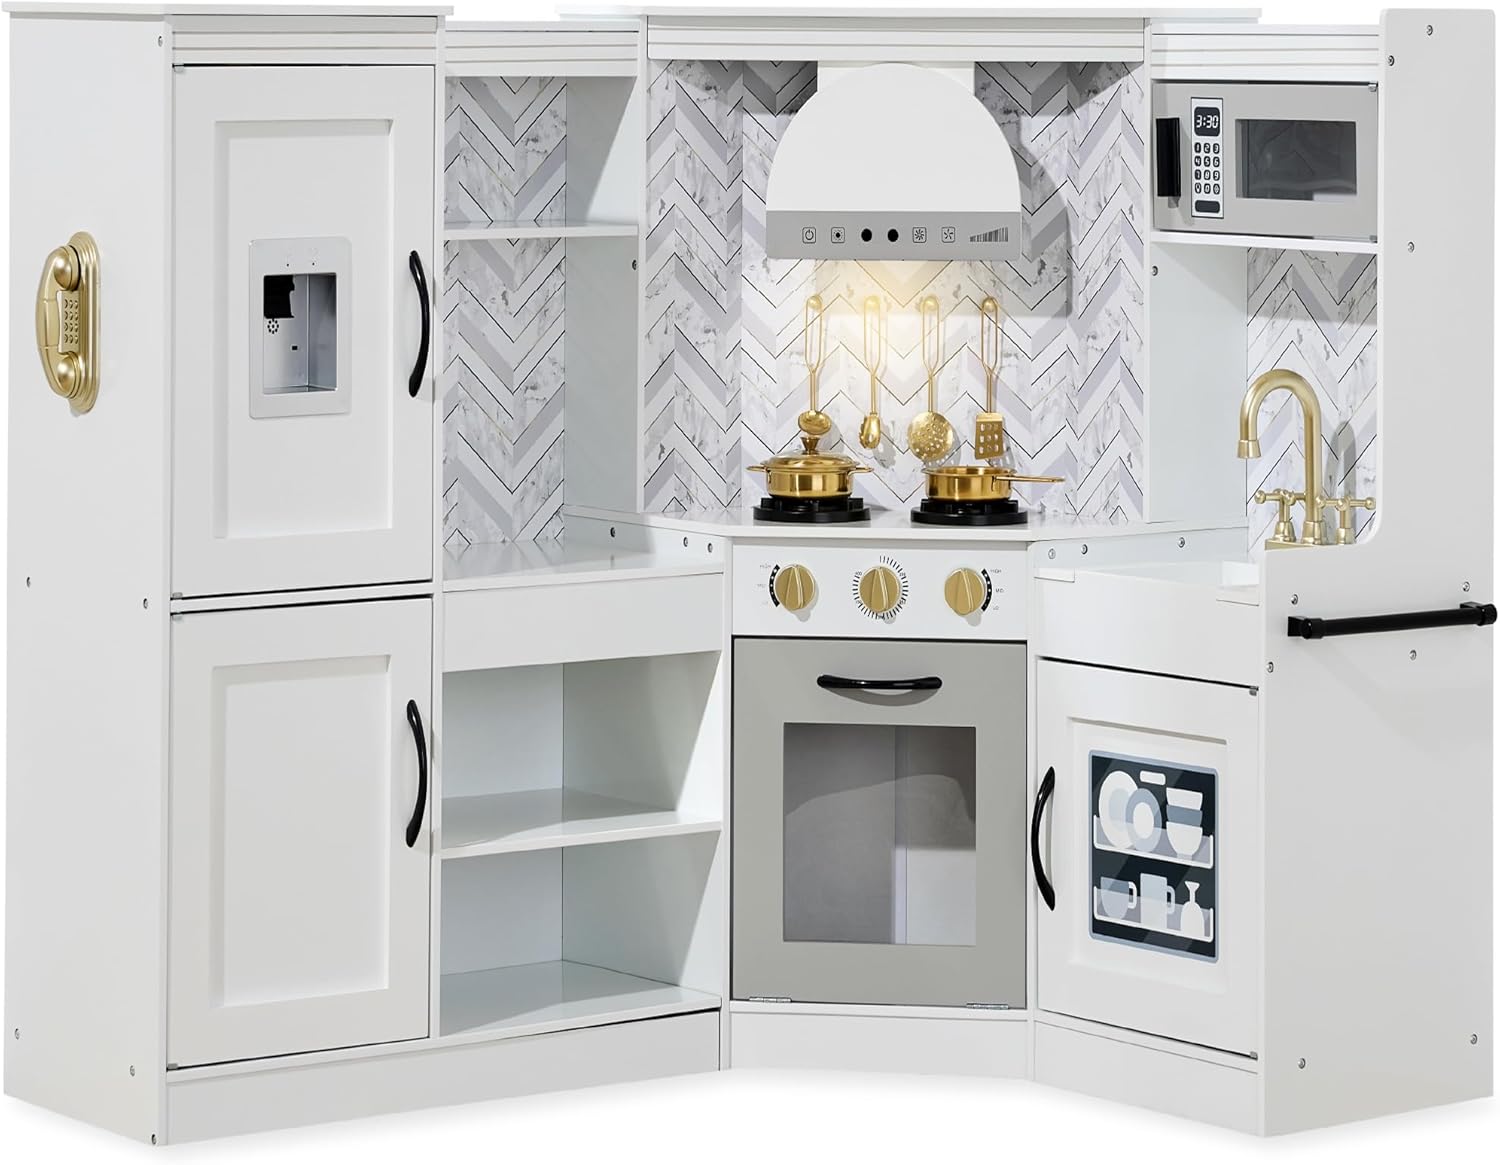
Image 1.1: The Best Choice Products Pretend Play Corner Kitchen in white, showcasing its L-shape design and various interactive features.
2. Informazioni sulla sicurezza
WARNING: Not for children under 3 years old.
- Si raccomanda la supervisione di un adulto durante il gioco.
- Ensure all fasteners are securely tightened during assembly to prevent hazards.
- Tenere le parti piccole lontano dalla portata dei bambini per evitare rischi di soffocamento.
- Regularly inspect the playset for any loose or damaged components. Discontinue use if damage is found.
- Questo prodotto è destinato esclusivamente all'uso in ambienti interni.
- Le batterie devono essere inserite con la polarità corretta. Non mischiare batterie vecchie e nuove. Rimuovere tempestivamente le batterie esaurite.
3. Cosa c'è nella scatola
Verify that all components are present before beginning assembly. Refer to the included Assembly Guide for a complete list of parts and hardware.
- Wooden Playset Components
- Hardware (screws, fasteners, etc.)
- Guida all'assemblaggio
- 6 Play Accessories (for battery-powered stove)
4. Istruzioni di montaggio
Assembly of the Pretend Play Corner Kitchen requires time and patience due to the number of components and fasteners. It is recommended to have an electric screwdriver for efficiency. Follow the included Assembly Guide carefully, step-by-step, to ensure correct construction and stability.
- Disimballare e organizzare: Carefully unpack all components and lay them out. Identify each part by referring to the Assembly Guide's parts list.
- Controllo hardware: Ensure all screws and fasteners are present.
- Segui la guida: Adhere strictly to the sequence of steps provided in the Assembly Guide. Pay close attention to diagrams and illustrations.
- Elementi di fissaggio sicuri: Tighten all screws and fasteners firmly, but avoid over-tightening which could damage the wood.
- Integrazione dei componenti: Install interactive elements such as the stove hood, ice maker, and stove burners as directed.
- Ispezione finale: Once assembled, check all connections for stability and ensure all doors and drawers open and close smoothly.
Note: Some users have reported that screw holes may be slightly misaligned. Exercise caution and ensure proper alignment before tightening screws to prevent damage to the pressed board.

Image 4.1: Close-up of the play kitchen materials, highlighting the child-friendly construction.
5. Istruzioni per l'uso
The Pretend Play Corner Kitchen features several interactive elements designed to enhance the play experience. These features typically require batteries (not included) for full functionality.
5.1 Light-Up Stove Hood
The stove hood includes lights and mimics authentic sounds. Locate the battery compartment (usually on the underside or back of the hood) and insert the required batteries (e.g., AAA batteries). Press the designated buttons on the hood to activate the lights and sounds.

Image 5.1: A child interacting with the light-up stove hood, demonstrating its operational buttons.
5.2 Pretend Ice Maker
The ice maker features interactive lights and sounds. Install the necessary batteries into its compartment. Press the dispenser lever or button to activate the lights and sounds, simulating ice dispensing.

Image 5.2: A child pressing the lever on the pretend ice maker, which produces lights and sounds.
5.3 Interactive Stove and Oven Knobs
The stove and oven knobs are designed to produce realistic clicking sounds when turned, enhancing the cooking experience. No batteries are required for the clicking knobs.

Image 5.3: A child turning the interactive stove knobs, which produce clicking sounds.
5.4 Battery-Powered Stove Burners
The stove burners glow and produce cooking sounds. Insert the required batteries into the designated compartment(s) for the stove. Place the included play accessories (pots, pans) on the burners to activate the glowing lights and sounds.

Image 5.4: The battery-powered stove burners, showing their glowing effect when activated, with included play accessories.
6. Manutenzione
- Pulizia: Pulire le superfici con un panno morbido, damp panno. Evitare detergenti abrasivi o prodotti chimici aggressivi che potrebbero danneggiare la finitura.
- Spolverare: Spolverare regolarmente il set da gioco per mantenerne l'aspetto.
- Sostituzione della batteria: Replace batteries in interactive components as needed. Always use the correct battery type and ensure proper polarity.
- Controllo del dispositivo di fissaggio: Controllare periodicamente tutte le viti e gli elementi di fissaggio per assicurarsi che siano ben serrati. Serrarli nuovamente se necessario.
- Magazzinaggio: Store the playset in a dry environment away from direct sunlight or extreme temperatures to prevent warping or fading.
7. Risoluzione Dei Problemi
| Problema | Possibile causa | Soluzione |
|---|---|---|
| Interactive features (lights/sounds) not working. |
|
|
| Stove burner sounds are too loud. | Speaker output is at a fixed volume. | To reduce volume, a small piece of tape can be placed over the speaker opening (located on the underside of the burner unit) to muffle the sound. |
| Il set da gioco sembra traballante o instabile. | Elementi di fissaggio allentati o montaggio non corretto. | Review the Assembly Guide and re-tighten all screws and fasteners. Ensure all components are correctly aligned. |
| Le porte o i cassetti non si chiudono correttamente. | Misaligned hinges or panels. | Check hinge alignment and adjust if necessary. Ensure panels are installed correctly according to the Assembly Guide. |
8. Specifiche
| Caratteristica | Dettaglio |
|---|---|
| Dimensioni del prodotto (L x P x A) | 57" x 24" x 37.5" |
| Peso dell'articolo | 56 libbre |
| Numero di modello | SKY6910 |
| Età consigliata | 3 anni e oltre |
| Materiali | Legno ingegnerizzato con componenti metallici |
| Certificazioni | Certificato ASTM e CPSIA |

Image 8.1: Detailed diagram illustrating the overall dimensions of the play kitchen.
9. Garanzia e supporto
Best Choice Products garantisce la qualità dei suoi prodotti. Per informazioni specifiche sulla garanzia, consultare la documentazione inclusa con l'acquisto o visitare il sito ufficiale di Best Choice Products. website. For customer support, including assistance with assembly, missing parts, or operational issues, please contact Best Choice Products customer service directly.
Informazioni sui contatti:
- Websito: Negozio di prodotti Best Choice su Amazon (per informazioni generali sul prodotto)
- Refer to your purchase receipt or packaging for direct customer service contact details.
10. Informazioni aggiuntive
The L-shape design of this playset is intended for space-saving placement in room corners, allowing for versatile integration into play areas.

Image 10.1: A child enjoying the L-shaped corner kitchen, demonstrating its space-saving design.
The playset also offers ample storage within its fridge, pantry, oven, and sink shelves, providing space for play accessories and encouraging organized play.

Immagine 10.2: Un interno view of the play kitchen, highlighting the various storage compartments and cubbies.


