Introduzione
This manual provides essential information for the safe and efficient operation, maintenance, and troubleshooting of your CONENTOOL 12V Cordless Drill Driver Kit. Please read this manual thoroughly before first use and keep it for future reference.
The CONENTOOL 12V Cordless Drill Driver is designed for drilling into wood, plastic, metal, and other materials, as well as for driving and removing screws. It features a powerful 35 N.m max torque, 25+1 torque settings, and two variable speeds for versatile applications.

Image: The CONENTOOL 12V Cordless Drill Driver Kit, including the drill, two batteries, charger, and a case filled with various drill bits and screwdriver bits.
Importanti istruzioni di sicurezza
Quando si utilizzano utensili elettrici, seguire sempre le precauzioni di sicurezza di base per ridurre il rischio di incendi, scosse elettriche e lesioni personali.
- Indossare dispositivi di protezione individuale (DPI) adeguati, come occhiali di sicurezza, guanti e protezioni acustiche.
- Mantieni la tua area di lavoro pulita e ben illuminata. Le aree disordinate o scure provocano incidenti.
- Non utilizzare utensili elettrici in atmosfere esplosive, ad esempio in presenza di liquidi, gas o polveri infiammabili.
- Assicurarsi che l'utensile sia spento prima di effettuare qualsiasi regolazione, cambiare accessori o riporre l'utensile.
- Utilizzare l'utensile corretto per l'applicazione desiderata. Non forzare l'utensile.
- Conservare gli attrezzi inattivi fuori dalla portata dei bambini e di altre persone non addestrate.
Componenti e caratteristiche del prodotto
Familiarize yourself with the various parts and features of your CONENTOOL Cordless Drill Driver.

Image: A detailed diagram of the CONENTOOL drill driver highlighting its key components: 3/8" keyless chuck, 25+1 adjustable clutch, LED light, variable speed switch, forward and reverse button, 2 variable speeds, and 2000 mAh lithium battery.
- Mandrino autoserrante da 3/8": For quick and easy bit changes. Features an all-metal automatic spindle lock.
- 25+1 Adjustable Clutch: Allows precise torque settings for various applications, preventing overtightening or stripping screws.
- Luce LED: Illumina l'area di lavoro per una migliore visibilità negli spazi bui.
- Interruttore a velocità variabile: Fornisce un controllo preciso sulla velocità di perforazione e di avvitamento.
- Pulsante Avanti e Indietro: Easily switch between drilling/driving and unscrewing.
- 2 velocità variabili: Low speed (0-450 RPM) for screwing, high speed (0-1650 RPM) for drilling.
- 2000 mAh Lithium Battery: Offers long-lasting power and reliable performance.
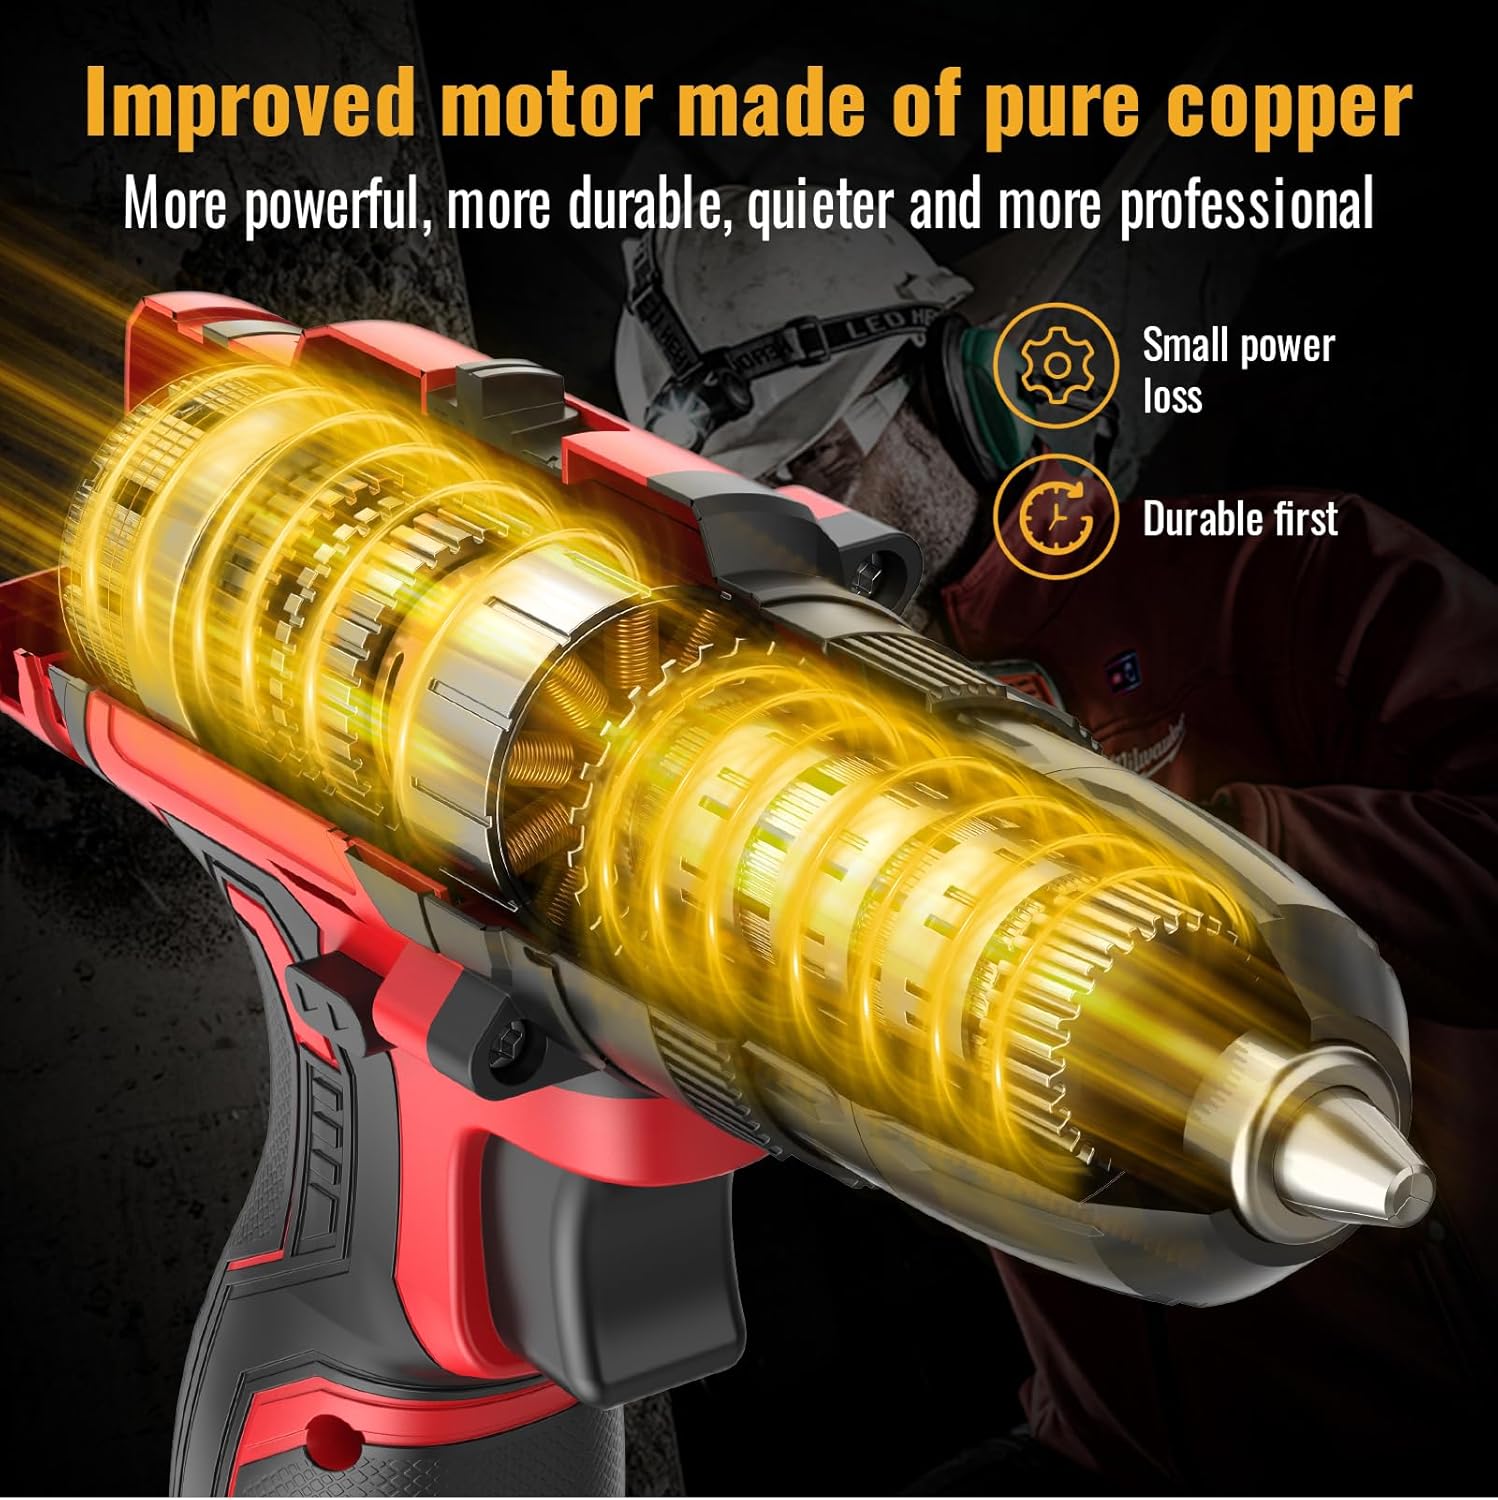
Immagine: Un interno view of the drill, highlighting the improved motor made of pure copper, designed for more power, durability, and quieter operation with small power loss.

Image: A graph illustrating the extended working hours provided by the 2x 2.0AH large capacity batteries compared to other batteries, showing a slower discharge rate over time.
Impostare
Carica della batteria
- Collegare il caricabatterie a una presa di corrente standard.
- Far scorrere la batteria sul caricabatterie finché non scatta in posizione.
- Allow the battery to charge fully before first use. The indicator light on the charger will change when charging is complete.
- Always disconnect the charger from the power supply and remove the battery once fully charged.
Installazione/rimozione della batteria
- Per installare: allineare il pacco batteria con la base dell'impugnatura del trapano e farlo scorrere finché non si blocca saldamente.
- To remove: Press the battery release button (usually located on the side of the battery pack) and slide the battery out.
Installazione/rimozione di punte da trapano o punte da cacciavite

Image: A close-up showing the operation of the 3/8" (10mm) self-locking drill chuck, demonstrating how to open and close it to insert or remove bits.
- Ensure the drill is switched off and the forward/reverse switch is in the center (locked) position.
- Ruotare il mandrino in senso antiorario per aprire le ganasce.
- Inserire completamente la punta del trapano o del cacciavite desiderata nel mandrino.
- Ruotare il mandrino in senso orario per serrare saldamente le ganasce attorno alla punta. Assicurarsi che la punta sia centrata e saldamente fissata.
- Per rimuovere: ruotare il mandrino in senso antiorario per allentare le ganasce ed estrarre la punta.
Istruzioni per l'uso
Selezione della velocità
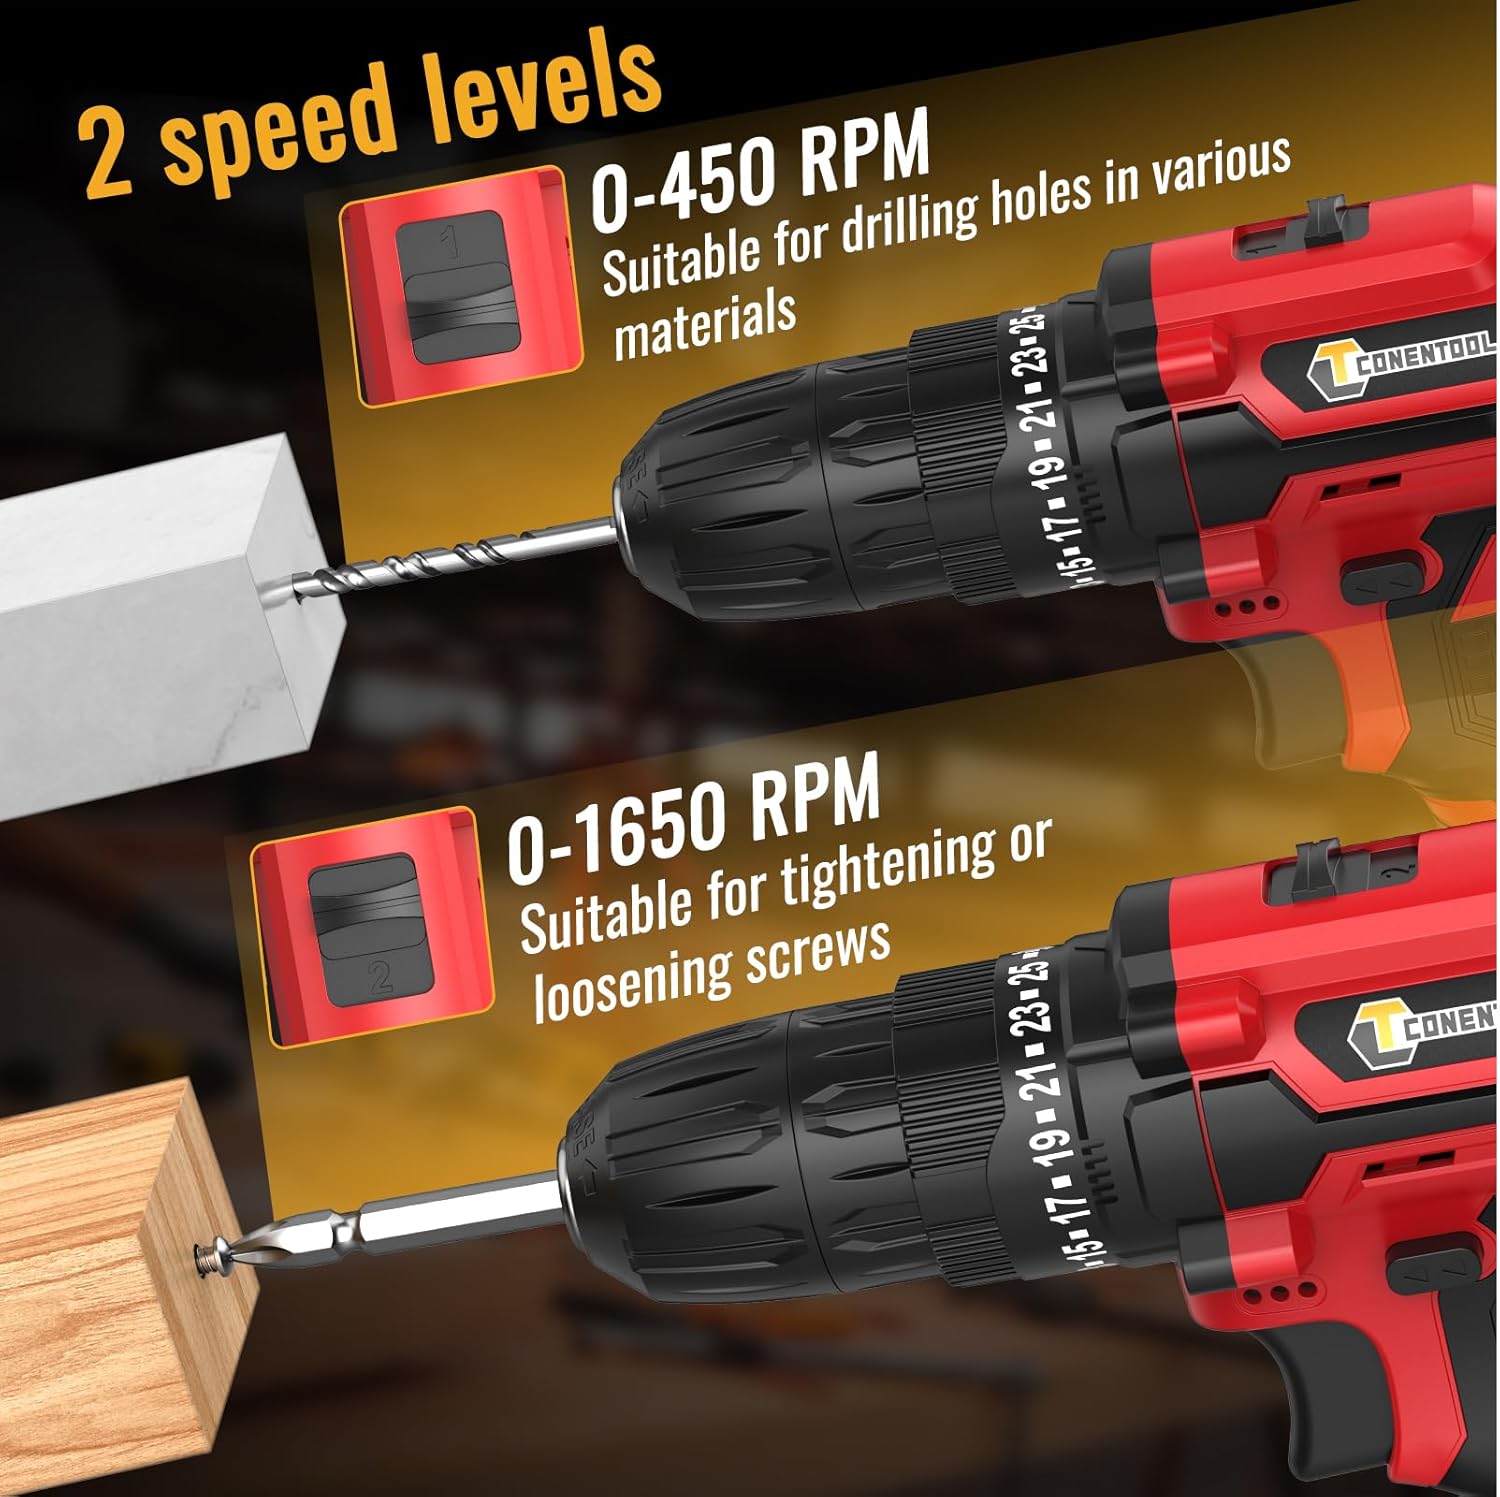
Image: A visual representation of the two-speed levels: 0-450 RPM for drilling holes in various materials (Speed 1) and 0-1650 RPM for tightening or loosening screws (Speed 2).
- Speed 1 (Low, 0-450 RPM): Ideal for driving screws, larger diameter drilling, or applications requiring higher torque.
- Speed 2 (High, 0-1650 RPM): Suitable for smaller diameter drilling and applications requiring faster speed.
- Adjust the speed by sliding the gear selector switch located on top of the drill.
Adjusting Torque (Clutch Setting)

Image: A chart illustrating the drill's multifunctional capabilities, showing increasing torque/power levels suitable for screws, wood, ceramics, brick, concrete, and steel, with distinct settings for drilling and screwdriving.
- The torque adjustment ring is located behind the chuck. Rotate it to select the desired torque setting from 1 to 25.
- The higher the number, the greater the torque. Start with a lower setting and increase as needed to prevent overtightening or damaging the workpiece.
- Use the drill symbol setting for drilling applications, which provides maximum torque without clutch engagement.
Funzionamento avanti/indietro
- Push the forward/reverse selector switch (located above the trigger) to the left for forward rotation (drilling/driving screws).
- Per invertire la rotazione, spingere l'interruttore verso destra (rimuovendo le viti).
- For safety, place the switch in the center position to lock the trigger and prevent accidental starting.
Funzionamento del trapano
- Ensure the correct bit is installed and the battery is charged.
- Selezionare la velocità e la coppia più adatte al proprio compito.
- Position the drill bit on the workpiece.
- Press the trigger to start the drill. The LED light will illuminate the work area.
- Applicare una pressione costante e uniforme. Non forzare il trapano.
- Rilascia il grilletto per fermare il trapano.
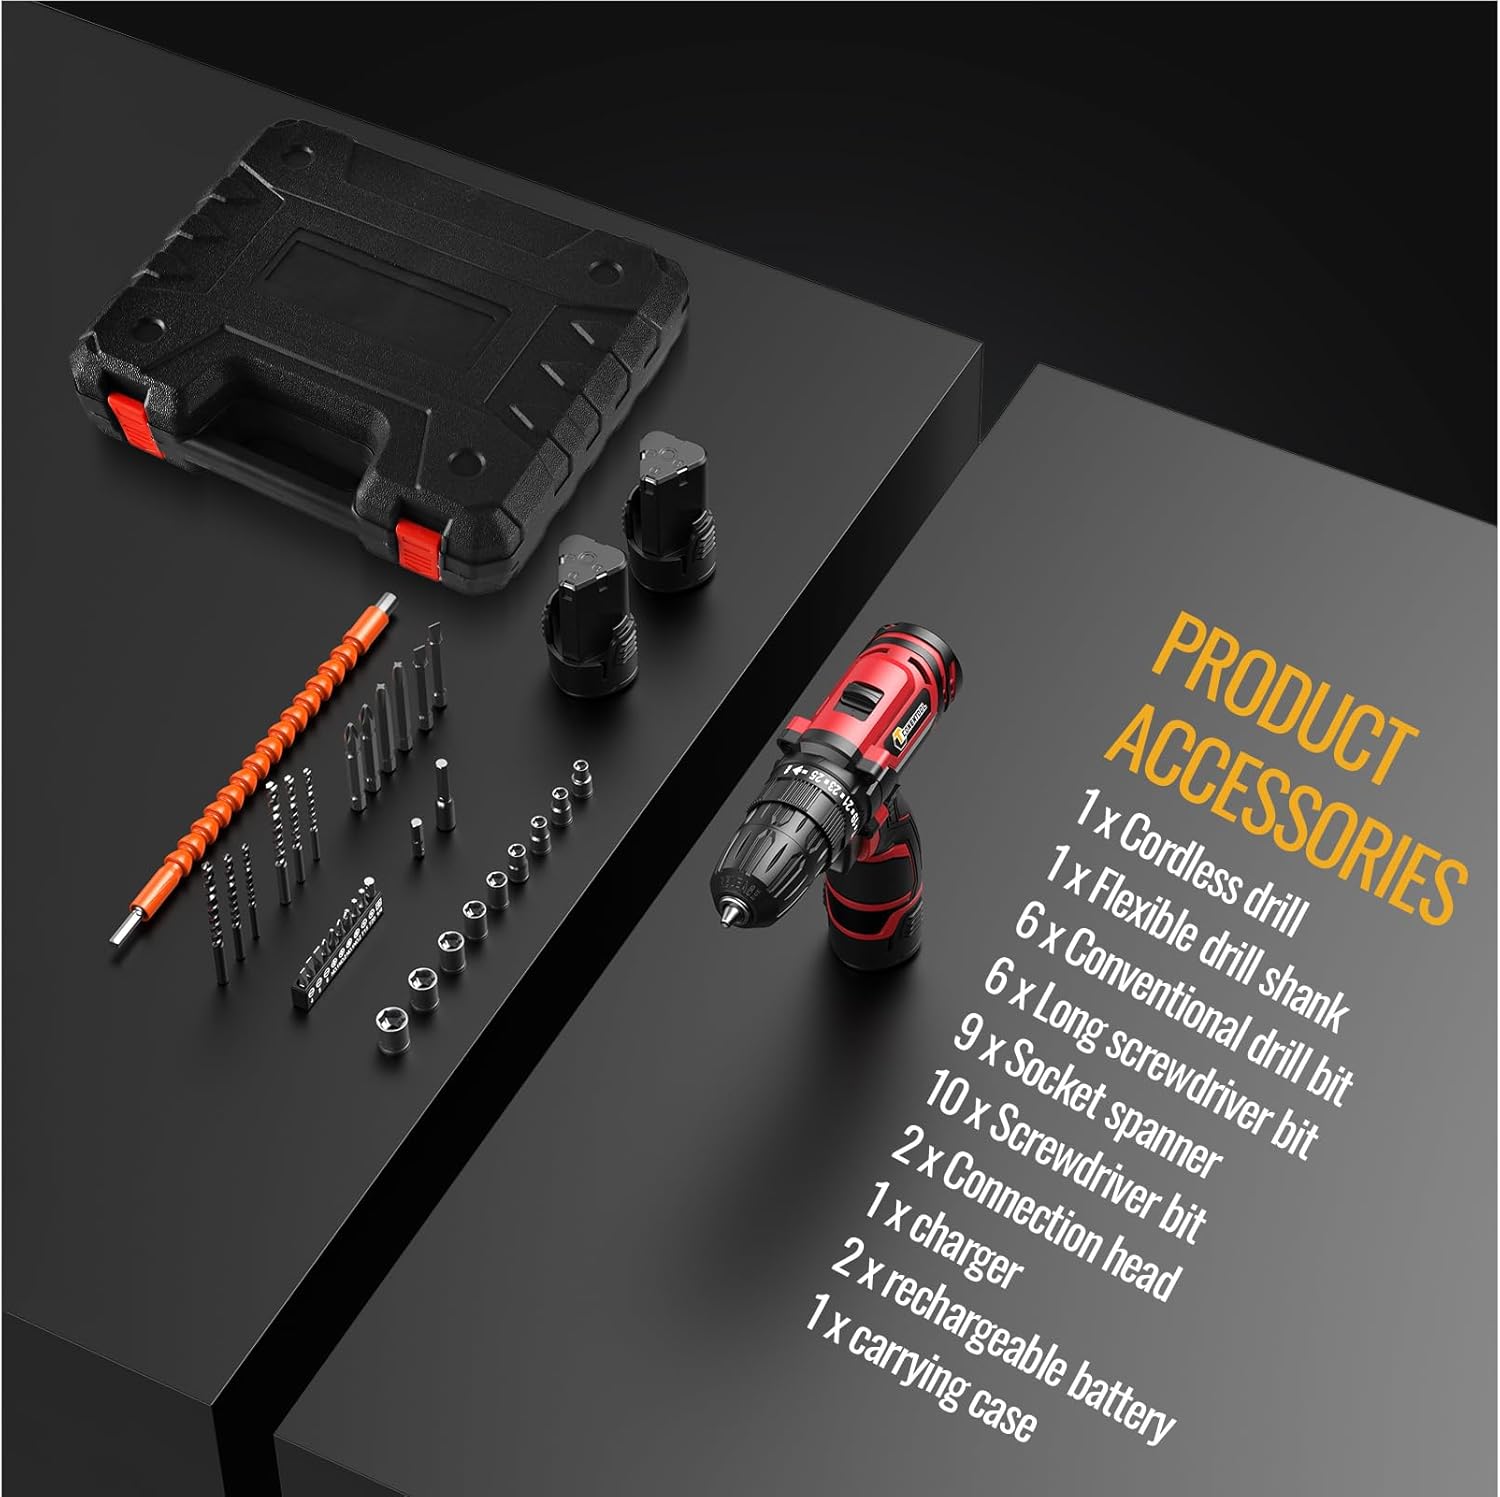
Image: A user demonstrating the versatility of the CONENTOOL drill, shown both drilling into wood and driving a screw into a wall, illustrating its practical application.
Manutenzione
Pulizia generale
- Scollegare sempre la batteria prima di pulirla.
- Pulisci l'utensile con un panno pulito eamp stoffa. Non utilizzare prodotti chimici aggressivi o detergenti abrasivi.
- Mantenere le aperture di ventilazione libere da polvere e detriti per evitare il surriscaldamento. Utilizzare aria compressa se necessario.
Cura della batteria
- Conservare le batterie in un luogo fresco e asciutto, lontano dalla luce solare diretta e da temperature estreme.
- Non conservare le batterie scariche per periodi prolungati. Ricaricarle periodicamente se non vengono utilizzate.
- Non cortocircuitare i terminali della batteria.
Cura degli accessori
- Pulire le punte del trapano e del cacciavite dopo l'uso.
- Store accessories in the provided carrying case to prevent damage and loss.
Risoluzione dei problemi
| Problema | Possibile causa | Soluzione |
|---|---|---|
| Il trapano non si avvia | Battery not charged or not properly installed. Forward/reverse switch in center (locked) position. | Charge battery fully. Reinstall battery securely. Move forward/reverse switch to desired direction. |
| Perdita di potenza durante il funzionamento | Batteria scarica. Protezione da sovraccarico attivata. | Ricaricare la batteria. Ridurre la pressione o utilizzare una coppia più elevata. |
| Bit wobbles or falls out | Chuck not tightened properly. Bit shank is damaged. | Retighten chuck firmly. Replace damaged bit. |
| Surriscaldamento | Uso intenso e continuo. Ventilazione bloccata. | Lasciare raffreddare l'utensile. Liberare le aperture di ventilazione. |
Specifiche
| Caratteristica | Dettaglio |
|---|---|
| Numero di modello | CR-314 |
| Voltage | 12 Volt |
| Coppia massima | 35 Nm |
| Velocità a vuoto (bassa) | 0-450 giri/min |
| Velocità a vuoto (alta) | 0-1650 giri/min |
| Impostazioni frizione | 25+1 |
| Dimensioni del mandrino | 3/8" (10mm) Keyless |
| Tipo di batteria | Agli ioni di litio |
| Capacità della batteria | 2000 mAh (2x included) |
| Peso | 2.13 kg (con batteria) |
| Dimensioni (L x P x A) | Dimensioni: 31 x 25 x 9 cm |
Accessori inclusi

Image: A display of all accessories included in the kit, such as the cordless drill, flexible drill shank, various drill bits, screwdriver bits, socket spanner, connection head, charger, rechargeable batteries, and carrying case.
- 1 x trapano a batteria
- 1 x Flexible Drill Shank
- 6 x Conventional Drill Bits
- 6 punte lunghe per cacciavite
- 9 x Socket Spanners
- 10 x Punte cacciavite
- 2 x Connection Heads
- 1 x Caricabatterie
- 2 x Rechargeable Batteries (2000 mAh each)
- 1 x Custodia per il trasporto
Garanzia e supporto
CONENTOOL is committed to providing high-quality products. For any questions regarding your product, please refer to the seller's contact information or Amazon's customer service.
While specific warranty details are not provided in this manual, most products come with a standard manufacturer's warranty against defects in materials and workmanship. Please retain your proof of purchase for any warranty claims.
For further assistance or technical support, please contact the seller Zhen Hui Xiang EU through the Amazon platform.


