Introduzione
This manual provides comprehensive instructions for the proper use and maintenance of the Sonnax 6L45/6L50 6L80/6L90 Pressure Switch Rebuild Installation Tool Kit, model 124740-TL70. This specialized kit is designed to facilitate the precise rebuilding and installation of pressure switches in 6L45, 6L50, 6L80, and 6L90 automatic transmissions. Adherence to these instructions will ensure optimal performance and longevity of the tool and the transmission components being serviced.
Contenuto del kit
The Sonnax 124740-TL70 Pressure Switch Rebuild Installation Tool Kit includes the following components:
- Laminate Installation Tool: Used for precise positioning and installation of the laminate.
- Seal Installer: Designed to correctly seat the seal without damage.
- Pistone: Un componente utilizzato nel processo di assemblaggio.
- Seal Plunger: Aids in the final seating of the seal.
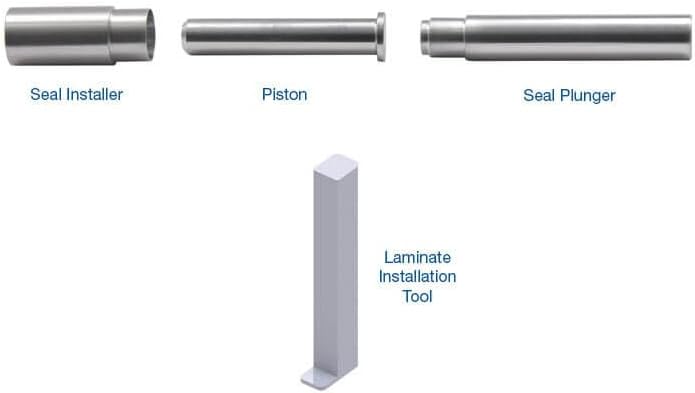
Figure 1: Components of the Sonnax 124740-TL70 Tool Kit with labels.
Installazione e preparazione
Before beginning the pressure switch rebuild process, ensure you have a clean, well-lit workspace. Gather all necessary transmission components, including the pressure switch body, new seals, and any other replacement parts. Inspect all tool kit components for any signs of damage or wear before use.
- Pulizia: Thoroughly clean the pressure switch body and all new components to prevent contamination.
- Ispezione: Verify that all parts of the 124740-TL70 tool kit are present and in good condition.
- Lubrificazione: Apply a small amount of clean transmission fluid to new seals before installation to aid in smooth seating and prevent damage.
Istruzioni per l'uso
Follow these steps carefully for the successful rebuild and installation of the pressure switch using the Sonnax 124740-TL70 tool kit.
- Smontaggio: Carefully disassemble the existing pressure switch, noting the orientation of all components. Refer to the transmission service manual for specific disassembly procedures for 6L45/6L50 or 6L80/6L90 transmissions.
- Seal Installation (using Seal Installer and Piston):
- Place the new seal onto the Seal Installer.
- Allinea il Seal Installer with the pressure switch body.
- Spingere delicatamente il Pistone attraverso il Seal Installer to guide and seat the seal into its groove. Ensure the seal is seated evenly and without crimping.
- Laminate Installation (using Laminate Installation Tool):
- Position the new laminate onto the pressure switch body.
- Utilizzare il Laminate Installation Tool to apply even pressure and properly seat the laminate. This tool ensures the laminate is installed flat and without damage.
- Final Seal Seating (using Seal Plunger):
- After the main seal and laminate are in place, use the Seal Plunger to ensure all seals are fully and correctly seated within their respective grooves. Apply gentle, firm pressure.
- Rimontaggio: Reassemble the pressure switch components according to the transmission service manual. Double-check all connections and ensure proper component orientation.
- Prova: After reassembly, perform necessary diagnostic tests as outlined in the transmission service manual to confirm proper pressure switch function before final transmission reinstallation.

Figure 2: The Sonnax 124740-TL70 Tool Kit components.
Manutenzione
Proper maintenance of your Sonnax tool kit will ensure its longevity and continued accuracy.
- Pulizia: After each use, wipe down all tool components with a clean, lint-free cloth to remove any transmission fluid, grease, or debris.
- Magazzinaggio: Store the tool kit in a dry, clean environment, preferably in its original packaging or a dedicated tool case, to prevent corrosion and damage.
- Ispezione: Periodically inspect the tools for any signs of wear, bending, or damage. Replace any damaged components immediately to maintain precision and prevent damage to transmission parts.
- Lubrificazione: Lightly oil any moving parts or surfaces prone to rust if storing for extended periods.
Risoluzione dei problemi
This section addresses common issues that may arise during the use of the Sonnax 124740-TL70 tool kit.
| Problema | Possibile causa | Soluzione |
|---|---|---|
| Seal not seating correctly. | Improper alignment; insufficient lubrication; damaged seal. | Ensure proper alignment of the Seal Installer. Apply a thin coat of transmission fluid to the seal. Inspect the seal for damage and replace if necessary. |
| Laminate appears uneven after installation. | Uneven pressure applied; debris under laminate. | Ensure the Laminate Installation Tool is applied with even pressure. Clean the surface thoroughly before installation to remove any debris. |
| Tool feels stiff or gritty during use. | Accumulation of dirt or old fluid; lack of lubrication. | Clean the tool thoroughly. Apply a light coat of appropriate lubricant to moving parts or surfaces. |
Specifiche
- Nome del prodotto: Sonnax 6L45/6L50 6L80/6L90 Pressure Switch Rebuild Installation Tool Kit
- Numero modello: 124740-TL70
- Produttore: Sonnax
- Compatible Transmissions: GM 6L45, 6L50, 6L80, 6L90
- Paese di origine: U.S.A.
- Contenuto: Laminate Installation Tool, Seal Installer, Piston, Seal Plunger
Garanzia e supporto
For specific warranty information regarding the Sonnax 124740-TL70 tool kit, please refer to the documentation provided with your purchase or visit the official Sonnax website. For technical support, product inquiries, or assistance with specific applications, please contact Sonnax customer service directly.
Sonnax Contact Information:
- Websito: www.sonnax.com
- Assistenza clienti: Fare riferimento a website for contact numbers and email.


