1. Introduzione
This manual provides comprehensive instructions for the safe and effective operation of the ZOYI ZT303 Digital Multimeter. The ZT303 is a high-precision, auto-ranging measurement tool designed for professionals and enthusiasts, capable of measuring voltage, current, resistance, capacitance, frequency, and duty cycle. Please read this manual thoroughly before use to ensure proper operation and to prevent potential hazards.
2. Informazioni sulla sicurezza
Per garantire un funzionamento e una manutenzione sicuri dello strumento, seguire queste istruzioni. La mancata osservanza di queste avvertenze può provocare lesioni gravi o morte.
- Prima di effettuare le misurazioni, assicurarsi sempre che il misuratore sia impostato sulla funzione e nell'intervallo corretti.
- Non utilizzare il misuratore se appare danneggiato o se i puntali di prova sono danneggiati.
- Non applicare più del volume nominaletage, come indicato sul contatore, tra i terminali o tra qualsiasi terminale e la terra.
- Usare estrema cautela quando si lavora con voltagsuperiori a 30 V CA RMS, 42 V di picco o 60 V CC. Questi voltagrappresentano un rischio di scossa elettrica.
- Scollegare i puntali di prova dal circuito prima di modificare le funzioni.
- Rimuovere i puntali dal misuratore prima di aprire il coperchio della batteria.
- Do not operate the meter with the battery cover removed.
- Rispettare i codici di sicurezza locali e nazionali.
3. Prodotto finitoview
The ZOYI ZT303 Digital Multimeter features a clear display, a rotary switch for function selection, and various input jacks for test leads.

Figura 3.1: Fronte view of the ZOYI ZT303 Digital Multimeter, showing the display, rotary switch, and input terminals.
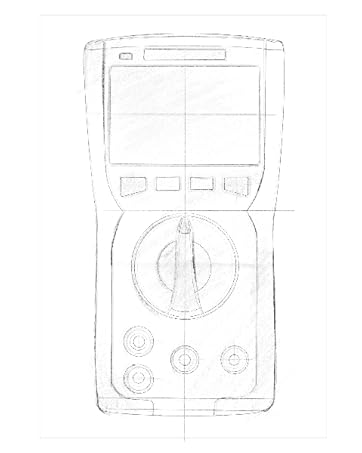
Figure 3.2: Technical drawing illustrating the internal layout or design elements of the ZOYI ZT303 Digital Multimeter.
3.1. componenti
- Schermo LCD: Mostra le letture delle misurazioni, le unità e gli indicatori di funzione.
- Pulsanti funzione: For selecting specific modes (e.g., RANGE, REL, MAX/MIN, Hz, SELECT, HOLD).
- Interruttore rotante: Used to select the desired measurement function (e.g., V~, V-, A~, A-, Ω, NCV).
- Jack di ingresso:
- Jack COM: Terminale comune per tutte le misurazioni. Collegare qui il puntale di prova nero.
- VHzΩCAP Diode Jack: Ingresso per voltage, frequency, resistance, capacitance, and diode/continuity tests. Connect the red test lead here for these functions.
- Presa mAµA: Input per milliampere e microampere current measurements. Connect the red test lead here for these functions.
- Presa 10A: Input per 10 Ampere current measurements. Connect the red test lead here for high current measurements.
4. Impostazione
4.1. Installazione della batteria
- Assicurarsi che il multimetro sia spento e scollegare tutti i puntali di prova.
- Individuare il coperchio del vano batterie sul retro dell'unità.
- Svitare la/le vite/i di fissaggio e rimuovere il coperchio.
- Insert new batteries (e.g., 2 x AAA or 9V, refer to the battery compartment for specific type) observing the correct polarity.
- Riposizionare il coperchio della batteria e fissarlo con la/le vite/i.
4.2. Collegamento dei puntali di prova
Collegare sempre il puntale di prova nero alla presa COM. Collegare il puntale di prova rosso alla presa di ingresso appropriata in base alla funzione di misurazione:
- Per voltage, Resistance, Capacitance, Frequency, Diode, and Continuity: Connect the red lead to the VHzΩCAP Diode cricco.
- For mA/µA Current: Connect the red lead to the mAμA cricco.
- For 10A Current: Connect the red lead to the 10A cricco.
5. Istruzioni per l'uso
5.1. Accensione/spegnimento
Turn the rotary switch from the "OFF" position to any desired measurement function to power on the meter. To power off, turn the rotary switch back to the "OFF" position.
5.2. Auto-range
The ZT303 features auto-ranging, which automatically selects the appropriate measurement range. For manual range selection, press the Consumo pulsante.
5.3. Vol. CC/CAtage Misurazione (V)
- Posizionare il selettore su V~ (Vol. ACtage) o V- (DC voltage) posizione.
- Connect the black test lead to the COM jack and the red test lead to the VHzΩCAP Diode jack.
- Collegare le sonde di prova al circuito o al componente da misurare.
- Leggi il vol.tage valore sul display LCD.
5.4. DC/AC Current Measurement (A, mA, µA)
Attenzione: Non collegare mai il misuratore in parallelo a un voltage sorgente quando si misura la corrente. Ciò può danneggiare il misuratore e il circuito.
- Set the rotary switch to the appropriate current range (A~, A-, mAµA~, mAµA-).
- Connect the black test lead to the COM jack. Connect the red test lead to the mAμA jack for low current or the 10A jack for high current.
- Aprire il circuito in cui si desidera misurare la corrente e collegare il misuratore in serie al carico.
- Leggere il valore corrente sul display LCD.
5.5. Misurazione della resistenza (Ω)
Attenzione: Prima di misurare la resistenza, assicurarsi che il circuito sia disattivato e che tutti i condensatori siano scarichi.
- Posizionare il selettore su Ombra posizione.
- Connect the black test lead to the COM jack and the red test lead to the VHzΩCAP Diode jack.
- Collegare le sonde di prova al componente da misurare.
- Leggere il valore della resistenza sul display LCD.
5.6. Misurazione della capacità (F)
Attenzione: Prima di effettuare la misurazione, assicurarsi che il condensatore sia completamente scarico per evitare danni al misuratore.
- Posizionare il selettore su CAP position (often shared with Ω or Diode, use SELECT button if needed).
- Connect the black test lead to the COM jack and the red test lead to the VHzΩCAP Diode jack.
- Collegare le sonde di prova ai terminali del condensatore.
- Leggere il valore della capacità sul display LCD.
5.7. Frequency/Duty Cycle Measurement (Hz/%)
- Posizionare il selettore su Hz/% position (often shared with voltage or other functions, use SELECT button if needed).
- Connect the black test lead to the COM jack and the red test lead to the VHzΩCAP Diode jack.
- Collegare le sonde di prova alla sorgente del segnale.
- Leggere il valore della frequenza o del ciclo di lavoro sul display LCD.
5.8. Diode Test and Continuity Test
- Posizionare il selettore su Diodo/Continuità posizione. Utilizzare il SELEZIONARE button to toggle between diode test and continuity test.
- Connect the black test lead to the COM jack and the red test lead to the VHzΩCAP Diode jack.
- Prova del diodo: Collegare la sonda rossa all'anodo e la sonda nera al catodo del diodo. Una tensione direttatage drop will be displayed. Reverse the probes; an "OL" (Overload) reading indicates a good diode.
- Test di continuità: Connect the probes across the circuit or component. A continuous beep and a low resistance reading indicate continuity.
5.9. Vol. senza contattotage (NCV) Rilevamento
- Posizionare il selettore su VNC posizione.
- Move the top part of the meter close to the conductor or outlet.
- The meter will emit an audible beep and/or flash an LED indicator when AC voltage viene rilevato.
5.10. Funzione di conservazione dei dati
Premere il tasto PRESA per bloccare la lettura corrente sul display. Premerlo nuovamente per disattivare la funzione di blocco.
5.11. MAX/MIN Function
Premere il tasto Massimo/minimo button to enter MAX/MIN recording mode. The meter will display the maximum or minimum reading detected since the mode was activated. Press again to cycle between MAX, MIN, and current reading. Hold to exit.
5.12. Relative Measurement (REL)
Premere il tasto REL button to store the current reading as a reference value. Subsequent measurements will be displayed as the difference from this reference value. Press again to exit relative mode.
6. Manutenzione
6.1. Pulizia
Pulisci la custodia con l'adamp panno e detergente delicato. Non utilizzare abrasivi o solventi. Assicurarsi che il misuratore sia completamente asciutto prima dell'uso.
6.2. Sostituzione della batteria
When the low battery indicator appears on the display, replace the batteries as described in Section 4.1. Prompt replacement ensures accurate readings and proper operation.
6.3. Sostituzione del fusibile
If the current measurement function fails, the fuse may need replacement. Refer to the specific fuse ratings printed near the input jacks or inside the battery compartment. Fuse replacement typically involves opening the back case (after removing batteries) and carefully replacing the blown fuse with one of the identical type and rating. If unsure, consult a qualified technician.
7. Risoluzione Dei Problemi
| Problema | Possibile causa | Soluzione |
|---|---|---|
| Nessun display o display poco luminoso | Batterie scariche o scariche | Sostituire le batterie (Sezione 4.1) |
| "OL" (sovraccarico) visualizzato | La misurazione supera l'intervallo selezionato o la capacità massima del misuratore | Select a higher range (if in manual range) or ensure measurement is within meter's limits. |
| Letture errate | Incorrect function selected, poor test lead connection, or damaged test leads | Verify function, check lead connections, inspect and replace damaged leads. |
| Misurazione della corrente non funzionante | Fusibile bruciato | Sostituire il fusibile (Sezione 6.3) |
8. Specifiche
| Caratteristica | Dettaglio |
|---|---|
| Marca | ZOYI |
| Numero di modello | Numero di modello: ZT303 |
| Dimensioni del prodotto | 4.53 x 1.97 x 7.68 pollici |
| Peso dell'articolo | 14.11 once (399.98 grammi) |
| Fonte di alimentazione | Alimentato a batteria |
| Colore | Blu |
| Display | Digital LCD, 19999 Counts (typical for ZT303 series) |
| Distanza | Intervallo automatico/manuale |
| Caratteristiche speciali | True RMS, NCV, Data Hold, Backlight, MAX/MIN, REL |
Note: Detailed electrical specifications (e.g., voltage/current ranges, accuracy) are typically printed on the device or included in a separate specification sheet.
9. Garanzia e supporto
Warranty information for the ZOYI ZT303 Digital Multimeter is typically provided at the point of purchase or within the product packaging. For specific warranty terms, technical support, or service inquiries, please refer to the official ZOYI websito o contattare il rivenditore autorizzato.
Per ulteriore assistenza, visitare: ZOYI Official Flagship Store on Amazon


