1. Introduzione
This manual provides detailed instructions for the proper setup, operation, and maintenance of your Topping A50 III Headphone Amplifier. Please read this manual thoroughly before using the device to ensure optimal performance and safety. The Topping A50 III is a high-performance desktop headphone amplifier designed to deliver clear and powerful audio to a wide range of headphones.
2. Prodotto finitoview
2.1 Caratteristiche principali
- NFCA Modules: Incorporates Nested Feedback Composite Amplifier (NFCA) modules, utilizing a voltage-current hybrid feedback architecture and Ultra-High Gain Feedback (UHGF) technology for enhanced DC and AC performance. This design supports driving low impedance headphones effectively.
- Connettività versatile: Features both 6.35mm single-ended and 4.4mm balanced headphone output jacks. Input options include RCA single-ended and 6.35mm TRS balanced inputs, allowing for various audio source connections.
- Compatibilità delle cuffie: Offers three gain selections (High, Medium, Low) to accommodate different headphone sensitivities. A low noise floor of 0.3uVrms ensures minimal interference, particularly for sensitive In-Ear Monitors (IEMs).
- Elevata potenza in uscita: Delivers a maximum output of 3500mW x 2, capable of driving most headphones to their full potential while maintaining a low distortion rate of less than 0.1% at high power levels.
- Innesco 12V: Equipped with a 12V Trigger input, enabling synchronized power on/off with other compatible audio devices.
- Integrazione del design: Shares a consistent design aesthetic with the Topping D50 III, allowing for a cohesive setup when paired together. The 12V Trigger functionality facilitates synchronized operation between these units.
2.2 Contenuto della confezione

Figura 1: Contenuto e dimensioni della confezione
The Topping A50 III package includes the following items:
- Cuffie Topping A50 III AmpUnità lificatore
- Adattatore di alimentazione CC 15V
- Adattatore da 6.35 mm a 3.5 mm
- Scheda informativa sul prodotto
2.3 Identificazione dei componenti
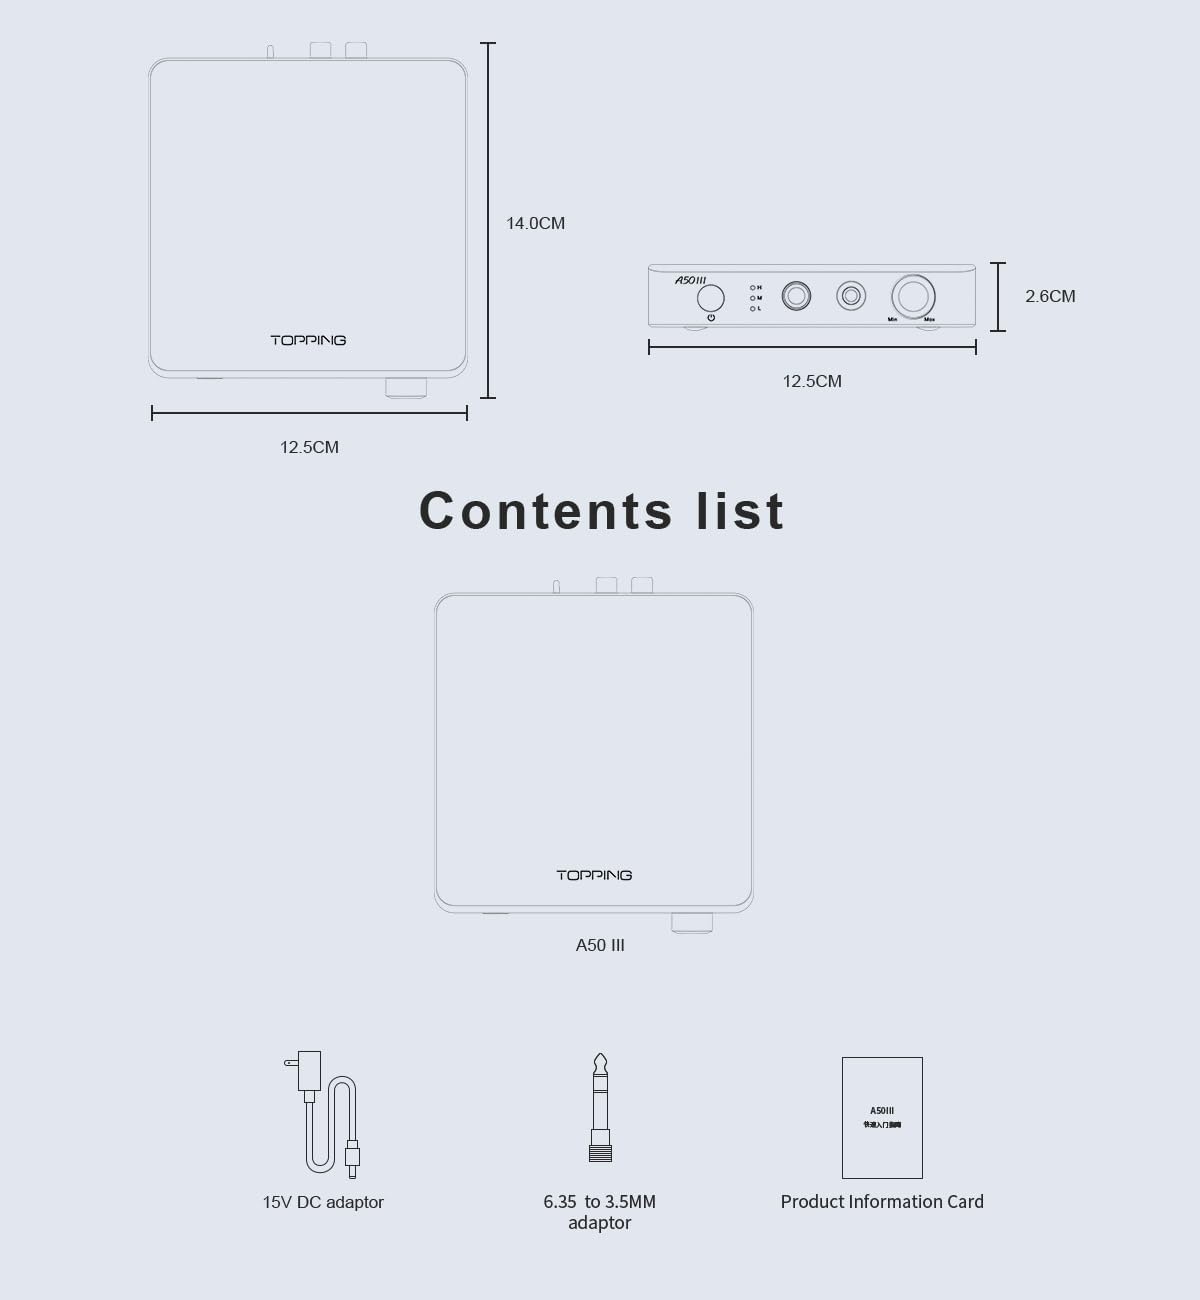
Figura 2: disposizione del pannello anteriore e posteriore
This diagram provides a detailed labeling of all controls and ports on the Topping A50 III. The front panel labels include:
- Power switch & Gain switch button: Press to power on/off. Press and hold to cycle through gain settings (H, M, L).
- Gain indicator: LEDs indicating High (H), Medium (M), or Low (L) gain.
- 6.35mm headphone output jack: For single-ended headphone connections.
- 4.4mm headphone output jack: For balanced headphone connections.
- Manopola del volume: Regola il volume di uscita.
The rear panel labels include:
- Balanced 6.35mm TRS input (R, L): For balanced audio input from a source device.
- Single-ended RCA input (R, L): For single-ended audio input from a source device.
- Input channel switching (BAL/SE): Toggle switch to select between balanced (BAL) and single-ended (SE) inputs.
- Firmware upgrade interface (FW): Porta USB per gli aggiornamenti del firmware.
- Ingresso trigger 12V: Input for synchronized power control with other compatible devices.
- Power input (DC15V): Connect the provided 15V DC power adaptor here.
3. Istruzioni di sicurezza
- Do not expose this device to rain, moisture, or extreme temperatures.
- Garantire un'adeguata ventilazione intorno all'unità per evitare il surriscaldamento.
- Use only the provided 15V DC power adaptor. Using an incorrect adaptor may damage the device.
- Evitare di posizionare il dispositivo su superfici instabili.
- Non tentare di smontare o modificare l'unità. Per qualsiasi intervento di manutenzione, rivolgersi a personale qualificato.
- Tenere il dispositivo lontano da forti campi magnetici.
- Always lower the volume before connecting or disconnecting headphones to prevent sudden loud sounds.
4. Impostazione
4.1 Collegamento delle sorgenti audio
The A50 III supports both balanced and single-ended audio inputs.
- Ingresso bilanciato: Connect your audio source (e.g., DAC with balanced outputs) to the 6.35mm TRS (Tip-Ring-Sleeve) input jacks on the rear panel. Ensure the left (L) and right (R) channels are connected correctly.
- Single-Ended Input: Connect your audio source (e.g., DAC with RCA outputs) to the RCA input jacks on the rear panel. Ensure the left (L) and right (R) channels are connected correctly.
4.2 Collegamento delle cuffie
The A50 III provides both balanced and single-ended headphone outputs.
- Uscita bilanciata: For headphones with a 4.4mm balanced connector, plug them into the 4.4mm headphone output jack on the front panel.
- Uscita single-ended: For headphones with a 6.35mm single-ended connector, plug them into the 6.35mm headphone output jack on the front panel. If your headphones use a 3.5mm connector, use the provided 6.35mm to 3.5mm adaptor.
4.3 Collegamento di alimentazione
Connect the provided 15V DC power adaptor to the DC15V power input on the rear panel of the A50 III. Then, plug the adaptor into a suitable power outlet.
4.4 12V Trigger Connection (Optional)

Figure 3: 12V Trigger Connection Example
If you have another audio device with a 12V Trigger output, you can connect it to the 12V Trigger In port on the A50 III using a compatible cable. This allows the A50 III to power on and off synchronously with the connected device.
5. Istruzioni per l'uso
5.1 Accensione/spegnimento
Press the power switch button on the front panel to turn the A50 III on or off. The gain indicator LEDs will illuminate when the unit is powered on.
5.2 Selezione dell'ingresso
Use the input channel switching toggle switch on the rear panel to select between Balanced (BAL) and Single-Ended (SE) audio inputs. Ensure the switch matches the type of input you are using.
5.3 Controllo del volume
Rotate the volume knob on the front panel clockwise to increase the volume and counter-clockwise to decrease it. Always start with the volume at a low level before playing audio to prevent hearing damage.
5.4 Impostazione del guadagno
The A50 III offers three gain levels: High (H), Medium (M), and Low (L). To change the gain setting, press and hold the power switch button on the front panel. The corresponding LED (H, M, or L) will light up to indicate the selected gain. Choose a gain setting appropriate for your headphones:
- Basso (L): Recommended for highly sensitive headphones or In-Ear Monitors (IEMs).
- Medio (M): Suitable for most standard headphones.
- Alto (H): For less sensitive or high-impedance headphones that require more power.
6. Manutenzione
- Pulizia: Utilizzare un panno morbido e asciutto per pulire l'esterno dell'unità. Non utilizzare detergenti liquidi o materiali abrasivi.
- Magazzinaggio: Quando non viene utilizzato per lunghi periodi, conservare il dispositivo in un luogo fresco e asciutto, lontano dalla luce solare diretta e dalla polvere.
- Ventilazione: Ensure that the ventilation openings are not blocked to prevent heat buildup.
7. Risoluzione Dei Problemi
- Nessun suono:
- Verificare che l'adattatore di alimentazione sia collegato correttamente e che l'unità sia accesa.
- Verify that the audio source is properly connected to the correct input (RCA or TRS).
- Ensure the input channel switch (BAL/SE) on the rear panel matches your audio source.
- Confirm that headphones are securely plugged into the correct output jack (6.35mm or 4.4mm).
- Increase the volume level on the A50 III and your audio source.
- Test with different headphones and audio sources to isolate the issue.
- Suono distorto:
- Reduce the volume level on both the A50 III and your audio source.
- Try a lower gain setting (L or M) if using sensitive headphones.
- Assicurarsi che tutti i cavi siano collegati saldamente e non danneggiati.
- Controllare la sorgente audio per eventuali distorsioni.
- L'unità non si accende:
- Verify the power adaptor is correctly connected to the unit and a working power outlet.
- If using the 12V Trigger, ensure the connected device is powered on and the trigger cable is functional.
8. Specifiche

Figura 4: Specifiche tecniche dettagliate
The following table outlines the key technical specifications of the Topping A50 III Headphone Amplificatore:
| Specificazione | Valore |
|---|---|
| Nome del modello | A50III |
| Presa per cuffie | Jack da 6.35 mm, Jack da 4.4 mm |
| Tecnologia di connettività | Cablato |
| Tecnologia di comunicazione wireless | Non supportato |
| Componenti inclusi | Cable (likely power cable and adaptors) |
| Dispositivi compatibili | Desktops, Laptops, Headphones, Audio Devices |
| Metodo di controllo | Button, Knob |
| Numero di articoli | 1 (unità principale) |
| Produttore | LEAUDIO CO. |
| Peso dell'articolo | 2 libbre (circa 0.91 kg) |
| Dimensioni del pacco | 6.8 x 6.5 x 5.8 pollici (circa 17.3 x 16.5 x 14.7 cm) |
| Numero modello articolo | LE-TP-A50III |
| Colore | Nero |
| Controllo del rumore | Nessuno |
9. Garanzia e supporto
For warranty information and technical support, please refer to the documentation included with your product or contact the manufacturer, LEAUDIO CO., or your authorized dealer. Keep your purchase receipt as proof of purchase for warranty claims.


