1. Introduzione
The BSP D9 Game Controller is a versatile gaming accessory designed to enhance your mobile and PC gaming experience. It supports a wide range of devices including iPhones, iPads, Android phones and tablets, PCs, Nintendo Switch, and PlayStation consoles. Featuring advanced Hall Effect joysticks and triggers, programmable back buttons, and a stretchable design, the D9 controller provides precise control and comfortable gameplay across various platforms.
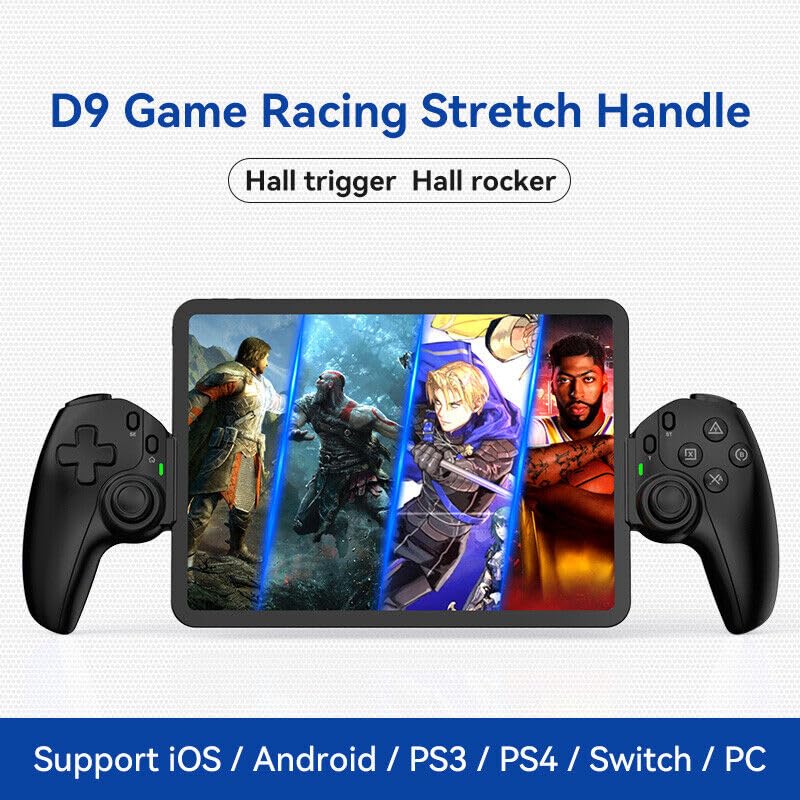
Figure 1.1: The BSP D9 Game Controller attached to a tablet, showcasing its design and compatibility with mobile gaming.
2. Prodotto finitoview: Key Details
Familiarize yourself with the various buttons and components of your D9 Game Controller.

Figure 2.1: Detailed diagram of the D9 controller's button layout, including the Cross Key, SELECT, HOME, START, A/B/X/Y buttons, L1/R1, L2/R2 triggers, M1/M2 back buttons, Left/Right Sticks (L3/R3), Status Indicator, and Charging Indicator.
- Cross Key (D-Pad): Input direzionale.
- Left Stick/L3: Left analog joystick, press down for L3.
- Pulsante SELEZIONA: Function button, typically for menu selection.
- Tasto CASA: Power on/off, mode switching, return to home screen.
- Indicatore di stato: Shows connection status and mode.
- Indicatore di carica: Visualizza lo stato di carica della batteria.
- Right Stick/R3: Right analog joystick, press down for R3.
- Pulsanti A/B/X/Y: Pulsanti di azione standard.
- Pulsante Start: Function button, typically for pausing or starting games.
- Pulsante TURBO: Activates/deactivates turbo function for assigned buttons.
- Pulsanti L1/R1: Bottoni sulle spalle.
- Trigger L2/R2: Trigger analogici.
- Pulsanti M1/M2: Pulsanti posteriori programmabili.
3 Caratteristiche
3.1 Hall Effect Triggers and Joysticks
The D9 controller is equipped with advanced Hall Effect technology for both its triggers and joysticks. This provides superior precision and durability compared to traditional potentiometers.

Figure 3.1: Explanation of Hall Effect Triggers and Joysticks, highlighting 0.1mm accuracy for triggers and benefits like no drift issues, no dead zone, long lifespan, and precise control for joysticks.
- Trigger ad effetto Hall: Provide 0.1mm accuracy for precise micro-operations in games.
- Joystick ad effetto Hall: Eliminate drift issues, maintain stable trajectory, offer precise positioning, and provide a smooth feel without stuttering.
3.2 Funzione Turbo
The Turbo function allows you to set automatic rapid firing for specific buttons, giving you an advantage nei giochi frenetici.

Figure 3.2: The Turbo function allows setting A/B/X/Y, L1/R1, L2/R2 buttons for rapid fire. Three adjustable turbo speeds are available: 8 shots/s, 15 shots/s, and 25 shots/s.
3.3 Macro Programming Function
The M1 and M2 back buttons can be programmed to execute complex key combinations with a single press, reducing repetitive actions and extending controller lifespan.

Figure 3.3: Instructions for setting and canceling macro programming on the M1 and M2 back buttons. Macros can be assigned to A/B/X/Y/L1/R1/L2/R2/Cross Key combinations.
3.4 Stretchable Design
The controller features a stretchable design to accommodate a wide range of smartphones and tablets, ensuring a secure fit and comfortable grip.

Figure 3.4: The controller supports device lengths from 130mm to 280mm (5-11 inches) and a maximum thickness of 13mm. It is perfectly compatible with iPhone 15 series and supports silicone & clear phone cases.
4. Compatibilità
The BSP D9 Game Controller offers broad compatibility with various operating systems and gaming platforms, transforming your mobile device into a portable gaming console.

Figure 4.1: The controller supports streaming & cloud gaming (PS Remote Play, Xbox Game Pass, Steam Link, Rainway, NVIDIA GeForce NOW, Moonlight Game Streaming, Apple Arcade), direct play on iOS devices (Genshin Impact, Call of Duty Mobile, Diablo Immortal, Minecraft, Roblox), and direct play on Android devices (Call of Duty Mobile, Diablo Immortal, Minecraft, NBA 2K, Asphalt).
- Sistemi operativi: iOS, Android, Windows (PC).
- Console: Nintendo Switch, PlayStation (PS3, PS4, PS5 via remote play).
- Gioco su cloud: Supports services like Xbox Game Pass, PS Remote Play, Steam Link, NVIDIA GeForce NOW, and more.
- Riproduzione diretta: Compatible with popular mobile games on both iOS and Android.
5. Impostazione
5.1 Ricarica del controller
- Connect the provided USB-C charging cable to the charging port on the controller.
- Collegare l'altra estremità del cavo a una fonte di alimentazione USB (ad esempio, una porta USB del computer, un adattatore da parete).
- The Charging Indicator light will illuminate during charging and turn off when fully charged.
5.2 Inserimento del dispositivo
- Gently pull the two sides of the controller apart to extend the stretchable mechanism.
- Carefully place your smartphone or tablet into the central slot, ensuring it is securely seated. The controller supports devices with lengths between 130mm and 280mm and a maximum thickness of 13mm.
- The controller is designed to accommodate devices with slim cases.
5.3 Connecting to Your Device (Bluetooth Pairing)
The connection method varies slightly depending on your device's operating system.
Per dispositivi Android:
- Premere e tenere premuto il tasto CASA button until the Status Indicator light begins to flash rapidly, indicating pairing mode.
- Sul tuo dispositivo Android, vai a Impostazioni > Bluetooth e attiva il Bluetooth.
- Cercare available devices and select "BSP-D9" or similar from the list.
- Once connected, the Status Indicator light on the controller will become solid.
Per dispositivi iOS:
- Premere e tenere premuto il tasto CASA button until the Status Indicator light begins to flash rapidly.
- Sul tuo dispositivo iOS, vai a Impostazioni > Bluetooth e attiva il Bluetooth.
- Cercare available devices and select "Xbox Wireless Controller" or "DUALSHOCK 4 Wireless Controller" (depending on the mode the D9 emulates for iOS compatibility) from the list.
- Once connected, the Status Indicator light on the controller will become solid.
For PC/Switch/PS (Wired/Wireless):
Refer to the specific connection instructions provided with your controller for PC, Switch, or PS modes, as these may involve different button combinations or wired connections.
6. Istruzioni per l'uso
6.1 Funzioni base dei pulsanti
Refer to Section 2, "Product Overview: Key Details," for the layout and basic functions of all buttons (Cross Key, A/B/X/Y, L1/R1, L2/R2, Joysticks, SELECT, START, HOME).
6.2 Utilizzo della funzione Turbo
- Premere e tenere premuto il tasto Turbosoffiante pulsante.
- Mentre si tiene Turbosoffiante, press the button you wish to assign the turbo function to (e.g., A, B, X, Y, L1, R1, L2, R2). The button will now have turbo enabled.
- To adjust the turbo speed, press and hold Turbosoffiante and then press the Right Stick (R3) up or down to cycle through the 3 available speeds (8, 15, 25 shots/s).
- To cancel the turbo function for a specific button, press and hold Turbosoffiante e premere nuovamente il pulsante assegnato.
- To clear all turbo settings, press and hold Turbosoffiante and then press the SELECT button.
6.3 Programming Macro Buttons (M1/M2)
The M1 and M2 back buttons can be programmed to store a sequence of button presses.
How to Set a Macro:
- Premere e tenere premuto il tasto SELEZIONARE pulsante e il M1 (or M2) key for 2 seconds. The LED indicator light will flash quickly.
- Press the key(s) you want to set for the macro programming function (e.g., A+B+X+Y).
- After setting the sequence, press the M1 (or M2) key again. The LED light will become solid, indicating that the setting is complete.
- Once set, pressing M1 (or M2) will automatically execute the programmed key combination.
How to Cancel a Macro:
- Premere e tenere premuto il tasto SELEZIONARE pulsante e il M1 (or M2) key for 2 seconds. The LED indicator light will flash quickly.
- Premere il tasto M1 (or M2) key again to clear the macro programming. (Note: Do not press other buttons at this time). The LED light will remain solid to confirm the setting is cleared.
7. Manutenzione
- Pulizia: Per pulire il controller, utilizzare un panno morbido e asciutto. Non utilizzare detergenti abrasivi o solventi.
- Magazzinaggio: Conservare il controller in un luogo fresco e asciutto, lontano dalla luce solare diretta e da temperature estreme.
- Cura della batteria: Per prolungare la durata della batteria, evitare di scaricare completamente il controller frequentemente. Caricarlo regolarmente, anche se non lo si utilizza per lunghi periodi.
- Evitare gocce: Proteggere il controller da cadute e urti che potrebbero danneggiare i componenti interni.
8. Risoluzione Dei Problemi
| Problema | Possibile causa | Soluzione |
|---|---|---|
| Il controller non si accende. | Batteria scarica. | Caricare il controller per almeno 30 minuti. |
| Impossibile effettuare l'associazione tramite Bluetooth. | Controller non in modalità di associazione; interferenza Bluetooth; Bluetooth del dispositivo disattivato. | Ensure controller is in pairing mode (flashing LED). Turn off and on Bluetooth on your device. Move closer to the device. |
| I pulsanti o i joystick non rispondono. | Problema di connessione; problema software; danno fisico. | Reconnect the controller. Restart your device. If problem persists, contact customer support. |
| Il dispositivo non si adatta al controller. | Device dimensions exceed supported limits. | Ensure your device length is between 130-280mm and thickness is max 13mm. Remove bulky cases. |
9. Specifiche
- Modello: D9
- Marca: BSP
- Connettività: Bluetooth, Wired (for PC/Switch/PS, specific modes may vary)
- Lunghezza del dispositivo supportata: 130 mm - 280 mm (5 - 11 pollici)
- Supported Device Thickness: Fino a 13 mm
- Joystick/Trigger Technology: Effetto Hall
- Pulsanti programmabili: M1, M2 (pulsanti indietro)
- Funzione Turbo: Yes, with 3 adjustable speeds
- Produttore: ShenZhen ShanWan Technology Co., Ltd.
- Prima data disponibile: 30 marzo 2024
10. Garanzia e supporto
For warranty information and technical support, please refer to the documentation included with your purchase or visit the official BSP product support websito. Conservare la prova d'acquisto per eventuali reclami in garanzia.
Nota: i termini di garanzia specifici e i dettagli di contatto dell'assistenza possono variare in base alla regione.