1. Informazioni importanti sulla sicurezza
Please read this entire manual before assembling or operating your Wenoker 312FRB Exercise Bike. Keep this manual for future reference.
- Consultare il proprio medico prima di iniziare qualsiasi programma di esercizi.
- Tenere i bambini e gli animali domestici lontano dall'apparecchiatura.
- Posizionare la cyclette su una superficie piana e stabile, con spazio sufficiente attorno.
- Prima di ogni utilizzo, ispezionare la bicicletta per verificare la presenza di parti allentate o usurate. Non utilizzarla se danneggiata.
- Indossare abbigliamento e calzature sportive adeguati.
- La capacità massima di peso dell'utente è di 160 kg (350 libbre).
- The emergency brake stops the flywheel immediately. Use it if you need to stop quickly.
2. Prodotto finitoview
The Wenoker 312FRB Exercise Bike is designed for effective indoor cycling with a focus on quiet operation and adjustable resistance.

Figura 2.1: Complessivamente view of the Wenoker 312FRB Magnetic Resistance Exercise Bike, showcasing its robust frame, adjustable components, and integrated LCD display and tablet holder.
Caratteristiche principali:
- Sistema di resistenza magnetica: Provides smooth, quiet, and consistent resistance without physical contact, minimizing wear and noise.
- Volano pesante: Ensures a stable and fluid pedaling experience.
- Sedile e manubrio regolabili: Allows for customization to fit various user heights (1.4m - 1.93m) and preferences.
- Schermo LCD: Tracks essential workout data including time, speed, distance, odometer, and calories burned.
- Tablet/Phone Holder: Integrated into the handlebars for entertainment during workouts.
- Freno di emergenza: For immediate stopping of the flywheel.
- Ruote di trasporto: Per spostare facilmente la bici.
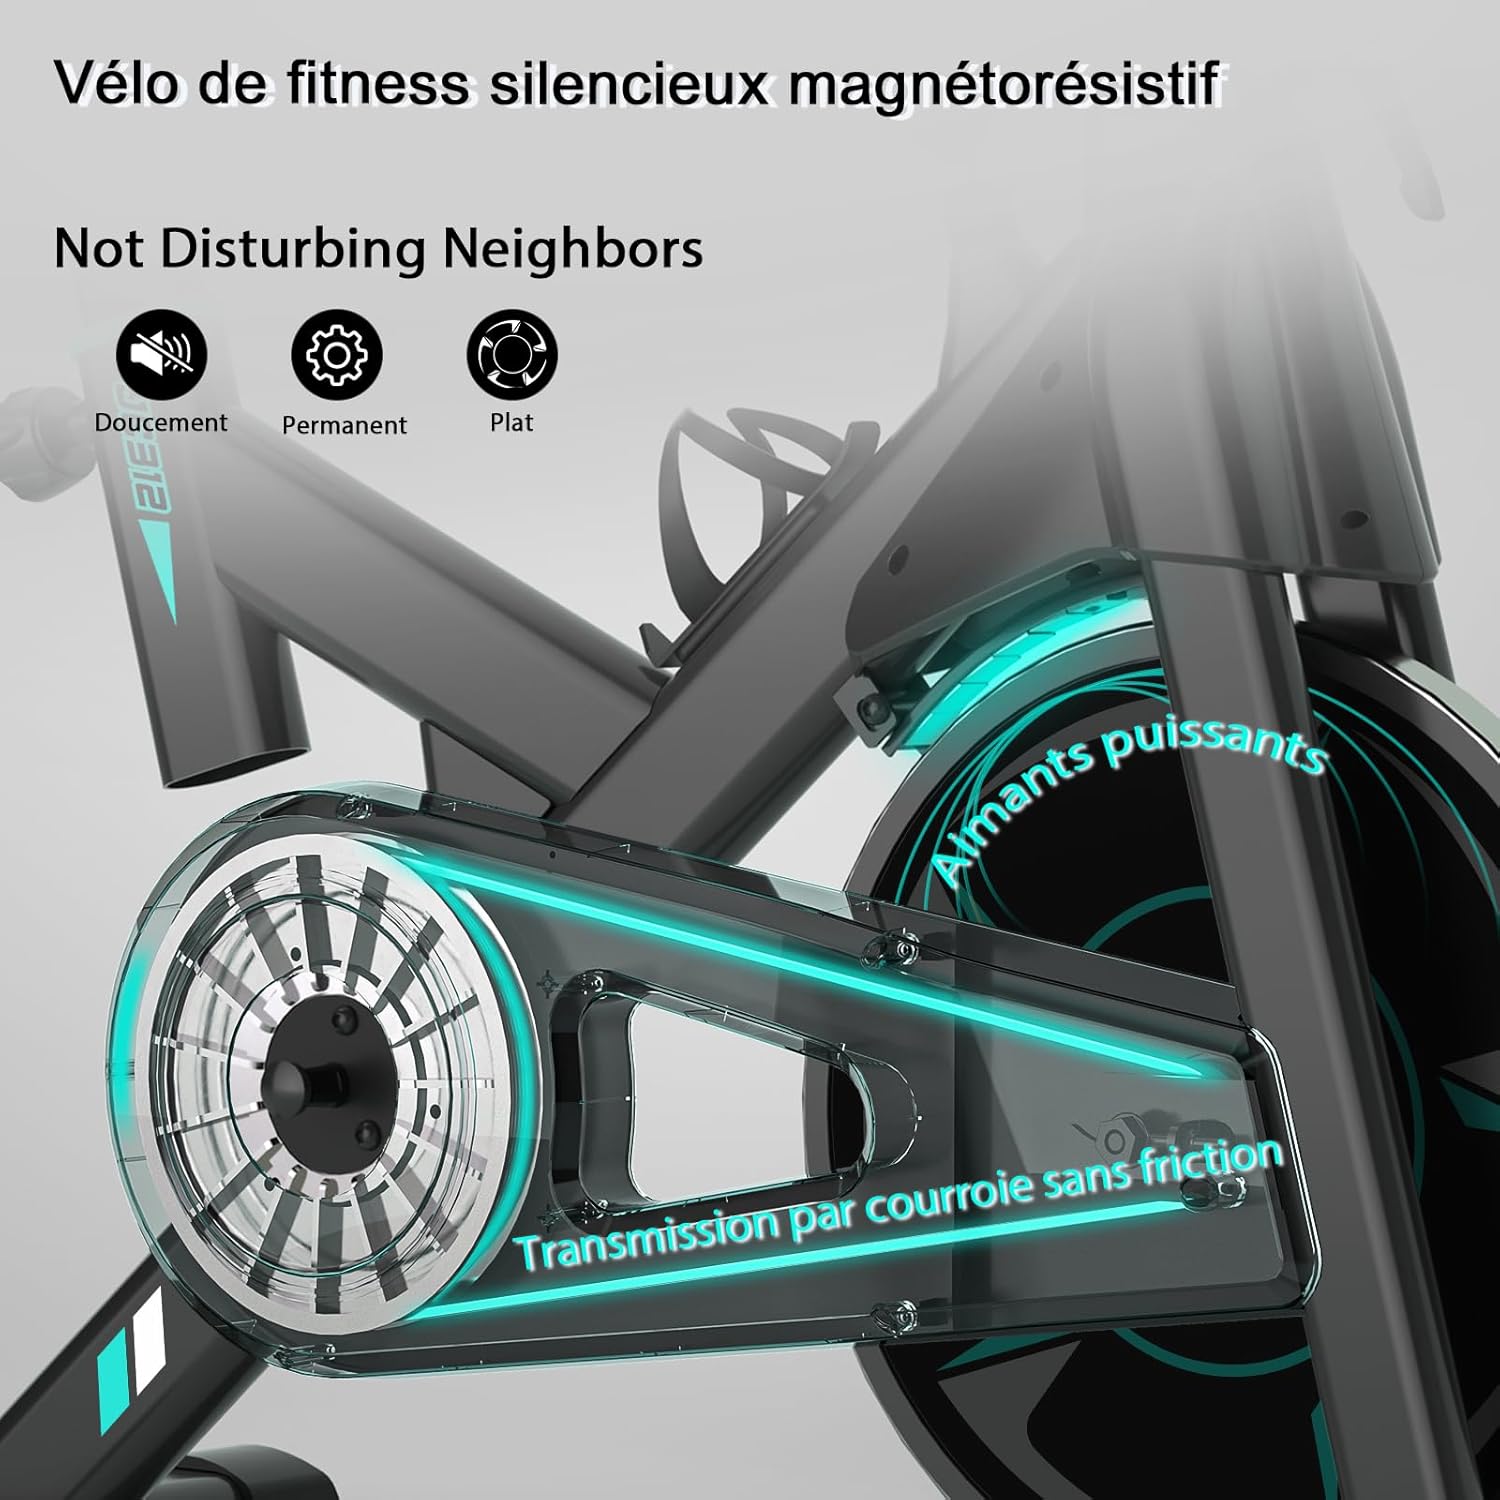
Figura 2.2: Avvicinamento view of the magnetic resistance system and belt drive, highlighting the quiet and smooth operation without disturbing others.
3. Installazione e assemblaggio
Follow these steps to assemble your Wenoker 312FRB Exercise Bike. It is recommended to have two people for some assembly steps.
- Disimballare i componenti: Carefully remove all parts from the packaging. Place them on a clean, flat surface. Verify all parts are present against the included parts list.
- Fissare gli stabilizzatori: Fissare le barre stabilizzatrici anteriore e posteriore al telaio principale utilizzando i bulloni e le rondelle forniti. Assicurarsi che siano serrati saldamente per garantire la stabilità.
- Installa i pedali:
- Identificare i pedali sinistro (L) e destro (R).
- IL Right pedal (R) threads clockwise into the crank arm.
- IL Left pedal (L) threads counter-clockwise into the crank arm.
- Stringere saldamente entrambi i pedali con una chiave inglese per evitare che si allentino durante l'uso.
- Fissare il reggisella e la sella: Insert the seat post into the frame and secure it at your desired height. Attach the seat to the seat post.
- Installare il reggisella e il manubrio: Insert the handlebar post into the frame. Attach the handlebars to the post and secure them.
- Collegare il display LCD: Connect the sensor wires from the main frame to the LCD display. Mount the LCD display onto the handlebar assembly.
- Controllo finale: Ensure all bolts and nuts are securely tightened. Check the bike's stability before first use.

Figura 3.1: Illustrative image showing various components of the exercise bike, which are assembled during the setup process.
4. Istruzioni per l'uso
4.1 Regolazione del sedile e del manubrio
Una corretta regolazione garantisce comfort ed una postura efficace durante l'allenamento.
- Altezza del sedile: Loosen the adjustment knob on the vertical seat post. Raise or lower the seat until your leg has a slight bend at the knee when the pedal is at its lowest point. Tighten the knob securely.
- Sedile avanti/indietro: Loosen the adjustment knob under the seat. Slide the seat forward or backward to align your knees properly over the pedals. Tighten the knob securely.
- Altezza manubrio: Loosen the adjustment knob on the handlebar post. Raise or lower the handlebars to a comfortable position that allows for a slight forward lean without straining your back. Tighten the knob securely.
Figura 4.1: Diagram illustrating the adjustable range for the seat (up/down, forward/backward) and handlebars (up/down) to accommodate various user heights.
4.2 Regolazione della resistenza
The resistance level is controlled by the red knob located on the main frame.
- Aumenta la resistenza: Turn the knob clockwise (+) to increase the magnetic resistance, making pedaling harder.
- Diminuire la resistenza: Turn the knob counter-clockwise (-) to decrease the magnetic resistance, making pedaling easier.
- Arresto di emergenza: Premere con decisione la manopola di resistenza per attivare il freno di emergenza e arrestare immediatamente il volano.
Figura 4.2: Close-up of the resistance adjustment knob, showing the '+' and '-' indicators for increasing e decreasing resistance, and its function as an emergency stop.
4.3 Utilizzo del display LCD
The LCD display tracks your workout progress.
- Funzioni: The display typically shows Time, Speed, Distance, Odometer, and Calories Burned.
- Pulsante Modalità: Press the "MODE" button to cycle through the different display functions.
- Funzione di scansione: If available, select "SCAN" to automatically cycle through all functions every few seconds.
- Reset: Press and hold the "MODE" button (or "RESET" if present) to clear all workout data.
- Batteria: The display is battery-powered. Replace batteries when the display becomes dim or unresponsive.
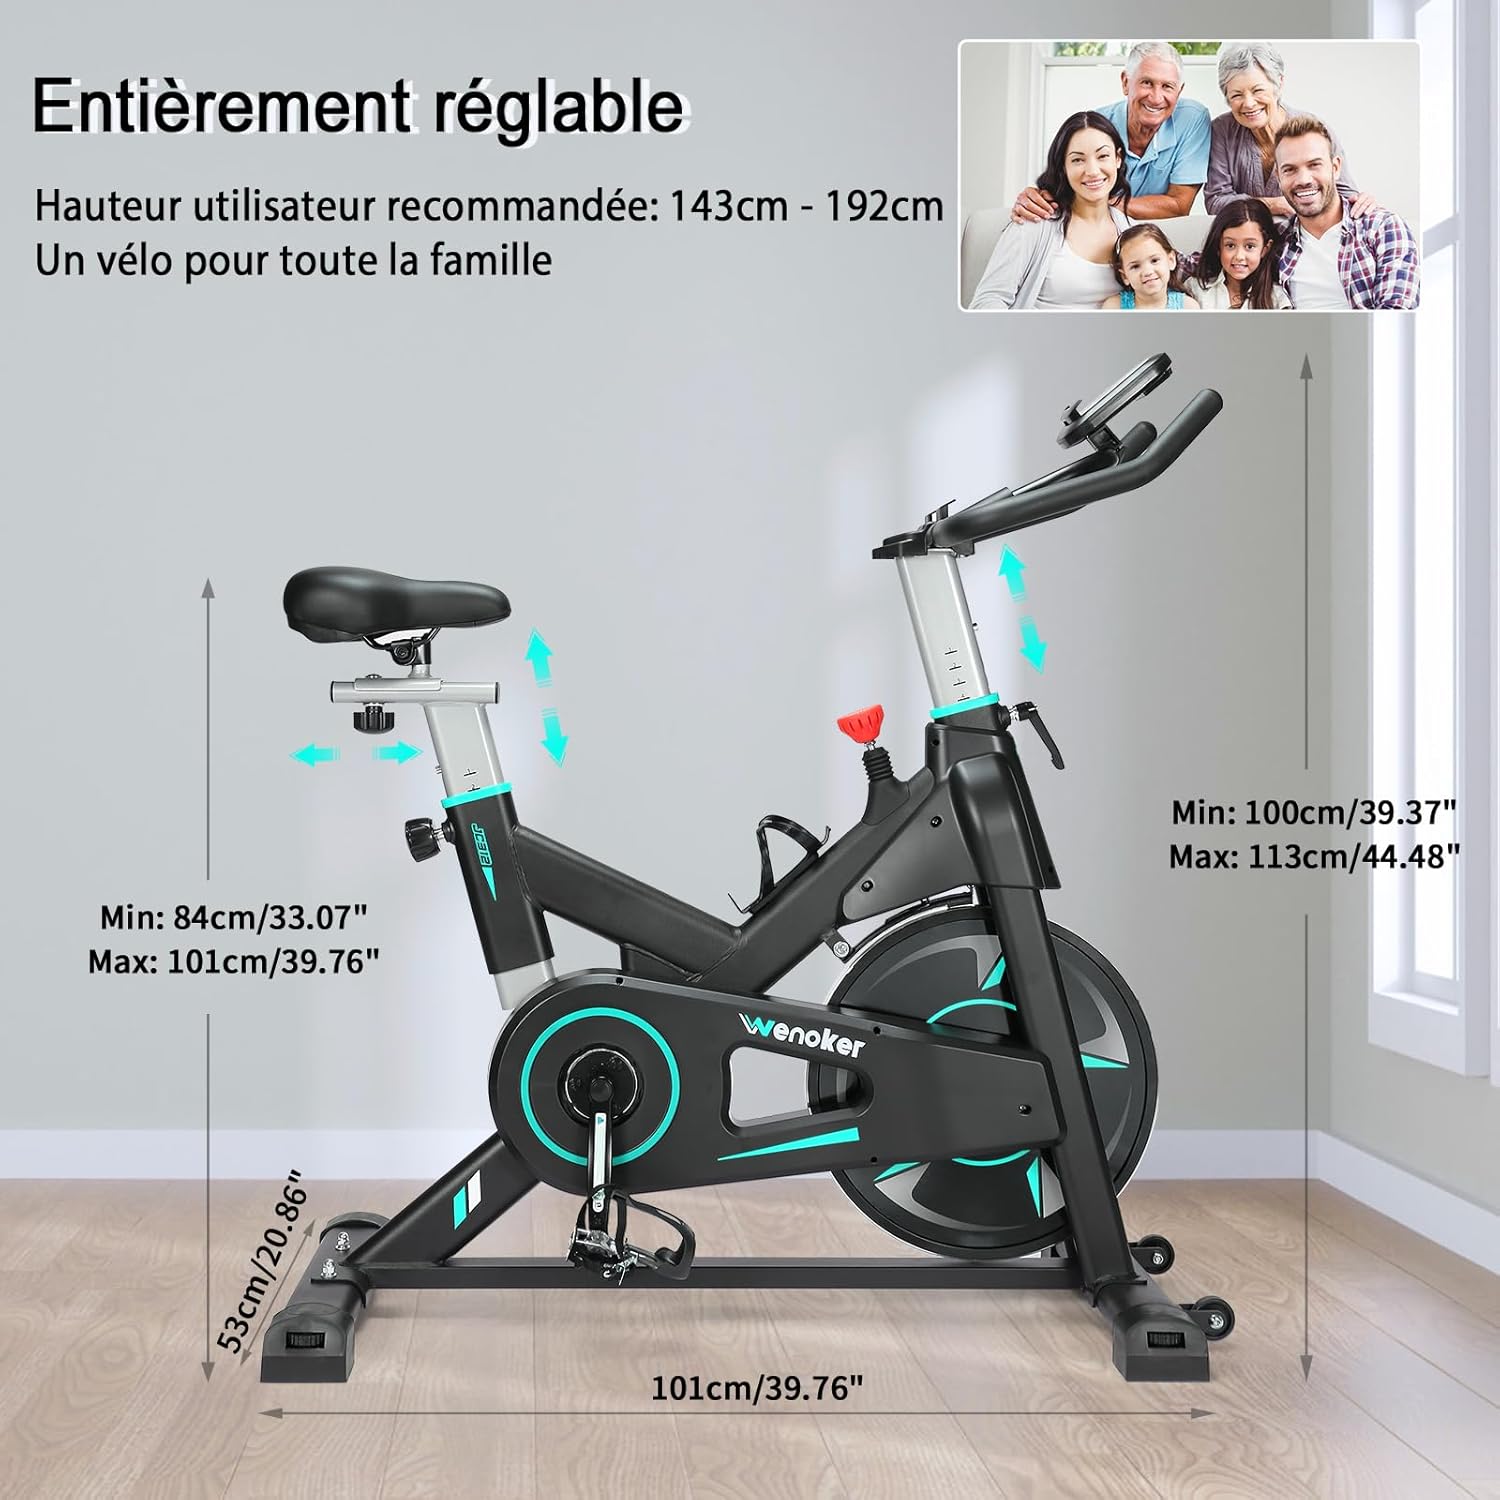
Figura 4.3: View of the LCD display and the integrated tablet/phone holder, showing the various metrics tracked during a workout.
5. Manutenzione
Una manutenzione regolare garantisce la longevità e il funzionamento sicuro della cyclette.
- Pulizia: Pulisci la bici con la pubblicitàamp Dopo ogni utilizzo, pulire con un panno per rimuovere sudore e polvere. Evitare detergenti abrasivi.
- Controllare i dispositivi di fissaggio: Controllare periodicamente tutti i bulloni, i dadi e le viti per assicurarsi che siano ben serrati. Serrare eventuali elementi di fissaggio allentati.
- Lubrificazione: The magnetic resistance system is generally maintenance-free. However, if you notice any squeaking from moving parts (e.g., seat post, handlebar post), apply a small amount of silicone-based lubricant.
- Magazzinaggio: Conservare la bicicletta in un luogo asciutto e fresco, lontano dalla luce solare diretta e da temperature estreme.
6. Risoluzione Dei Problemi
| Problema | Possibile causa | Soluzione |
|---|---|---|
| La bici è instabile o traballa. | Loose stabilizer bolts; uneven floor. | Assicurarsi che tutti i bulloni degli stabilizzatori siano serrati. Regolare i piedini di livellamento sugli stabilizzatori se il pavimento non è uniforme. |
| Pedaling is noisy (squeaking/grinding). | Loose pedals; dry moving parts; internal issue. | Check and tighten pedals (remember left-hand thread for left pedal). Apply lubricant to seat/handlebar posts if they are the source. If noise persists, contact customer support. |
| Resistance not changing or too weak/strong. | Manopola di resistenza non completamente inserita; problema al meccanismo interno. | Ensure the resistance knob is turned fully in both directions to test range. If no change, contact customer support. |
| Il display LCD non funziona o è scuro. | Batterie scariche; collegamento allentato. | Replace the batteries in the LCD display. Check that the sensor wire connection to the display is secure. |
7. Specifiche
| Caratteristica | Dettaglio |
|---|---|
| Numero di modello | 312FRB |
| Marca | Wenoker |
| Meccanismo di resistenza | Magnetico |
| Sistema di azionamento | Belt Drive (for quiet operation) |
| Materiale | Acciaio legato |
| Peso massimo dell'utente | 160 kg (350 libbre) |
| Altezza consigliata per l'utente | 140 cm - 193 cm (4'7" - 6'4") |
| Dimensioni del prodotto (L x P x A) | Circa 101 cm x 53 cm x 113 cm (40" x 21" x 44") |
| Fonte di alimentazione (display) | Alimentato a batteria (batterie non incluse) |
| Caratteristiche | Adjustable Footstrap, LCD Display, Tablet Holder, Transport Wheels |
8. Garanzia e supporto
Wenoker is committed to providing quality products. For any questions, concerns, or warranty claims, please contact our customer support team through your purchase platform. Please have your model number (312FRB) and purchase details ready.
Note: Specific warranty terms may vary by region and retailer. Refer to your purchase documentation for detailed warranty information.


