1. Prodotto finitoview
The SCULPFUN RA Pro Max is a versatile 4-in-1 multi-function rotary module designed for laser engraving machines. It combines a chuck rotary and a roller, offering adaptability for engraving a wide range of objects including rings, spherical items, cylindrical objects, and irregular shapes. Its durable metal structure and 180° adjustable angle provide stability and flexibility for various engraving tasks.
Video 1: Oltreview of the SCULPFUN RA Pro Max Rotary Chuck features and capabilities.
2. Caratteristiche principali
- Durable Metal Structure: Constructed from anodized aluminum alloy and high-strength brass for corrosion resistance, stability, and long-term reliability.
- Easy and Convenient Setup: Features a shared motor for roller and chuck, quick disassembly, and plug-and-play connectivity via adapter cables to the Y-axis stepper motor interface.
- Angolo regolabile di 180°: Allows free adjustment for processing large objects, with an angle line for easy viewing and flexible positioning.
- Multi-function Rotary Module: Includes 3 sets of jaw attachments (stepped, L-shaped, hexagonal) and a dual wheel extension bracket for engraving irregular shapes like wine glasses, baseballs, and handled mugs.
- Ampia compatibilità: Compatible with LightBurn and LaserGRBL software, and SCULPFUN S6/S6 Pro/S9/S10/S30 series/S30 Ultra series/SF-A9 laser engravers. Includes a measuring tape and mini level for precise object placement.
3. Contenuto della confezione
Verifica che tutti gli articoli elencati di seguito siano inclusi nel tuo pacchetto:

Immagine 1: Dettagliata view of all components included in the SCULPFUN RA Pro Max package.
- SCULPFUN RA Pro Max Rotating Module Body
- L-shaped Jaws (3 sets)
- Stepped Jaws (3 sets)
- Hexagonal Jaws (3 sets)
- Contropunta
- Dual Wheel Bracket
- Cavo di collegamento del motore
- Motor Adapter Cable
- Machine Risers (4 pieces)
- M5 Nuts, Screws
- M2, M2.5, M3 Allen Keys
- Viti M3
- Nastro di misurazione
- Mini Livello
- Manuale dell'utente
4. Informazioni sulla sicurezza
Always wear appropriate safety goggles when operating the laser engraver. Ensure the work area is well-ventilated. Keep hands and loose clothing away from moving parts. Do not leave the machine unattended during operation. Refer to your laser engraver's manual for additional safety guidelines.
5. Configurazione e installazione
This section provides detailed instructions for setting up your SCULPFUN RA Pro Max Laser Rotary Roller with your laser engraver.
Video 2: Comprehensive installation guide for the SCULPFUN RA Chuck Rotary Roller with SF-A9 and S9 laser engravers, covering chuck and roller modes, angle adjustment, and software settings.
5.1. Attaching the Rotary Module
- Place the rotary module on a stable surface beneath your laser engraver.
- Ensure the module is positioned centrally within the engraving area.
5.2. Connecting to Laser Engraver
- Locate the Y-axis stepper motor interface on your laser engraver.
- Connect the provided adapter cable to the Y-axis interface.
- Connect the rotary module's motor cable to the adapter cable.
5.3. Adjusting for Different Objects
The RA Pro Max offers multiple configurations for various object shapes:
- Chuck Mode (Jaws): Use the L-shaped, stepped, or hexagonal jaws to securely hold irregular, spherical, or ring-shaped objects. The jaws can be installed in forward or reverse positions to accommodate different object sizes.
- Roller Mode: For cylindrical objects like pens or tumblers, remove the jaws and install the roller. Adjust the roller's position using the two adjustable gears for objects with diameters between 5-198mm.
- Angolo regolabile di 180°: The chuck can be tilted up to 180 degrees to engrave objects at various angles, useful for items with handles or unique geometries. Use the angle markings on the side for precise adjustment.
- Dual Wheel Bracket: For extra-long cylindrical objects, attach the dual wheel bracket to provide additional support and stability during engraving.

Image 2: The RA Pro Max configured for different object types, including chuck and roller modes.

Image 3: Demonstration of the 180° adjustable angle feature for versatile engraving.
6. Istruzioni per l'uso
This section outlines how to operate the SCULPFUN RA Pro Max with common laser engraving software.
6.1. Software Setup (LightBurn)
- Open LightBurn software.
- Vai a Laser Tools > Rotary Setup.
- Selezionare Mandrino or Rullo a seconda della configurazione.
- Abilitare Rotante.
- Impostato asse rotante to Y Axis.
- Measure the object's diameter and circumference using the provided measuring tape.
- Input the correct mm per rotation value. This value depends on your specific laser engraver model and the rotary module. Refer to your laser engraver's documentation or SCULPFUN support for precise values.
- Inserisci il Diametro dell'oggetto E Circonferenza.
- Clic OK.
- Vai a Edit > Machine Settings.
- Confirm or adjust the Y Direction pin invert ($3) setting to ensure correct rotation direction. For some SCULPFUN models (e.g., SF-A9), this might need to be set to 'True' for chuck mode and 'False' for roller mode, or vice-versa. Test rotation to verify.
- Clic Scrivere to save settings to the machine.
- Place your object securely in the rotary module.
- Use the mini level to ensure the object is level.
- Adjust the laser focus as needed for the object's surface.
- Frame your design to check alignment before starting the engraving process.
6.2. Software Setup (LaserGRBL)
- Open LaserGRBL software.
- Connect to your laser engraver via the correct COM port.
- Vai a Grbl > Grbl Configuration.
- Regolare il Y-axis travel resolution ($101) based on your rotary module and object. This value is crucial for accurate engraving. Calculate it by dividing the steps per rotation of your engraver's Y-axis motor by the circumference of your object. For example, if your engraver's Y-axis is 13000 steps/mm and your object's circumference is 192mm, the resolution would be 13000/192 ≈ 67.7 steps/mm.
- Clic Scrivere per salvare le impostazioni.
- Import your image and set engraving parameters (speed, power, etc.).
- Ensure the laser mode is set to M4 - Dynamic Power for optimal results with rotary engraving.
- Place your object securely in the rotary module.
- Use the mini level to ensure the object is level.
- Adjust the laser focus as needed for the object's surface.
- Run a test frame to check alignment before starting the engraving process.
7. Manutenzione
Regular maintenance ensures optimal performance and longevity of your rotary module.
- Pulizia: Periodically clean the rotary module, especially the jaws and rollers, to remove dust, debris, and engraving residue. Use a soft, dry cloth. Avoid abrasive cleaners.
- Lubrificazione: Lightly lubricate moving parts (e.g., roller bearings, chuck mechanism) with a suitable lubricant as needed to ensure smooth operation.
- Ispezione: Regularly inspect all components for wear, damage, or loose connections. Tighten any loose screws. Replace worn parts promptly.
- Magazzinaggio: Quando non in uso, conservare il modulo rotante in un luogo pulito e asciutto, lontano dalla luce solare diretta e da temperature estreme.
8. Risoluzione Dei Problemi
In caso di problemi, fare riferimento ai seguenti problemi comuni e alle relative soluzioni:
- Rotante non in movimento:
- Controllare tutti i collegamenti dei cavi per assicurarsi che siano sicuri.
- Verify that the rotary function is enabled in your engraving software (LightBurn/LaserGRBL).
- Ensure the Y-axis stepper motor interface on your engraver is functioning correctly.
- Incorrect engraving size/distortion:
- Double-check the 'mm per rotation' or Y-axis travel resolution settings in your software. Ensure the object diameter and circumference are accurately measured and entered.
- Verify that the object is securely held and not slipping during engraving.
- Object not level:
- Use the provided mini level to ensure the object is perfectly horizontal or at the desired angle. Adjust the rotary module or object supports as needed.
- Jaws/Roller not holding securely:
- Ensure the correct jaw type is selected for the object's shape.
- Tighten the jaws sufficiently without over-tightening and damaging the object.
- For roller mode, ensure the object is centered and the rollers are adjusted to the correct width.
9. Specifiche
| Specificazione | Valore |
|---|---|
| Dimensioni del prodotto | 11.81 x 3.94 x 5.51 pollici |
| Numero modello articolo | SCULPFUN RA Pro Max |
| Peso dell'articolo | 3.92 libbre |
| Produttore | SCULPFUN |
| Chuck Jaw Range (L-shaped) | Minimo 47 mm, massimo 116 mm |
| Chuck Jaw Range (Stepped) | Minimo 10 mm, massimo 109 mm |
| Chuck Jaw Range (Hexagonal) | Minimo 10 mm, massimo 102 mm |
| Rotary Roller Diameter Range | Minimo 5 mm, massimo 198 mm |
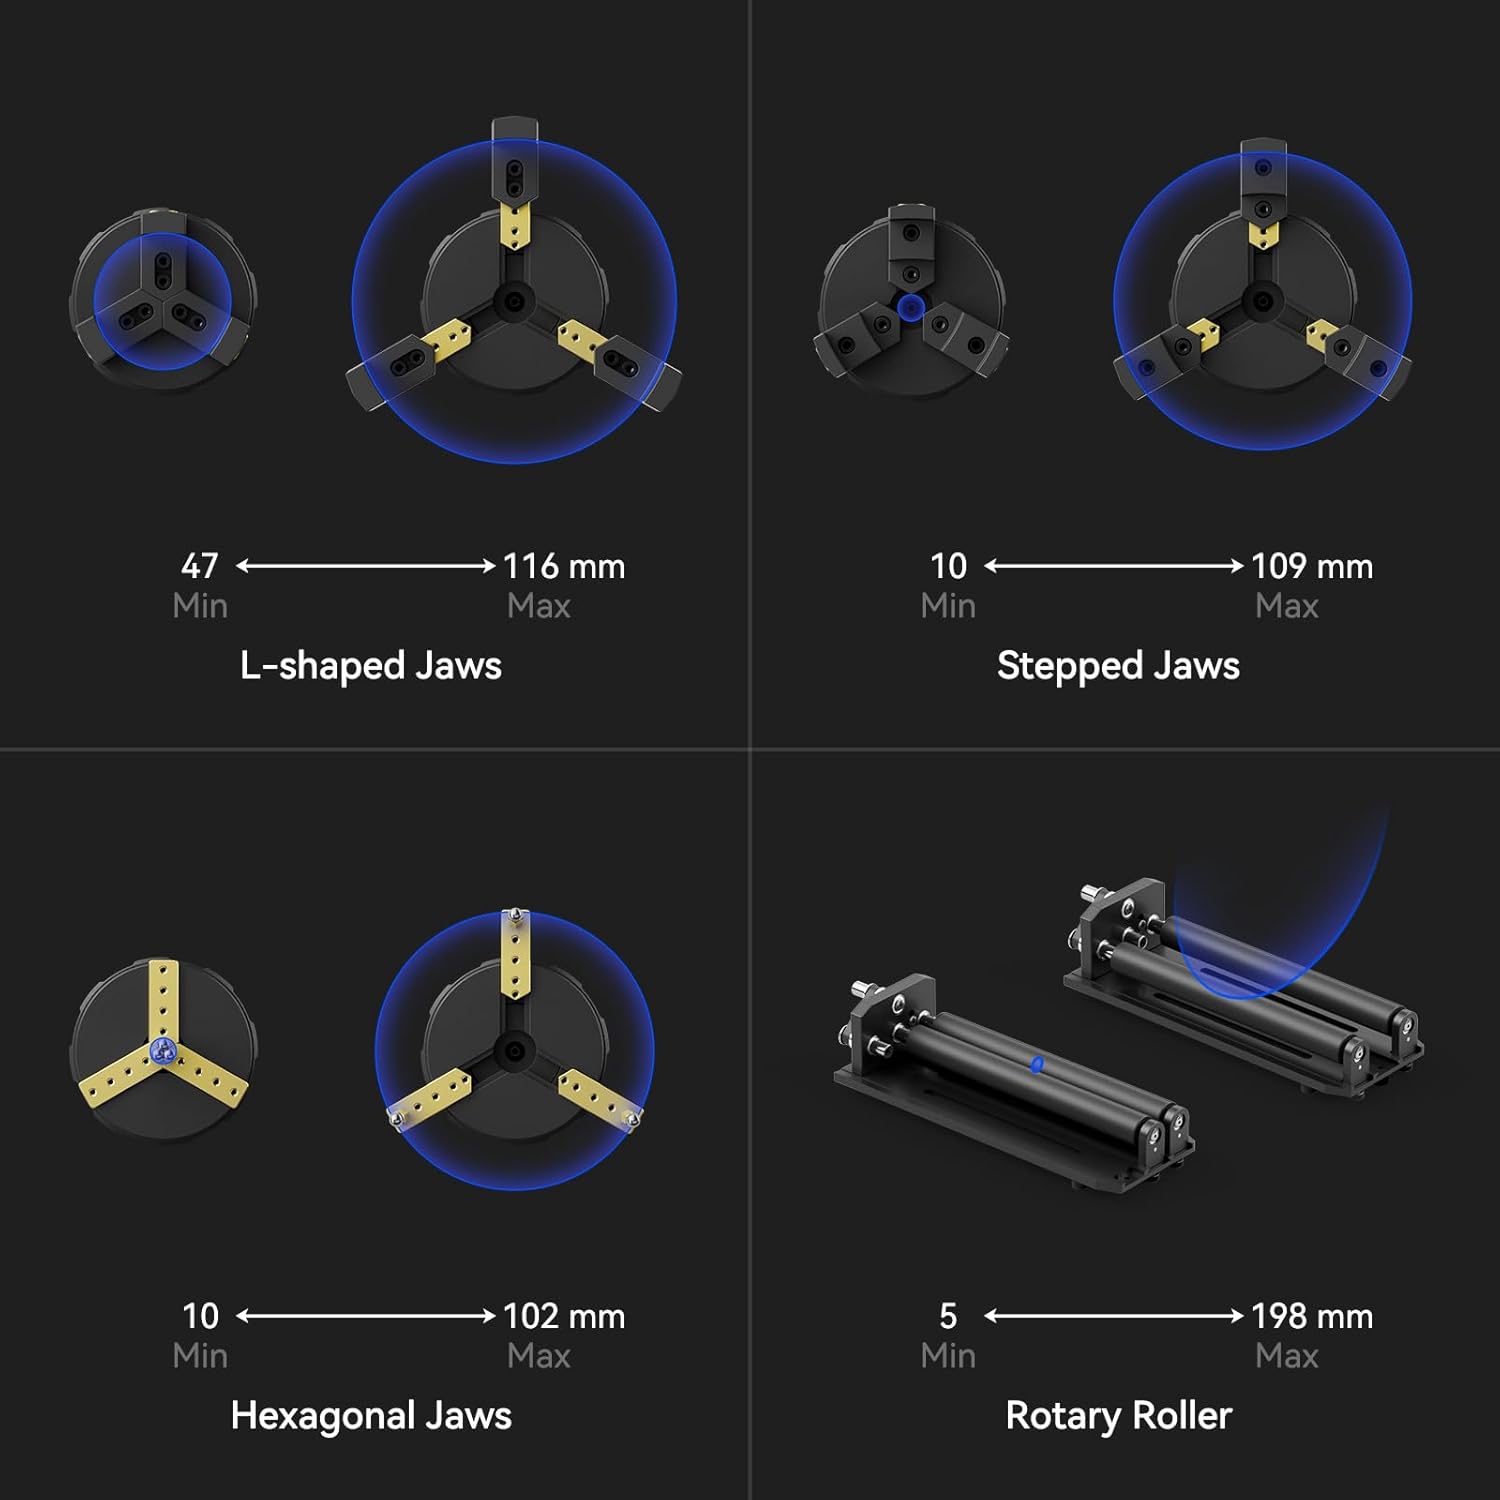
Image 4: Minimum and maximum dimensions for various jaw types and the rotary roller.
10. Garanzia e supporto
The SCULPFUN RA Pro Max Laser Rotary Roller comes with a standard manufacturer's warranty. For specific warranty details, technical support, or service inquiries, please contact SCULPFUN customer service directly. You can typically find contact information on the official SCULPFUN websito o tramite la tua piattaforma di acquisto.


