1. Introduzione
This manual provides essential information for setting up, operating, maintaining, and troubleshooting your HP Pro Mini 400 G9 MFF Mini PC. Please read this manual thoroughly before using your device to ensure proper functionality and longevity.
2. Cosa c'è nella scatola
Verificare che tutti gli articoli siano presenti nella confezione:
- HP Pro Mini 400 G9 MFF Mini PC
- Adattatore di alimentazione (90 W)
- Tastiera HP Wired Desktop 320K
- Mouse con cavo HP 125
- Vertical Stand (optional, may vary by region)
- Documentazione (Guida rapida, Informazioni sulla garanzia)
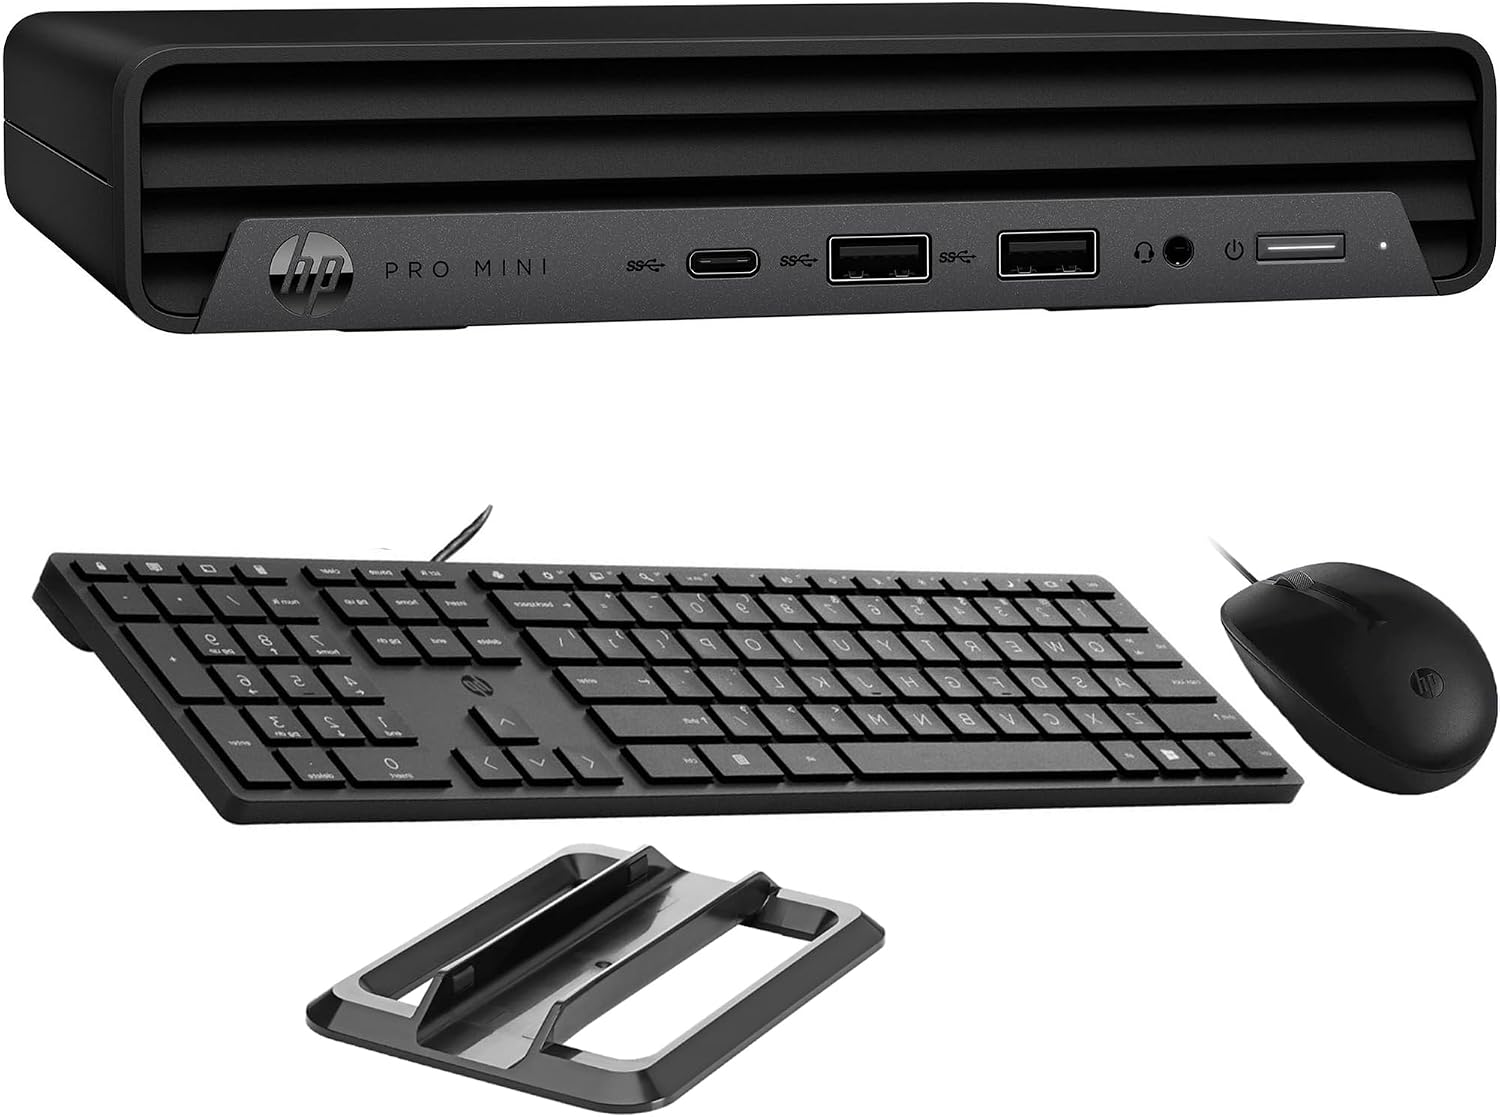
Image: HP Pro Mini 400 G9 Mini PC shown with its wired keyboard, wired mouse, and a vertical stand.
3. Fisico oltreview
3.1 Pannello frontale
The front panel provides easily accessible ports for common peripherals and power control.
- Pulsante di accensione: Per accendere o spegnere il PC.
- Jack combinato per cuffie/microfono: Per l'ingresso e l'uscita audio.
- SuperSpeed USB Type-A 10Gbps (Charging): For high-speed data transfer and charging devices.
- SuperSpeed USB Type-A 10Gbps: Per il trasferimento dati ad alta velocità.
- SuperSpeed USB Type-C 20Gbps: For ultra-high-speed data transfer and display output.

Immagine: Frontale view of the HP Pro Mini 400 G9, highlighting the power button, USB Type-A ports, USB Type-C port, and headphone/microphone combo jack.
3.2 Pannello posteriore
The rear panel contains ports for display, network, and additional USB devices.
- Connettore di alimentazione: Si collega all'adattatore di alimentazione esterno.
- Porta RJ-45 (Ethernet): Per la connessione di rete cablata.
- SuperSpeed USB Type-A 10Gbps: Per il trasferimento dati ad alta velocità.
- SuperSpeed USB Type-A 5Gbps (x2): Per il trasferimento dati standard.
- DisplayPort 1.4 (x2): Per collegare display esterni.
- HDMI 2.1: Per collegare display esterni.

Immagine: Posteriore view of the HP Pro Mini 400 G9, detailing the power connector, RJ-45 Ethernet port, various USB Type-A ports, two DisplayPort 1.4 ports, and one HDMI 2.1 port.
3.3 Diagramma dei porti
A comprehensive diagram illustrating all available ports on the HP Pro Mini 400 G9.
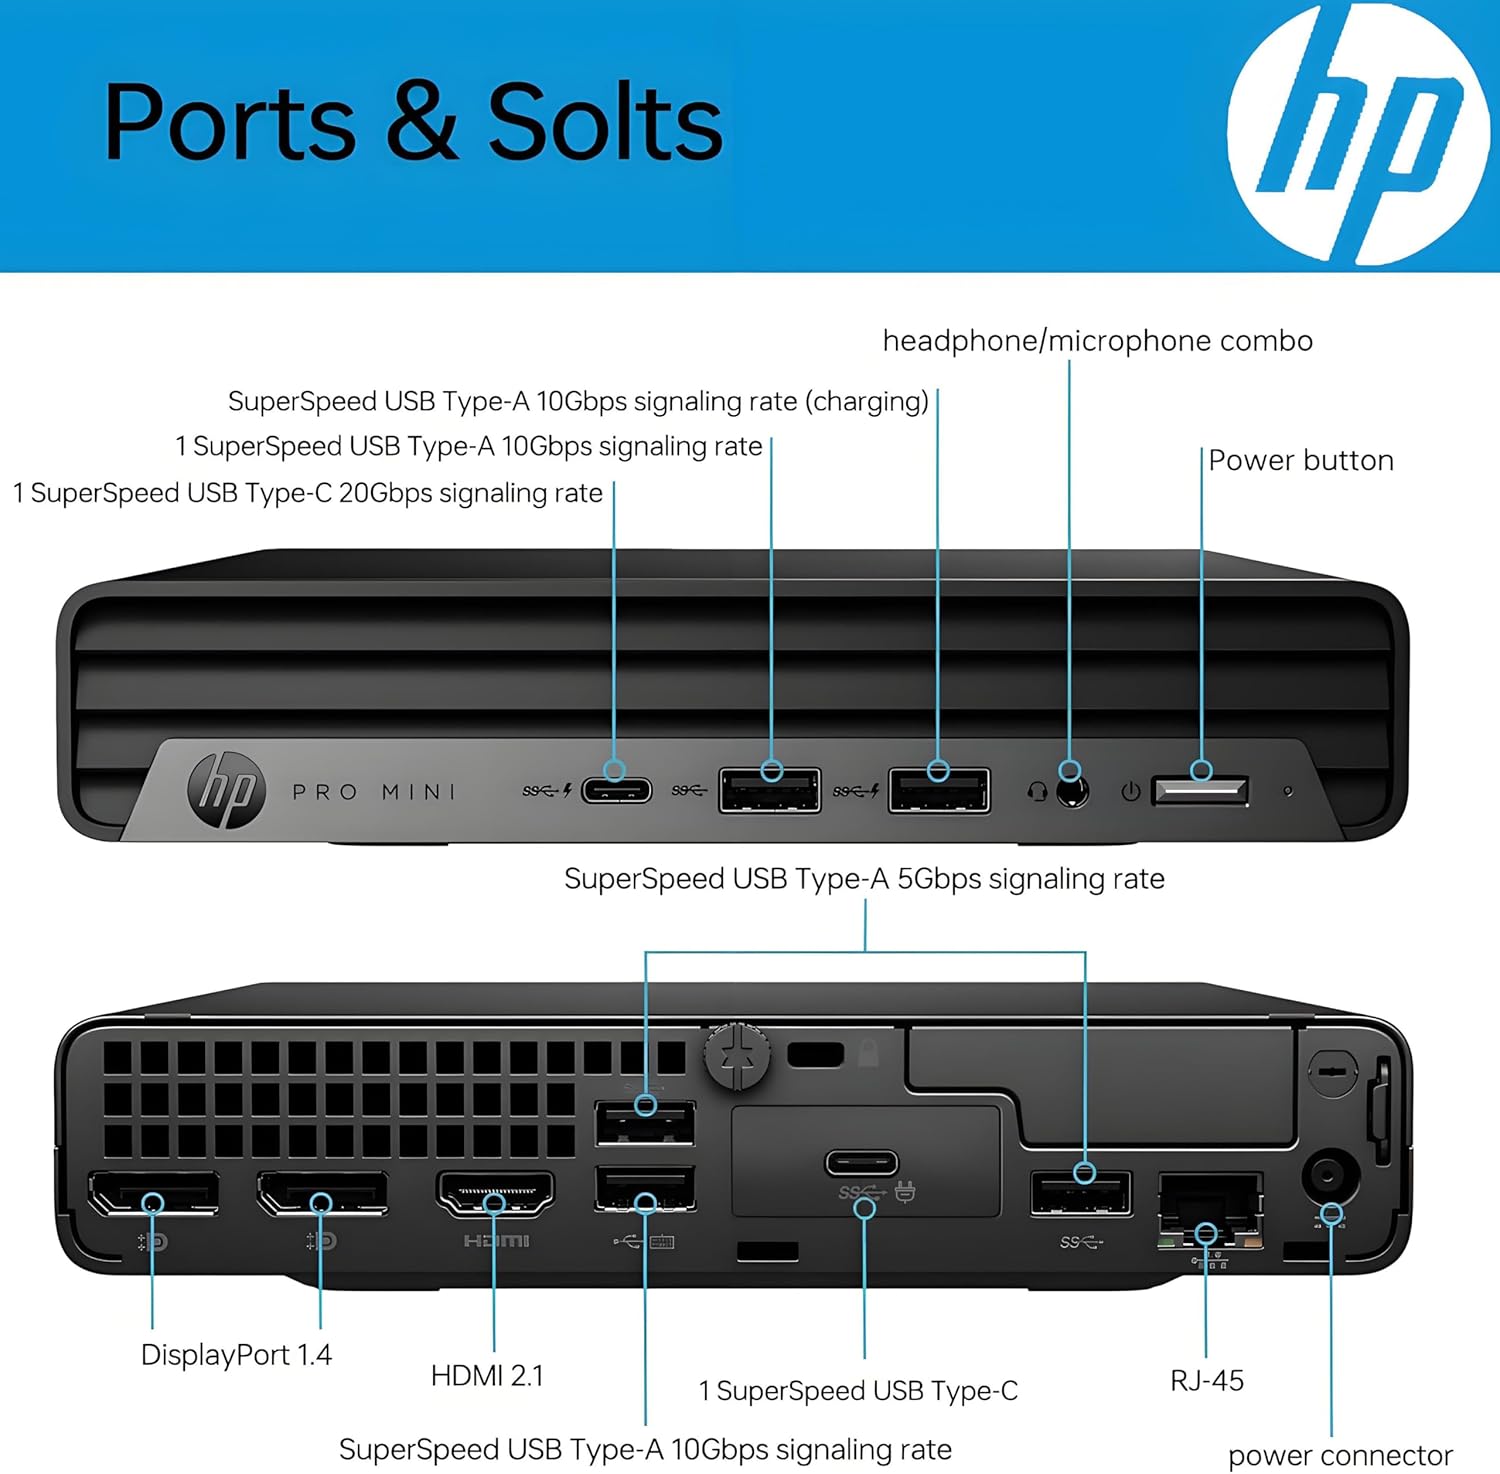
Image: Detailed diagram labeling each port on both the front and rear panels of the HP Pro Mini 400 G9 for easy identification.
3.4 Dimensioni e peso
The HP Pro Mini 400 G9 is designed for a compact footprint.
- Dimensioni (L x P x A): 6.97 x 6.89 x 1.34 pollici (17.7 x 17.5 x 3.4 cm)
- Peso: Circa 3.13 libbre (1.42 kg)

Image: The HP Pro Mini 400 G9 with its physical dimensions (width, depth, height) and weight clearly indicated.
4. Configurazione iniziale
Follow these steps to set up your HP Pro Mini 400 G9:
- Disimballare il PC: Estrarre con cautela il Mini PC e tutti gli accessori dalla confezione.
- Connetti le periferiche:
- Connect the wired keyboard and mouse to any available USB Type-A ports on the front or rear panel.
- Connect your monitor(s) to the DisplayPort or HDMI ports on the rear panel.
- Connettiti alla rete (facoltativo):
- For a wired connection, connect an Ethernet cable from your router/modem to the RJ-45 port on the rear panel.
- For wireless (Wi-Fi), the PC will prompt you to connect during Windows setup.
- Connetti alimentazione: Connect the power adapter cable to the power connector on the rear panel of the PC, then plug the power adapter into a wall outlet.
- Primo avvio: Press the power button on the front panel. The PC will start, and you will be guided through the Windows 11 Pro initial setup process.
5. Istruzioni per l'uso
5.1 Accensione/spegnimento
- Per accendere: Premere il pulsante di accensione sul pannello frontale.
- Spegnere: Fare clic sul pulsante Start in Windows, quindi selezionare Arresta il sistema > Arresta il sistema.
- Ricominciare: Fare clic sul pulsante Start in Windows, quindi selezionare Arresta > Riavvia.
- Per dormire: Fare clic sul pulsante Start in Windows, quindi selezionare Alimentazione > Sospensione.
5.2 Connessione a una rete wireless (Wi-Fi)
- Fare clic sull'icona Wi-Fi nella barra delle applicazioni (angolo in basso a destra dello schermo).
- Seleziona la rete Wi-Fi desiderata dall'elenco.
- Click 'Connect' and enter the network security key (password) if prompted.
5.3 Using USB and Display Ports
- Porte USB: Connect USB devices such as external hard drives, flash drives, printers, or other peripherals. The USB Type-C port supports data transfer and can also be used for display output with an appropriate adapter (sold separately).
- Display Ports (HDMI, DisplayPort): Connect up to three external monitors simultaneously for extended desktop or mirrored display configurations.
6. Manutenzione
Regular maintenance helps ensure optimal performance and extends the life of your Mini PC.
- Pulizia: Use a soft, dry cloth to clean the exterior of the PC. For dust accumulation in vents, use compressed air. Ensure the PC is powered off and unplugged before cleaning.
- Aggiornamenti software: Regularly check for and install Windows updates and HP driver updates to maintain system security and performance.
- Backup dei dati: Eseguire periodicamente il backup dei dati importanti su un'unità esterna o su un archivio cloud per evitare la perdita di dati.
- Ventilazione: Ensure the PC's vents are not obstructed to allow for proper airflow and prevent overheating.
7. Risoluzione Dei Problemi
Questa sezione affronta i problemi più comuni che potresti incontrare.
| Problema | Possibile soluzione |
|---|---|
| Il PC non si accende | Assicurarsi che l'adattatore di alimentazione sia collegato saldamente sia al PC sia a una presa di corrente funzionante. Testare la presa con un altro dispositivo. |
| Nessuna visualizzazione sul monitor | Check that the monitor is powered on and the video cable (HDMI/DisplayPort) is securely connected to both the PC and the monitor. Try a different video port or cable if available. |
| Nessuna connessione internet | For wired connection, check the Ethernet cable and router/modem status. For Wi-Fi, ensure Wi-Fi is enabled and you are connected to the correct network with the correct password. Restart your router/modem. |
| La tastiera o il mouse non rispondono | Ensure the USB cables for the keyboard and mouse are securely plugged into the PC. Try different USB ports. |
| Il sistema è lento o non risponde | Close unnecessary applications. Check Task Manager for high resource usage. Ensure Windows and drivers are up to date. Restart the PC. |
8. Specifiche tecniche
Key technical specifications for the HP Pro Mini 400 G9 MFF Mini PC (configuration may vary).
| Caratteristica | Specificazione |
|---|---|
| Sistema operativo | Windows 11 Pro |
| Processore | Intel 6-Core i5-12500T (up to 4.20 GHz) |
| Grafica | Grafica Intel UHD 770 integrata |
| Memoria RAM | RAM DDR8 da 4 GB (espandibile) |
| Magazzinaggio | 256GB PCIe NVMe TLC SSD (M.2) |
| Connettività wireless | Intel AX201 Wi-Fi 6 (2x2) and Bluetooth 5.2 combo |
| Porte anteriori | 1x Headphone/Microphone combo, 1x SuperSpeed USB Type-A 10Gbps (charging), 1x SuperSpeed USB Type-A 10Gbps, 1x SuperSpeed USB Type-C 20Gbps |
| Porte posteriori | 1x Power connector, 1x RJ-45, 1x SuperSpeed USB Type-A 10Gbps, 2x SuperSpeed USB Type-A 5Gbps, 2x DisplayPort 1.4, 1x HDMI 2.1 |
| Alimentazione elettrica | 90 W external power adapter |
| Dimensioni (L x P x A) | 6.97 x 6.89 x 1.34 pollici (17.7 x 17.5 x 3.4 cm) |
| Peso | Circa 3.13 libbre (1.42 kg) |
9. Garanzia e supporto
Your HP Pro Mini 400 G9 MFF Mini PC comes with a standard limited warranty. Please refer to the warranty documentation included in your product packaging for specific terms and conditions.
Per supporto tecnico, download di driver e ulteriori informazioni sul prodotto, visitare il sito ufficiale dell'assistenza HP websito:
You may also find helpful resources and community forums on the HP websito.