1. Configurazione e installazione
This section provides detailed instructions for the proper setup and installation of your CASAINC Frameless Glass Shower Door. Please follow all steps carefully to ensure safe and correct assembly.
1.1 Strumenti necessari
Prima di iniziare l'installazione, assicurarsi di disporre dei seguenti strumenti:
- Livello
- Screwdriver (various types may be needed)
- Trapano
- Martello
- Forbici
- Nastro di misurazione
- Pistola per calafataggio
- Saw (for cutting the track if necessary)
- Matita per segnare
1.2 Controlli pre-installazione
Ensure the shower base and surrounding walls are livello 100% before proceeding with installation. Use a level to verify the flatness of the installation surface.

Figure 1: Fully installed CASAINC Frameless Glass Shower Door.
1.3 Passaggi di installazione
Refer to the official installation video below for a visual guide to the process. Detailed steps are provided after the video.
Video 1: Official CASAINC Shower Door Installation Guide. This video demonstrates the complete installation process, from initial measurements to final sealing.
- Preparazione della pista:
The shower door is designed for versatile installation and can slide to the right or left. If necessary, the track can be cut to adjust the width between 44 and 48 inches. Ensure the internal buckle mechanism is in the correct position for proper soft-closing functionality. (Refer to video segments 0:10 - 0:34 for track orientation and buckle check).

Figure 2: Illustration of the concealed soft-closing mechanism within the track.

Figure 3: Guide for adjusting the upper guide rail based on installation width.
- Wall Channel Installation:
Position the wall channels and mark drilling points. Drill holes, insert anchors, and apply sealant before securing the channels to the wall. Ensure the channels are plumb and level. (Refer to video segments 0:40 - 1:00 for wall channel placement and drilling).
- Fixed Glass Panel Installation:
Carefully place the fixed glass panel into the installed wall channel and bottom track. Secure it using the provided hardware. Do not remove the glass corner protection until the entire installation is complete. (Refer to video segments 1:02 - 1:23 for fixed glass panel placement and securing).

Figure 4: The 10mm ANSI-certified laminated tempered glass is designed for safety, preventing shattering into sharp pieces.
- Sliding Glass Panel Installation:
Attach the rollers to the sliding glass panel. Carefully lift and hang the sliding panel onto the top track, ensuring the track hanger holes align with the glass holes. Adjust the soft-closing mechanism as needed. (Refer to video segments 2:10 - 2:43 for sliding panel installation and adjustment).

Figure 5: The shower door can be installed for either right or left opening, offering flexibility.
- Installazione della maniglia:
Install the 304 stainless steel handle onto the sliding glass panel. Ensure it is securely fastened. (Refer to video segments 3:09 - 3:13 for handle installation).
- Final Sealing:
Apply a continuous bead of silicone sealant along all exterior seams where the shower door meets the wall and shower base. Ensure a watertight seal. Allow 24 ore for the sealant to cure before using the shower. (Refer to video segments 3:34 - 3:40 for final sealing).
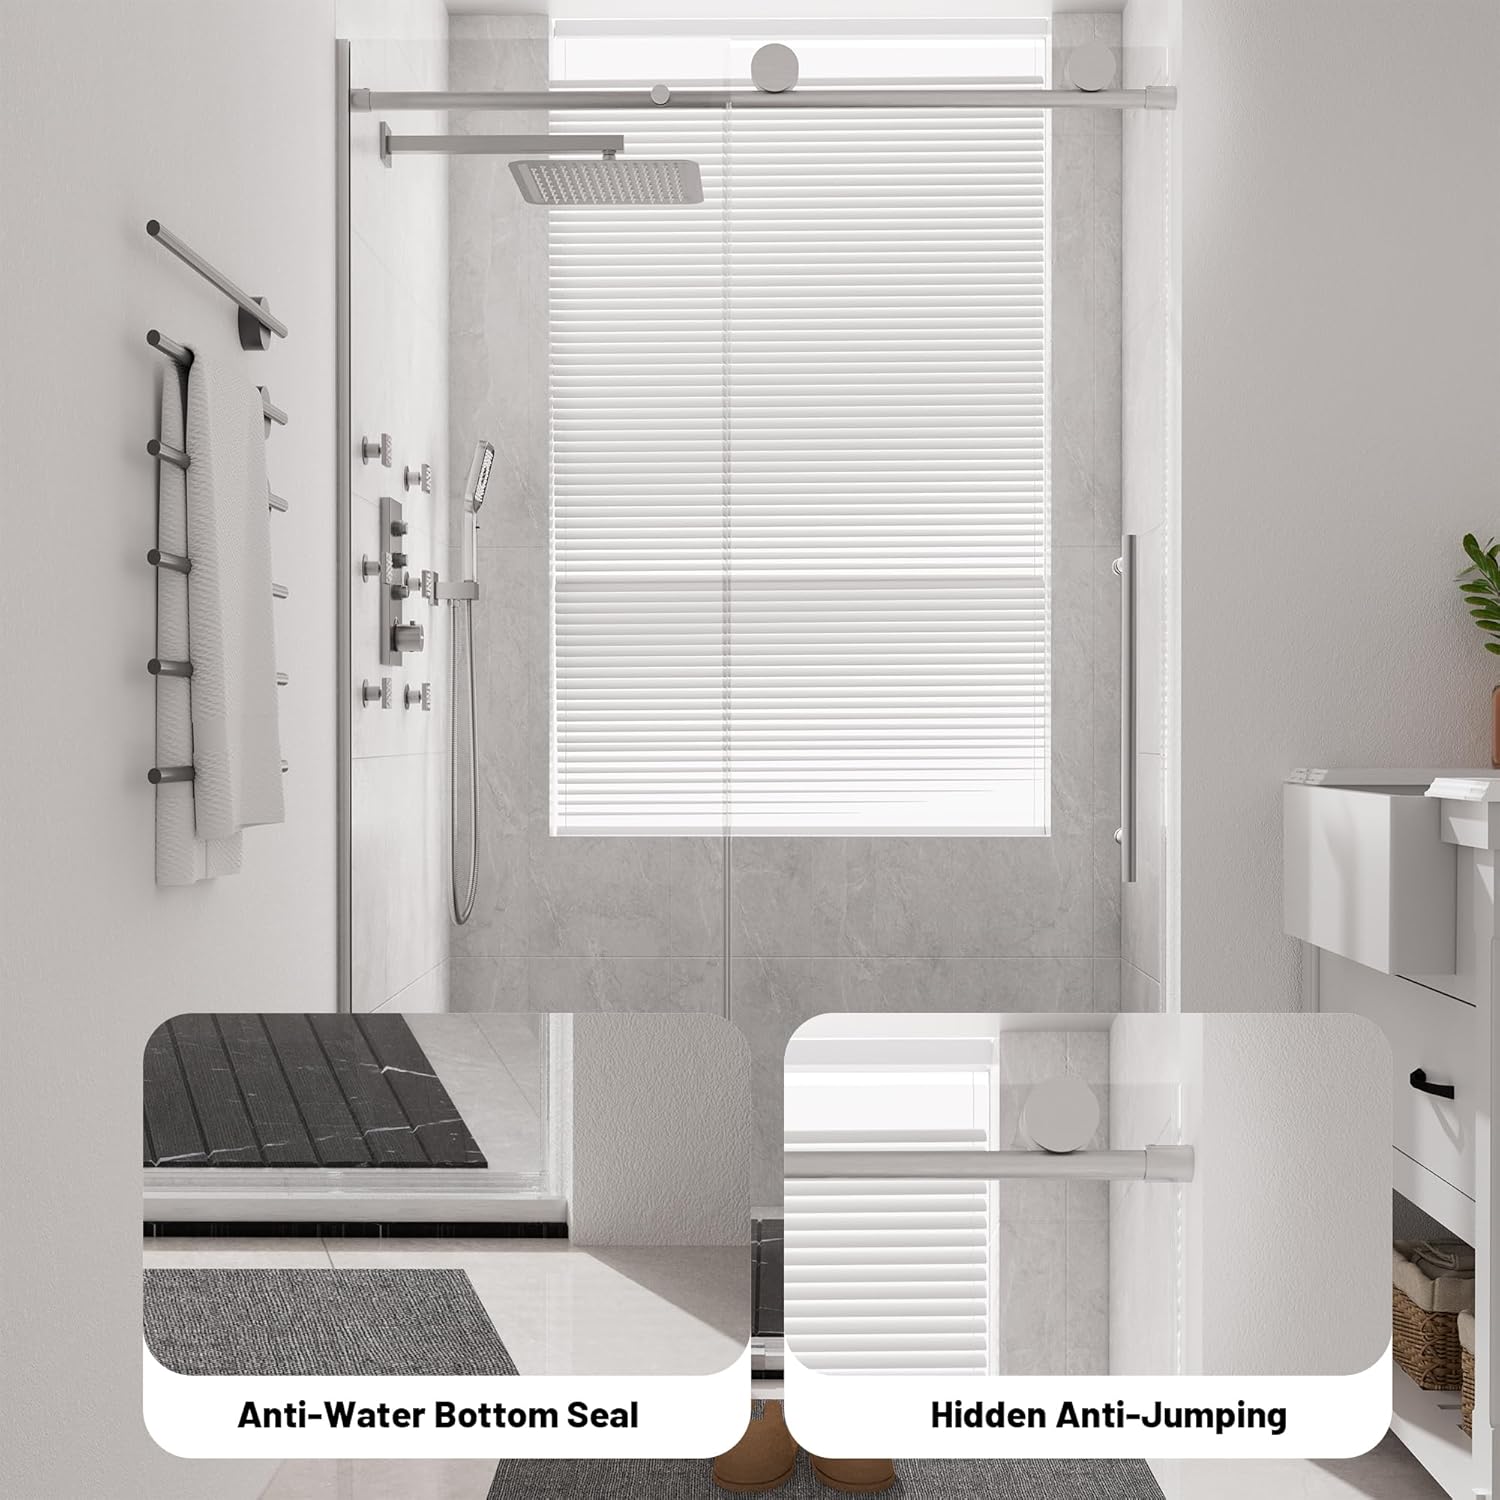
Figure 6: The anti-water bottom seal helps prevent leaks, keeping your bathroom dry.
2. Istruzioni per l'uso
Your CASAINC Frameless Glass Shower Door is designed for smooth and quiet operation.
- Apertura e chiusura: Gently slide the door along the top track. The advanced shock-absorbing design and concealed soft-closing functions ensure quiet and smooth movement, preventing abrupt stops or slamming.
- Anti-Jump Mechanism: The built-in anti-jump mechanism minimizes glass vibration, ensuring stability and reducing the risk of breakage during operation.
3. Manutenzione e cura
Una corretta manutenzione garantirà la longevità e l'aspetto impeccabile della porta della doccia.
- Pulizia del vetro: The 10mm ANSI-certified laminated tempered glass features a nano-coated surface that resists water spots, soap scum, and fingerprints. To clean, simply wipe with water and a mild detergent. Avoid abrasive cleaners or harsh scrubbing, as these can damage the coating. Regular cleaning will keep the glass sparkling like new.
- Cura dell'hardware: All hardware components are made from high-quality 304 stainless steel, ensuring excellent resistance to corrosion and rust. Wipe down metal components with a soft, damp cloth regularly to maintain their sleek and modern appearance.
- Ispezione della tenuta: Periodically inspect the sealing strips for any signs of wear or damage. Replace them if necessary to maintain the waterproof seal and prevent water leakage.
4. Risoluzione Dei Problemi
If you encounter any issues with your shower door, refer to the following common problems and their solutions:
| Problema | Possibile causa | Soluzione |
|---|---|---|
| Door not sliding smoothly or quietly. | Debris in the track, misaligned rollers, or issues with the soft-closing mechanism. | Clean the track thoroughly. Check roller alignment and adjust if necessary. Ensure the soft-closing mechanism is properly engaged and free of obstructions. |
| Water leakage from the shower area. | Damaged or improperly installed sealing strips, or insufficient sealant application. | Inspect all sealing strips and replace any that are worn or damaged. Reapply silicone sealant to any gaps or compromised areas, ensuring a continuous, watertight bead. |
| Glass panel appears unstable or wobbly. | Loose hardware or improper installation of fixed panels. | Check all screws and fasteners on both fixed and sliding panels, as well as wall channels, and tighten them securely. Ensure the anti-jump mechanism is correctly installed. |
5. Specifiche
Key specifications for the CASAINC Frameless Glass Shower Door:
- Marca: CASAINC
- Numero modello: CA-GLS1-4876BN1
- Colore: Nichel spazzolato
- Materiale: Stainless Steel, Laminated Tempered Glass
- Stile: Laminated Tempered Glass
- Peso dell'articolo: 174 libbre
- Dimensioni del prodotto: 0.38 x 48 x 76 inches (Thickness x Width x Height)
- Assemblaggio richiesto: SÌ

Figure 7: Detailed dimensions of the CASAINC Frameless Glass Shower Door.
6. Garanzia e supporto
CASAINC is committed to customer satisfaction. Your product is covered by a 30-day easy returns policy.
For any questions, technical assistance, or warranty claims, please contact CASAINC Customer Support through the retailer's platform or visit the official CASAINC websito per le informazioni di contatto.
Si consiglia di conservare la ricevuta d'acquisto come prova d'acquisto ai fini della garanzia.


