Introduzione
This manual provides detailed instructions for the safe and efficient installation, operation, and maintenance of your Tecmojo 6U Wall Mount Server Network Rack. Please read this manual thoroughly before beginning assembly or use to ensure proper functionality and safety.
Informazioni sulla sicurezza
- Durante l'installazione indossare sempre dispositivi di protezione individuale (DPI) adeguati.
- Ensure the mounting surface can support the combined weight of the rack and all installed equipment. This rack supports up to 176 lbs when wall-mounted.
- Use appropriate tools and follow all local building codes and safety regulations.
- Do not overload the rack. Distribute equipment weight evenly.
- Durante il montaggio, tenere bambini e animali domestici lontani dall'area di lavoro.
Contenuto della confezione
Prima di procedere con il montaggio, verificare che tutti i componenti elencati di seguito siano presenti e integri.
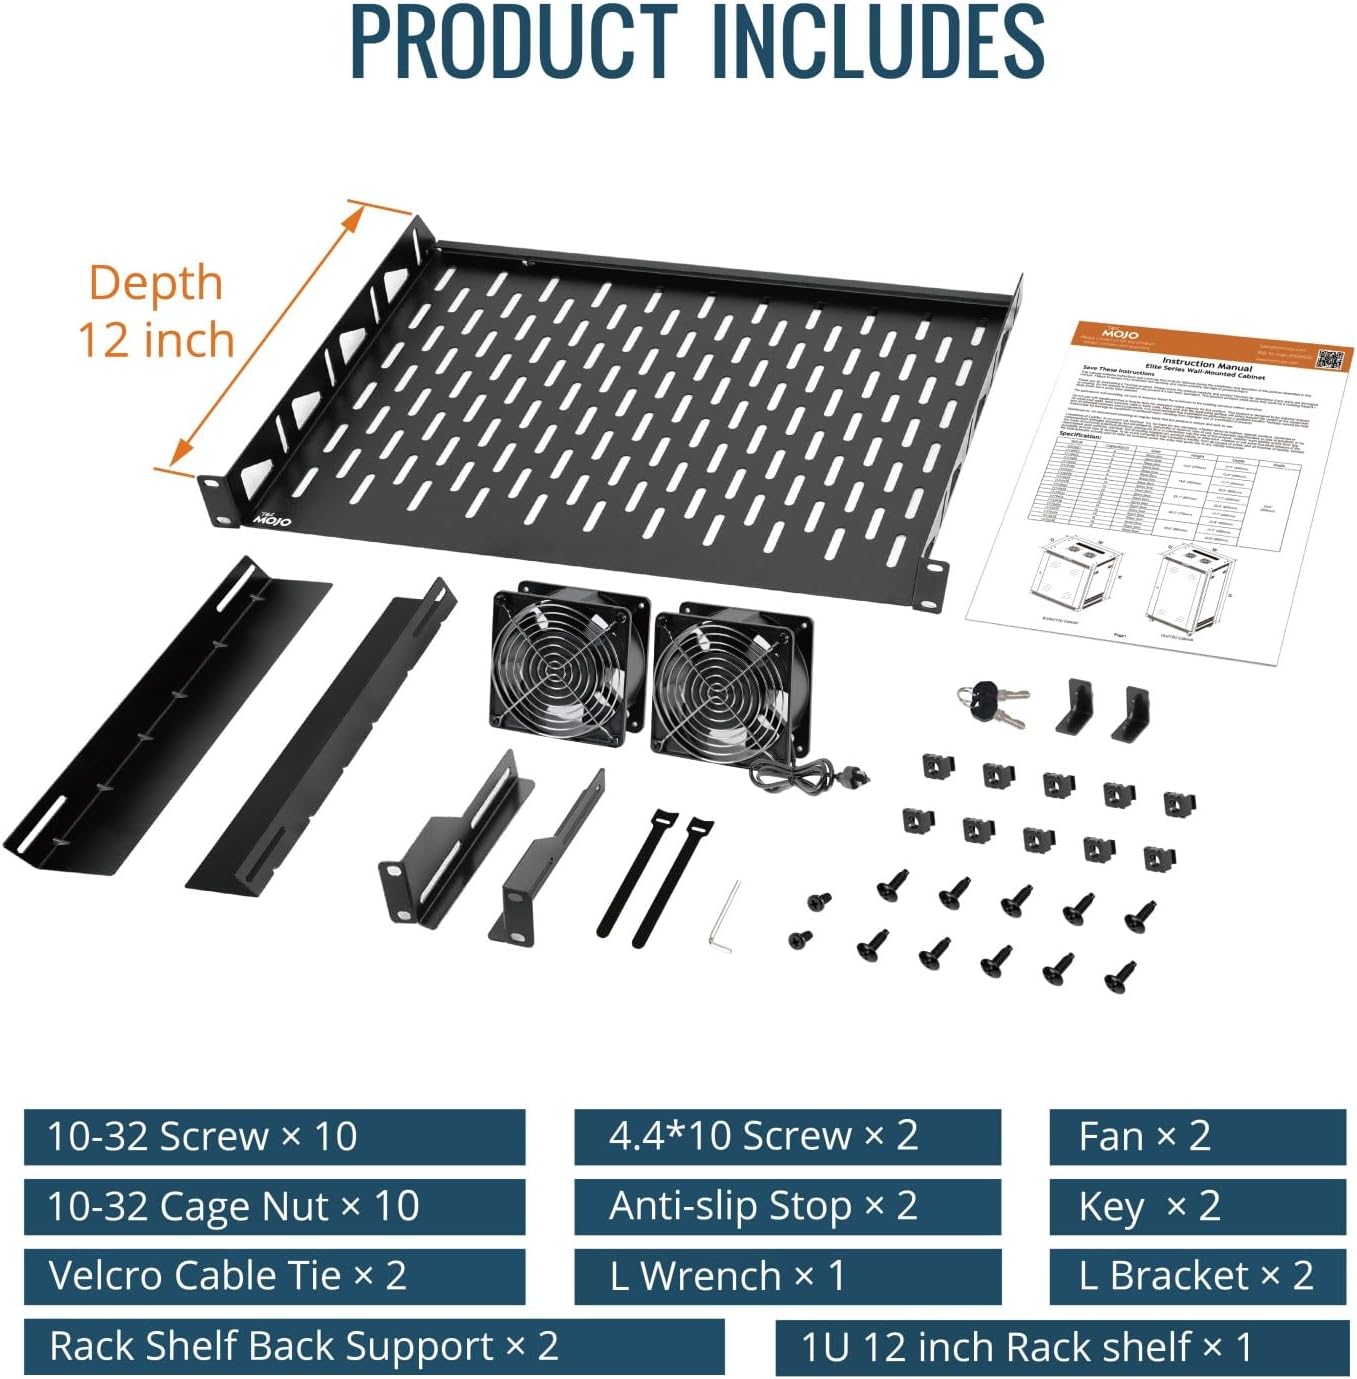
Image: All components included in the Tecmojo 6U Wall Mount Rack package. This includes various screws, cage nuts, Velcro cable ties, two cooling fans, L brackets, and a 1U 12-inch rack shelf.
- Pannello inferiore
- Top Cover (with pre-installed fans)
- Front Mesh Door
- Front Frames (2)
- Rack Rails (4)
- Pannelli laterali (2)
- Copertina posteriore
- 1U Cantilever Shelf
- Mounting Hardware (10-32 Screws, 10-32 Cage Nuts, 4.4*10 Screws, Anti-slip Stops, L Wrench, Keys)
- Velcro Cable Ties (2)
Configurazione e installazione
Follow these steps for assembling and mounting your Tecmojo 6U Wall Mount Server Network Rack.
Video Guide: Standard Wall Mount Cabinet Installation
Video: A detailed installation guide for the Tecmojo Standard Wall Mount Cabinet, demonstrating step-by-step assembly and mounting procedures.
Montaggio passo dopo passo
- Assemblare il telaio principale:
Attach the two front frames to the vented side of the bottom panel using the provided screws. Ensure they are securely fastened and aligned.

Image: The bottom panel and two vertical frame pieces are shown, illustrating the initial assembly of the rack's main structure.
- Attach the Back Cover:
Secure the back cover to the bottom panel and the two front frames. This forms the rear structure of the cabinet.
- Installare il coperchio superiore:
Place the top cover onto the assembled frame and fasten it with the provided screws. Verify all parts are correctly aligned and secured.
- Installare le guide del rack:
Install the four rack rails inside the cabinet. These rails can be adjusted to your desired depth and are compatible with both square and tapped holes for versatile equipment mounting.
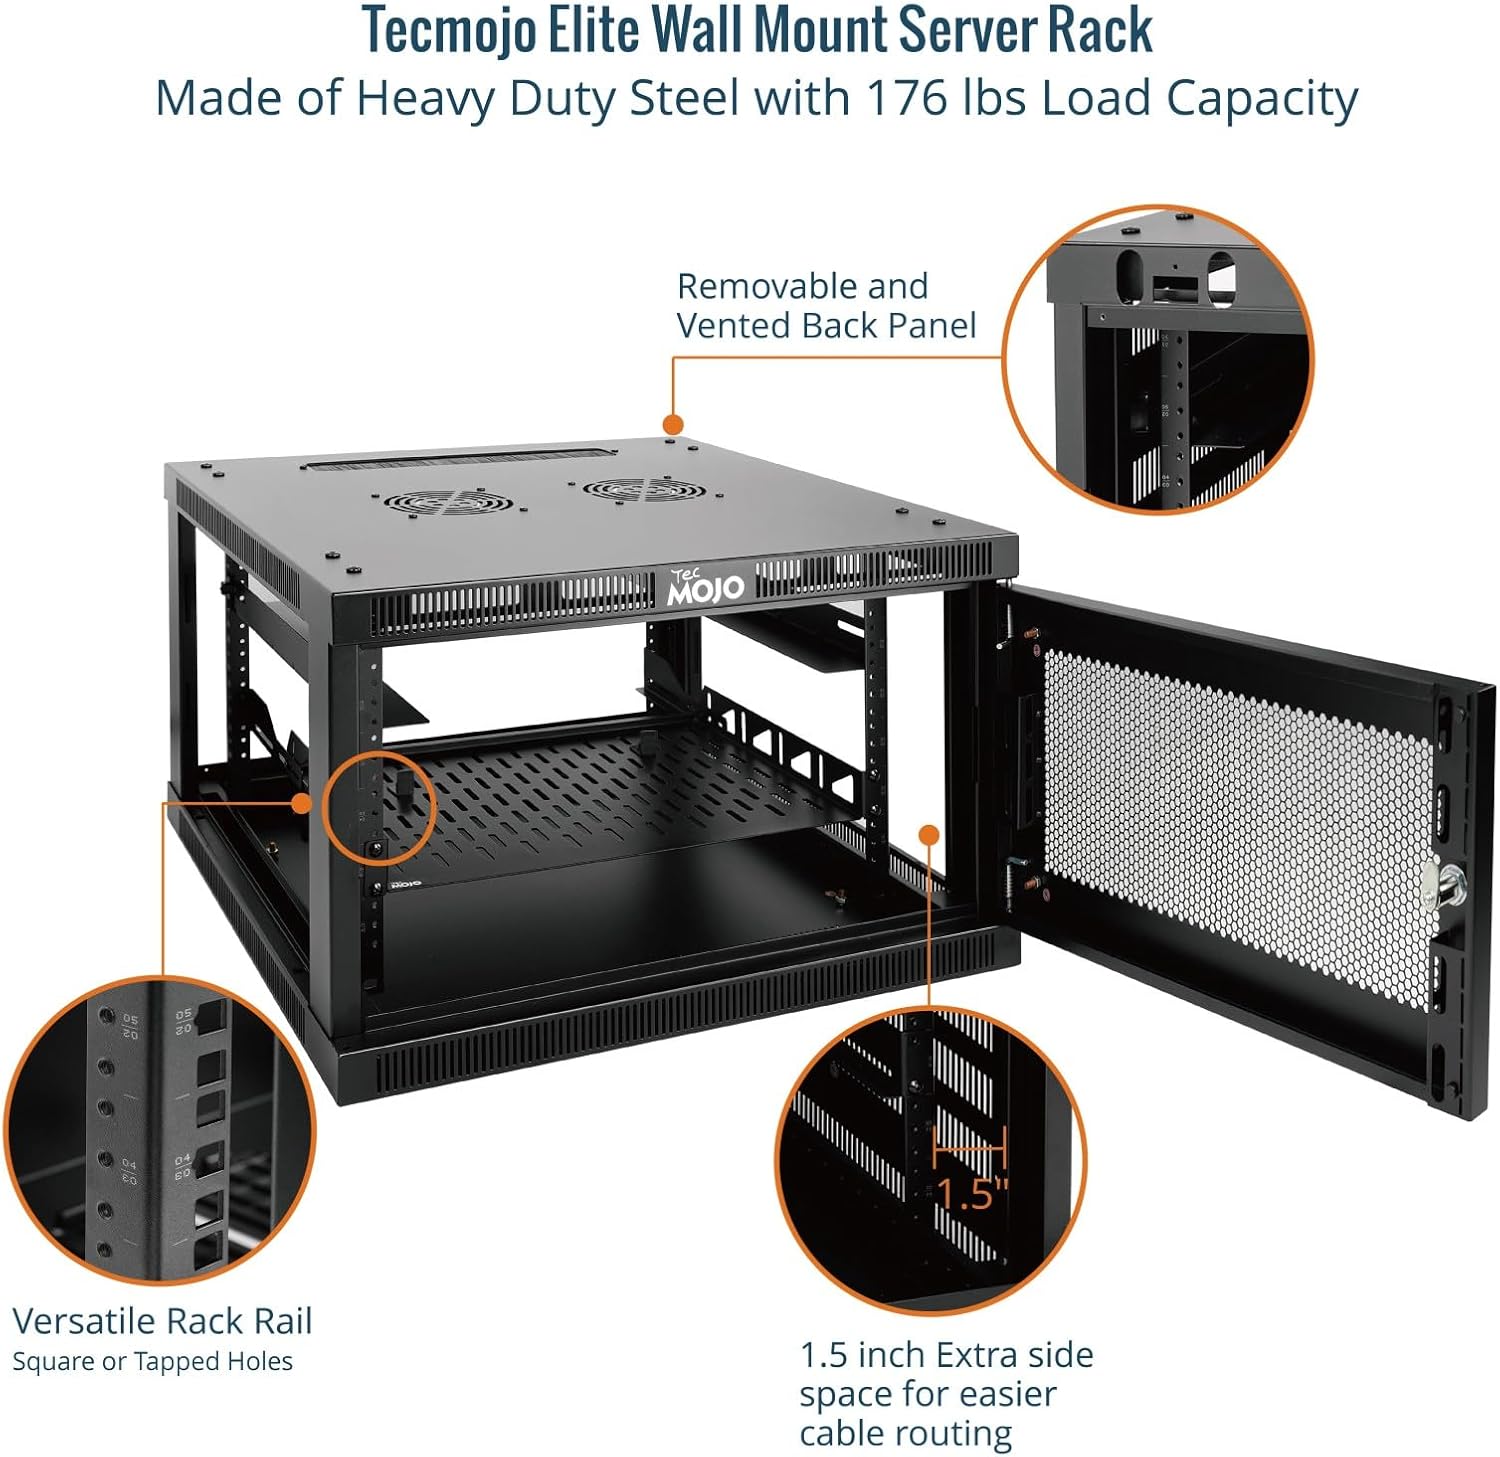
Immagine: Un interno view highlighting the versatile rack rails, which can accommodate square or tapped holes, and the 1.5-inch extra side space for cable routing.
- Assemblare i pannelli laterali:
Attach the two side panels to the main frame. These panels are lockable for enhanced security.
- Installare la porta d'ingresso:
Install the front mesh door. This door is reversible and lockable, providing security and airflow.

Image: The fully assembled Tecmojo 6U Wall Mount Rack with its mesh door, ready for installation.
- Install Cantilever Shelf:
Mount the 1U cantilever shelf inside the rack at your desired height to support non-rack equipment.
Montaggio a parete
Use the provided mounting hole drilling template to mark the positions on your wall. Ensure the wall is structurally sound to support the rack's weight. Secure the wall hanging panel to the wall using appropriate fasteners (not included, as wall types vary). Then, hang the assembled cabinet onto the wall hanging panel and secure it with screws.

Image: The Tecmojo Elite Wall Mount Server Cabinet highlighting key features such as top and bottom brush panels for cable management, two cooling fans, and lockable door and side panels for security.
Istruzioni per l'uso
Your Tecmojo 6U Wall Mount Server Network Rack is designed for optimal performance and security.
- Sistema di raffreddamento: The cabinet features dual top-mounted cooling fans for active ventilation. These fans help maintain an optimal temperature for your equipment.
- Sicurezza: The front mesh door and side panels are lockable to protect your valuable IT equipment from unauthorized access. Use the provided keys to secure the cabinet.
- Gestione dei cavi: Utilize the 1.5-inch extra side space and top/bottom brush panels for efficient cable routing and management, ensuring a tidy and organized setup.
- Controllo del termostato: This Elite Series cabinet includes a thermostat for precise temperature management. Adjust the thermostat to your preferred temperature to ensure optimal operating conditions for your equipment.
Video Guide: Tecmojo Elite Series Wall Mount Cabinet Features
Video: Un oltreview of the features of the Tecmojo Elite Series wall mount cabinet, including its thermostat control and robust design.
Manutenzione
- Pulizia: Regularly wipe down the exterior surfaces with a soft, damp stoffa. Evitare detergenti abrasivi.
- Ispezione della ventola: Periodically check the cooling fans for dust buildup and ensure they are operating correctly to maintain proper airflow. Clean fan blades gently if necessary.
- Controllo hardware: Controllare periodicamente tutte le viti e gli elementi di fissaggio per assicurarsi che siano ben serrati. Serrare nuovamente se si rilevano allentamenti.
- Door and Lock: Ensure the door hinges and locking mechanism operate smoothly. Lubricate if needed.
Risoluzione dei problemi
| Problema | Possibile causa | Soluzione |
|---|---|---|
| Difficulty with screw installation during assembly. | Misalignment of parts or tight threading. | Ensure proper alignment before tightening. Apply gentle pressure and turn slowly. For very tight threads, a small amount of lubricant can help. |
| Door does not close smoothly or requires force. | Cerniere o meccanismo di chiusura disallineati. | Check hinge alignment and adjust if necessary. Ensure the latch mechanism is free of obstructions and lubricate if stiff. |
| Cabinet feels unstable after wall mounting. | Improper wall fasteners or insufficient wall support. | Verify that the wall is suitable for mounting heavy loads. Use appropriate anchors and ensure all mounting screws are securely fastened into wall studs or robust anchors. Consult a professional if unsure. |
| Cooling fans are not operating. | Power issue or fan malfunction. | Check power connection to the fans. Ensure the thermostat is set to an appropriate temperature that would trigger fan operation. If issues persist, contact customer support. |
Specifiche

Image: Visual representation of the Tecmojo 6U Wall Mount Rack's dimensions and key specifications.
- Dimensioni del prodotto: 23.6"P x 23.6"L x 14.6"A
- Peso dell'articolo: 56.9 libbre
- Materiale: Alloy Steel (Heavy Duty Cold Rolled Steel)
- Misurare: 6U
- Profondità: 23.6 pollici
- Tipo di porta: Mesh Door (Reversible, Lockable)
- Capacità di carico: 176 lbs (wall-mounted), 350 lbs (floor-mounted)
- Compatibilità: Standard 19-inch rackmount devices
- Raffreddamento: Dual top-mounted cooling fans
- Sicurezza: Lockable front door and side panels
- Certificazioni: EIA/ECA-310-E, CE, PCI, HIPAA, NEMA Type-1 standards
Garanzia e supporto
For warranty information, technical support, or to purchase replacement parts, please visit the official Tecmojo websito o contattare il nostro servizio clienti. Conservare la ricevuta d'acquisto per eventuali reclami in garanzia.
Tecmojo Customer Service: Visit the Tecmojo Store