1. Introduzione
The SmallRig HawkLock Quick Release Cage Kit (Model 4825) is designed to enhance the functionality and protection of your Panasonic LUMIX GH7 or GH6 camera. This kit provides a robust framework for attaching various accessories, ensuring stable and efficient camera operation. It features a patented quick-release system, multiple mounting points, and integrated cable management for a streamlined setup.
2. Contenuto della confezione
Verifica che tutti gli articoli elencati di seguito siano inclusi nel tuo pacchetto:
- Gabbia x 1
- Cavo Clamp for HDMI & USB-C x 1
- Maniglia superiore x 1
- Hex Spanner x 1

Image: Contents of the SmallRig HawkLock Quick Release Cage Kit, including the camera cage, top handle, cable clamp, and hex spanner.
3. Caratteristiche principali
- Exclusive HawkLock Quick Release Structure: Patented self-developed quick-release system for solid, false-position-free attachment of HawkLock eco-accessories. Features one-push loading and release-to-lock functionality for improved disassembly efficiency.
- Seamless Slide-In Stabilizer Mount: Integrated Arca-Swiss quick release plate at the bottom of the cage allows direct, seamless insertion into compatible stabilizer brackets (e.g., DJI RS 2 / RSC 2 / RS 3 / RS 3 Pro / RS 4 / RS 4 Pro) without disassembly.
- Integrated Cable Clamp for HDMI & USB-C: A dedicated cable clamp secures HDMI and USB-C cables to the left side of the cage using a 1/4"-20 screw, preventing accidental disconnection and protecting camera ports.
- Multiple Mounting Points: Features various attachment options including 1/4"-20 threaded holes, 3/8"-16 ARRI locating holes, cold shoe mounts, NATO rails, and a QD socket. Compatible with a wide range of accessories such as monitor brackets (e.g., 2294, 2903B), handles, microphones, and fill lights.
- Built-in Magnetic Wrench: A magnetic flat-head screwdriver and hex spanner are integrated into the cage for convenient disassembly and assembly.
4. Impostazione
4.1. Camera Installation (Three-point Locking System)
- Before installing the cage kit, remove any triangular rings present on both sides of your Panasonic LUMIX GH7 / GH6 camera.
- Align the camera with the cage.
- Secure the camera using the 1/4"-20 screw at the bottom of the cage.
- Further secure the camera by tightening the M2.5 screws on both sides of the cage. This three-point locking system prevents camera deflection.

Image: Illustration of the three-point locking system for securing the camera within the cage, highlighting the bottom 1/4"-20 screw and side M2.5 screws.
4.2. Top Handle Attachment
Attach the included top handle to the cold shoe mount or 1/4"-20 threaded holes located on the top of the cage. Ensure it is securely fastened.
4.3. Cavo Clamp Installazione
The dedicated cable clamp for HDMI and USB-C is designed to prevent cable strain and accidental disconnection. Attach the clamp to the left side of the cage using the designated 1/4"-20 screw. Hand-tighten the screw to secure the cables once connected to the camera.
4.4. Stabilizer Mounting
The bottom of the cage features a built-in Arca-Swiss quick release plate. This allows for seamless and rapid mounting onto compatible stabilizer brackets, such as those for DJI RS 2 / RSC 2 / RS 3 / RS 3 Pro / RS 4 / RS 4 Pro, without requiring additional plates or disassembly.

Image: Demonstrates the seamless slide-in stabilizer mount feature, showing the cage being attached to an Arca-Swiss compatible stabilizer.
5. Istruzioni per l'uso
5.1. Using the HawkLock Quick Release
The patented HawkLock system allows for quick and secure attachment and detachment of compatible accessories. Simply push to load an accessory and release to lock it into place. This one-touch self-locking mechanism improves efficiency during setup and breakdown.

Immagine: Primo piano view of the HawkLock one-touch self-locking mechanism and the built-in magnetic wrench.
5.2. Utilizing Multiple Mounting Points
The cage is equipped with numerous 1/4"-20 threaded holes, 3/8"-16 ARRI locating holes, cold shoe mounts, NATO rails, and a QD socket. These allow for flexible attachment of various camera accessories such as external monitors, microphones, LED lights, and additional handles to customize your camera rig for different shooting scenarios.

Immagine: dettagliata view of the various mounting points on the cage, including 3/8"-16 ARRI locating holes, 1/4"-20 threaded holes, strap slots, QD socket, and cold shoe mounts.

Immagine: Examples of the cage kit being used in various shooting scenes, demonstrating the versatility of its mounting points for different accessories and setups.
5.3. Using the Built-in Magnetic Wrench
The integrated magnetic flat-head screwdriver and hex spanner are conveniently located within the cage. Use these tools for quick adjustments, tightening, or loosening of screws during setup or when modifying your rig.
6. Note di compatibilità
- The cage is compatible with Panasonic DMW-XLR1 / XLR2 audio units. However, the top handle included in this specific kit (Model 4825) is non compatible with these audio units.
- If you intend to use the Panasonic DMW-XLR1 / XLR2, it is recommended to use SmallRig Top Handle ID: 3082. Before attaching Top Handle 3082, ensure you remove the cable clamp located at the bottom of the XLR unit.
- If using the side lock of the expansion frame, remove the triangular rings on both sides of the camera first.
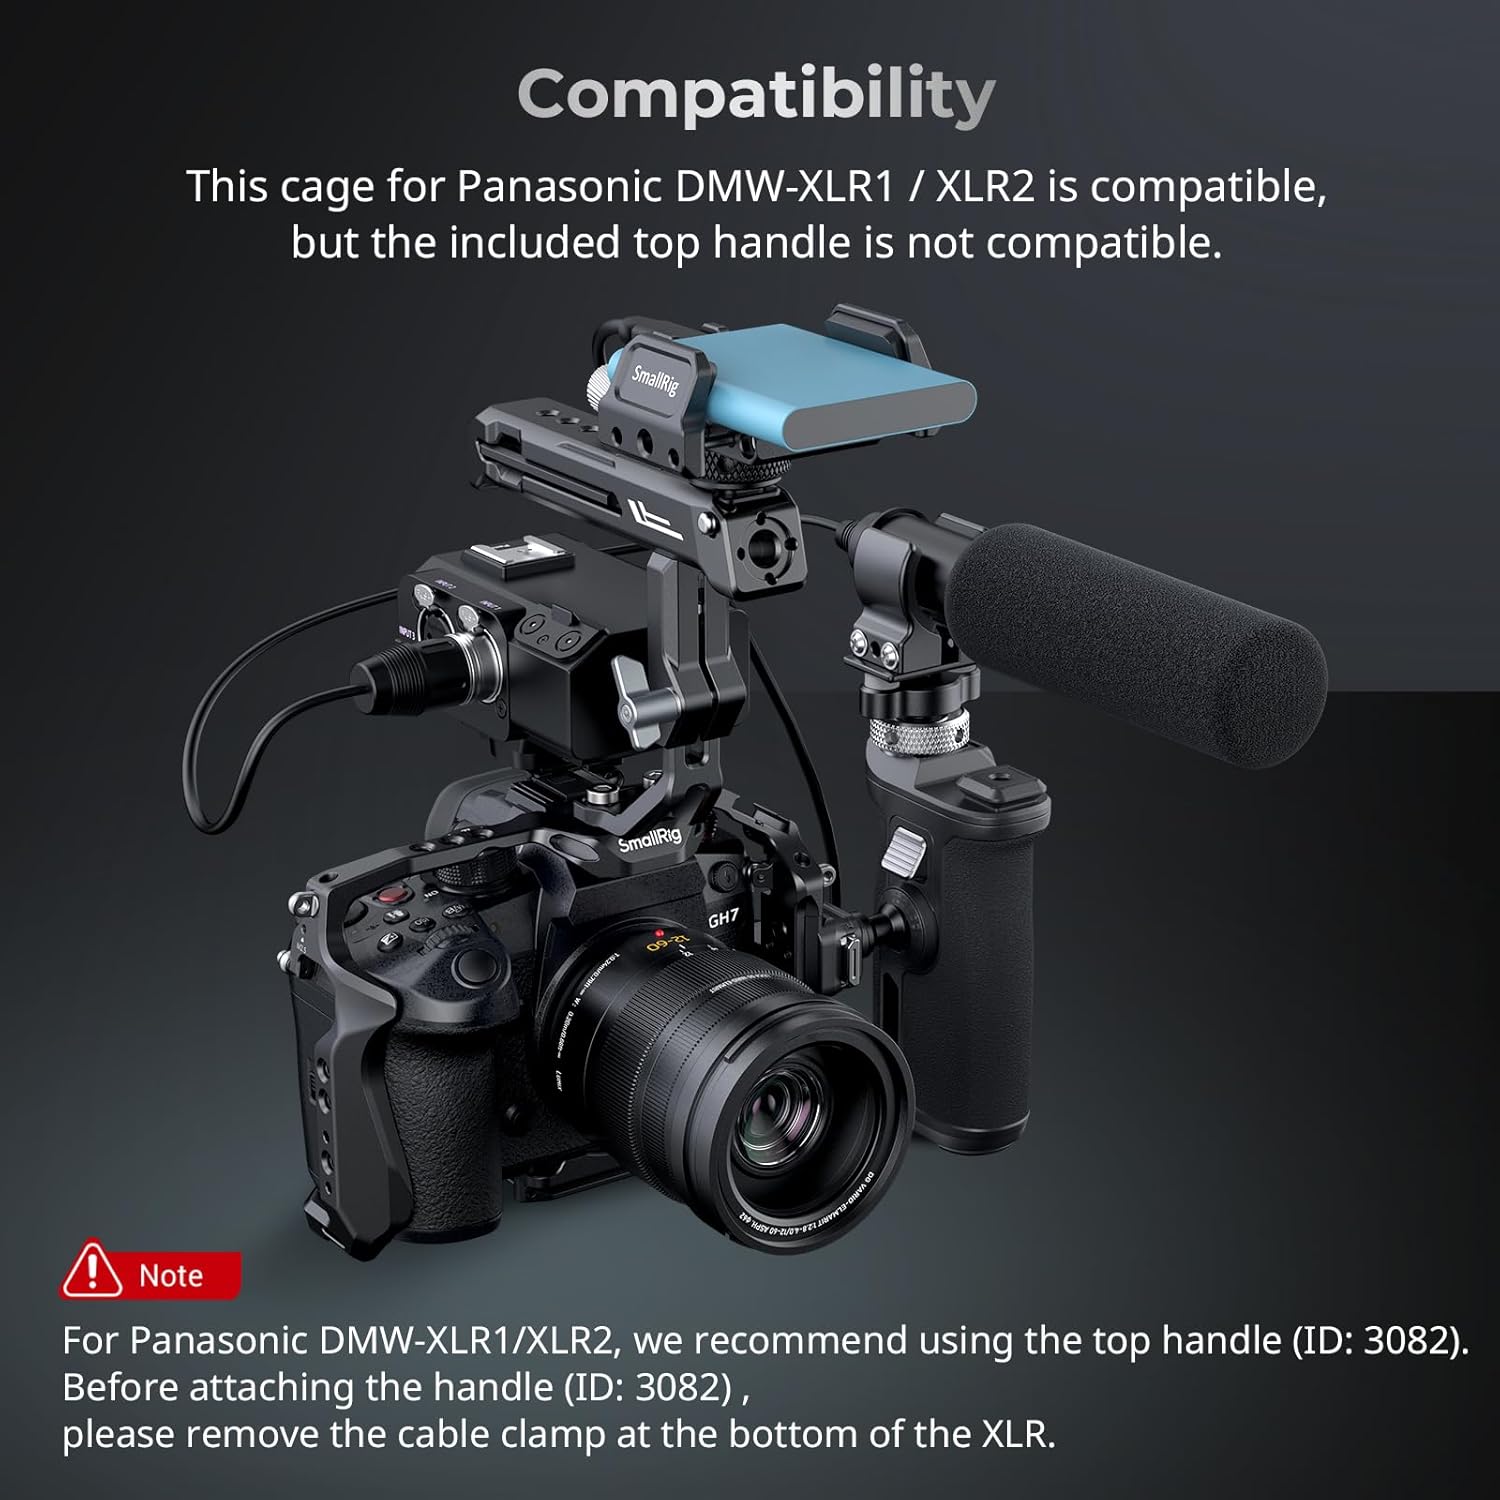
Image: Illustrates compatibility notes, specifically regarding the Panasonic DMW-XLR1 / XLR2 audio units and recommended alternative top handle.
7. Specifiche
| Numero di modello | 4825 |
| Dimensioni del prodotto | 7.2 x 6.87 x 5.31 pollici (183.0 x 174.5 x 135.0 mm) |
| Peso dell'articolo | 12 once (341 grammi) |
| Materiali | Lega di alluminio, acciaio inossidabile, silicone |
| Colore | Nero |
| Dispositivi compatibili | Fotocamera Panasonic LUMIX GH7 / GH6 |
8. Manutenzione
To ensure the longevity and optimal performance of your SmallRig HawkLock Quick Release Cage Kit, follow these maintenance guidelines:
- Regularly inspect all screws and mounting points for tightness. Use the built-in hex spanner to re-tighten any loose connections.
- Clean the cage and accessories with a soft, dry cloth. Avoid using harsh chemicals or abrasive materials that could damage the finish.
- Store the kit in a dry, dust-free environment when not in use.
- Periodically check the quick-release mechanisms for smooth operation and ensure they are free of debris.
9. Risoluzione Dei Problemi
- Problema: Camera feels loose within the cage.
Soluzione: Ensure all three locking points (bottom 1/4"-20 screw and two side M2.5 screws) are securely tightened. Verify that any triangular rings on the camera were removed prior to installation if using side locks. - Problema: Accessories are not securely attaching to mounting points.
Soluzione: Check that the accessory's screw or mount is compatible with the cage's mounting point (e.g., 1/4"-20, 3/8"-16, cold shoe). Ensure screws are fully tightened. For HawkLock accessories, confirm the quick-release mechanism is fully engaged. - Problema: HDMI/USB-C cables are disconnecting.
Soluzione: Verify the cable clamp is correctly installed and hand-tightened to secure the cables. - Problema: Access to certain camera buttons is obstructed.
Soluzione: While the cage is designed for full access, some camera models or specific button layouts might experience minor obstructions. Review your camera's button placement relative to the cage design. Adjust the camera's position within the cage if possible, or consider alternative accessory mounting points.
10. Garanzia e supporto
For warranty information, product support, or any inquiries regarding your SmallRig HawkLock Quick Release Cage Kit, please refer to the official SmallRig website or contact SmallRig customer service directly. Keep your purchase receipt for any warranty claims.


