1. Introduzione
This manual provides essential information for the safe and efficient operation of your TOPBULL 40A MPPT Solar Charge Controller. This device is designed to optimize power harvesting from your solar panels and efficiently charge various battery types in 12V or 24V systems. It features advanced Maximum Power Point Tracking (MPPT) technology, comprehensive protection functions, and a user-friendly LCD interface.

Immagine 1: anteriore view of the TOPBULL 40A MPPT Solar Charge Controller, showing the LCD display and control buttons.
2. Istruzioni di sicurezza
Please read all safety instructions carefully before installation and operation. Failure to follow these instructions may result in personal injury or damage to the controller or other components.
- Prima di applicare l'alimentazione, assicurarsi che tutti i collegamenti siano corretti e sicuri.
- Do not disassemble or attempt to repair the controller. Refer to qualified personnel for service.
- Installare il controller in un'area ben ventilata, lontano da materiali infiammabili e umidità.
- Collegare sempre prima la batteria al controller, poi al pannello solare e infine al carico. Scollegare seguendo l'ordine inverso.
- Quando si lavora con batterie e sistemi elettrici, indossare dispositivi di protezione individuale adeguati, tra cui protezioni per gli occhi.
- The controller includes multiple electronic protections such as reverse polarity, overcharge, over-discharge, overload, short-circuiting, TVS lightning, overpower, reverse current, and overtemperature protection. However, proper installation is crucial for optimal safety.
3. Contenuto della confezione
Verificare che tutti gli articoli siano presenti nel pacco:
- TOPBULL 40A MPPT Solar Charge Controller
- Viti di montaggio
- Manuale dell'utente (questo documento)

Image 2: Contents of the product package, showing the controller, user manual, and mounting hardware.
4. Prodotto finitoview
The TOPBULL 40A MPPT Solar Charge Controller features a clear LCD display and intuitive buttons for monitoring and configuration. It is equipped with terminals for solar panel input, battery connection, DC load output, and dual USB ports.
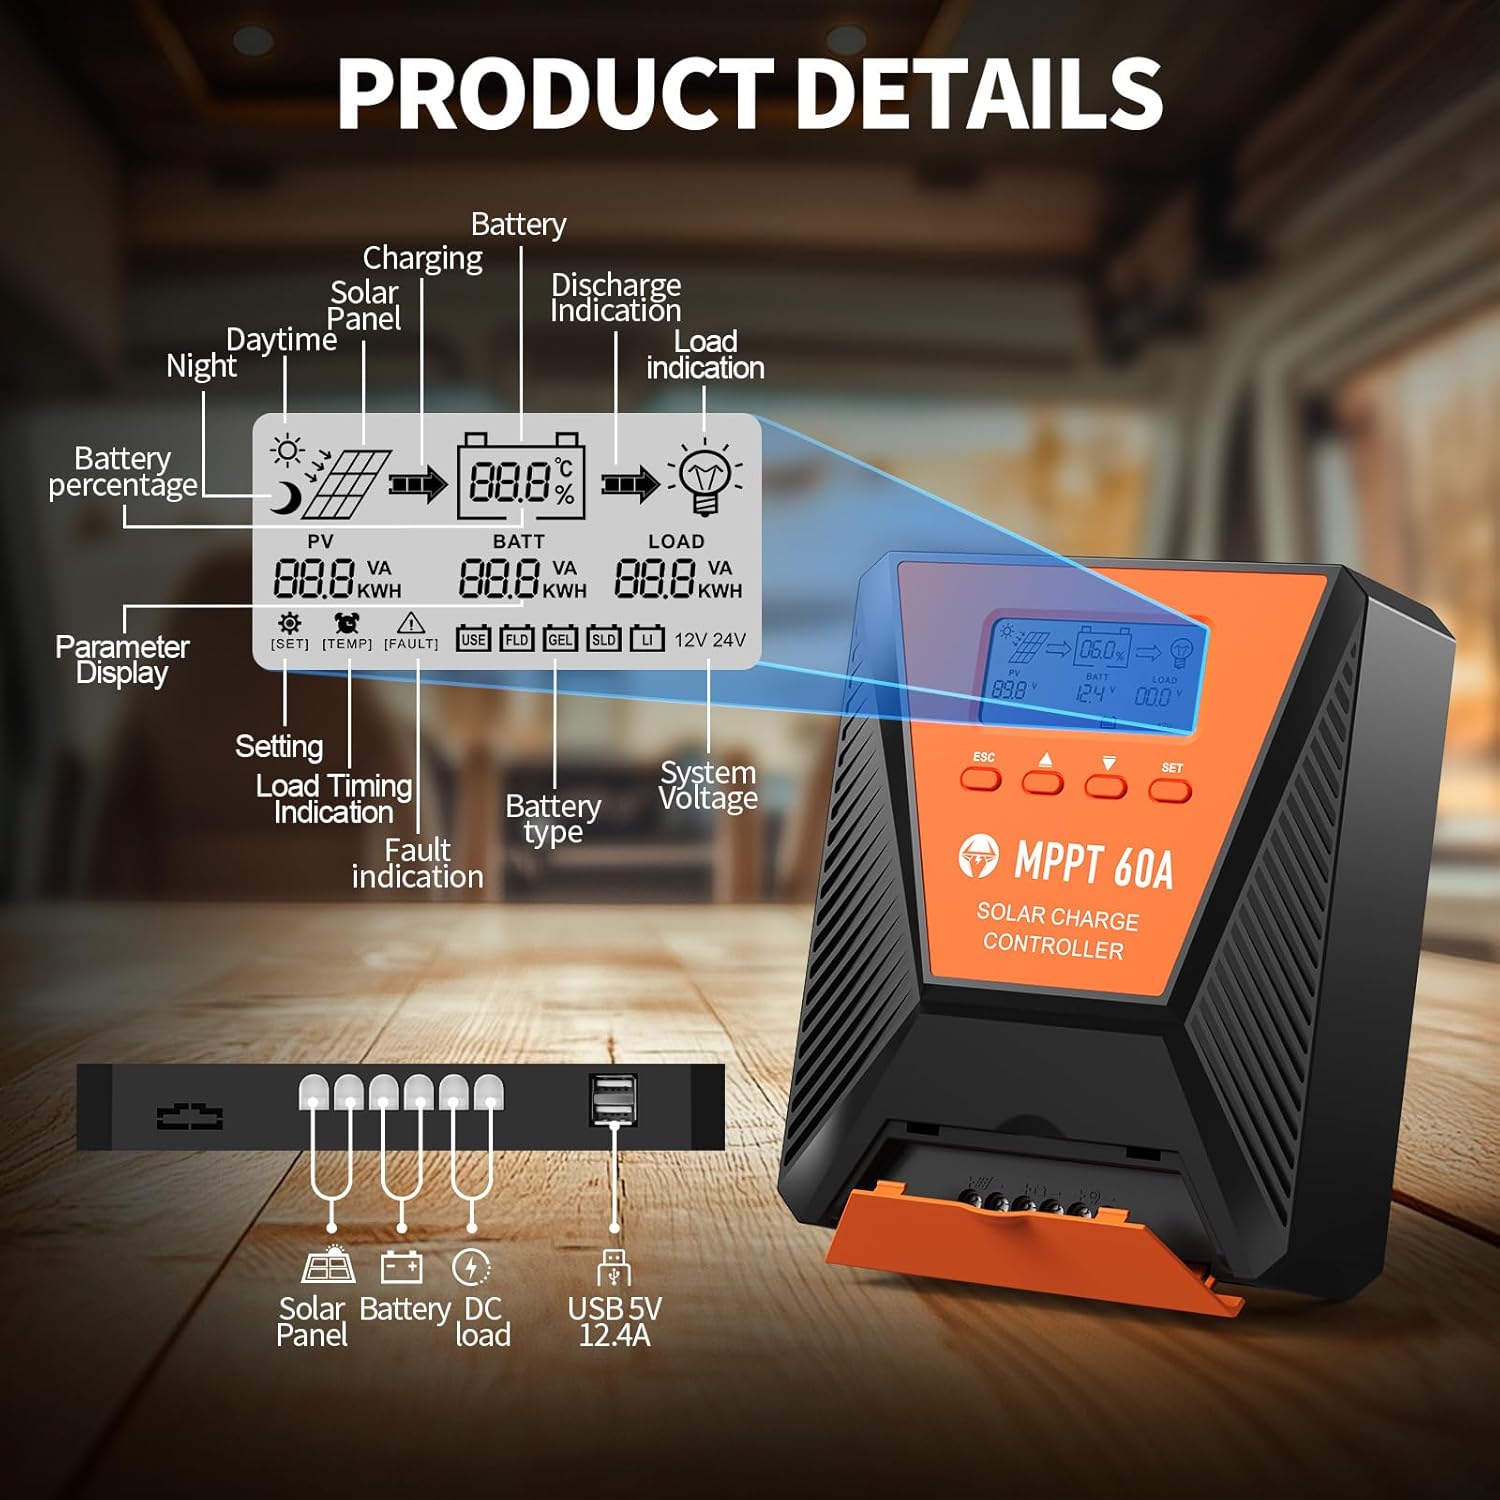
Immagine 3: Dettagliata view of the controller's LCD display, showing various indicators and parameters, along with the connection ports at the bottom.
Indicatori del display LCD:
- Reporter: Pannello solare voltage e potenza.
- BATTUTA: Volume della batteriatage, charge status, and type.
- CARICO: Load status and power.
- Percentuale batteriatage: Livello di carica attuale della batteria.
- Charging/Discharge Indication: Arrows indicating power flow.
- Indicazione di guasto: Error codes displayed if issues occur.
- Volume di sistematage: Automatically detected 12V or 24V.
Pulsanti di controllo:
- ESC: Exit menu or cancel setting.
- Frecce SU/GIÙ: Navigare nei menu o regolare i valori.
- IMPOSTATO: Enter menu or confirm setting.
5. Configurazione e installazione
Per una corretta installazione del regolatore di carica solare, seguire questi passaggi:
- Montaggio: Choose a suitable location for the controller, ensuring adequate ventilation and protection from direct sunlight, high temperatures, and moisture. Use the provided mounting screws to secure the controller.
- Collegamento della batteria: Connect the battery to the controller's battery terminals first. Ensure correct polarity (positive to positive, negative to negative). The controller will automatically detect the 12V or 24V system voltage.
- Connessione al pannello solare: Connect the solar panel to the controller's solar input terminals. Ensure correct polarity. The controller will begin charging the battery.
- Collegamento del carico CC (opzionale): Connect your DC loads to the load terminals. Ensure correct polarity.

Image 4: Connection diagram illustrating how to connect the solar panel, battery bank, inverter (for AC load), and DC load to the MPPT controller.
The controller supports various deep cycle battery types, including FLD, LiFePO4, SLD, GEL, and AGM. It also supports 0V lithium battery charging (lithium battery activation function).

Image 5: The controller is compatible with various 12V/24V battery types, automatically identifying voltage and supporting custom parameters and 0V lithium battery charging.
6. Istruzioni per l'uso
LCD Display and Parameter Settings:
The LCD display provides real-time information about your solar charging system. Use the four buttons (ESC, UP, DOWN, SET) to navigate menus and adjust parameters.
- Premere IMPOSTATO per accedere al menu principale.
- Utilizzo SU/GIÙ to scroll through options such as battery type, load timer settings, and other customizable parameters.
- Premere IMPOSTATO again to select an option and then use SU/GIÙ per modificare i valori.
- Premere IMPOSTATO per confermare le modifiche, o ESC per uscire senza salvare.
Processo di ricarica:
The controller utilizes a smart 4-stage processo di ricarica per ottimizzare la salute e la longevità della batteria:
- Carica alla rinfusa: Ricarica rapida per portare la batteria a circa l'80% della capacità.
- Carica di assorbimento: Charging at a constant voltage to bring the battery to 100% capacity.
- Carica galleggiante: Maintaining the battery at full charge with a lower voltage.
- Equalization Charge (for specific battery types): Periodically overcharging to balance cell voltages.
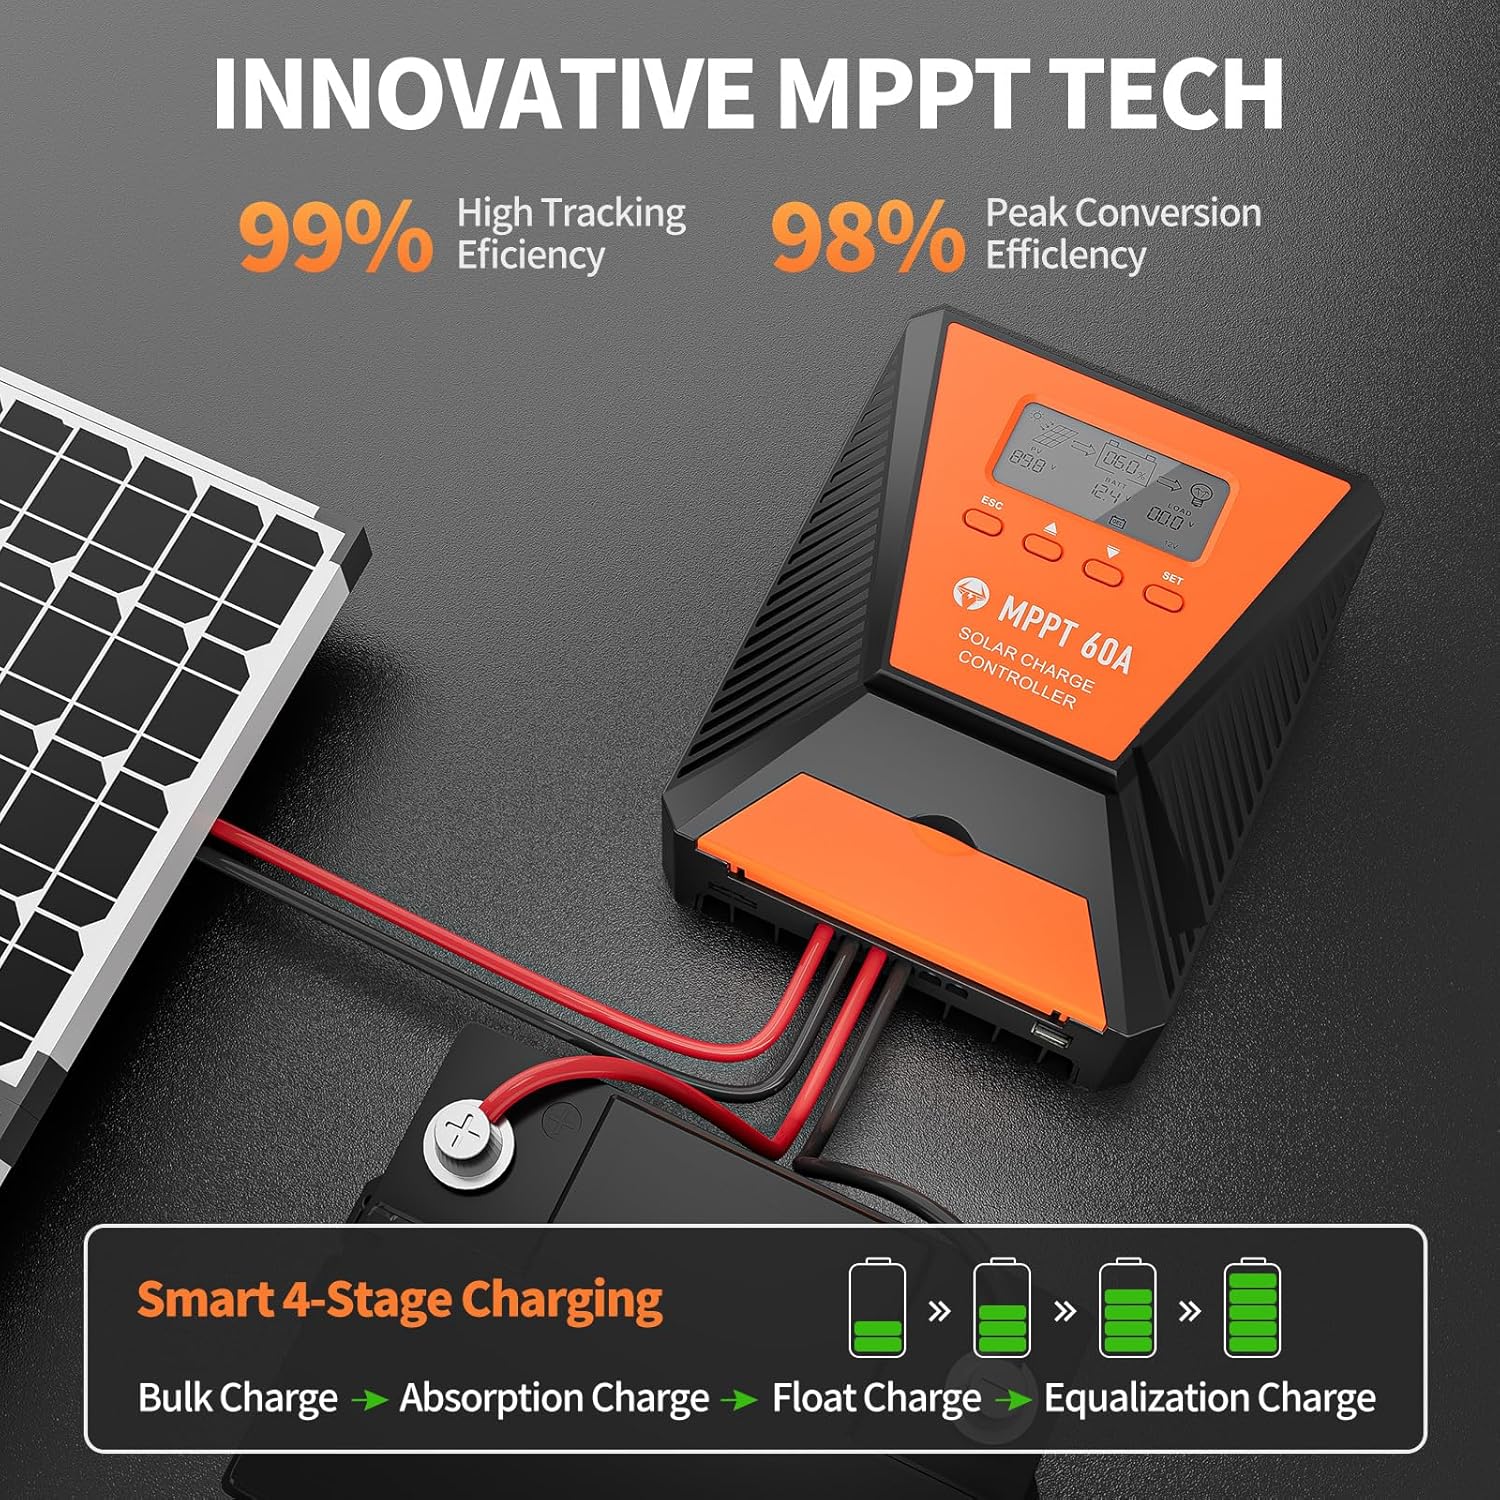
Image 6: The controller features 99% high tracking efficiency and 98% peak conversion efficiency, along with a smart 4-stage processo di ricarica.
Ricarica USB:
The controller includes dual USB ports for charging electronic devices. These ports provide 5V DC output.
7. Manutenzione
Regular maintenance ensures optimal performance and extends the lifespan of your solar charge controller and battery system.
- Controllare le connessioni: Controllare periodicamente tutti i collegamenti elettrici per verificarne la tenuta e la corrosione.
- Controller pulito: Mantenere il controller pulito e privo di polvere e detriti. Utilizzare un panno asciutto per la pulizia.
- Ventilazione: Ensure the installation area remains well-ventilated to prevent overheating. The controller is designed with a metal case and dual high-speed intelligent fans for enhanced heat dissipation.
- Ispezione della batteria: Seguire le linee guida di manutenzione del produttore per il tipo specifico di batteria.
- Compensazione della temperatura: The controller features a temperature compensation function that automatically adjusts charging and discharging parameters to prolong battery life.
8. Risoluzione Dei Problemi
If you encounter issues with your controller, refer to the LCD display for error codes and consult the following common troubleshooting steps:
- Nessuna visualizzazione: Controllare i collegamenti della batteria e assicurarsi che la batteria abbia una tensione sufficientetage.
- Nessuna ricarica: Verify solar panel connections and ensure adequate sunlight. Check for any fault indications on the LCD.
- Carico non funzionante: Check load connections and ensure the load is within the controller's rated capacity. Verify load timer settings.
- Codici di errore: The LCD display will show specific error codes for various issues (e.g., overvoltage, sottovoltage, overtemperature, short circuit). Refer to the controller's internal error code list (if provided in a separate document) for detailed explanations and solutions.
The controller incorporates 9 intelligent protection features to safeguard your system:
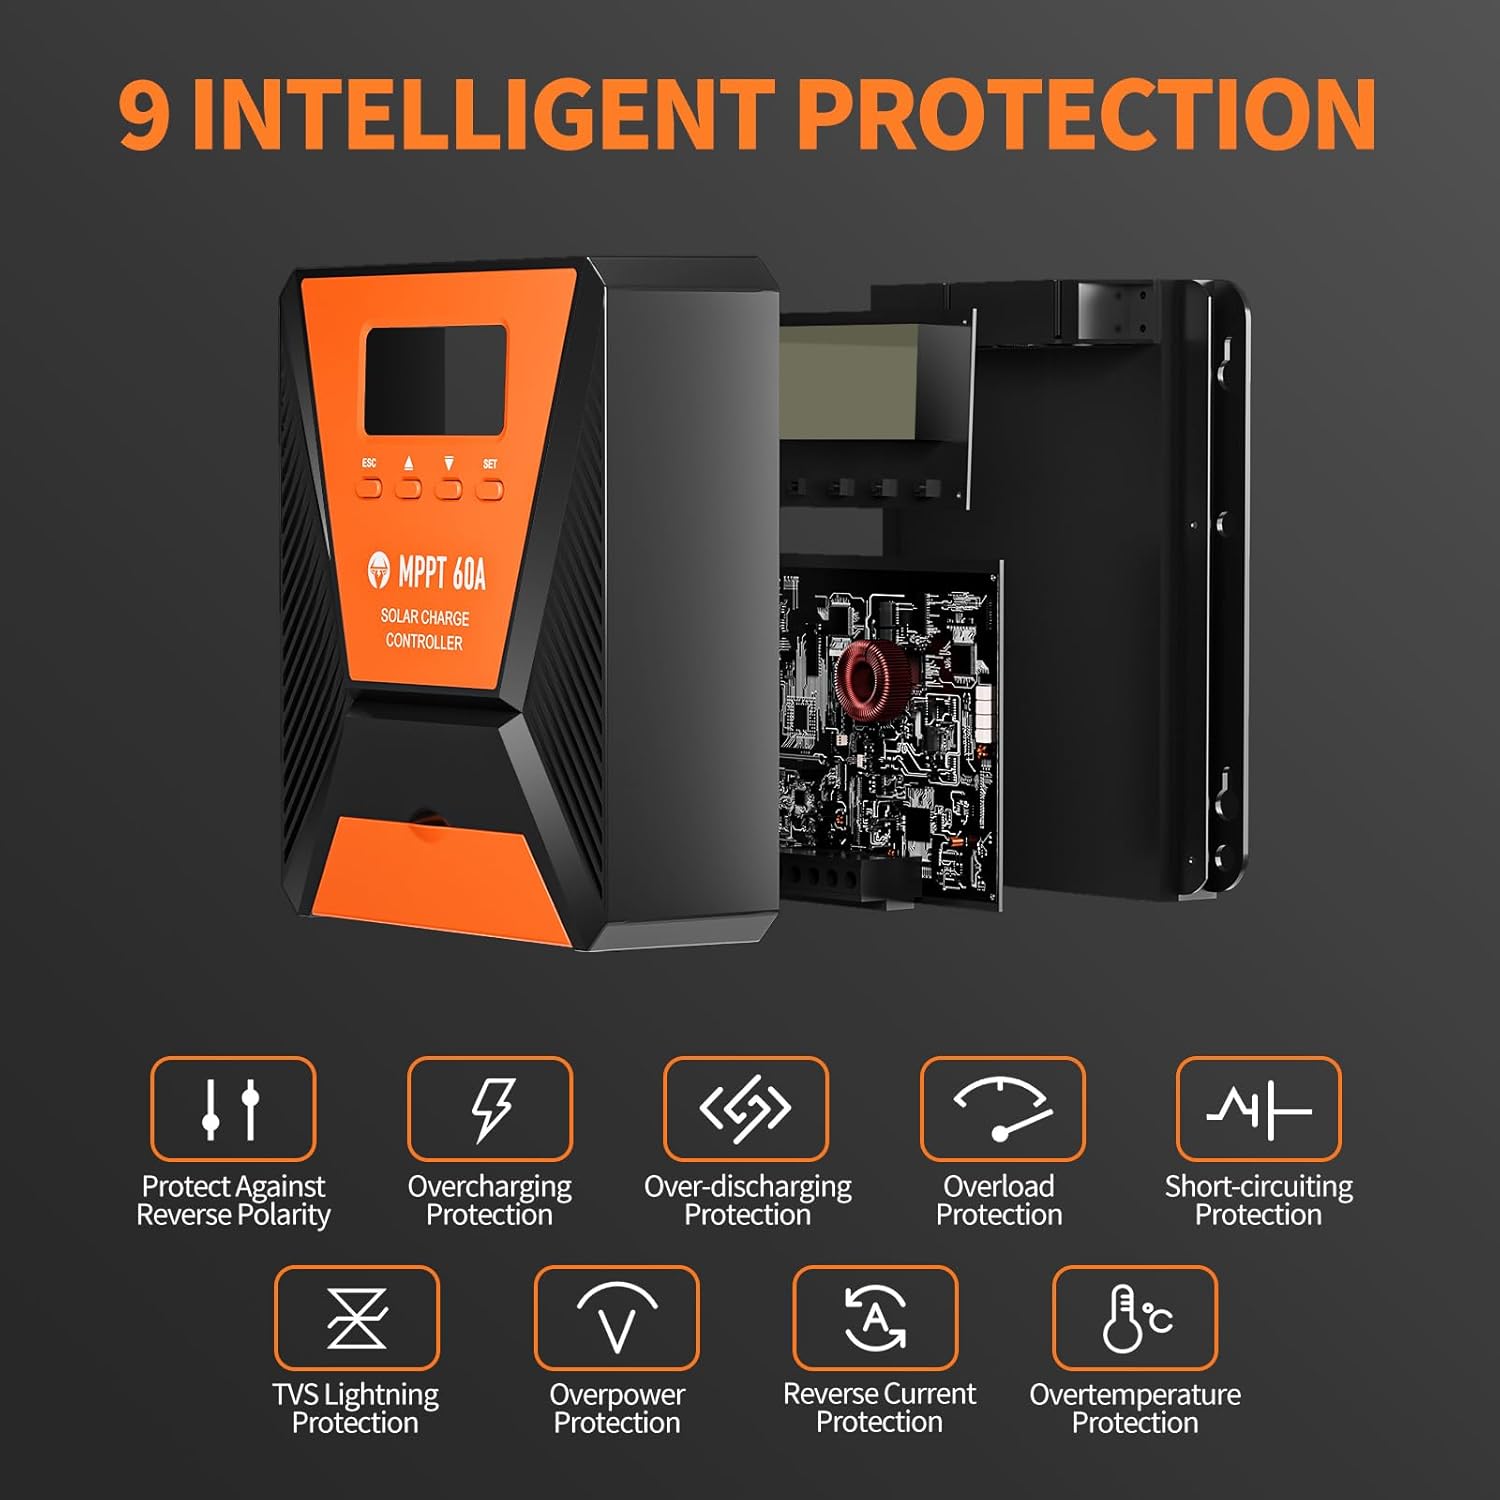
Image 7: The controller provides 9 intelligent protection features, including protection against reverse polarity, overcharging, over-discharging, overload, short-circuiting, TVS lightning, overpower, reverse current, and overtemperature.
9. Specifiche
| Caratteristica | Specificazione |
|---|---|
| Modello | 40A |
| Marca | TOPBULL |
| Volume di sistematage | 12V/24V Automatic Recognition |
| Efficienza di tracciamento | >99% |
| Efficienza di conversione di picco | Massimo 98% |
| Tipi di batterie compatibili | FLD, LiFePO4, SLD, GEL, AGM |
| Max ingresso PV Voltage | 100V CC |
| Max Solar Input Power (12V System) | 720W |
| Max Solar Input Power (24V System) | 1440W |
| Uscita USB | Dual USB Ports, 5V DC |
| Tipo di visualizzazione | LCD |
| Dimensioni (confezione) | Dimensioni: 23.6 x 22.1 x 10.59 cm |
| Peso (confezione) | 1.25 kg |
| Accessori inclusi | Viti di montaggio |
10. Garanzia e supporto
TOPBULL is committed to providing professional technical support. If you have any questions or require assistance with your MPPT solar charge controller, please contact our customer service. We strive to meet your needs and provide the best possible support.


