1. Informazioni sulla sicurezza
Si prega di leggere attentamente e comprendere l'intero manuale prima di procedere al montaggio, all'utilizzo o all'installazione del prodotto. Il mancato rispetto di queste istruzioni potrebbe causare scosse elettriche, incendi o gravi lesioni personali.
- Prima dell'installazione, assicurarsi che l'alimentazione sia scollegata dall'interruttore automatico.
- Tutti i cablaggi devono essere conformi alle normative elettriche nazionali e locali.
- Il ventilatore deve essere montato su una trave del soffitto o su una struttura di supporto adatta in grado di sostenerne il peso (12 libbre).
- Do not bend blade holders during installation or operation.
- Assicurarsi che tutti i collegamenti siano ben saldi e sicuri.
- This fan is suitable for indoor and covered outdoor use.
2. Contenuto della confezione
Verify that all parts are included before beginning installation. If any parts are missing or damaged, do not proceed with assembly.
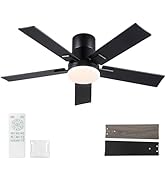
Image: All components of the Rayqueen 42-inch ceiling fan laid out, including the motor housing, blades, light kit, remote control, downrods, and hardware.
- Alloggiamento motore
- Fan Blades (5) - Dual-sided (Matte Black and Wood Grain)
- Blade Brackets (5)
- Light Kit (24W LED, 2000LM)
- Remote Control with Wall Mount Bracket
- Ricevitore per telecomando
- Downrod (various sizes may be included)
- Staffa di fissaggio
- Pacchetto hardware (viti, dadi, rondelle)
- Manuale di installazione
3. Configurazione e installazione
Follow these steps carefully for proper and safe installation. Basic tools are required.
3.1. Assemblaggio della lama
Attach the fan blades to the blade brackets using the provided screws and washers. Ensure the desired blade finish (Matte Black or Wood Grain) is facing downwards.
Image: Close-up of a hand attaching a fan blade to its bracket with screws, demonstrating the dual-sided blade feature.
3.2. Downrod and Motor Assembly
Connect the downrod to the motor housing. Feed the motor wires through the downrod. Secure the downrod with the provided pin and screws. The modular design simplifies this process.
Video: Demonstrates the assembly of the downrod and motor for the Rayqueen 1175 Ceiling Fan Downrod Series.
Video: Shows the black downrod assembly for the Rayqueen 1175 Ceiling Fan, highlighting the connection points.
3.3. Montaggio e cablaggio
Secure the mounting bracket to the ceiling electrical box. Hang the fan assembly onto the mounting bracket. Connect the electrical wires (live, neutral, ground) from the ceiling to the fan's receiver unit, then connect the receiver to the fan motor. Ensure all connections are properly insulated with wire nuts.

Immagine: un primo piano view of the ceiling mounting bracket with electrical wires connected, showing the receiver unit tucked inside.
3.4. Installazione del kit luci
Connect the LED light kit wires to the corresponding wires from the fan motor. Secure the light kit to the bottom of the fan assembly.

Image: The fully assembled Rayqueen 42-inch ceiling fan, showcasing the integrated LED light kit.
4. Istruzioni per l'uso
Your Rayqueen ceiling fan is operated using the included remote control.
4.1. Funzioni di controllo remoto

Image: A detailed diagram of the remote control, labeling buttons for fan speed, light control, timer, and reverse function.
- Ventola ON/OFF: Premere il pulsante di accensione per accendere o spegnere la ventola.
- Velocità della ventola (1-6): Selezionare la velocità desiderata della ventola da 1 (più bassa) a 6 (più alta).
- Luce accesa/spenta: Accende o spegne la luce.
- Luminosità della luce (+/-): Adjust the brightness of the LED light (20%-100%).
- Color Temperature (3000K/4500K/6000K): Cycle through warm white (3000K), natural white (4500K), and cool white (6000K) light options.
- Flusso d'aria inverso: Press the reverse button to change the direction of the fan blades for summer (downward airflow) or winter (upward airflow) operation.
- Timer (1H/3H/6H): Imposta lo spegnimento automatico della ventola dopo 1, 3 o 6 ore.
- Modalità risparmio: Activates a gentle, quiet fan setting for undisturbed rest.
- Funzione di memoria: The fan and light settings will retain their last state when turned off and on again.

Image: The ceiling fan's LED light displaying the three adjustable color temperatures (3000K, 4500K, 6000K).

Image: A visual representation of the fan's reversible airflow, showing downward air for cooling in summer and upward air for heat circulation in winter.
5. Manutenzione
Una manutenzione regolare garantisce prestazioni ottimali e longevità del ventilatore da soffitto.
- Pulizia: Per evitare danni alla finitura, pulire la ventola con un panno morbido eamp panno. Non usare detergenti abrasivi o solventi.
- Pulizia della lama: Spolverare regolarmente le pale del ventilatore per evitare l'accumulo di polvere, che può compromettere il flusso d'aria e l'equilibrio.
- Viti di serraggio: Controllare periodicamente tutte le viti della ventola e l'hardware di montaggio per assicurarsi che siano ben serrate.
- Design modulare: Key components such as fan blades, light cover, LED light, and remote are replaceable. Contact customer support for spare parts.
6. Risoluzione Dei Problemi
Se riscontri problemi con la ventola, fai riferimento ai seguenti problemi comuni e alle relative soluzioni:
| Problema | Possibile causa | Soluzione |
|---|---|---|
| La ventola non si avvia | Loose wiring, no power, remote not paired. | Check circuit breaker. Ensure all wiring connections are secure. Re-pair remote control if necessary (refer to remote pairing instructions in full manual). |
| La ventola traballa | Loose blades, uneven blades, improper mounting. | Ensure all blade screws are tight. Check if blades are bent or damaged. Verify mounting bracket is securely attached to a ceiling joist. Use balancing kit if needed. |
| La luce non funziona | Loose light kit wiring, faulty LED module. | Check light kit wiring connections. If LED module is faulty, contact customer support for replacement. |
| Il telecomando non funziona | Dead batteries, remote not paired, signal interference. | Replace batteries (2 AAA included). Re-pair remote control. Ensure no obstructions between remote and fan. |
7. Specifiche
| Caratteristica | Dettaglio |
|---|---|
| Marca | Rayqueen |
| Nome del modello | Modello DY1175-5B/42 |
| Colore | Nero |
| Progettazione di ventilatori elettrici | Ventilatore a soffitto |
| Fonte di alimentazione | DC |
| Stile | Moderno |
| Dimensioni del prodotto | 42"P x 42"L x 12.2"A |
| Tipologia di camera | Bedroom, Dining Room, Kids Room, Living Room, Patio |
| Caratteristiche speciali | Cooling and Air Circulation, Dimmable fan light, Fan direction memory function, Fan light memory function, Fan speed memory function |
| Usi consigliati | Al chiuso |
| Livello di rumore | 32 decibel |
| Cosatage | 24 watt (luce LED) |
| Tipo di finitura | Opaco |
| Numero di lame | 5 |
| Capacità del flusso d'aria | 4000 piedi cubi al minuto |
| Voltage | 120 Volt |
| Peso dell'articolo | 12 libbre |
| Uso interno/esterno | Interno, esterno (coperto) |
| Specifica Met | ETL |
| Metodo di controllo | Remoto |
| Numero di livelli di potenza | 6 |
| Tipo di motore | DC |
| Tipo di installazione | Supporto per asta |
| Batterie | Sono necessarie 2 batterie AAA (incluse) |
8. Garanzia e supporto
Your Rayqueen ceiling fan is ETL-certified for safety. For any questions, replacements, spare parts, or repair assistance, please contact our 24/7 customer support via Amazon Message.


