1. Introduzione
This manual provides detailed instructions for the safe and effective operation, maintenance, and troubleshooting of your Nitecore MH40S rechargeable flashlight and NB10000 power bank. Please read this manual thoroughly before use to ensure optimal performance and longevity of your devices.
2. Contenuto della confezione
Verifica che tutti gli articoli elencati di seguito siano presenti nel tuo pacco:
- Nitecore MH40S Flashlight
- 2 x Nitecore NL2150 5,000mAh Li-ion Batteries
- Nitecore NB10000 10,000mAh Power Bank
- Interruttore remoto senza fili
- Adattatore QC
- Cavo di ricarica USB-C
- O-ring di ricambio
- cordino
- Chiusura a strappo
- 2 x Hook-and-loop Straps
- Fondina

3. Caratteristiche del prodotto
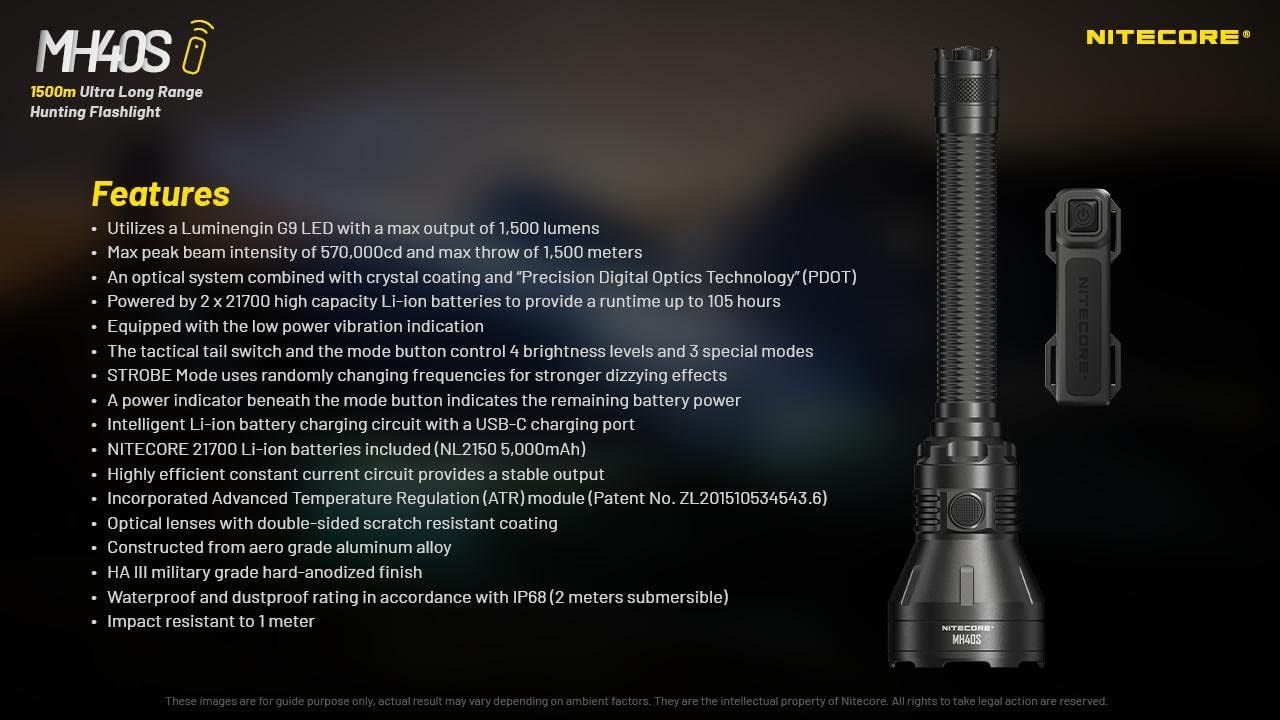
- Utilizes a Luminengin G9 LED with a maximum output of 1,500 lumens.
- Maximum peak beam intensity of 570,000cd and a maximum throw of 1,500 meters.
- Optical system combines crystal coating and "Precis Digital Optics Technology" (PDOT).
- Powered by 2x high-capacity Li-ion batteries, providing a runtime of up to 105 hours.
- Equipped with a low power vibration indicator.
- Tactical tail switch and mode button control 4 brightness levels and 3 special modes.
- STROBE mode uses randomly changing frequencies for enhanced disorienting effects.
- Power indicator beneath the mode button displays remaining battery power.
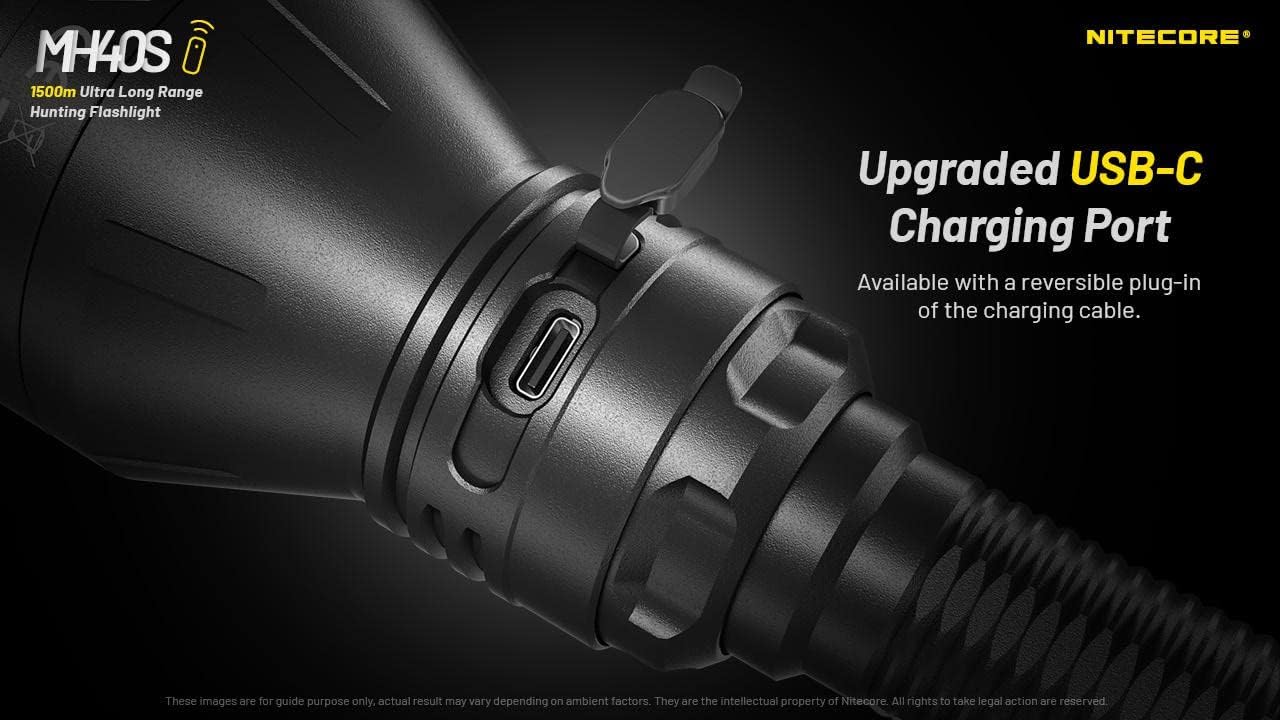
- Intelligent Li-ion battery charging circuit with a USB-C charging port.
- Includes Nitecore NL2150 5,000mAh Li-ion batteries.
- Highly efficient constant current circuit ensures stable output.
- Incorporates Advanced Temperature Regulation (ATR) module.
- Optical lenses feature double-sided scratch-resistant coating.
- Realizzato in lega di alluminio aeronautico con finitura anodizzata dura di grado militare HA III.
- Waterproof and dustproof rating in accordance with IP68 (2 meters submersible).
- Resistente agli urti fino a 1 metro.

4. Specifiche
4.1 MH40S Flashlight Technical Data
| Norma FL1 | Turbosoffiante | ALTO | METÀ | BASSO | STROBE | FARO | sos |
|---|---|---|---|---|---|---|---|
| Produzione | 1,500 lumen | 500 lumen | 150 lumen | 18 lumen | 1,500 lumen | 1,500 lumen | 1,500 lumen |
| Durata | 3h 15min | 7h 15min | ore 25 | ore 105 | — | — | — |
| Distanza del raggio | 1,500 metri | 860 metri | 450 metri | 150 metri | — | — | — |
| Intensità del raggio | 570,000 dollari | 186,000 dollari | 51,000 dollari | 5,800 dollari | — | — | — |
Note: The stated data is measured in accordance with international flashlight testing standards ANSI/PLATO FL 1-2019, using 2x 21700 Li-ion batteries (5,000mAh) under laboratory conditions. Actual data may vary due to different battery types or environmental conditions.

4.2 Specifiche generali
- GUIDATO: Luminengin G9 LED
- Riflettore: SMO
- Batteria: 2 x 21700 Li-ion (NL2150 5,000mAh included)
- Modalità speciali: Location Beacon, SOS, Strobe
- Beam Color: Luce bianca
- Lunghezza: 256 mm (10.08 pollici)
- Misura della testa: 65 mm (2.56 pollici)
- Peso: 245.8 g (8.67 once) (senza batterie)
- Materiale: Lega di alluminio di qualità aeronautica
- Fine: HA III military-grade hard-anodized
- Grado di impermeabilità: IP68 (sommergibile 2 metri)
- Resistenza all'impatto: 1 metro
4.3 NB10000 Power Bank Specifications
- Capacità: 10,000mAh 3.85V
- Energia nominale: 6,400mAh 5V
- Ingresso (USB-C): 5V - 2.4A / 9V - 2A
- Uscita (USB-C): 5V - 3A / 9V - 2A / 12V - 1.5A
- Uscita doppia porta: 5V - 3A (MAX)
- Materiale: Carbon fiber frame and panels
- Dimensioni: 4.8" x 2.32" x 0.42"
- Peso: 5.29 oncia
- Caratteristiche: Dual output channels (USB and USB-C), LED remaining power level indicator, one-touch low current mode.
5. Impostazione
5.1 Installazione della batteria
- Unscrew the tail cap of the MH40S flashlight.
- Insert the two Nitecore NL2150 21700 Li-ion batteries with the positive (+) terminals facing the head of the flashlight.
- Riavvitare saldamente il tappo di coda per garantire un contatto adeguato e la resistenza all'acqua.
Avvertimento: Assicurarsi che le batterie siano inserite con la polarità corretta. Un inserimento errato può danneggiare il dispositivo.
5.2 Carica iniziale
Before first use, fully charge the MH40S flashlight and the NB10000 power bank.
5.2.1 Charging the MH40S Flashlight
- Individuare la porta di ricarica USB-C sul corpo della torcia.
- Open the rubber cover protecting the port.
- Connect the USB-C charging cable to the flashlight and the QC Adapter.
- Plug the QC Adapter into a power outlet.
- The power indicator beneath the mode button will flash during charging and remain solid when fully charged.
- Close the rubber cover after charging to maintain water and dust resistance.
5.2.2 Charging the NB10000 Power Bank
- Connect the USB-C charging cable to the USB-C input port on the NB10000.
- Connect the other end of the cable to a USB power source (e.g., QC Adapter, computer USB port).
- The LED indicators on the power bank will show the charging status.
6. Istruzioni per l'uso
6.1 Basic Flashlight Operation
The MH40S features a tactical tail switch and a mode button for control.

6.1.1 Accensione/Spegnimento
- momentaneo acceso: Half-press and hold the tactical tail switch. Release to turn off.
- Accensione/spegnimento costanti: Fully press the tactical tail switch until a click is heard to turn on. Fully press again to turn off.
6.1.2 Brightness Level Adjustment
- With the flashlight on, press the mode button to cycle through brightness levels: LOW - MID - HIGH - TURBO.
- The flashlight will memorize the last used brightness level (except for special modes) when turned off and on again.
6.1.3 Special Modes (STROBE, BEACON, SOS)
- With the flashlight on, press and hold the mode button to activate STROBE mode.
- While in STROBE mode, press the mode button again to cycle through BEACON and SOS modes.
- To exit special modes, short press the mode button or turn off the flashlight.
6.2 Wireless Remote Switch Operation
The included wireless remote switch allows for convenient control of the MH40S from a distance of up to 1 meter (3.28 feet).

- momentaneo acceso: Press and hold the designated button on the remote switch. Release to turn off.
- Accensione/spegnimento costanti: Press the designated button on the remote switch to turn on. Press again to turn off.
- STROBO: Press the designated STROBE button on the remote switch to activate. Press again to turn off.
The remote switch is powered by a 3V CR1632 button cell battery and features advanced power cut-off (APC) technology for extended standby time.
6.3 NB10000 Power Bank Usage
- Dispositivi di ricarica: Connect your device to the USB-A or USB-C output port of the NB10000 using an appropriate charging cable.
- Indicatore del livello di potenza: Press the power button on the NB10000 to check the remaining battery level via the LED indicators.
- Modalità a bassa corrente: For charging delicate electronics (e.g., Bluetooth earphones, smartwatches), activate the low current mode by pressing and holding the power button until a specific indicator lights up.
7. Manutenzione
- Pulizia: Pulisci il corpo della torcia con un panno morbido eamp panno. Non usare detergenti abrasivi o solventi.
- Filettature e O-ring: Lubricate the threads and O-rings regularly with silicone grease to maintain water resistance. Replace worn O-rings as needed.
- Cura della batteria: Rimuovere le batterie se la torcia non viene utilizzata per un periodo prolungato. Conservare le batterie in un luogo fresco e asciutto.
- Porta di ricarica: Keep the USB-C charging port clean and free of debris. Ensure the rubber cover is securely closed when not charging.
8. Risoluzione Dei Problemi
- La torcia non si accende:
- Controllare la polarità della batteria.
- Assicurarsi che le batterie siano completamente cariche.
- Stringere saldamente il tappo posteriore.
- Clean battery contacts with an alcohol swab.
- Reduced brightness or short runtime:
- Le batterie potrebbero essere scariche; ricaricarle.
- Batteries may be aging; consider replacement.
- Ensure the flashlight head and tail cap are tightly screwed on.
- Remote switch not responding:
- Check the distance between the remote and the flashlight (max 1 meter).
- Sostituire la batteria CR1632 nell'interruttore remoto.
- Assicurarsi che nessun ostacolo blocchi il segnale.
- Problemi di ricarica:
- Verify the USB-C cable is properly connected.
- Ensure the power source (QC Adapter) is functioning.
- Pulisci la porta di ricarica da eventuali detriti.
9. Informazioni sulla sicurezza
- Non puntare la torcia direttamente negli occhi.
- Tenere fuori dalla portata dei bambini.
- Do not disassemble or modify the flashlight or power bank, as this voids the warranty and may cause damage.
- Evitare di esporre i dispositivi a temperature estreme o alla luce solare diretta per periodi prolungati.
- Use only recommended batteries and charging accessories.
- Smaltire le batterie secondo le normative locali.
10. Garanzia e supporto
Nitecore products are covered by a warranty. For detailed warranty information and support, please refer to the official Nitecore webo contattare il distributore locale. Conservare la ricevuta d'acquisto per eventuali reclami in garanzia.
Per ulteriore assistenza, visitare il Negozio Nitecore su Amazon or the official Nitecore websito.


