1. Introduzione
Thank you for choosing the Sharkoon AK6 RGB ATX PC Case. This manual provides essential information for the proper installation, operation, and maintenance of your new PC case. Please read this guide thoroughly before beginning the assembly process to ensure optimal performance and longevity of your components.
2. Informazioni sulla sicurezza
- Scollegare sempre l'alimentatore dalla presa a muro prima di installare o rimuovere qualsiasi componente all'interno del case del PC.
- Maneggiare con cura i pannelli in vetro temperato. Sono fragili e possono rompersi se cadono o subiscono urti.
- Evitare di esporre la custodia a temperature estreme, umidità o luce solare diretta.
- Tenere le parti di piccole dimensioni e le viti fuori dalla portata dei bambini.
- Assicurare una corretta messa a terra per evitare danni causati da scariche elettrostatiche (ESD) ai componenti elettronici sensibili.
3. Contenuto della confezione
Si prega di verificare che tutti gli articoli siano presenti nel pacco:
- Case per PC Sharkoon AK6 RGB ATX
- Accessory box (containing screws, cable ties, and other small parts)
- Manuale dell'utente (questo documento)
4. Prodotto finitoview
The Sharkoon AK6 RGB ATX PC Case is designed with a modern glass aesthetic, featuring seamless integration of tempered glass on the front and side panels. It includes four pre-installed 120mm addressable RGB PWM fans for optimal airflow and visual appeal. The case supports a wide range of components, including BTF motherboards, and offers ample space for high-performance hardware.

Figure 4.1: Front interior view of the Sharkoon AK6 RGB PC case, showcasing the pre-installed addressable RGB fans and the spacious main chamber.

Figura 4.2: Angolato view of the Sharkoon AK6 RGB PC case, highlighting the tempered glass side panel and the top mesh for ventilation.

Figura 4.3: Posteriore view of the Sharkoon AK6 RGB PC case, showing the I/O shield cutout, rear exhaust fan mount, and expansion slots.
Pannello I/O frontale
The front I/O panel is located on the side of the case and includes:
- Pulsante di accensione
- Pulsante di reset
- 2 x USB Ports (Type-A)
- 1 porte USB di tipo C
- Audio Jacks (TRRS)
5. Configurazione e installazione
Follow these steps to install your components into the Sharkoon AK6 RGB PC Case.
5.1 Preparazione del caso
- Posizionare la custodia su una superficie piana e stabile.
- Carefully remove the tempered glass side panel by unscrewing the thumb screws at the rear and gently pulling the panel away.
- Remove the rear metal side panel by unscrewing the thumb screws.
5.2 Installazione della scheda madre
The AK6 RGB supports Mini-ITX, Micro-ATX, ATX, and BTF motherboards.
- Install the I/O shield into the cutout at the rear of the case (if not pre-installed on your motherboard).
- Allineare la scheda madre con i distanziali all'interno del case. Assicurarsi che tutti i distanziali corrispondano ai fori di montaggio della scheda madre.
- Fissare la scheda madre con le viti appropriate presenti nella scatola degli accessori.
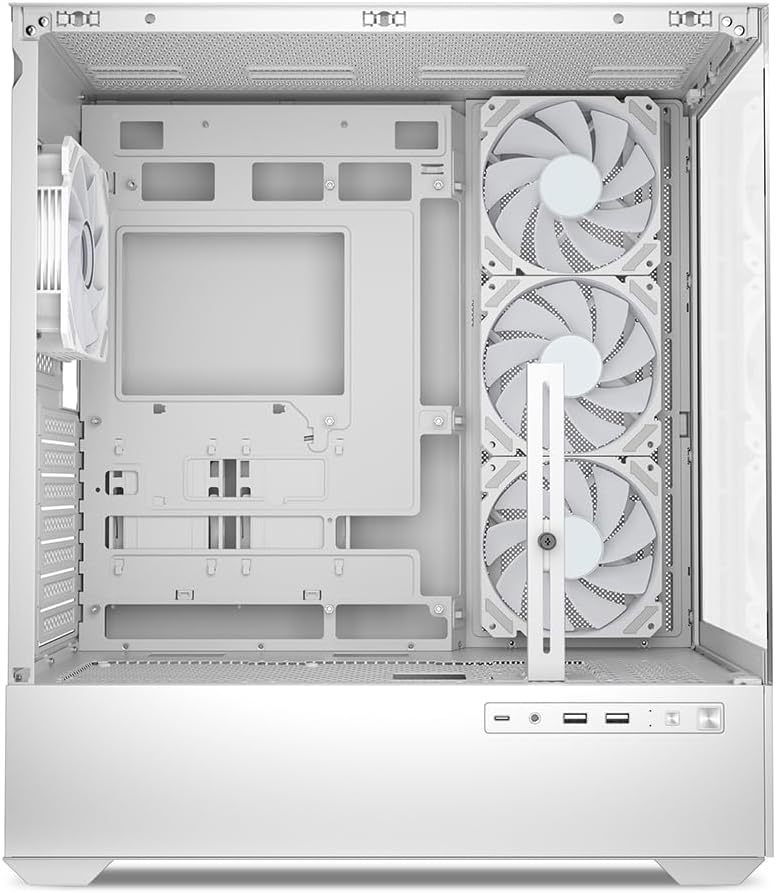
Figura 5.1: Interno view of the Sharkoon AK6 RGB PC case, illustrating the motherboard tray, cable management cutouts, and front fan mounting points.
5.3 Installazione dell'alimentatore
The case features a bottom-mount power supply design.
- Slide the power supply unit (PSU) into the dedicated compartment at the bottom rear of the case.
- Align the PSU with the screw holes at the rear of the case.
- Secure the PSU with the provided screws.
5.4 Installazione del dispositivo di archiviazione
The AK6 RGB supports up to two 3.5" HDDs or four 2.5" SSDs.
- For 3.5" HDDs: Locate the drive cages beneath the PSU shroud. Slide the HDD into a drive tray and secure it with screws.
- For 2.5" SSDs: SSDs can be mounted on the dedicated brackets behind the motherboard tray or on the 3.5" drive trays using adapter screws.
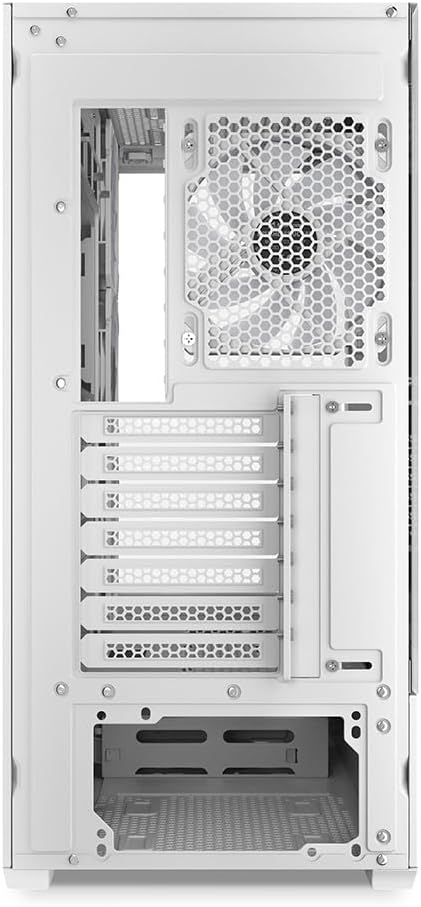
Figura 5.2: Interno posteriore view of the Sharkoon AK6 RGB PC case, detailing the drive cages for 3.5-inch HDDs and 2.5-inch SSDs, and the power supply shroud area.
5.5 Installazione della scheda grafica e della scheda di espansione
- Rimuovere le coperture degli slot di espansione necessari nella parte posteriore del case.
- Inserisci la scheda grafica o altre schede di espansione negli slot PCIe appropriati sulla scheda madre.
- Secure the cards with screws. The case includes a rubberized graphics card support for larger cards.
5.6 CPU Cooler and Radiator Installation
The case supports CPU coolers up to 17 cm in height and allows for extensive liquid cooling setups.
- Installare il dissipatore della CPU seguendo le istruzioni del produttore.
- For liquid cooling, the case can accommodate a 360mm radiator at the top and an additional 280mm radiator.
5.7 Gestione dei cavi
Utilizzate i fori per la gestione dei cavi e i punti di fissaggio dietro il vassoio della scheda madre per instradare e fissare i cavi. Questo migliora il flusso d'aria e l'estetica.
6. Istruzioni per l'uso
6.1 Accensione
After all components are installed and cables are connected, replace the side panels. Connect the power cable to your PSU and a wall outlet, then press the power button on the front I/O panel to start your system.
Controllo ventola RGB 6.2
The AK6 RGB comes with four pre-installed addressable RGB PWM fans. These fans are connected to an RGB controller which also provides connections for up to four LED elements and four PWM fans. The RGB lighting can typically be controlled via your motherboard's RGB software (if compatible) or through a dedicated button on the case (if present and connected).
6.3 Ottimizzazione del flusso d'aria
The case is designed for ideal airflow, with three inverted fans drawing air from the side into the case. The top and rear fan mounts allow for additional exhaust fans. Ensure proper fan orientation for optimal cooling performance.

Figura 6.1: Esample of a fully assembled system within the Sharkoon AK6 RGB PC case, featuring various components and active RGB lighting.
7. Manutenzione
Una manutenzione regolare contribuisce a garantire la longevità e le prestazioni dei componenti del PC.
- Filtri antipolvere: Periodically clean the removable dust filters (e.g., on the top and bottom) to maintain optimal airflow and prevent dust buildup inside the case. Use compressed air or a soft brush.
- Pannelli in vetro: Clean tempered glass panels with a soft, lint-free cloth and a glass cleaner. Avoid abrasive materials that could scratch the surface.
- Pulizia interna: Use compressed air to remove dust from internal components and fans. Ensure the system is powered off and unplugged before cleaning.
8. Risoluzione Dei Problemi
If you encounter issues with your PC case, refer to the following common troubleshooting steps:
- Nessun potere: Ensure the power supply is properly connected to the wall outlet and the motherboard. Check all internal power cables (24-pin ATX, 8-pin CPU, PCIe power).
- Le ventole non girano/RGB non funziona: Verify that all fan and RGB cables are correctly connected to the motherboard or the included RGB controller. Check your motherboard's BIOS/UEFI settings or RGB software for fan speed and lighting control.
- Porte I/O anteriori non funzionanti: Confirm that the front panel connectors (USB, audio, power/reset switches) are correctly plugged into the corresponding headers on your motherboard.
- Surriscaldamento: Ensure all fans are spinning correctly and oriented for proper airflow. Clean dust filters and internal components. Verify CPU cooler installation.
For further assistance, please contact Sharkoon support.
9. Specifiche
| Caratteristica | Specificazione |
|---|---|
| Marca | Squalo |
| Nome del modello | AK6 RGB |
| Numero di modello | C-AK6W |
| Tipo di caso | Torre ATX |
| Colore | Bianco |
| Materiale | Vetro temperato |
| Compatibilità della scheda madre | Mini ITX, Micro ATX, ATX, BTF |
| Tipo di montaggio dell'alimentatore | Montaggio inferiore |
| Metodo di raffreddamento | Aria |
| Ventole preinstallate | 4 x 120mm Addressable RGB PWM Fans |
| Altezza massima del dissipatore della CPU | 17 centimetri |
| Lunghezza massima della scheda grafica | 41 cm (with rubberized support) |
| Lunghezza massima dell'alimentatore | 23.5 centimetri |
| Supporto radiatore | Top: up to 360mm, Additional: up to 280mm |
| Alloggiamenti unità | 2 x 3.5" HDD or 4 x 2.5" SSD |
| Porte I / O anteriori | 2 x USB Type-A, 1 x USB Type-C, Audio (TRRS) |
| Peso dell'articolo | 6.1 chilogrammi |
| Caratteristiche speciali | RGB Lighting, Unique Glass Appearance, BTF Motherboard Support |
10. Garanzia
Sharkoon products are manufactured to high quality standards. For detailed warranty information, please refer to the warranty card included with your product or visit the official Sharkoon websito. La garanzia copre in genere i difetti di materiali e di fabbricazione in condizioni di normale utilizzo.
11. Supporto
If you require technical assistance or have questions regarding your Sharkoon AK6 RGB ATX PC Case, please visit the official Sharkoon website for support resources, FAQs, and contact information. You may also find updated drivers or software for the RGB controller there.
Websito: www.sharkoon.com


