1. Introduzione
This manual provides detailed instructions for the AMIR WA143BKM-AMUS Indoor Outdoor Thermometer with 3 Wireless Sensors. Please read this manual thoroughly before use to ensure proper operation and to maximize the product's lifespan. This device allows you to monitor temperature and humidity in up to four different locations simultaneously (one main unit, three remote sensors).

Image: The AMIR Indoor Outdoor Thermometer main display unit and three wireless remote sensors.
2. Cosa c'è nella scatola
Verificare che tutti i componenti siano presenti al momento del disimballaggio:
- Thermometer Main Unit x1
- Wireless Sensor x3
- Manuale operativo x1

Image: The package contents, showing the main thermometer unit, three remote sensors, and the instruction manual.
3. Caratteristiche del prodotto
- Wide Range & High Accuracy: The thermometer features a 3-channel system with three transmitters for monitoring temperature and humidity in multiple locations. It offers an indoor temperature range of 0°C to 60°C (32°F to 140°F) and an outdoor temperature range of -40°C to 60°C (-40°F to 140°F). Humidity is measured from 10% to 99%. Accuracy is ±1°C (±1.8°F) for temperature and ±5% for humidity. The wireless transmission range between the main unit and sensors is up to 100 meters (328 feet).
- Registrazione massima e minima: The device records maximum and minimum temperature and humidity values for the main unit and all three remote sensors. Data updates every 60 seconds. Users can switch between Celsius and Fahrenheit display modes. The main unit also includes time, alarm clock, calendar, and snooze/light functions.
- Schermo LCD chiaro: The LCD screen provides clear readability. A humidity comfort indicator uses smiley icons to represent environmental conditions: 'DRY' for humidity below 45%, 'COMFORT' for humidity between 45% and 65%, and 'WET' for humidity above 65%.
- Funzione di retroilluminazione: The display features a backlight for enhanced visibility in low-light conditions. Pressing the backlight button activates the illumination, which automatically turns off after 5 seconds.
- Facile da usare: The main unit can be placed on a surface using its integrated stand or mounted on a wall. Each remote sensor also supports wall mounting or standing. The main unit requires 3 AAA batteries, and each sensor requires 2 AAA batteries (batteries not included). A low battery indicator will appear on the display when sensor batteries need replacement.

Image: Visual representation of the thermometer's high precision and sensitivity, highlighting temperature and humidity accuracy.
4. Impostazione
4.1 Installazione della batteria
- Unità principale: Aprire il vano batterie sul retro dell'unità principale. Inserire 3 batterie AAA, assicurandosi della corretta polarità (+/-). Chiudere il vano.
- Sensori remoti: Open the battery compartment on the back of each remote sensor. Insert 2 AAA batteries into each sensor, observing correct polarity. Close the compartments.
Nota: le batterie non sono incluse e devono essere acquistate separatamente.
4.2 Accoppiamento dei sensori
After battery installation, the main unit will automatically begin searching for sensor signals. The receiving icon on the main unit will flash. To pair the sensors:
- Ensure all sensors have batteries installed and are powered on.
- The main unit will attempt to connect to the sensors for approximately 3 minutes.
- If a sensor does not connect automatically, press the 'CHANNEL' button on the main unit to cycle through channels until the desired sensor's data appears.
- For manual re-pairing, press and hold the 'CHANNEL' button on the main unit until the receiving icon flashes again, then press the 'TX' button inside the battery compartment of the remote sensor you wish to pair.
Video: Demonstrates the pairing process of the main unit with remote sensors, showing how to select channels and view MAX/MIN values.
4.3 Opzioni di posizionamento
The main unit and remote sensors offer flexible placement:
- Unità principale: Features an integrated kickstand for desktop placement and a mounting hole for wall hanging.
- Sensori remoti: Can be placed on a flat surface, mounted on a wall, or hung using the integrated hook.

Image: Illustrates different ways to place the main unit (desktop, wall mount) and remote sensors (stand, wall mount, hanging).
5. Istruzioni per l'uso
5.1 Fine displayview
Lo schermo LCD visualizza varie informazioni:
- Temperatura e umidità interna: Visualizzato nella parte superiore del display.
- Channel 1, 2, 3 Temperature & Humidity: Displayed for each remote sensor.
- Indicatore di comfort: Smiley icons indicating humidity levels (Dry, Comfort, Wet).
- Freccia di tendenza: Indica se la temperatura/umidità sta aumentando, diminuendo o rimanendo stabile.
- Indicatore di batteria scarica: Appears when sensor batteries need replacement.
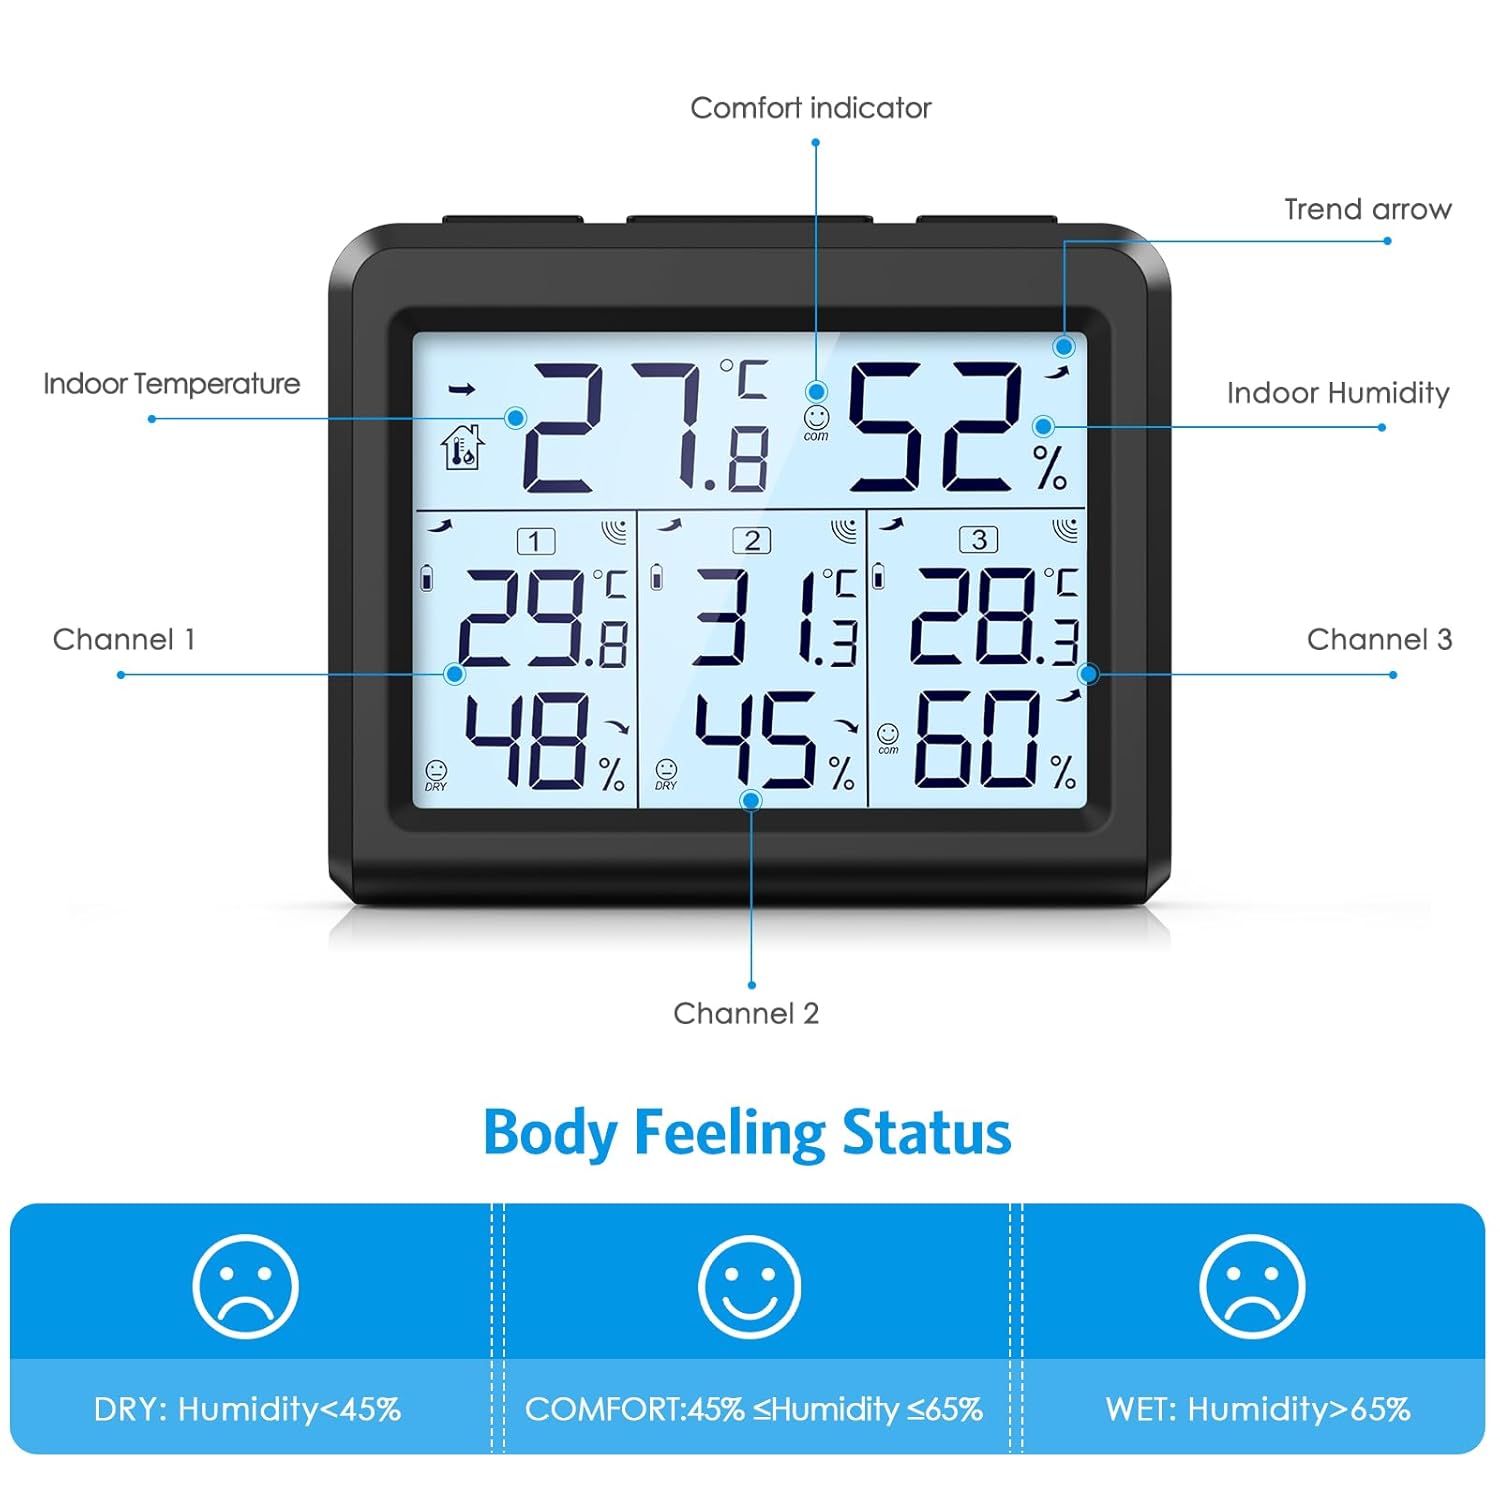
Immagine: Un dettaglio view of the LCD screen, labeling the indoor temperature, indoor humidity, comfort indicator, trend arrow, and data for channels 1, 2, and 3.
5.2 Selezione dell'unità di temperatura (°C/°F)
Premere il tasto ° C / ° F button on the main unit to toggle between Celsius and Fahrenheit temperature displays.
5.3 Funzione di registrazione MAX/MIN
The device stores maximum and minimum temperature and humidity readings. To access these records:
- In modalità di visualizzazione normale, premere il tasto Massimo/minimo pulsante una volta per view the maximum indoor and outdoor temperature/humidity values. The screen will show "MAX".
- Premere il tasto Massimo/minimo button a second time to view the minimum indoor and outdoor temperature/humidity values. The screen will show "MIN".
- Premere il tasto Massimo/minimo button a third time to return to the current temperature and humidity values.
- To manually clear the recorded MAX/MIN values, press and hold the Massimo/minimo pulsante per circa 3 secondi.
5.4 Funzione di retroilluminazione
Per attivare la retroilluminazione del display, premere il tasto LEGGERO button. The backlight will illuminate for 5 seconds and then automatically turn off.

Image: Shows the LCD screen's visibility in both bright and dark environments, demonstrating the effect of the backlight.
5.5 Indicatore di comfort
The comfort indicator provides a quick visual reference for humidity levels:
- ASCIUTTO: Umidità inferiore al 45%
- COMFORT: Umidità tra il 45% e il 65%
- BAGNATO: Umidità superiore al 65%
6. Manutenzione
6.1 Sostituzione della batteria
When the low battery indicator appears on the main unit's display for a specific sensor, it is time to replace the batteries for that sensor. For the main unit, replace batteries when the display dims or functions become erratic.
- Aprire il vano batteria.
- Rimuovere le vecchie batterie.
- Inserire nuove batterie AAA, assicurandosi della corretta polarità.
- Chiudere il vano batterie.
Smaltire sempre le batterie usate in modo responsabile, nel rispetto delle normative locali.
6.2 Pulizia
Wipe the main unit and sensors with a soft, dry cloth. Do not use abrasive cleaners or immerse the devices in water.
7. Risoluzione Dei Problemi
If you encounter issues with your AMIR thermometer, refer to the following common problems and solutions:
- No Reading from Remote Sensor:
- Check if the sensor batteries are installed correctly and are not depleted. Replace if necessary.
- Ensure the sensor is within the 100m (328ft) transmission range of the main unit.
- Reduce obstacles between the sensor and the main unit (e.g., thick walls, electronic devices).
- Re-pair the sensor by pressing the 'CHANNEL' button on the main unit and the 'TX' button on the sensor.
- Letture imprecise:
- Ensure sensors are not exposed to direct sunlight, rain, or extreme temperature fluctuations.
- Place sensors away from heat sources or vents.
- Allow the devices to stabilize for 15-30 minutes after initial setup or relocation.
- Il display è scuro o vuoto:
- Sostituire le batterie nell'unità principale.
8. Specifiche
| Caratteristica | Specificazione |
|---|---|
| Dimensioni del prodotto | 3.5 x 3.5 x 3.9 pollici; 9.44 once |
| Numero modello articolo | WA143BKM-AMUS |
| Produttore | AMIR |
| Marca | AMIR |
| Fonte di alimentazione | Battery Powered (Main unit: 3x AAA, Sensors: 2x AAA each) |
| Caratteristiche speciali | LCD Backlight, Large Display, Wireless, Max/Min Record, Comfort Indicator |
| Tecnologia di connettività | Frequenza Radio |
| Colore | Nero |
| Precisione della temperatura | ±1 °C (±1.8 °F) |
| Precisione dell'umidità | ±5% |
| Intervallo di temperatura interna | da 0 °C a 60 °C (da 32 °F a 140 °F) |
| Intervallo di temperatura esterna | Da -40 °C a 60 °C (da -40 °F a 140 °F) |
| Umidità ambiente | Dal 10% al 99% |
| Portata di trasmissione wireless | 100 metri (328 piedi) |
9. Garanzia e supporto
For warranty information or technical support, please refer to the contact details provided with your purchase or visit the official AMIR websito. Conservare la ricevuta d'acquisto come prova d'acquisto per eventuali reclami in garanzia.


