1. Introduzione
Thank you for choosing the Vormooi Digital Voice Recorder. This device is designed for high-quality audio recording, offering features such as ultra-long continuous recording, voice activation, and versatile input options. With its substantial 96GB memory capacity and advanced noise reduction technology, it is an ideal tool for lectures, interviews, meetings, and personal notes. This manual provides detailed instructions to help you set up, operate, and maintain your device for optimal performance.
2. Contenuto della confezione
Si prega di selezionare la casella per i seguenti elementi:
- 1 x Vormooi Digital Voice Recorder (32GB built-in memory)
- 1 scheda TF da 64 GB (preinstallata o separata)
- 1 x 3.5mm External Microphone
- 1 cavo di ingresso linea da 3.5 mm
- 1 cavo USB C
- 1 x Manuale utente
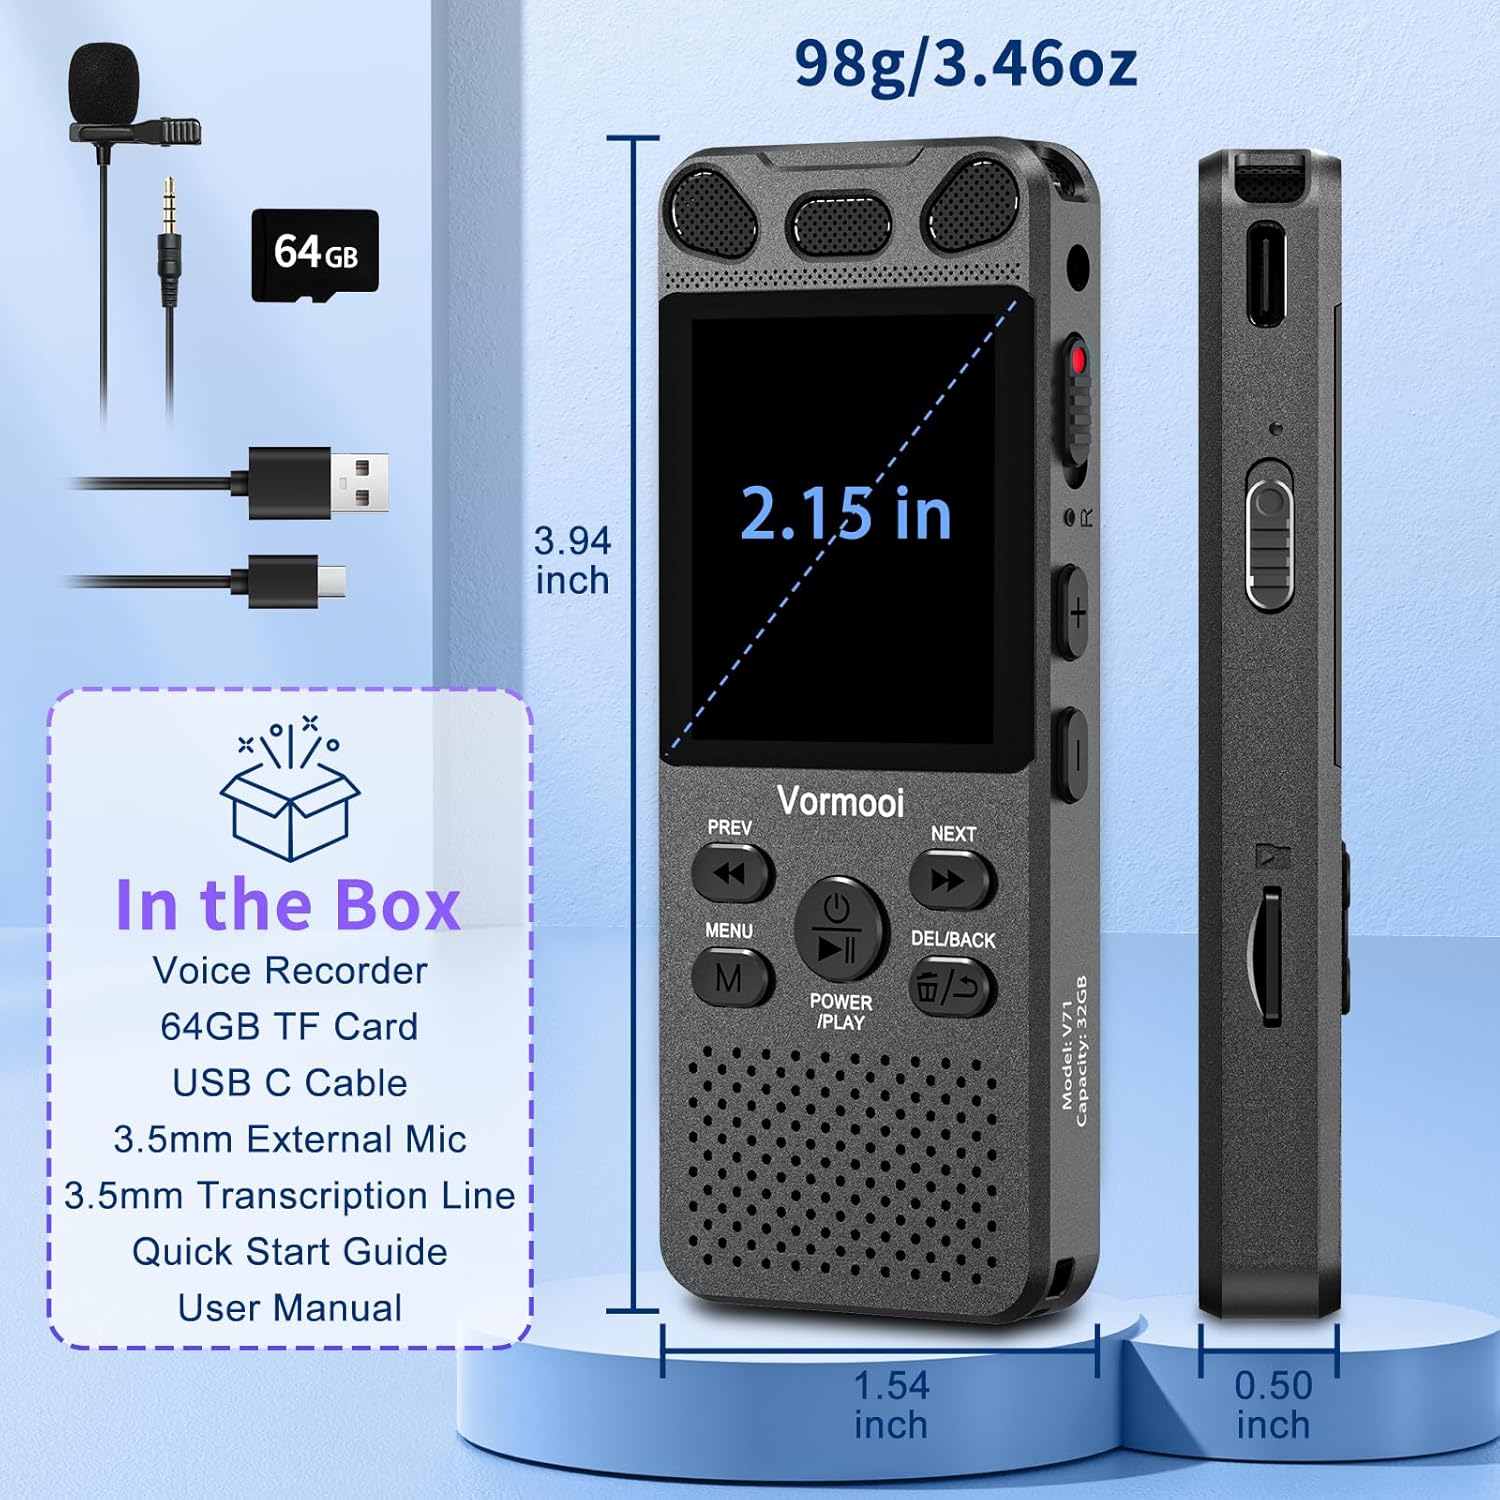
Image: The Vormooi Digital Voice Recorder and its included accessories, such as the external microphone, USB-C cable, and 64GB TF card.
3. Prodotto finitoview
Familiarize yourself with the various parts and controls of your Vormooi Digital Voice Recorder.

Image: Labeled diagram of the Vormooi Digital Voice Recorder highlighting its USB C Port, Lock/Unlock switch, Previous Song/Fast Rewind button, TF-Card Slot, Menu button, Power/Play/Pause/OK button, 3.5mm Jack, Record/Save (REC) switch, Reset button, Volume +/- buttons, Next Song/Fast Forward button, and Back/Delete Filepulsante s.
Componenti chiave:
- Schermo di visualizzazione: 2.15-inch color screen for navigation and information display.
- Microfoni integrati: For omni-directional recording.
- Oratore: For playback of recordings.
- Interruttore REC: Scorrere verso l'alto per avviare la registrazione, scorrere verso il basso per salvare.
- Pulsante BLOCCO: Locks all buttons to prevent accidental operation during recording.
- Porta USB-C: Per la ricarica e il collegamento al computer.
- Presa da 3.5 mm: For connecting external microphone or headphones.
- Slot per scheda TF: Per inserire la scheda TF da 64 GB per espandere la memoria.
4. Impostazione
4.1 Ricarica del dispositivo
Before first use, fully charge the voice recorder.
- Connect the provided USB-C cable to the recorder's USB-C port.
- Collegare l'altra estremità del cavo USB-C a un adattatore di alimentazione USB (non incluso) o alla porta USB di un computer.
- The battery icon on the screen will indicate charging status. A full charge takes approximately 2 hours.
Nota: A fully charged battery provides up to 110 hours of continuous recording.
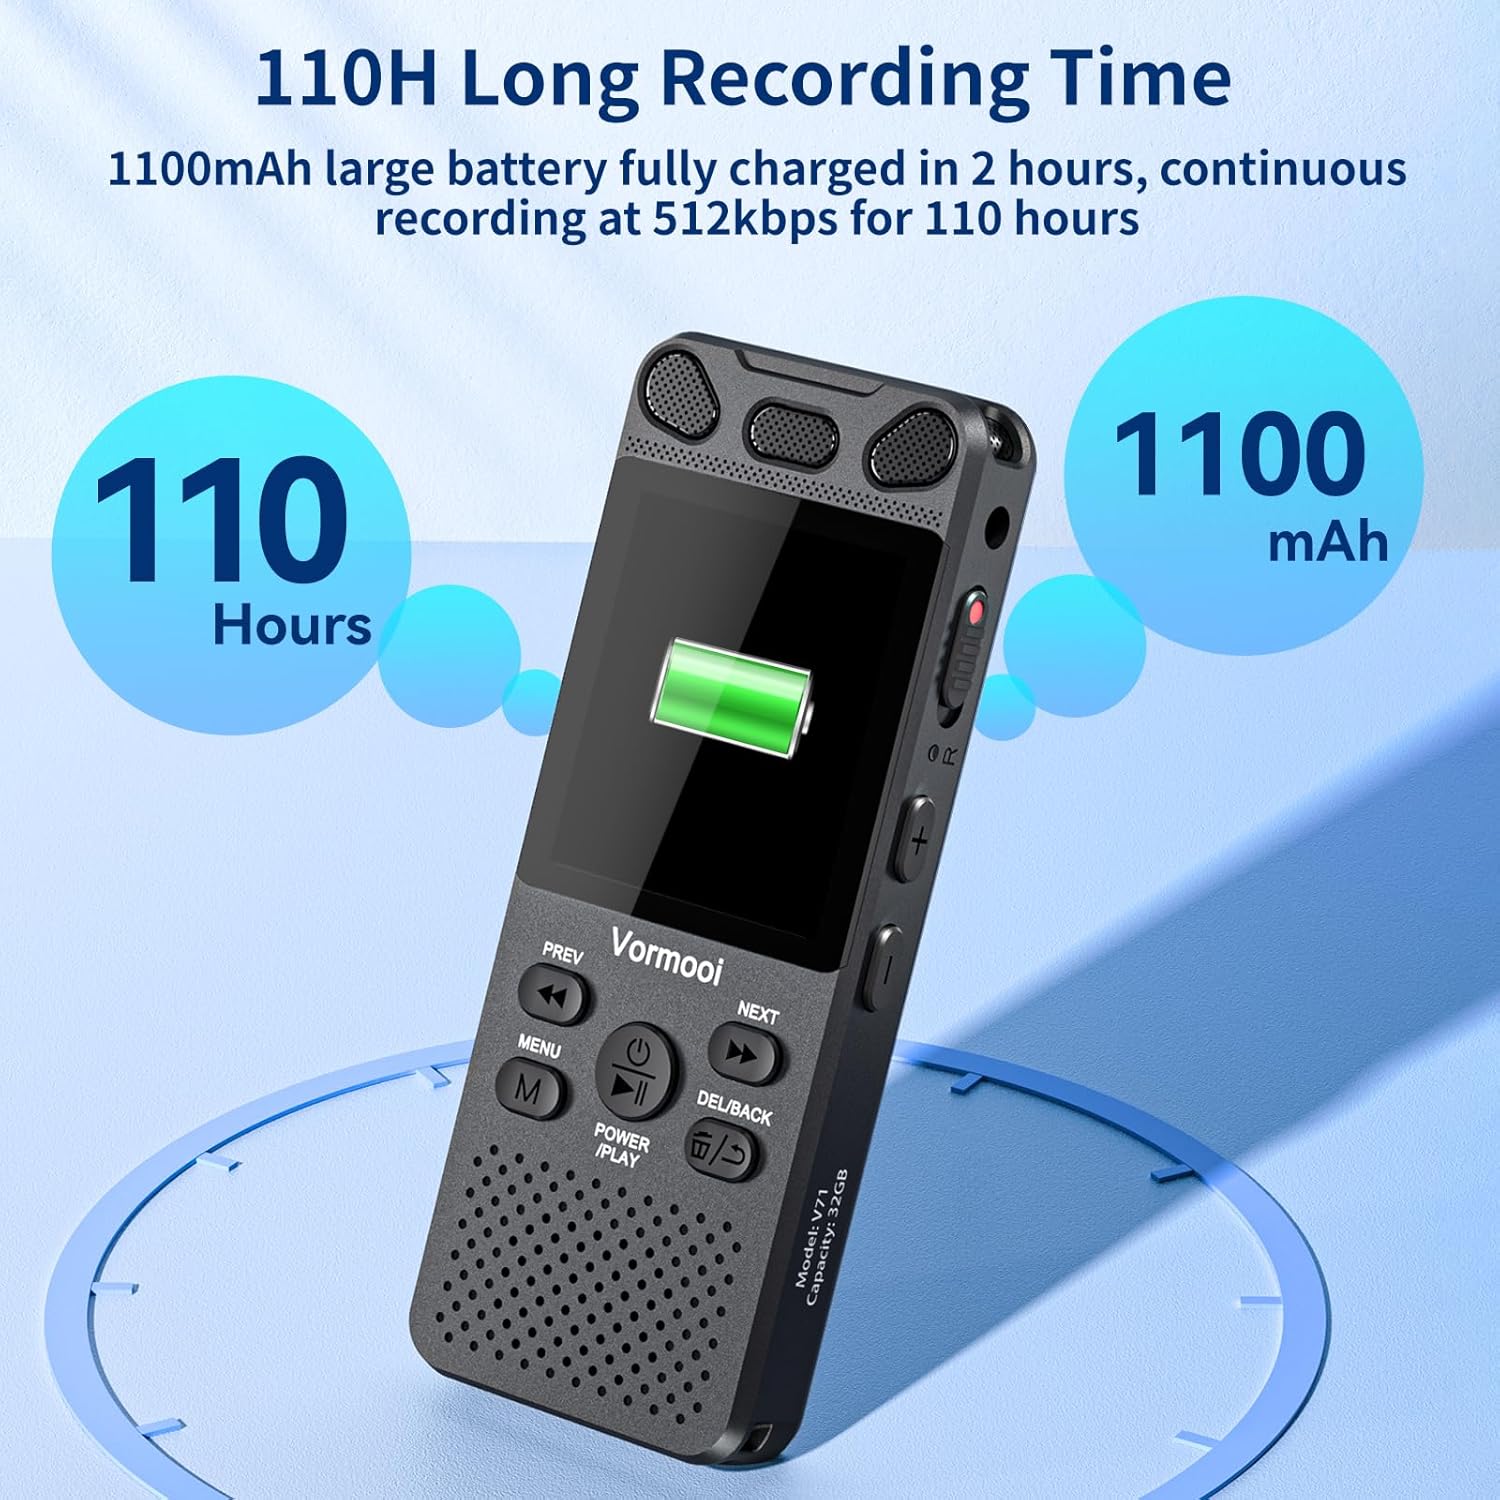
Image: The recorder's screen displaying battery status and highlighting its 110-hour long recording capability and 1100mAh battery.
4.2 Inserimento della scheda TF
The device comes with 32GB built-in memory and an additional 64GB TF card for expanded storage.
- Locate the TF-Card Slot on the side of the recorder.
- Inserire delicatamente la scheda TF da 64 GB nello slot finché non scatta in posizione. Assicurarsi che la scheda sia orientata correttamente.
- Per rimuoverla, spingere delicatamente la scheda verso l'interno finché non scatta fuori.

Image: Visual representation of the recorder's 96GB storage, composed of 32GB internal memory and an expandable 64GB TF card, capable of storing over 7000 hours of 32kbps recordings.
4.3 Accensione/Spegnimento
- Accensione: Premere e tenere premuto il tasto POWER/PLAY/PAUSE/OK button for a few seconds until the screen lights up.
- Spegni: Premere e tenere premuto il tasto POWER/PLAY/PAUSE/OK pulsante finché lo schermo non si spegne.
5. Istruzioni per l'uso
5.1 Registrazione di base
The Vormooi recorder features a convenient one-touch recording function.
- Per avviare la registrazione, far scorrere il RICORDA switch upwards. The recording indicator will light up, and the screen will show recording in progress.
- Per salvare la registrazione, far scorrere il RICORDA switch downwards. The recording will be saved automatically.

Image: The recorder's one-touch record/save switch, demonstrating its ease of use, alongside icons representing 1536K clear sound quality and an intelligent noise cancellation chip.
5.2 Riproduzione
- From the main menu, navigate to "Recordings Library" or "Folders".
- Utilizzare il PRECEDENTE E PROSSIMO pulsanti per selezionare la registrazione desiderata.
- Premere il tasto POWER/PLAY/PAUSE/OK pulsante per avviare la riproduzione.
- Durante la riproduzione, premere POWER/PLAY/PAUSE/OK to pause/resume.
- Utilizzare il PRECEDENTE E PROSSIMO buttons for fast rewind/fast forward.
- Regolare il volume utilizzando il Volume +/- pulsanti.
5.3 Registrazione attivata dalla voce (VAR)
The VAR function allows the recorder to start recording automatically when sound is detected and pause when silence occurs, saving memory space.
- Go to the "Settings" menu.
- Select "VAR Mode" or "Voice Activated".
- Choose your desired sensitivity level (e.g., Level 1-7, where 7 is most sensitive).
- Exit the menu. The recorder will now record only when sound is present.

Image: A composite image illustrating key functionalities: Voice Activated Recording, 110-hour battery life, password protection, A-B repeat for specific section playback, and variable speed playback.
5.4 External Microphone Recording
For more precise audio capture, especially in interviews, use the included external microphone.
- Plug the 3.5mm jack of the external microphone into the recorder's 3.5mm jack.
- Ensure the microphone is positioned correctly for optimal sound pickup.
- Proceed with recording as usual using the RICORDA switch. The device will automatically switch to external microphone input.

Image: The Vormooi recorder connected to its external 3.5mm microphone, showing the setup for enhanced audio recording.
5.5 Line-in Recording (Transcription)
The line-in function allows you to record audio directly from other devices like cell phones, MP3 players, or computers.
- Connect one end of the 3.5mm Line-in Cable to the audio output of your external device (e.g., headphone jack of a phone).
- Connect the other end of the 3.5mm Line-in Cable to the recorder's 3.5mm jack.
- Start playback on your external device and then slide the RICORDA switch upwards on the recorder to begin recording.

Image: Setup for line-in recording, showing the recorder connected to a smartphone via a 3.5mm cable, enabling direct audio capture from other devices.
5.6 Riduzione del rumore
The Vormooi recorder is equipped with an advanced noise reduction chip and adjustable noise reduction levels (7 levels).
- Accedi al menu "Impostazioni".
- Find the "Noise Reduction" or "DSP" option.
- Adjust the level to minimize environmental noise during recording. Higher levels provide more aggressive noise reduction.

Immagine: Un interno view highlighting the 2159 Intelligent Noise Reduction Chip (DSP) responsible for minimizing environmental noise and enhancing audio clarity.
5.7 Pulsante di blocco
To prevent accidental interruption or loss of recording due to unintentional button presses, use the LOCK button.
- Fai scorrere il SERRATURA button (usually on the side) to the "locked" position. All buttons will become unresponsive.
- Slide it back to the "unlocked" position to regain control of the buttons.

Image: The lock switch on the side of the recorder, showing its "UP: Locked" and "DOWN: Unlock" positions, designed to prevent accidental button presses during recording.
5.8 Collegamento al computer
You can transfer recordings to your Windows or macOS computer.
- Collega il registratore al computer tramite il cavo USB-C in dotazione.
- Il registratore apparirà come un'unità disco rimovibile sul tuo computer.
- Puoi quindi trascinare e rilasciare l'audio files da e verso il dispositivo.
6. Manutenzione
- Pulizia: Per pulire il dispositivo, utilizzare un panno morbido e asciutto. Non utilizzare detergenti liquidi o solventi.
- Magazzinaggio: Conservare il dispositivo in un luogo fresco e asciutto, lontano dalla luce solare diretta e da temperature estreme.
- Cura della batteria: Per prolungare la durata della batteria, evitare di scaricarla completamente frequentemente. Caricarla regolarmente, anche se non viene utilizzata per periodi prolungati.
- Backup dei dati: Esegui regolarmente il backup delle registrazioni importanti sul tuo computer per evitare la perdita di dati.
7. Risoluzione Dei Problemi
| Problema | Possibile soluzione |
|---|---|
| Il dispositivo non si accende. |
|
| Impossibile registrare. |
|
| Scarsa qualità di registrazione. |
|
| Dispositivo non riconosciuto dal computer. |
|
8. Specifiche
| Caratteristica | Dettaglio |
|---|---|
| Numero di modello | O1 |
| Capacità di memoria | 96 GB (32 GB integrati + scheda TF da 64 GB) |
| Qualità di registrazione | Up to 1536Kbps HD |
| Durata della batteria | Fino a 110 ore di registrazione continua |
| Dimensioni dello schermo | 2.15 pollici |
| Dimensioni del prodotto | 1.54"P x 3.94"L x 4.96"A |
| Peso dell'articolo | 5.3 once |
| Presa per cuffie | 3.5 millimetri |
| Formati supportati | MP3 Audio, WAV (also FLAC, OGG, APE, WMA for playback, as per A+ content image) |
| Interfaccia Hardware | USB tipo C |
| Dispositivi compatibili | Windows/macOS Computer |
9. Assistenza clienti
For any questions, issues, or assistance with your Vormooi Digital Voice Recorder, please contact our support team.
- Risposta del supporto: Vormooi support team will promptly respond and solve the problem within 24 hours on weekdays.
- Please refer to the contact information provided on the product packaging or the official Vormooi websito per i canali di supporto più aggiornati.


