Introduzione
Thank you for choosing the RGV Touch Electric Kettle. This manual provides essential information for the safe and efficient operation, maintenance, and troubleshooting of your new appliance. Please read these instructions carefully before first use and keep them for future reference.
Importanti istruzioni di sicurezza
Quando si utilizzano apparecchi elettrici, è necessario adottare sempre le seguenti precauzioni di sicurezza di base per ridurre il rischio di incendi, scosse elettriche e/o lesioni alle persone, tra cui:
- Leggi tutte le istruzioni.
- Non toccare le superfici calde. Utilizzare maniglie o manopole.
- Per proteggersi da incendi, scosse elettriche e lesioni personali, non immergere il cavo, le spine o il bollitore elettrico in acqua o altri liquidi.
- È necessaria un'attenta supervisione quando un elettrodomestico viene utilizzato da bambini o nelle loro vicinanze.
- Scollegare dalla presa quando non in uso e prima di pulire. Lasciare raffreddare prima di mettere o togliere parti e prima di pulire l'apparecchio.
- Non utilizzare alcun apparecchio con cavo o spina danneggiati, o dopo un malfunzionamento o un danno di qualsiasi tipo. Contattare l'assistenza clienti per un controllo, una riparazione o una regolazione.
- L'uso di accessori non consigliati dal produttore dell'apparecchio può causare incendi, scosse elettriche o lesioni personali.
- Non utilizzare all'aperto.
- Non lasciare che il cavo penda dal bordo del tavolo o del bancone o che tocchi superfici calde.
- Non posizionare sopra o vicino a un fornello a gas o elettrico caldo, oppure in un forno caldo.
- Collegare sempre prima la spina all'apparecchio, quindi collegare il cavo alla presa a muro. Per scollegarlo, posizionare un qualsiasi interruttore su "off", quindi rimuovere la spina dalla presa a muro.
- Non utilizzare l'apparecchio per scopi diversi da quelli previsti.
- Se il coperchio viene rimosso durante il ciclo di riscaldamento, potrebbero verificarsi scottature.
- Questo apparecchio è destinato esclusivamente all'uso domestico.
- Do not fill below the MIN level or above the MAX level indicated inside the kettle.
Prodotto finitoview
Familiarize yourself with the components of your RGV Touch Electric Kettle.
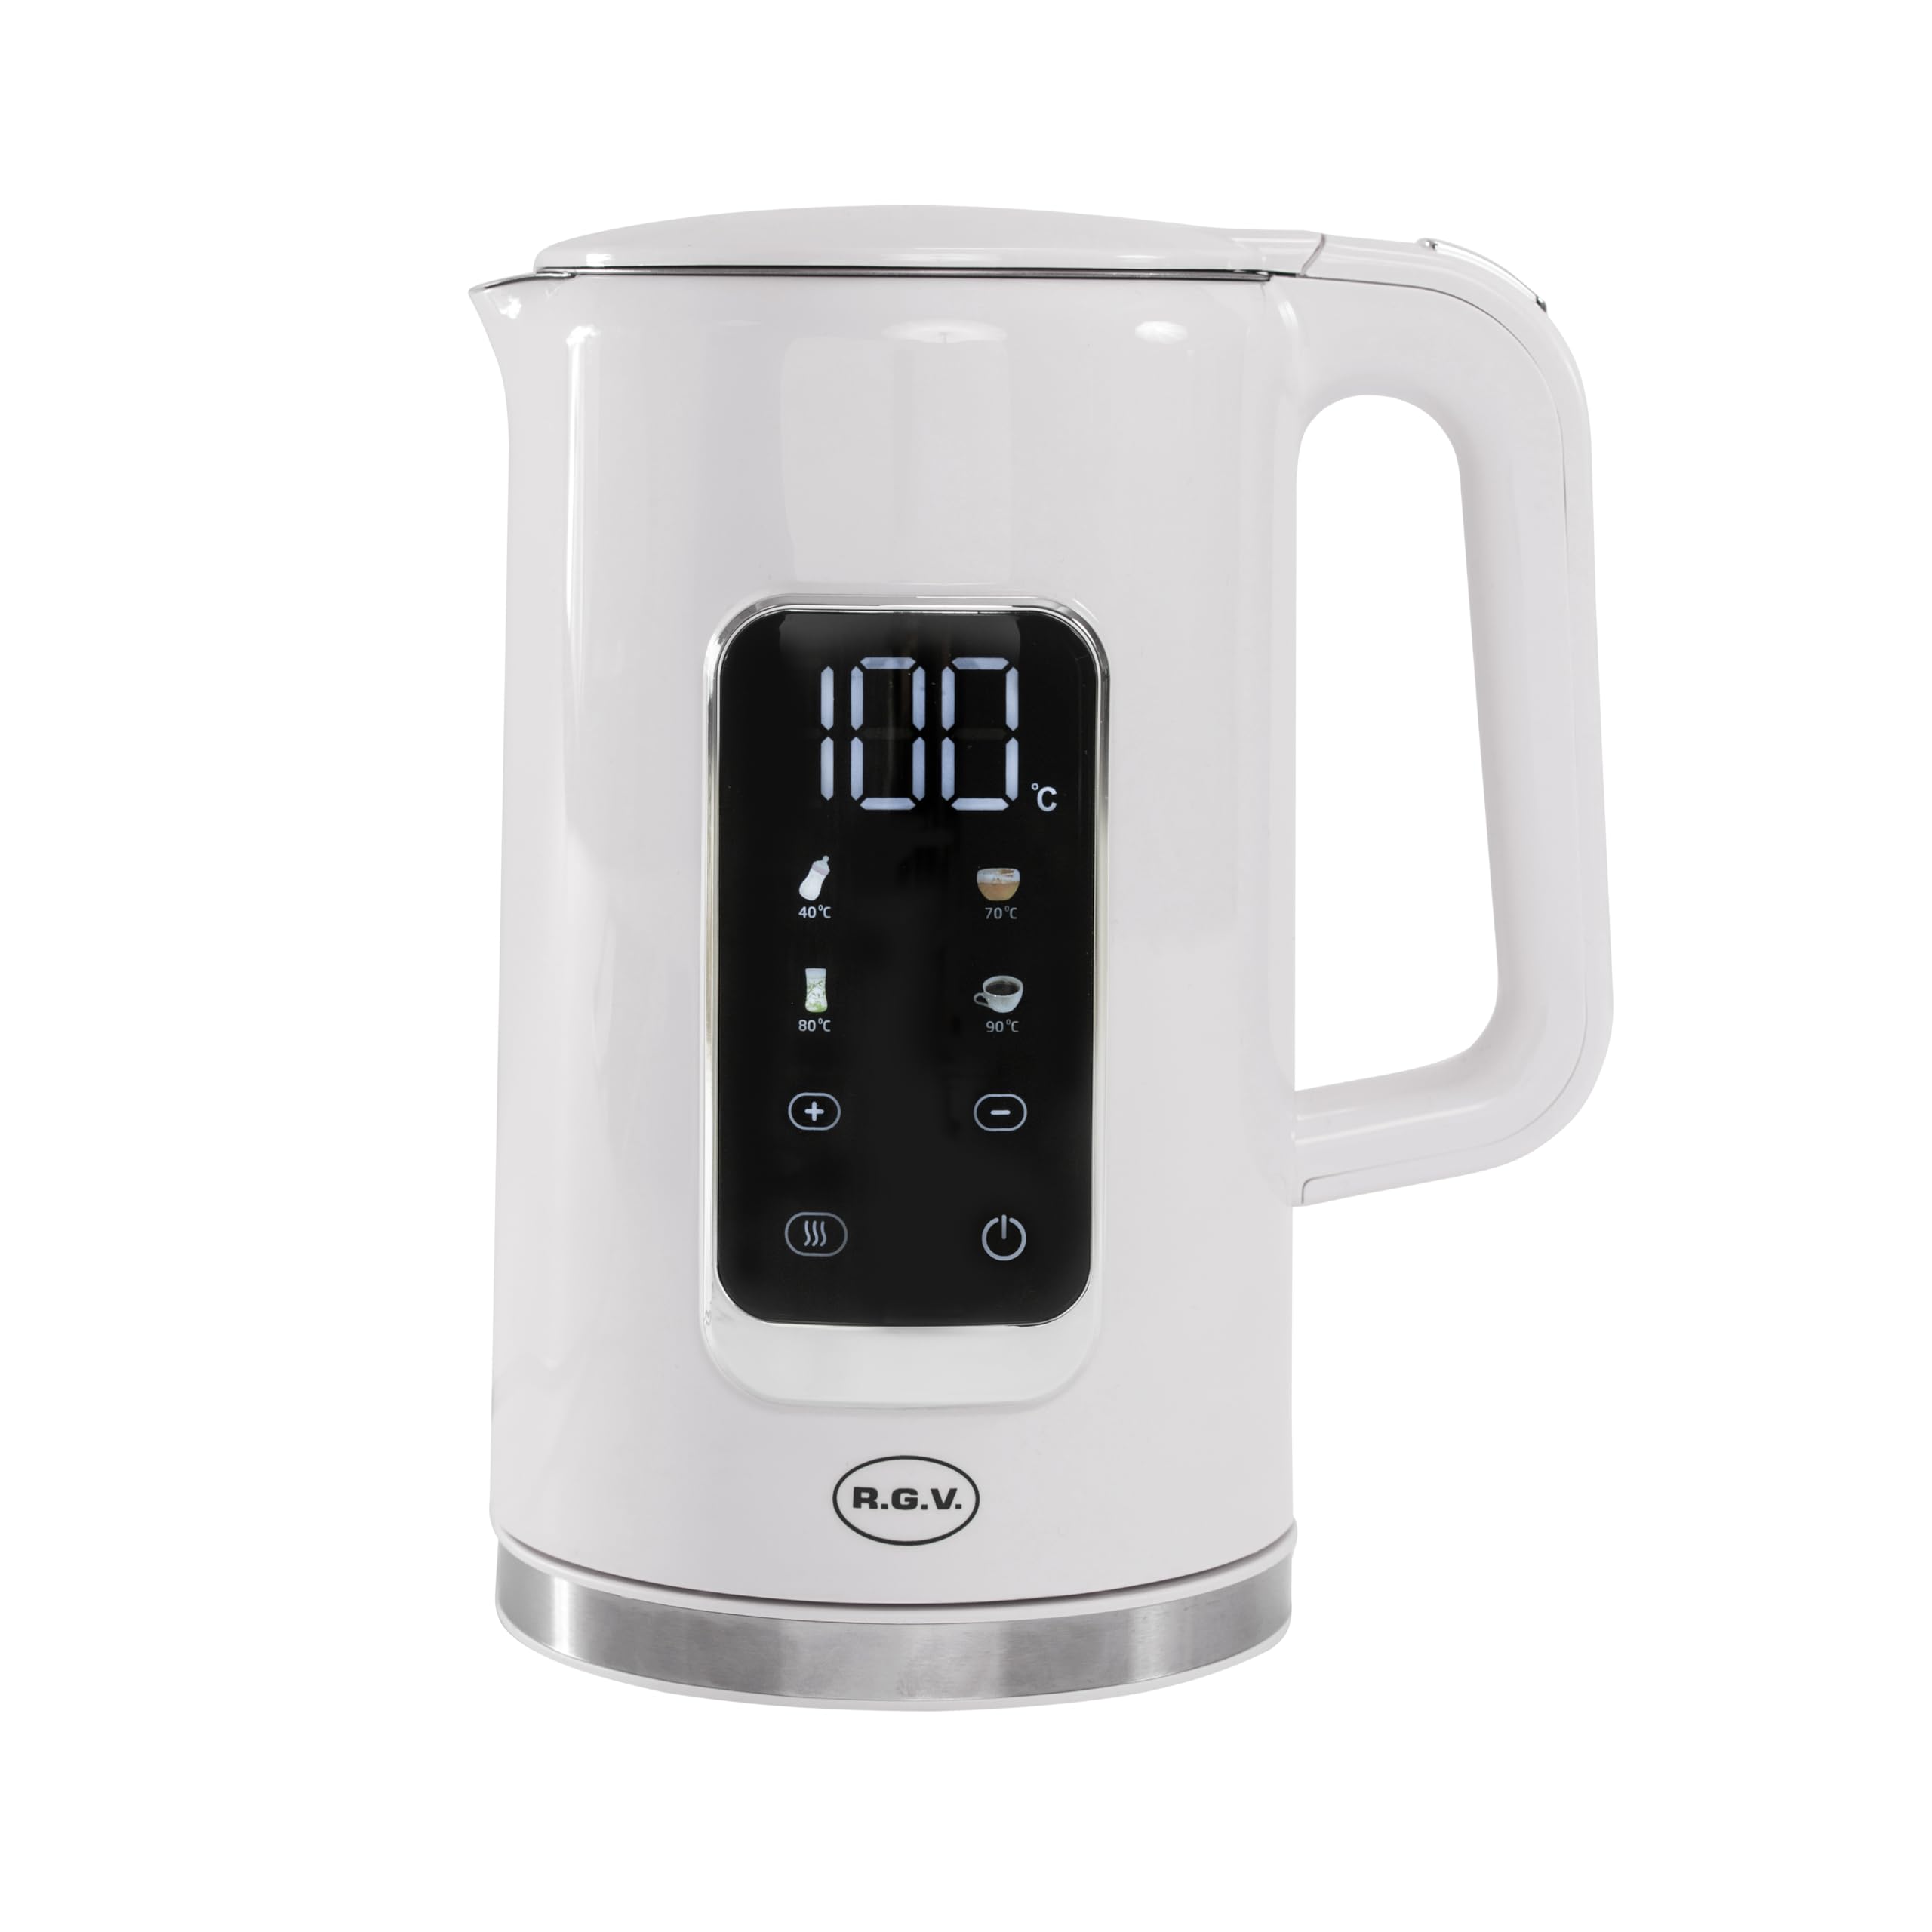
Image: RGV Touch Electric Kettle with its lid open, revealing the stainless steel interior and clear water level markings. The touch control panel is visible on the front.
- Coperchio
- Beccuccio con filtro
- Maniglia
- Water level indicator (internal)
- Pannello di controllo touch
- Base di alimentazione con avvolgicavo
- Interni in acciaio inossidabile

Immagine: Frontale view of the RGV Touch Electric Kettle, highlighting its sleek white exterior and the integrated black touch control panel.
Impostare
- Disimballaggio: Estrarre con cautela il bollitore e tutti gli accessori dall'imballaggio. Conservare l'imballaggio per un eventuale trasporto o stoccaggio futuro.
- Pulizia al primo utilizzo: Before first use, fill the kettle with clean water to the MAX level. Boil the water, then discard it. Repeat this process 2-3 times to remove any manufacturing residues.
- Posizionamento: Place the power base on a flat, stable, heat-resistant surface, away from the edge of the counter. Ensure the power cord is not dangling or in contact with hot surfaces.
- Collegamento elettrico: Collegare il cavo di alimentazione a una presa elettrica dotata di messa a terra.
Istruzioni per l'uso
1. Riempimento del bollitore
- Premere il pulsante di rilascio del coperchio per aprire il coperchio.
- Fill the kettle with the desired amount of fresh, cold water. Do not fill below the MIN mark or above the MAX mark (1.7 Liters).
- Chiudere bene il coperchio finché non scatta in posizione.
2. Accensione/Spegnimento
- Place the kettle securely on its power base.
- The touch control panel will illuminate.
- Premere il pulsante di accensione (U) on the touch panel to turn the kettle on or off.
3. Selecting Temperature Presets
The RGV Touch Electric Kettle offers several pre-set temperature options for various beverages:
- After powering on, select your desired temperature by tapping the corresponding icon or temperature setting on the touch panel. Available temperatures range from 40°C to 100°C.
- The kettle will automatically heat the water to the selected temperature and then switch off.
4. Using Precise Temperature Control
For specific needs, you can precisely set the water temperature between 40°C and 100°C.
- After powering on, use the temperature adjustment buttons (e.g., '+' and '-' or specific temperature icons) to set the exact desired temperature.
- Confirm your selection, and the kettle will begin heating.
5. Mantieni la funzione calda
The keep warm function maintains the water at your selected temperature for an extended period.
- After selecting a temperature and starting the heating process, activate the 'Keep Warm' function (if available as a separate button or integrated into temperature selection).
- The kettle will maintain the water at the target temperature until manually switched off or removed from the base for a prolonged period.
Pulizia e manutenzione
Una pulizia regolare garantisce prestazioni ottimali e prolunga la durata del bollitore.
1. Pulizia esterna
- Scollegare sempre il bollitore e lasciarlo raffreddare completamente prima di pulirlo.
- Pulisci l'esterno con un panno morbido eamp stoffa. Non utilizzare detergenti abrasivi o prodotti chimici aggressivi.
- Assicurarsi che la base di alimentazione e i collegamenti elettrici rimangano asciutti.
2. Interior Cleaning (Descaling)
Mineral deposits (limescale) can build up over time, affecting performance. Descale your kettle regularly, especially in hard water areas.
- Riempire il bollitore con una miscela di aceto bianco e acqua (rapporto 1:2) o con una soluzione decalcificante commerciale, seguendo le istruzioni del prodotto.
- Bring the mixture to a boil and let it stand for at least 30 minutes, or longer if scale is heavy.
- Gettare la soluzione e sciacquare abbondantemente l'interno con acqua fresca più volte.
- Per i depositi più ostinati, strofinare delicatamente con una spazzola non abrasiva.
3. Pulizia del filtro
- The spout filter can be removed for cleaning. Gently pull it out.
- Rinse the filter under running water and brush away any deposits.
- Reinsert the filter securely after cleaning.
Istruzioni per la cura: Hand wash only for the kettle interior. Do not immerse the kettle or power base in water.
Risoluzione dei problemi
| Problema | Possibile causa | Soluzione |
|---|---|---|
| Il bollitore non si riscalda. | Not plugged in; Kettle not properly seated on base; No power at outlet; Kettle has boiled dry. | Check power plug; Ensure kettle is correctly placed on base; Check household fuse/breaker; Allow kettle to cool, then refill and restart. |
| L'acqua ha un sapore strano o contiene particelle. | Residui del primo utilizzo; accumulo di calcare. | Perform first use cleaning (boil and discard water 2-3 times); Descale the kettle as per cleaning instructions. |
| Kettle switches off before boiling/reaching target temperature. | Limescale buildup; Faulty sensor. | Descale the kettle; If problem persists, contact customer support. |
| Il coperchio non si chiude correttamente. | Obstruction; Damaged lid. | Check for any foreign objects preventing closure; Contact customer support if damaged. |
Specifiche
- Marca: RGV
- Numero modello: 111420
- Colore: Bianco
- Dimensioni (L x P x A): Dimensioni: 21 x 16 x 27 cm
- Capacità: 1.7 litri
- Energia: 2200 Watt
- Materiale: Acciaio inossidabile (interno)
- Caratteristica speciale: Temperature Control (40°C - 100°C), Keep Warm Function
- Peso dell'articolo: 1.7 chilogrammi
- Uso consigliato: Riscaldamento acqua
Garanzia e supporto
This RGV product is covered by a manufacturer's warranty. Please refer to the warranty card included with your purchase for specific terms and conditions, including the warranty period and coverage details. For technical support, service, or spare parts inquiries, please contact your local RGV authorized service center or the retailer where the product was purchased. Keep your proof of purchase for warranty claims.