1. Introduzione
Thank you for choosing DEXSO Heavy Duty Carport Sidewalls. These sidewalls are designed to provide enhanced protection and functionality for your existing 13'x25' carport frame. Constructed from durable 180G PE fabric, they offer resistance against weather and UV radiation, ensuring your vehicle and belongings remain dry and secure. This manual provides essential information for proper installation, operation, and maintenance.
Nota importante: This product includes only the sidewalls. The carport frame is not included and must be purchased separately.
2. Informazioni sulla sicurezza
- Always ensure the carport frame is securely anchored before attaching sidewalls.
- Do not use the sidewalls in extreme weather conditions such as high winds, heavy snow, or severe storms, as this may cause damage to the product or surrounding property.
- Keep all open flames and heat sources away from the fabric.
- Regularly inspect the sidewalls for any signs of wear or damage. Replace damaged components immediately.
- Ensure proper ventilation when the carport is enclosed, especially if storing vehicles or equipment that may emit fumes.
3. Contenuto della confezione
Verificare che tutti i componenti siano presenti prima di iniziare l'installazione.
- DEXSO 13' x 25' Carport Sidewalls (Gray, 180G PE Fabric)
- Bungee Cords for attachment
- Note: Carport frame is NOT included.
4. Configurazione e installazione
These sidewalls are designed for quick and easy attachment to a standard 13'x25' carport frame. Ensure your frame is fully assembled and securely anchored before proceeding.
4.1 Attaching the Sidewalls
- Unfold the sidewall panels carefully. Identify the panels with zipper doors and mesh windows.
- Position the sidewall panels around your existing carport frame. The panels are designed to fit standard 13'x25' frames.
- Using the provided bungee cords, attach the grommets on the sidewalls to the frame poles. Ensure a snug fit to prevent flapping in the wind.
- Work your way around the entire perimeter, securing all attachment points.

Figure 4.1: Bungee Cord Connection. This image illustrates how the bungee cords are used to securely fasten the sidewall panels to the carport frame, ensuring stability.
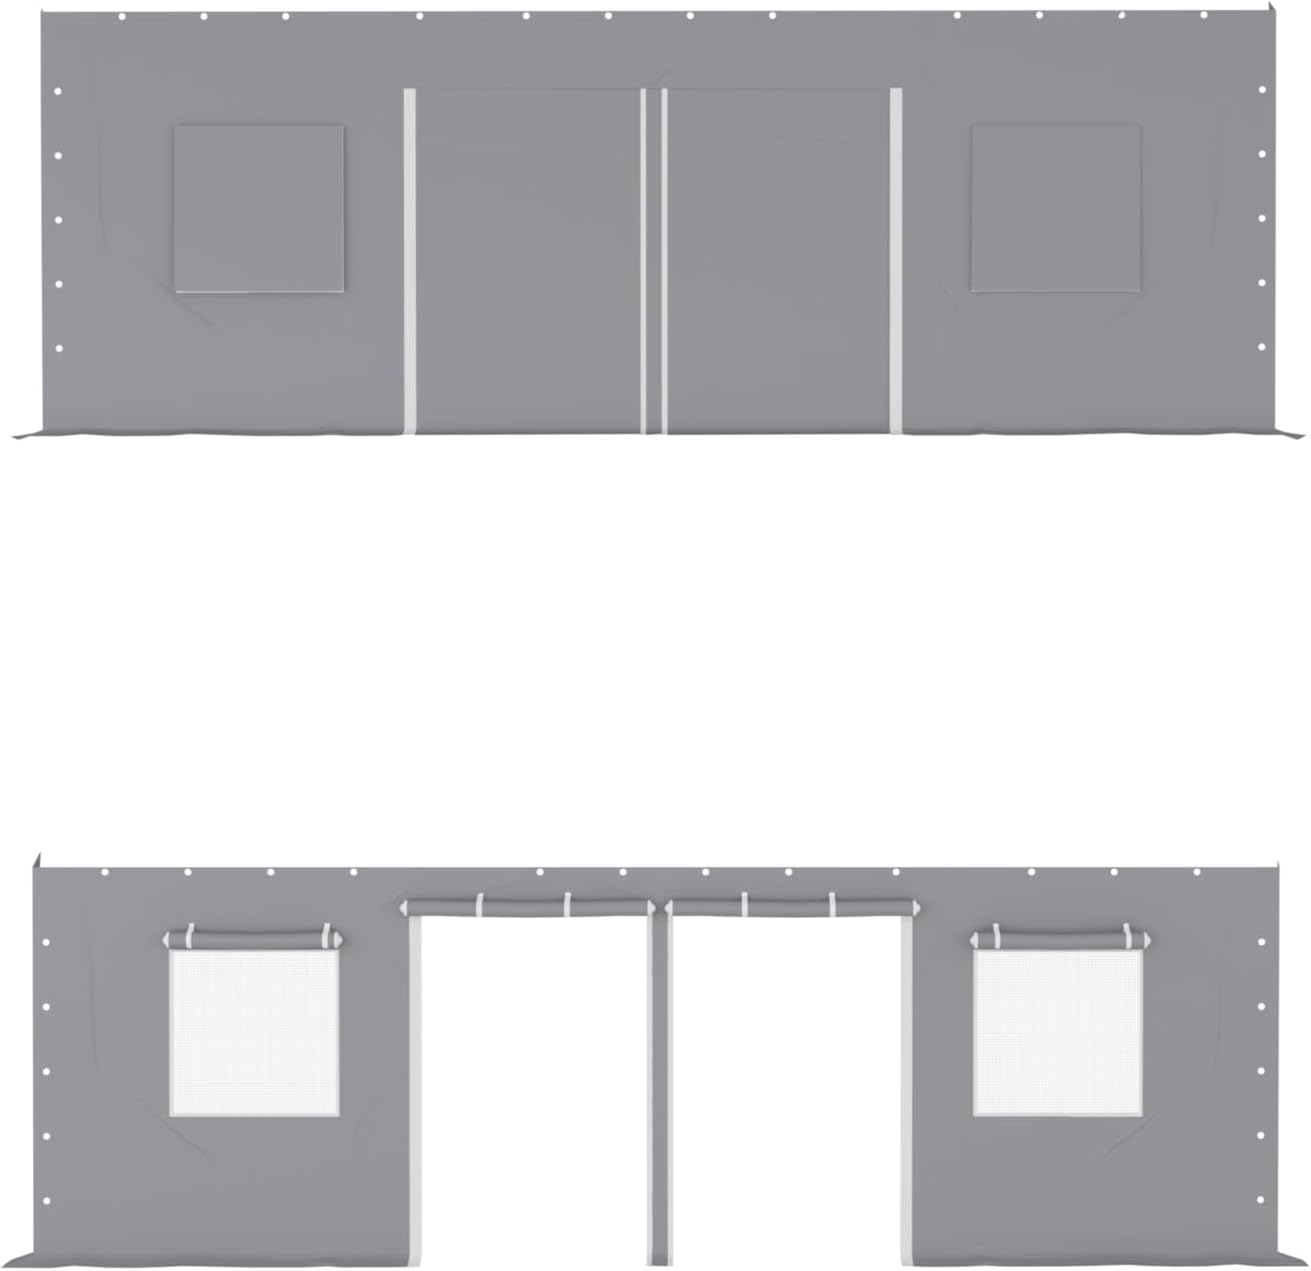
Figure 4.2: Sidewall Panels. This image displays the overall appearance of the installed sidewalls, highlighting the roll-up zipper doors and mesh windows in both open and closed positions.
5. Istruzioni per l'uso
5.1 Using the Roll-Up Zipper Doors
The sidewalls feature four roll-up zipper doors for convenient access. To open a door, simply unzip it completely and roll the fabric upwards. Secure the rolled-up door using the attached straps or ties to keep it in the open position.
Figure 5.1: Dual Zipper Doors and Roll-Up Panels. This image details the dual zipper mechanism for easy access and the method for rolling up panels to create flexible storage space.
5.2 Utilizing Mesh Windows for Airflow
The four mesh windows are designed to optimize airflow and prevent condensation. Each window can be opened or closed as needed. To open, unzip the outer fabric layer and roll it up, securing it with the ties. This exposes the mesh screen, allowing air circulation while keeping insects out. To close, unroll the fabric layer and zip it down.

Figure 5.2: Roll-Up Windows and Fabric Layers. This image illustrates the construction of the windows, showing the outer 220g thickened PE fabric layer and the inner white gauze mesh, which can be rolled up for ventilation.

Figure 5.3: Airflow Vents. This image demonstrates how the open windows facilitate airflow through the carport, helping to prevent moisture buildup and condensation.
6. Manutenzione
- Pulizia: Clean the sidewalls periodically with mild soap and water. Use a soft brush or cloth. Rinse thoroughly and allow to air dry completely before storing or zipping up. Do not use harsh chemicals or abrasive cleaners.
- Ispezione: Regularly check the fabric for tears, punctures, or excessive wear. Inspect zippers and bungee cords for damage. Address any issues promptly to maintain the integrity of the sidewalls.
- Magazzinaggio: If removing the sidewalls for extended periods, ensure they are clean and completely dry. Fold them neatly and store them in a cool, dry place away from direct sunlight and pests.
7. Risoluzione Dei Problemi
- Issue: Sidewalls do not fit the frame correctly.
- Soluzione: Ensure your carport frame is a standard 13'x25' size. These sidewalls are specifically designed for this dimension. Double-check that the panels are oriented correctly.
- Issue: Water pooling on the sidewalls or inside the carport.
- Soluzione: Verify that the sidewalls are tautly attached to the frame using all bungee cords. Ensure the carport frame itself is properly assembled and pitched to allow water runoff from the roof. Check for any tears in the fabric.
- Problema: le cerniere sono difficili da usare.
- Soluzione: Clean any dirt or debris from the zipper teeth. A silicone-based lubricant can be applied sparingly to the zipper teeth to improve smooth operation. Avoid forcing the zippers.
8. Specifiche
| Marca | DEXSO |
| Numero di modello | dexso-sidewalls-1325-180gy5b |
| Dimensioni (L x L) | 13 feet x 25 feet (Designed for standard frames) |
| Materiale del tessuto | 180G PE Fabric (Polyethylene) |
| Colore | Grigio |
| Livello di resistenza all'acqua | Resistente all'acqua |
| Protezione UV | SÌ |
| Caratteristiche | 4 Roll-up Zipper Doors, 4 Mesh Windows for Airflow |
| Peso dell'articolo | 15 libbre |
9. Garanzia e supporto
For warranty information or product support, please contact DEXSO customer service. Refer to your purchase documentation for specific warranty terms and contact details. You can also visit the official DEXSO store on Amazon for further assistance.
DEXSO Store Link: Visit the DEXSO Store


