1. Informazioni sulla sicurezza
Leggere attentamente tutte le istruzioni prima del montaggio e dell'uso. Conservare il manuale per riferimento futuro.
- Do not install near heat sources or in areas with high humidity.
- Garantire un'adeguata ventilazione nell'area di installazione.
- Use caution when handling heavy components to prevent injury.
- Always follow manufacturer's instructions for assembly and installation.
- Keep electrical appliances away from water sources to avoid electrical hazards.
- This product requires full assembly. It is recommended that two people assemble the vanity.
2. Contenuto della confezione
Verify that all parts and hardware are present before beginning assembly. Refer to the detailed parts list included in your product packaging for specific quantities and identification.

Figure 2.1: Front dimensions of the vanity, showing overall width, depth, and height.

Figura 2.2: Basin sink dimensions, including faucet hole spacing and sink depth.
3. Strumenti necessari per il montaggio
The following tools are commonly required for assembling bathroom vanities. Specific tools may vary; consult your included assembly guide.
- Cacciavite con testa Phillips
- Trapano (facoltativo, per preforare i fori pilota se necessario)
- Livello
- Nastro di misurazione
- Occhiali di sicurezza (consigliati)
- Guanti (consigliati)
4. Istruzioni per l'installazione e il montaggio
This bathroom vanity requires full assembly. It is recommended that two people perform the assembly, which typically takes about 30 minutes. Follow the step-by-step instructions provided in the separate assembly manual included with your package. Below are general guidelines and visual aids.
4.1. Fasi dell'assemblea generale
- Disimballare e ispezionare: Carefully unpack all components and inspect them for any damage or missing parts.
- Preparare l'area: Choose a clean, flat, and spacious area for assembly. Lay down a blanket or cardboard to protect the vanity parts and your floor.
- Assemblare il telaio: Follow the diagrams in your assembly manual to connect the main frame components using the provided hardware.
- Installare ripiani e cassetti: Insert the adjustable shelf and assemble the drawer components. The drawer features a removable panel for customizable storage.
- Porte di collegamento: Secure the soft-closing doors to the cabinet frame. Ensure they open and close smoothly.
- Place the Ceramic Sink: Once the cabinet base is assembled, carefully place the ceramic sink with integrated countertop onto the cabinet. Use a sealant (not included) as recommended by your plumbing professional to secure the sink and prevent water leaks.
- Collegare l'impianto idraulico: The vanity features a back open design for easy access to plumbing connections. Consult a qualified plumber for water supply and drain connections.
4.2. Visual Assembly Aids
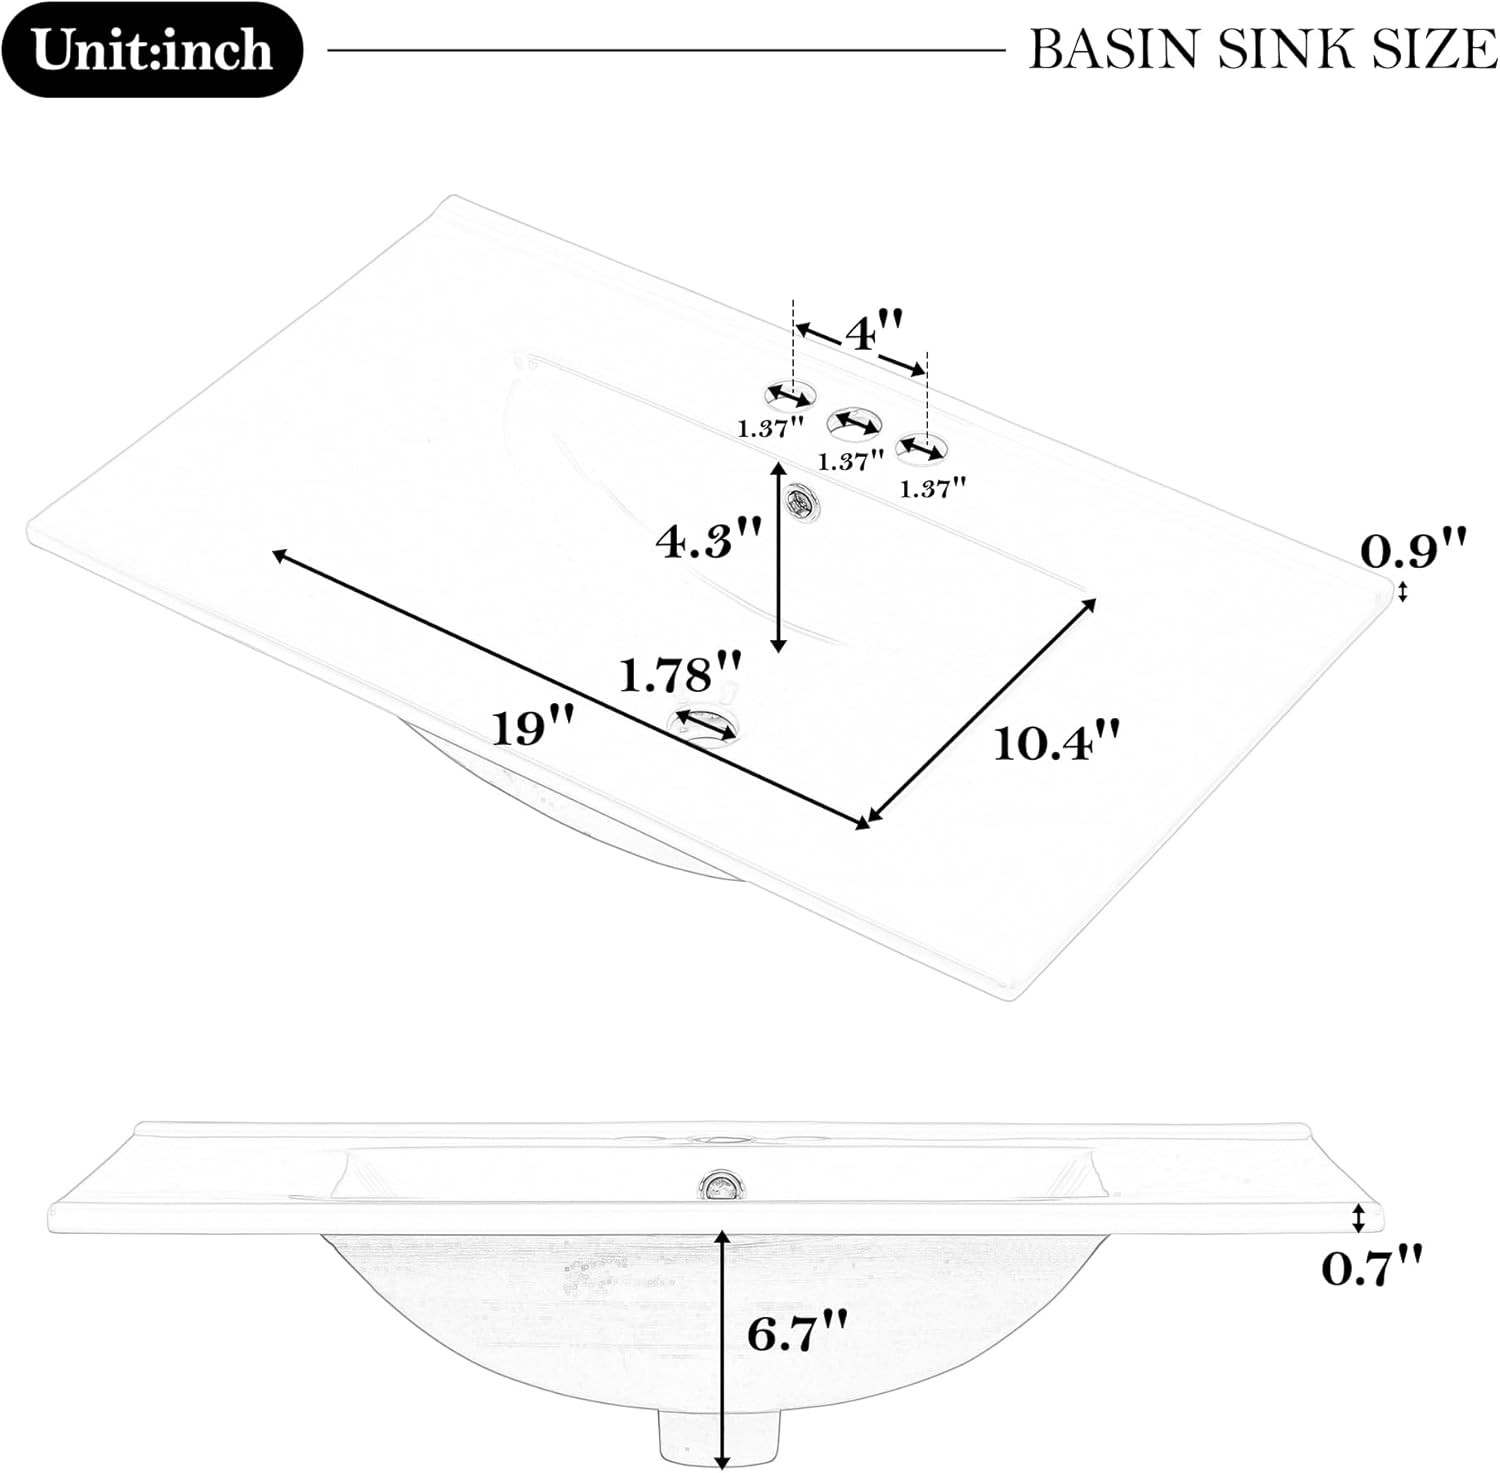
Figura 4.1: Interno view of the vanity, showcasing the two-tier storage and sliding drawer.

Figura 4.2: dettagliata view of the door organizer, adjustable shelf, and the removable panel within the drawer.

Figure 4.3: Back open design for convenient plumbing installation.
4.3. Video di installazione
Video 4.1: Detailed installation guide for a bathroom vanity, demonstrating assembly steps.
5. Istruzioni per l'uso
The THINK 30 Bathroom Vanity is designed for practical and convenient use in your bathroom.
- Porte con chiusura ammortizzata: The cabinet doors are equipped with soft-closing hinges to prevent slamming and ensure quiet operation. Gently push the doors to close them; they will automatically slow down before fully closing.
- Organizzazione di archiviazione: Utilize the two-tier storage shelves behind the doors and the sliding drawer for organizing bathroom essentials such as soaps, towels, shampoos, and tissue paper. The removable panel in the drawer allows for flexible compartment customization.
- Ripiano regolabile: The internal shelf can be adjusted to different heights to accommodate items of various sizes. Refer to your assembly manual for instructions on adjusting shelf height.
- Lavandino in ceramica: The integrated ceramic sink is designed for daily use. Ensure the faucet (not included) is properly installed and sealed to prevent leaks. The overflow with a metal circle helps prevent water from spilling over.
6. Manutenzione
Proper care and maintenance will extend the life and appearance of your bathroom vanity.
- Pulizia dell'armadio: Wipe the painted wood surfaces with a soft, damp panno. Evitare detergenti abrasivi, prodotti chimici aggressivi o umidità eccessiva, che possono danneggiare la finitura.
- Pulizia del lavandino in ceramica: Clean the ceramic sink with mild soap and water. Rinse thoroughly and dry with a soft cloth to prevent water spots. Do not use abrasive pads or cleaners that could scratch the surface.
- Preventing Moisture Damage: Always wipe up spills immediately. Ensure adequate ventilation in the bathroom to reduce humidity, which can affect wood products.
- Cura dell'hardware: Periodically check and tighten any loose screws or hardware. Clean metal handles with a soft, dry cloth.
- Evitare carichi pesanti: Do not place excessively heavy items on shelves or in drawers beyond the recommended weight limit of 100 pounds for the vanity.
7. Risoluzione Dei Problemi
If you encounter issues with your vanity, refer to the following common solutions.
| Problema | Possibile causa | Soluzione |
|---|---|---|
| Le porte non si chiudono correttamente o sono disallineate. | Loose hinge screws or improper hinge adjustment. | Tighten hinge screws. Adjust hinges as per the assembly manual to align doors. |
| I cassetti non scorrono agevolmente. | Drawer slides are not properly aligned or lubricated. | Check alignment of drawer slides. Ensure no obstructions. Lightly lubricate slides if necessary. |
| Water leaks from the sink or plumbing. | Improperly sealed connections or loose plumbing. | Inspect all plumbing connections for tightness. Re-seal if necessary. Consult a qualified plumber. |
| Minor paint chips or scratches. | Normale usura o impatto accidentale. | For minor chips, touch-up paint may be available from the manufacturer or a suitable color match can be found at a hardware store. |
8. Specifiche
| Caratteristica | Dettaglio |
|---|---|
| Marca | THINK 30 |
| Numero di modello | N759P226000F |
| Colore | Verde |
| Dimensioni del prodotto | 18.3"P x 30"L x 33.7"A |
| Materiale | Rubberwood (Frame), Ceramic (Top Material) |
| Tipo di finitura | Dipinto |
| Tipo di montaggio | Montaggio a pavimento (autonomo) |
| Limite di peso | 100 libbre |
| Caratteristiche speciali | Moisture Resistant, Removable Shelf, Scratch Resistant, Stain Resistant, Soft-Closing Doors, Door Organizer, Sliding Tray |
| Assemblaggio richiesto | SÌ |
8.1. Prodotto finitoview Video
Video 8.1: A product showcase video highlighting the features and design of the vanity.
9. Garanzia e supporto
For warranty information, technical support, or to order replacement parts, please contact THINK 30 customer service. Refer to your purchase documentation for specific contact details and warranty terms.
Please have your model number (N759P226000F) and date of purchase ready when contacting support.


