Introduzione
Thank you for choosing the tectake Arctic Ice Maker. This manual provides important information regarding the safe operation, maintenance, and troubleshooting of your new appliance. Please read this manual thoroughly before first use and keep it for future reference.
Istruzioni di sicurezza
Quando si utilizzano apparecchi elettrici, seguire sempre le precauzioni di sicurezza di base per ridurre il rischio di incendi, scosse elettriche e lesioni alle persone.
- Leggere tutte le istruzioni prima dell'uso.
- Non immergere il cavo, la spina o qualsiasi parte dell'apparecchio in acqua o altri liquidi.
- È necessaria un'attenta supervisione quando un elettrodomestico viene utilizzato da bambini o nelle loro vicinanze.
- Scollegare dalla presa quando non in uso e prima della pulizia.
- Non utilizzare alcun apparecchio con un cavo o una spina danneggiati oppure dopo che l'apparecchio stesso non funziona correttamente o è stato danneggiato in qualsiasi modo.
- Utilizzare solo accessori consigliati o venduti dal produttore.
- Non utilizzare all'aperto.
- Non lasciare che il cavo penda dal bordo del tavolo o del bancone o che tocchi superfici calde.
- Non posizionare sopra o vicino a un fornello a gas o elettrico caldo, oppure in un forno caldo.
- Non utilizzare l'apparecchio per scopi diversi da quelli previsti.
- Assicurarsi che l'apparecchio sia posizionato su una superficie stabile e piana.
- Allow adequate ventilation around the appliance.
Prodotto finitoview
The tectake Arctic Ice Maker is designed to quickly produce ice cubes for your beverages. It features a 1.2-liter water reservoir and offers two ice cube sizes.

Figure 1: The tectake Arctic Ice Maker, showing the main unit, removable ice basket, and ice scoop.

Figura 2: Oltreview of the ice maker's features, including two ice cube sizes (small and large), included accessories, assistance systems for full ice basket or empty water reservoir, high capacity, and removable handle.
Impostare
- Disimballaggio: Carefully remove the ice maker from its packaging. Retain the packaging for future storage or transport.
- Posizionamento: Place the ice maker on a flat, stable, and heat-resistant surface. Ensure there is adequate space around the unit for proper ventilation, especially at the back and sides where the fan is located. Avoid direct sunlight or heat sources.
- Pulizia iniziale: Prima del primo utilizzo, pulire l'interno della macchina per il ghiaccio.
- Remove the ice basket and ice scoop. Wash them with warm, soapy water, rinse thoroughly, and dry.
- Wipe the interior of the water reservoir and ice collection area with a soft cloth dampened with warm water and a mild detergent. Rinse with clean water and dry.
- Collegamento elettrico: Collegare il cavo di alimentazione a una presa elettrica dotata di messa a terra (220-240 V).
Istruzioni per l'uso
- Riempire il serbatoio dell'acqua: Aprire il coperchio e riempire il serbatoio dell'acqua con acqua pulita e potabile fino alla linea di riempimento "MAX". Non riempire eccessivamente.
- Accensione: Press the "ON/OFF" button on the control panel to turn on the ice maker. The "POWER" indicator light will illuminate.
- Seleziona la dimensione del cubetto di ghiaccio: Press the "SELECT" button to choose between small (S) or large (L) ice cubes. The corresponding indicator light will illuminate.
- Produzione di ghiaccio: The ice maker will begin its first ice-making cycle. The first batch of ice cubes may take slightly longer (approx. 6-13 minutes) and might be smaller or irregularly shaped. Subsequent cycles will produce ice more consistently.
- Luci di segnalazione:
- "ADD WATER" (Red): This light illuminates when the water reservoir is empty. Refill the reservoir with water, and the ice maker will automatically resume operation.
- "ICE FULL" (Green): This light illuminates when the ice basket is full. The ice maker will pause operation. Remove ice from the basket, and the machine will automatically resume.
- Rimozione del ghiaccio: Once ice cubes are formed, they will drop into the removable ice basket. Use the provided ice scoop to remove ice as needed.
- Disattivazione: To turn off the ice maker, press the "ON/OFF" button again.

Figure 3: Close-up of the control panel, showing "ADD WATER", "ICE FULL", "POWER", and "SELECT" buttons with their respective indicator lights.
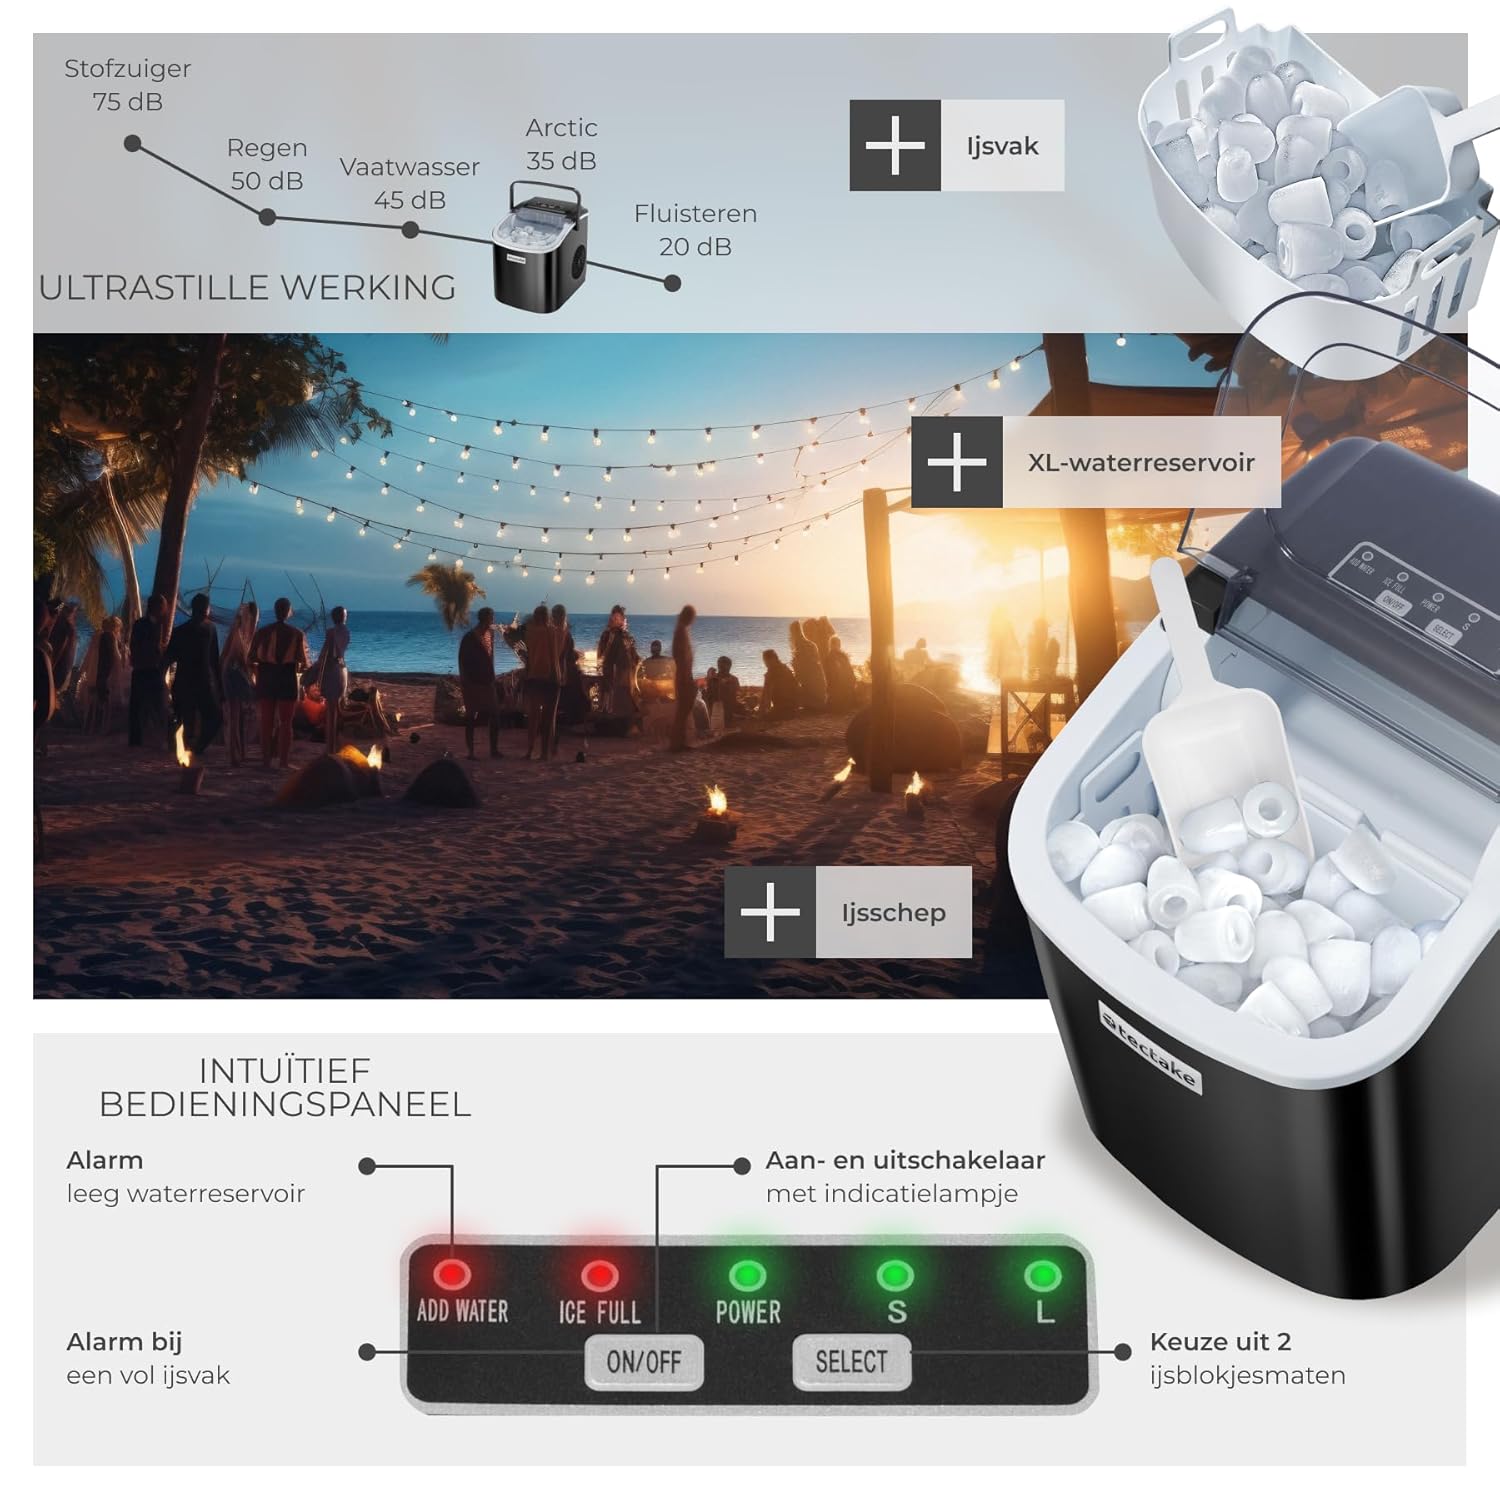
Figure 4: The removable ice basket and ice scoop, demonstrating how ice is collected and retrieved.
Manutenzione
Una pulizia e una manutenzione regolari garantiranno la longevità e le prestazioni ottimali della vostra macchina per il ghiaccio.
- Programma di autopulizia: The ice maker features a convenient self-cleaning program.
- Assicurarsi che il serbatoio dell'acqua sia riempito con acqua pulita.
- Press and hold the "ON/OFF" button for approximately 5 seconds to activate the self-cleaning cycle.
- The machine will run through a cleaning process. Once complete, drain the water.
- Drenaggio dell'acqua: To drain the water from the reservoir, locate the drainage plug at the bottom of the unit. Place a container underneath and remove the plug to allow water to flow out. Once empty, securely replace the plug.
- Pulizia regolare:
- Esterno: Pulisci l'esterno con un panno morbido eamp panno. Non usare detergenti abrasivi o solventi.
- Interno: Periodically clean the water reservoir and ice basket with a solution of water and mild vinegar (10:1 ratio) to prevent mineral buildup. Rinse thoroughly with clean water afterwards.
- Magazzinaggio: If storing the ice maker for an extended period, ensure it is completely drained and dry. Store in a cool, dry place away from direct sunlight.

Figure 5: The drainage plug located at the bottom of the ice maker for easy water removal.
Risoluzione dei problemi
Prima di contattare l'assistenza clienti, consultare la seguente guida alla risoluzione dei problemi più comuni.
| Problema | Possibile causa | Soluzione |
|---|---|---|
| "ADD WATER" light is on. | Il serbatoio dell'acqua è vuoto. | Refill the water reservoir with clean water. |
| La spia "ICE FULL" è accesa. | Il cestino del ghiaccio è pieno. | Rimuovere il ghiaccio dal cestello. |
| Ice production is slow or no ice is made. |
|
|
| I cubetti di ghiaccio sono piccoli o grumosi. |
|
|
Specifiche
Technical specifications for the tectake Arctic Ice Maker, Model 405572.
| Caratteristica | Dettaglio |
|---|---|
| Nome del modello | artico |
| Numero di modello | 405572 |
| Dimensioni (L x P x A) | Circa 24 x 30 x 29 cm (9.5 x 11.8 x 11.4 pollici) |
| Peso | Circa 6.2 kg (13.7 libbre) |
| Capacità di produzione di ghiaccio | Fino a 12 kg (26 libbre) ogni 24 ore |
| Ciclo operativo | Approx. 6 to 13 minutes per batch |
| Capacità del serbatoio d'acqua | ca. 1.2 litri |
| Capacità del cestello del ghiaccio | Circa 0.6 kg |
| Collegamento di potenza | 220-240 V AC |
| Consumo energetico | 100 Watt |
| Materiali | Steel, Copper, Stainless Steel, Aluminum, Polypropylene, ABS Plastic |
| Lunghezza del cavo | Circa 155 cm (61 pollici) |

Figure 6: Dimensional diagram of the tectake Arctic Ice Maker, including overall dimensions and ice cube sizes.
Garanzia e supporto
Per informazioni sulla garanzia e sull'assistenza clienti, consultare la documentazione fornita con l'acquisto o contattare direttamente il venditore. Conservare la prova d'acquisto per eventuali reclami in garanzia.
Il contenuto della confezione include:
- Ice Maker with Ice Basket
- Paletta di ghiaccio
- Manuale dell'utente (questo documento)


