1. Introduzione
This manual provides detailed instructions for the installation, operation, and maintenance of your TUIFAC RC09 Portable CarPlay Screen. This device integrates a 10.26-inch display with wireless Apple CarPlay and Android Auto capabilities, alongside a comprehensive 3-channel dash camera system. Please read this manual thoroughly before use to ensure proper functionality and safety.

Immagine 1.1: Sopraview of the TUIFAC RC09 Portable CarPlay Screen and its included accessories, showcasing the main display unit, front camera, rear camera, car charger, and various mounting options.
2. Contenuto della confezione
Verifica che tutti gli articoli elencati di seguito siano presenti nel tuo pacco:
- 10.26-inch Touchscreen Display with Integrated Front and Cabin Cameras
- Scheda SD da 32 GB
- Caricabatteria da auto con porta USB aggiuntiva
- Staffa di aspirazione
- Staffa verticale
- Rear Camera with Fixed Set (including mounting hardware)
- Supporto adesivo 3M
- Suction Cup Fixed Disk
- Piede di porco (per il passaggio dei cavi)
- Fibbie in filo metallico (x4)
- Cavo audio (AUX)
- Manuale dell'utente (questo documento)

Immagine 2.1: Visual representation of all components included in the TUIFAC RC09 product package.
3. Configurazione e installazione
Follow these steps to install your TUIFAC RC09 unit in your vehicle.
3.1 Montaggio dell'unità display
The TUIFAC RC09 offers two primary mounting options:
- Supporto a ventosa: Attach the suction cup bracket to a clean, smooth surface on your dashboard or windshield. Ensure the lever is pressed down to create a secure vacuum seal.
- Vertical Bracket: Use the vertical bracket for a more permanent installation, typically on the dashboard. Secure it using the provided adhesive.
Regola l'angolazione del display per una visualizzazione ottimale viewsenza ostacolare la guida view.

Immagine 3.1: Illustration of the flexible mounting options, including the suction cup and vertical bracket, allowing for various display positions.
3.2 Collegamento di alimentazione e telecamere
- Insert the 32GB SD card into the designated slot on the main unit.
- Connect the car charger to the main unit and plug it into your vehicle's cigarette lighter socket.
- Connect the rear camera cable to the main unit. Route the cable discreetly to the rear of your vehicle and mount the rear camera securely.
- Use the provided crowbar and wire buckles to neatly route all cables, ensuring they do not interfere with vehicle operation.
4. Istruzioni per l'uso
CarPlay wireless 4.1 e Android Auto
The TUIFAC RC09 supports wireless Apple CarPlay and Android Auto for seamless smartphone integration.
- Assicurati che il Bluetooth sia abilitato sul tuo smartphone.
- On the RC09 screen, navigate to the CarPlay or Android Auto icon and select it.
- Follow the on-screen prompts to pair your phone via Bluetooth. The unit will then establish a Wi-Fi connection for data transfer.
- Once connected, your phone's compatible apps (navigation, music, messaging) will appear on the RC09 display.
The unit also supports AirPlay and Mirror Link for screen mirroring.

Immagine 4.1: Display showing the various wireless connectivity options, including Apple CarPlay, Android Auto, and Mirror Link, along with Bluetooth 5.2 and 5GHz Wi-Fi.
4.2 3-Channel Dash Camera System
The integrated dash cam system provides comprehensive recording with three cameras:
- Fotocamera frontale: 3K WQHD (2880×1620 at 30fps) with a 170° wide angle.
- Telecamera di cabina: Full HD 1080P (at 30fps) with a 160° wide angle, featuring IR LEDs for night vision.
- Telecamera posteriore: Full HD 1080P (at 30fps) with a 160° wide angle.
Le caratteristiche principali includono:
- Visione notturna eccellente: F/1.8 aperture and 6-layer optical lens for clear recordings in low-light conditions. The cabin camera automatically switches to black-and-white imaging in darkness.
- Ampia gamma dinamica (WDR): Balances exposure in bright and dark areas for improved image clarity.
- Registrazione in loop: Sovrascrive automaticamente il più vecchio filequando la scheda SD è piena, garantendo una registrazione continua.
- Built-in Gravity Sensor (G-Sensor): Detects sudden impacts or collisions and automatically locks the current video segment to prevent it from being overwritten. Sensitivity can be adjusted (High, Medium, Low).
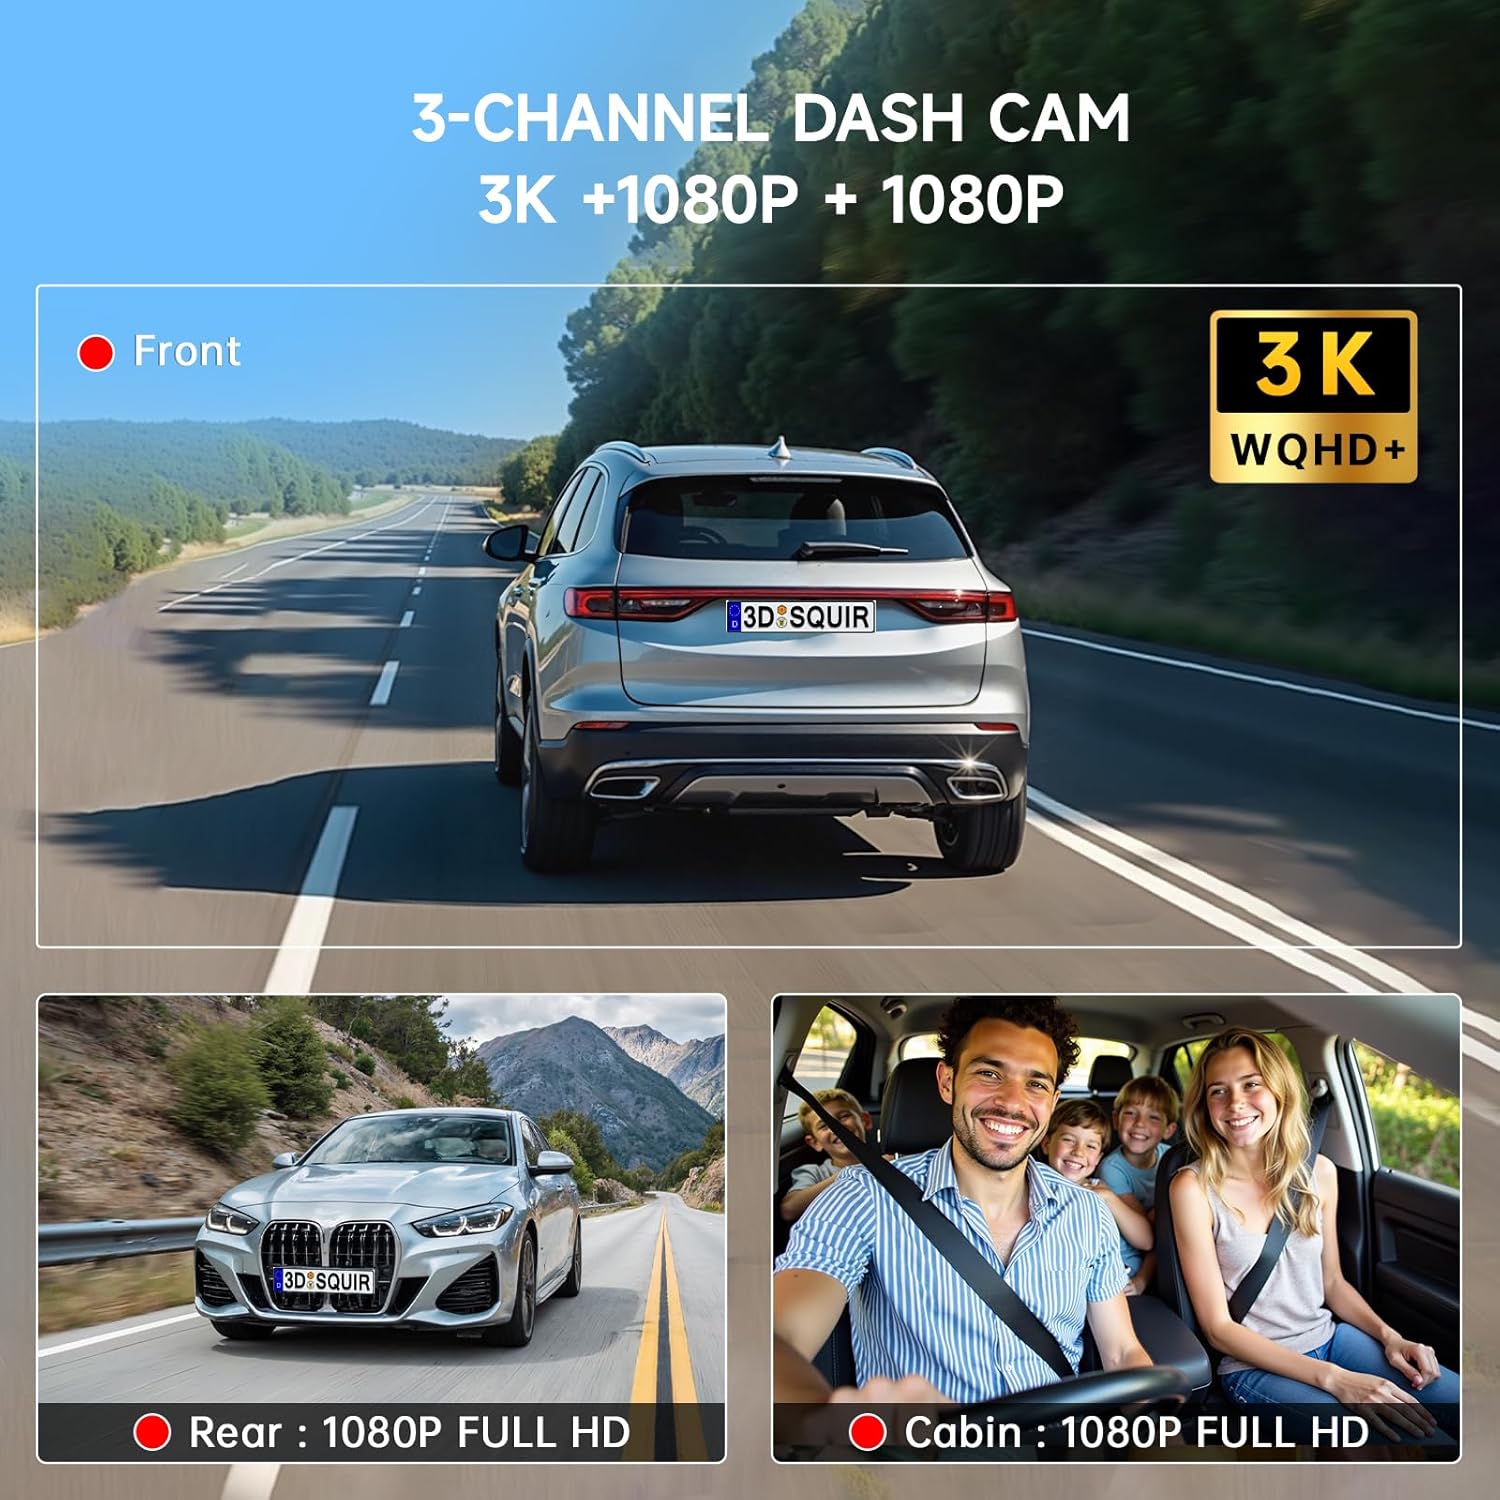
Immagine 4.2: Illustration of the three camera views: Front (3K WQHD), Rear (1080P Full HD), and Cabin (1080P Full HD).

Immagine 4.3: Details on Super Night Vision technology, including F/1.8 aperture, 6-layer optical lens, and WDR for enhanced clarity in various lighting conditions.
4.3 One-Button Reverse Camera
To activate the rear camera view, press the dedicated 'R' button located on the car charger. This instantly displays the rear camera feed with integrated reversing assist lines, aiding in parking maneuvers.

Immagine 4.4: Demonstrates the 'R' button on the car charger for instant activation of the reverse camera view con linee di assistenza al parcheggio.
4.4 Controllo vocale
Utilize voice commands through CarPlay or Android Auto for hands-free operation. Say "Hey Siri" (for Apple CarPlay) or "Hi Google" (for Android Auto) to perform actions such as adjusting volume, checking weather, making calls, or navigating.

Immagine 4.5: Examples of voice commands for navigation, calls, and information retrieval using Siri or Google Assistant.
4.5 Opzioni di uscita audio
The RC09 offers multiple ways to output audio:
- Doppi altoparlanti integrati: Per la riproduzione audio diretta dall'unità.
- Trasmissione FM: Tune your car's FM radio to a clear, unused frequency, then set the RC09 to transmit audio on the same frequency (87.5MHz-108MHz).
- Bluetooth 5.2: Connect the RC09 to your car's audio system via Bluetooth for wireless sound.
- Connessione ausiliaria: Use the provided audio cable to connect the RC09 to your car's AUX input.

Immagine 4.6: Visual representation of the four audio connection modes: Built-in Speaker, FM Transmit, Bluetooth 5.2, and Aux Connection.
4.6 Adjustable Brightness
The display brightness can be adjusted manually or set to automatic mode, which adapts to ambient light conditions for optimal visibility day or night.
5. Manutenzione
- Pulizia: Utilizzare un panno morbido e asciutto per pulire lo schermo del display. Per le macchie ostinate, strofinare leggermenteampLavare il panno con acqua. Evitare prodotti chimici aggressivi o materiali abrasivi.
- Gestione della scheda SD: Regularly format the SD card (at least once a month) to ensure optimal recording performance and prevent data corruption. Back up important video files before formatting. Replace the SD card if it shows signs of degradation or error.
- Ispezione dei cavi: Controllare periodicamente tutti i cavi per verificare che non siano usurati, danneggiati o allentati.
6. Risoluzione Dei Problemi
| Problema | Possibile causa | Soluzione |
|---|---|---|
| L'unità non si accende. | No power from car charger; faulty connection. | Ensure car charger is securely plugged into both the unit and the vehicle's cigarette lighter. Check vehicle's fuse for the cigarette lighter socket. |
| CarPlay/Android Auto non si connette. | Problemi con Bluetooth/Wi-Fi; compatibilità del telefono. | Ensure Bluetooth and Wi-Fi are enabled on your phone. Restart both the phone and the RC09 unit. Check phone settings for CarPlay/Android Auto permissions. |
| La dash cam non registra. | SD card full or corrupted; incorrect settings. | Format the SD card via the unit's settings. Ensure loop recording is enabled. Check if the SD card is properly inserted. |
| Poor audio quality via FM. | Interferenza; frequenza errata. | Select a different, unused FM frequency on both the RC09 and your car radio. Avoid frequencies near strong radio stations. |
| Unit turns off due to heat. | Overheating from direct sunlight or high ambient temperature. | If possible, reposition the unit to reduce direct sun exposure. Use a sunshade when parked in hot conditions. Ensure proper ventilation around the unit. |
| Reverse camera not automatic. | Designed for manual activation. | The reverse camera is activated by pressing the 'R' button on the car charger, not automatically by shifting into reverse. This is by design. |
7. Specifiche
| Caratteristica | Dettaglio |
|---|---|
| Numero di modello | RC09 |
| Dimensioni dello schermo | 10.26 inches Touchscreen |
| Risoluzione della fotocamera frontale | 3K WQHD (2880×1620 at 30fps) |
| Risoluzione della telecamera della cabina | 1080P Full HD (at 30fps) |
| Risoluzione della telecamera posteriore | 1080P Full HD (at 30fps) |
| Angolo della fotocamera frontale | 170° |
| Cabin/Rear Camera Angle | 160° |
| Connettività | Bluetooth 5.2, Dual-band Wi-Fi (2.4GHz & 5GHz), USB, AUX |
| Sistemi compatibili | Apple CarPlay, Android Auto, AirPlay, Mirror Link |
| Modalità di uscita audio | Stereo (Built-in Speaker, FM Transmit, Bluetooth, AUX) |
| Caratteristiche speciali | Super Night Vision, WDR, G-Sensor, Loop Recording, Voice Control |
| Magazzinaggio | Supporta schede TF (incluse 32 GB) |
| Peso dell'articolo | 2.59 libbre |
| Dimensioni del pacco | 11.25 x 6.25 x 4 pollici |
8. Garanzia e supporto
TUIFAC is committed to providing reliable products and customer satisfaction.
- Garanzia: Your purchase includes a 1-year warranty from the date of purchase.
- Politica di ritorno: A hassle-free 30-day return policy is provided.
- Assistenza clienti: Our dedicated support team is available 24/7 to assist with any concerns or technical issues.
Per assistenza, contattaci a: service-vip@customerafter-sales.com
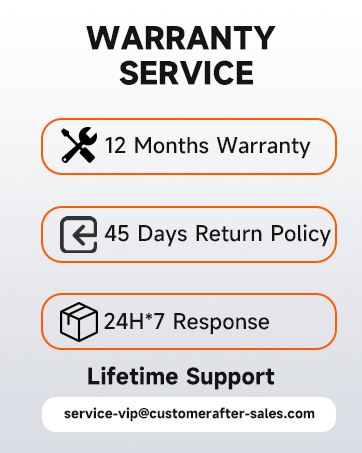
Immagine 8.1: Summary of warranty service, return policy, and customer support availability.


