Introduzione
This manual provides detailed instructions for the assembly, operation, maintenance, and troubleshooting of your Sovol SV06 Plus ACE 3D Printer. Please read this manual thoroughly before using the printer to ensure safe and efficient operation. The Sovol SV06 Plus ACE is an advanced 3D printer designed for high-speed and precise additive manufacturing, featuring a large build volume, automatic leveling, and open-source capabilities.
Key features include a maximum print speed of 500mm/s, a 4.3-inch capacitive touchscreen, built-in camera for defect detection and timelapse, dual-axis core metal bearings and rails for enhanced stability, and an advanced planetary dual gear extruder with a 300℃ high-temperature nozzle.
1. Impostazione
1.1 Disimballaggio e ispezione iniziale
Carefully remove all components from the packaging. Inspect all parts for any signs of damage during transit. Ensure all listed components are present. The printer comes well-packaged to prevent damage.
- Main printer frame
- Gantry assembly
- Extruder assembly
- Alimentazione elettrica
- Rack materiale
- Schermo tattile
- Tools and accessories (e.g., USB stick, filament sample)

Image: The fully assembled Sovol SV06 Plus ACE 3D Printer, showcasing la sua struttura e i suoi componenti.
1.2 Istruzioni di montaggio
The Sovol SV06 Plus ACE features a Gantry i3 structure, designed for easy assembly. Follow the included quick start guide or refer to online video tutorials for detailed steps. Assembly typically takes 15-20 minutes.
- Attach the gantry assembly to the base unit.
- Secure the extruder mechanism to the X-axis.
- Connect all necessary cables (power, motor, sensor, screen).
- Install the material rack.
- Mount the touch screen.
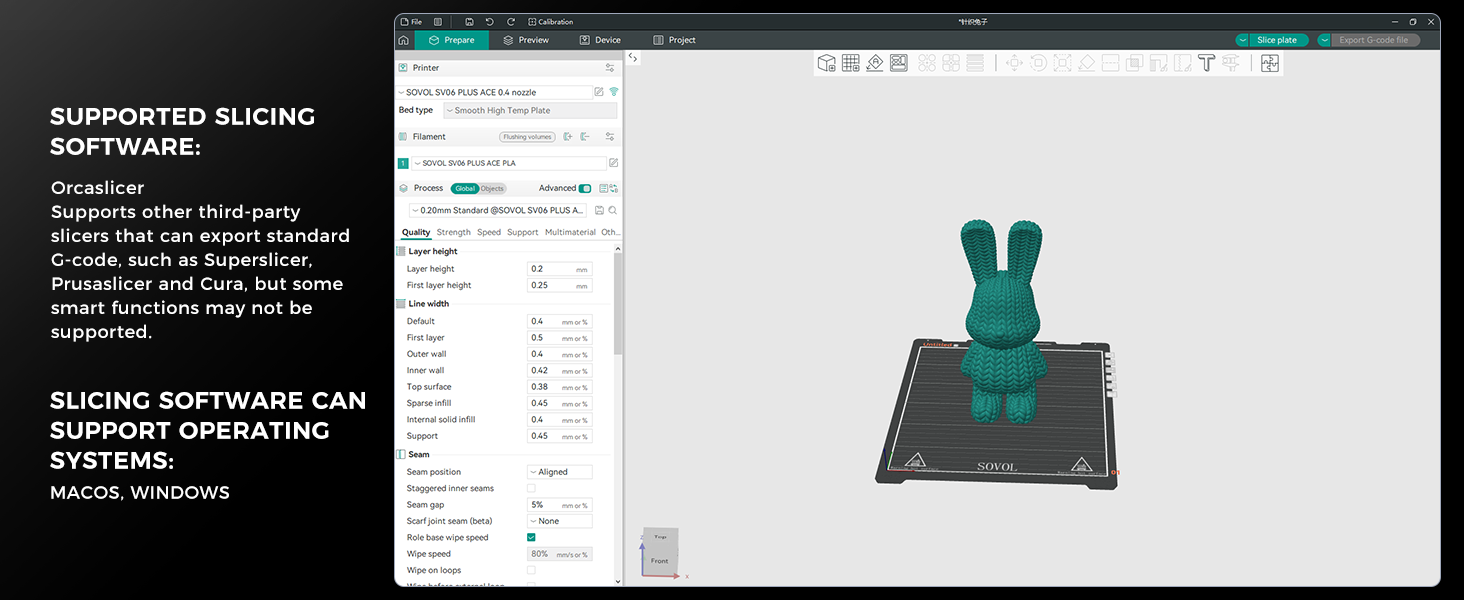
Image: A visual representation of the printer's components before and after assembly, highlighting the Gantry i3 structure.
1.3 Power Connection and Initial Boot-up
Connect the power cable to the printer and a suitable power outlet. Turn on the printer using the power switch. The 4.3-inch capacitive touchscreen will illuminate, indicating successful boot-up.
2. Utilizzo della stampante
2.1 Livellamento automatico del letto
The SV06 Plus ACE features one-click auto-leveling. The leveling sensor automatically measures Z-axis offsets and adjusts the Z-offset for precise leveling. Adaptive probing adjusts the probing area based on the print's footprint, reducing preparation time. Dual Z-axis motors ensure stable leveling.
- Navigate to the "Calibrate" menu on the touchscreen.
- Select "Auto Leveling" or "Bed Calibration" and initiate the process.
- The printer will automatically probe the print bed at multiple points.

Image: The printer's print head with a blue light indicating the auto-leveling sensor probing the print bed.
2.2 Filament Loading and Unloading
The advanced planetary dual gear extruder with a 1:7.5 gear ratio ensures consistent filament output. The SV06 Plus ACE supports a wide range of materials including PETG, TPU, PLA, and ABS.
Caricamento del filamento:
- Preheat the nozzle to the appropriate temperature for your filament type.
- Insert the filament into the extruder's input hole until it catches the gears.
- On the touchscreen, select "Load Filament" and confirm. The extruder will pull the filament through until it exits the nozzle.
Unloading Filament:
- Preheat the nozzle to the appropriate temperature.
- On the touchscreen, select "Unload Filament" and confirm. The extruder will retract the filament.
- Once retracted, gently pull the filament out of the extruder.

Image: A detailed diagram illustrating the internal mechanism of the planetary dual gear extruder, showing the gear ratio and filament path.
2.3 Printing from SD Card/USB
The printer supports printing directly from an SD card or USB drive. Ensure your G-code files are properly sliced using compatible software.
- Insert the SD card or USB drive into the designated slot on the printer.
- On the touchscreen, navigate to the "Print" menu.
- Seleziona il codice G desiderato file from the list and confirm to start printing.
2.4 Remote Monitoring and Control (Built-in Camera)
The built-in camera allows for real-time monitoring and defect detection. With the Obico App, the printer can automatically stop printing if a "spaghetti monster" is detected. You can also control the printer remotely and capture timelapse photography.

Image: Screenshots demonstrating the remote monitoring capabilities of the Sovol SV06 Plus ACE via a mobile application and a computer interface, showing live camera feed and printer status.
2.5 Slicing Software Compatibility
The Sovol SV06 Plus ACE is compatible with OrcaSlicer, Cura-Ultimaker, and Cura-Sovol. It also supports other third-party slicers that can export standard G-code, such as SuperSlicer and PrusaSlicer. The printer's Klipper firmware enhances speed and accuracy, supporting features like Input Shaping and Pressure Advance for smoother, more detailed prints.
Image: A screenshot of the OrcaSlicer software interface, showing a 3D model ready for slicing and various print settings.
3. Manutenzione
3.1 Pulizia del piano di stampa
Regularly clean the double-sided black PEI powder flexible steel plate to ensure optimal adhesion. Use isopropyl alcohol and a clean cloth to wipe down the surface after each print. Avoid abrasive materials that could damage the surface.
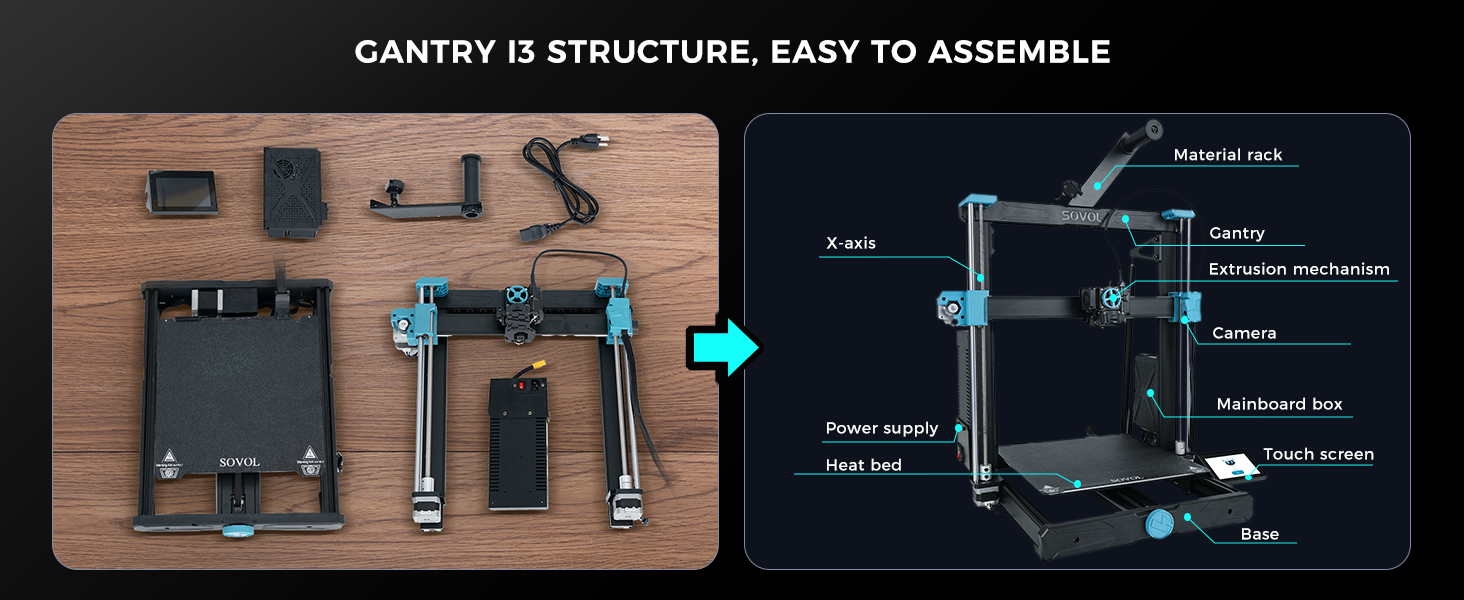
Immagine: Fronte e retro views of the double-sided black PEI powder flexible steel plate, which serves as the print surface.
3.2 Lubrication of Moving Parts
The X and Y axes are equipped with dual-axis core metal bearings and an all-metal rail system, which significantly improves reliability and lifespan. Periodically inspect and lubricate the smooth rods and lead screws with appropriate grease to ensure smooth movement and reduce wear.
3.3 Manutenzione dell'ugello e dell'estrusore
The 300℃ high-temperature all-metal nozzle kit and ceramic heating plate allow for printing with various filaments. Regularly check the nozzle for clogs and clean or replace it as needed. Ensure the extruder gears are free of filament debris to maintain consistent feeding.

Image: A composite image showing the 300℃ all-metal nozzle kit, ceramic heating plate, and the 1:7.5 planetary dual gear direct extruder components.
3.4 Aggiornamenti firmware
The printer supports One-Click OTA (Over-The-Air) firmware upgrades. Regularly check for and install the latest firmware versions to ensure optimal performance and access new features.
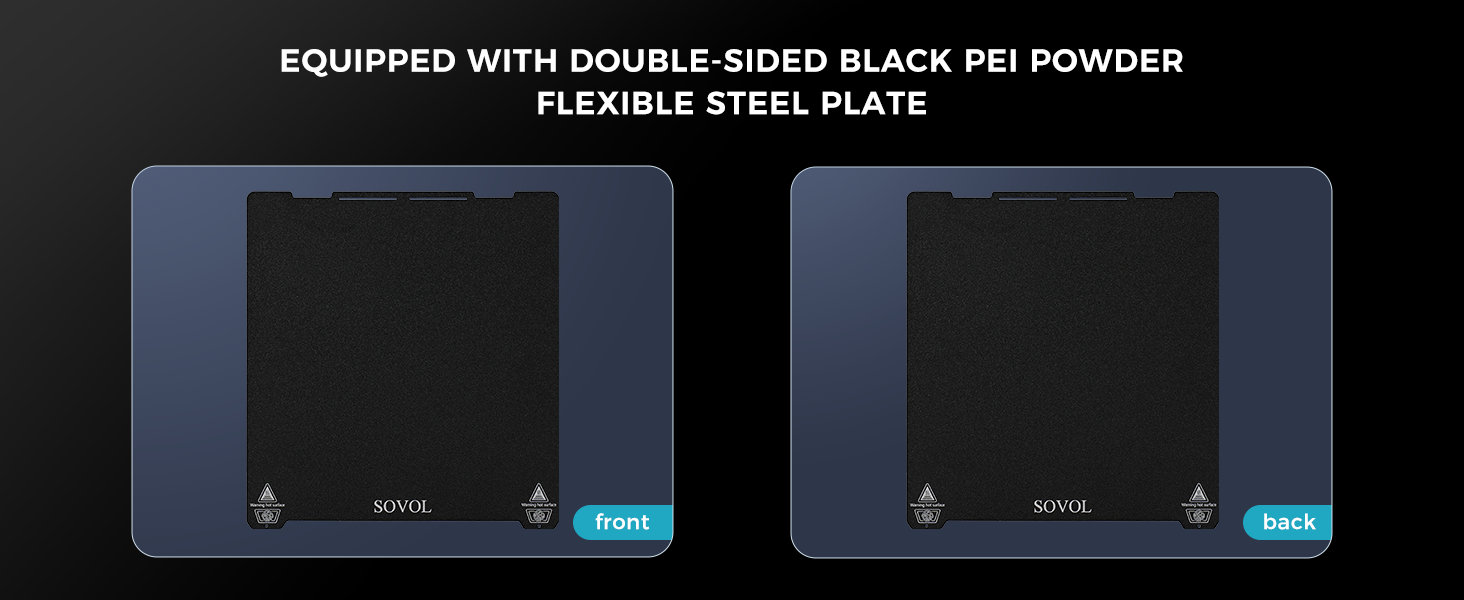
Image: A close-up of the printer's 4.3-inch touchscreen displaying a prompt for a firmware update, with "OK" and "Cancel" options.
4. Risoluzione Dei Problemi
| Problema | Possibile causa | Soluzione |
|---|---|---|
| La stampa non si attacca al letto | Livellamento del letto non corretto, superficie di stampa sporca, temperatura del letto non corretta. | Perform auto-leveling, clean the PEI plate with isopropyl alcohol, adjust bed temperature according to filament type. |
| Filamento non estruso | Clogged nozzle, tangled filament, incorrect temperature, extruder gear issues. | Clear nozzle clog, untangle filament, verify print temperature, check extruder gears for debris. |
| Scarsa qualità di stampa (spostamenti di livello, formazione di stringhe) | Loose belts, incorrect print speed, retraction settings, filament moisture. | Check and tighten belts, adjust print speed, optimize retraction settings in slicer, dry filament. The reinforced Z-axis with diagonal rod supports minimizes wobbling during high-speed printing. |
| La stampante emette rumori insoliti | Lack of lubrication on moving parts, loose components, fan issues. | Lubricate rods and lead screws, check for loose screws, inspect cooling fans. The dual-axis core metal bearings and rails reduce noise. |
| "Spaghetti monster" detection | Print failure, model detaching from bed. | The built-in camera and Obico App will automatically stop printing. Address the root cause of print failure (e.g., bed adhesion, support structures). |
For further assistance, refer to the official Sovol support resources or community forums.
5. Specifiche
| Caratteristica | Dettaglio |
|---|---|
| Modello | Sovol SV06 Plus ACE |
| Costruisci volume | 11.8 x 11.8 x 13.8 pollici (300 x 300 x 350 mm) |
| Max Velocità di stampa | Fino a 500 mm/s |
| Tipo di estrusore | Planetary Dual Gear Direct Drive Extruder (1:7.5 ratio) |
| Temperatura dell'ugello | Max 300℃ (All-metal nozzle kit, ceramic heating plate) |
| Letto di stampa | Double-sided Black PEI Powder Flexible Steel Plate |
| Livellamento | Fully Automatic Leveling (Adaptive probing, Dual Z-axis Motors) |
| Firmware | Klipper (Open Source, 64-bit Chip) |
| Connettività | USB, SD Card, 2.4G WiFi (for remote monitoring/control) |
| Display | Touchscreen capacitivo da 4.3 pollici |
| Telecamera | Built-in (for defect detection, timelapse, remote monitoring) |
| Filamenti supportati | PETG, TPU, PLA, ABS, etc. |
| Software di affettatura | OrcaSlicer, Cura-Ultimaker, Cura-Sovol (supports other G-code compatible slicers) |
| Compatibilità del sistema operativo | Win7/8/10/11, Linux Ubuntu 20.04+, Mac OS 10.10+ |
| Peso dell'articolo | 30.8 libbre (14 chilogrammi) |

Image: A graphic illustrating the high-speed printing capability of the SV06 Plus ACE at 500mm/s, comparing its print time for a Benchy model (14 minutes) to the SV06 Plus (96 minutes).
6. Garanzia e supporto
6.1 Informazioni sulla garanzia
Sovol provides a standard warranty for the SV06 Plus ACE 3D Printer. Please refer to the official Sovol website or the warranty card included with your product for specific terms and conditions regarding coverage duration and limitations. Protection plans are also available for extended coverage.
- Piano di protezione biennale: disponibile per l'acquisto.
- Piano di protezione biennale: disponibile per l'acquisto.
6.2 Assistenza clienti
For technical assistance, troubleshooting, or spare parts, please contact Sovol customer support through their official channels. You can often find support resources, FAQs, and community forums on the Sovol websito.
Official Sovol Store: Sovol Amazon Store
7. Informazioni sulla sicurezza
- Utilizzare sempre la stampante in un'area ben ventilata.
- Durante il funzionamento, tenere le mani lontane dalle parti in movimento.
- The nozzle and print bed can reach high temperatures; avoid direct contact during and immediately after printing.
- Non lasciare la stampante incustodita durante lunghi lavori di stampa.
- Assicurarsi che l'alimentatore sia correttamente collegato e messo a terra.
- Tenere la stampante lontana da materiali infiammabili.


