1. Informazioni importanti sulla sicurezza
Si prega di leggere attentamente tutte le istruzioni prima del montaggio e dell'uso. Il mancato rispetto di queste istruzioni può causare lesioni o danni al prodotto.
- Montaggio: This greenhouse requires assembly by two to three people. Ensure all parts are present and undamaged before beginning.
- Ancoraggio: Proper anchoring is crucial for stability, especially in windy conditions. Bury the extended cover edges into the soil as instructed. Additional anchoring (not included) may be necessary in high-wind areas.
- Posizione: Choose a level, well-drained site for installation. Avoid placing near overhead power lines or structures that could fall onto the greenhouse.
- Ventilazione: Ensure adequate ventilation to prevent overheating and promote plant health. Utilize the doors and mesh windows.
- Manutenzione: Regularly inspect the frame and cover for damage. Repair or replace damaged components promptly.
- Distribuzione del peso: Do not hang heavy objects from the frame. Avoid excessive snow accumulation on the roof.
2. Prodotto finitoview
The Outsunny 4 x 3m Walk-in Polytunnel Greenhouse provides a protected environment for growing plants, vegetables, and flowers year-round. Its robust design features a galvanized steel frame and a durable UV-resistant PE cover.

Image 2.1: The Outsunny 4 x 3m Walk-in Polytunnel Greenhouse, fully assembled in a garden. This image shows the overall structure, including the green PE cover, arched frame, and a partially open door.
Caratteristiche principali:
- Dimensioni: 400L x 300W x 200H cm (157.48"L x 118.11"W x 78.74"H)
- Materiale del telaio: Galvanized Steel with 25mm diameter tubes and additional reinforcement rods for enhanced stability.
- Materiale di copertura: 140gsm UV-resistant Polyethylene (PE) with reinforced polyester cloth, offering bird-proof, heat preservation, tear-proof, and UV protection properties.
- Porte: Two hinged doors (80W x 190H cm) for easy access and ventilation, equipped with latches.
- Finestre: Eight mesh windows (35W x 35H cm) for ventilation and pest control.
- Stabilità: 20cm extended cover edges designed to be buried in the soil for added wind resistance.

Image 2.2: Detail of the upgraded UV-resistant 140GSM PE cover, highlighting its bird-proof, heat preservation, tear-proof, and UV protection features, along with reinforced polyester cloth.

Image 2.3: Illustration of the reinforced structure, showing the 25mm diameter galvanized steel tubes and extra reinforcement rods for improved stability.
3. Installazione (assemblaggio)
Assembly of this polytunnel greenhouse requires careful attention to detail and is best performed by two to three individuals. Ensure you have sufficient space and all components before starting.
3.1 Disimballaggio e identificazione delle parti
- Disimballare con cura tutti i componenti e disporli.
- Refer to the included parts list to identify each component (poles, connectors, cover, hardware). Verify all parts are present and undamaged.
3.2 Assemblaggio del telaio
- Begin by assembling the base frame according to the diagrams in your manual. Connect the galvanized steel poles using the provided connectors and hardware.
- Erect the arched frame sections, ensuring they are securely fastened. Pay close attention to the orientation of each pole.
- Install the top reinforcement rods to enhance the structural integrity of the frame.
3.3 Installazione della copertura
- Disporre con cura la copertura in PE sul telaio assemblato. Assicurarsi che sia centrata e distribuita uniformemente.
- Secure the cover to the frame using the ties or fasteners provided. Work from one end to the other, ensuring a snug fit.
- Once the cover is in place, bury the 20cm extended edges deep into the surrounding soil. This action is critical for anchoring the greenhouse and preventing wind uplift.

Image 3.1: Close-up showing the 20cm extended edges of the cover, designed to be buried deep in the soil for enhanced stability and wind resistance.
3.4 Installazione di porte e finestre
- Install the two hinged doors at the designated openings. Ensure they swing freely and the latches operate correctly.
- Attach the eight mesh windows to their respective positions on the cover. These windows are designed to be rolled up and secured for ventilation.

Immagine 3.2: View of the front and rear hinged doors, illustrating their dimensions (0.8m wide, 1.9m high) and the latch mechanism for easy access and ventilation.

Image 3.3: Close-up of a mesh window (35cm x 35cm), demonstrating its function to keep the greenhouse ventilated while preventing unwanted pests from entering.
4. Istruzioni per l'uso
4.1 Controllo della ventilazione
- Porte: Open the hinged doors for maximum airflow, especially on warm days, to prevent excessive heat buildup. Close them to retain heat or protect plants from cold.
- Finestre a rete: Roll up the mesh windows to allow air circulation while keeping insects and birds out. Secure them in the open position using the provided ties. Close them during colder periods or when high humidity is desired.
4.2 Environmental Management
- Temperatura: Monitor the internal temperature. Use ventilation to cool the greenhouse and close openings to retain warmth. The UV-resistant PE cover helps in heat preservation.
- Umidità: Adjust ventilation to control humidity levels. Higher humidity is beneficial for some plants, while excessive humidity can lead to fungal issues.
- Luce solare: The PE cover allows approximately 85% sunlight transmission, providing adequate light for most plants while offering UV protection.
5. Manutenzione
Regular maintenance will extend the lifespan of your polytunnel greenhouse and ensure optimal growing conditions.
- Pulizia della copertura: Pulire periodicamente la copertura in PE con acqua e sapone neutro per rimuovere sporco, polvere e accumuli di alghe. Evitare detergenti abrasivi o spazzole che potrebbero danneggiare il materiale. Risciacquare abbondantemente.
- Ispezione del telaio: Regularly check all frame connections and hardware for tightness. Tighten any loose bolts or screws. Inspect poles for rust or damage and address promptly.
- Ispezione della copertura: Examine the cover for any tears, punctures, or signs of wear. Small damages can be repaired with specialized greenhouse repair tape. Large damages may require cover replacement.
- Controllo dell'ancoraggio: After strong winds or heavy rain, verify that the buried edges of the cover are still securely in place. Re-bury or reinforce if necessary.
- Preparazione invernale: In areas with heavy snowfall, gently remove snow accumulation from the roof to prevent structural stress. Consider temporarily removing the cover in extreme winter conditions if the greenhouse is not actively used.
6. Risoluzione Dei Problemi
6.1 Problemi comuni e soluzioni
- Problema: Greenhouse feels unstable or sways in wind.
Soluzione: Ensure the 20cm extended cover edges are deeply buried in the soil. Check all frame connections for tightness. Consider adding additional ground anchors or guy ropes for extra stability, especially in exposed locations. The greenhouse is rated for Windproof Level 6 when fully fixed. - Problema: Eccessivo accumulo di calore all'interno.
Soluzione: Increase ventilation by fully opening both hinged doors and rolling up all eight mesh windows. Consider using shade netting over the cover during peak summer heat if plants are sensitive. - Problema: Condensation or high humidity.
Soluzione: Improve airflow by opening doors and windows. Ensure proper spacing between plants to allow air circulation. - Problema: Cover tearing or damage.
Soluzione: For small tears, use a specialized greenhouse repair tape. For larger damage, contact customer support for replacement cover options. Ensure the cover is not rubbing against sharp edges of the frame.
7. Specifiche
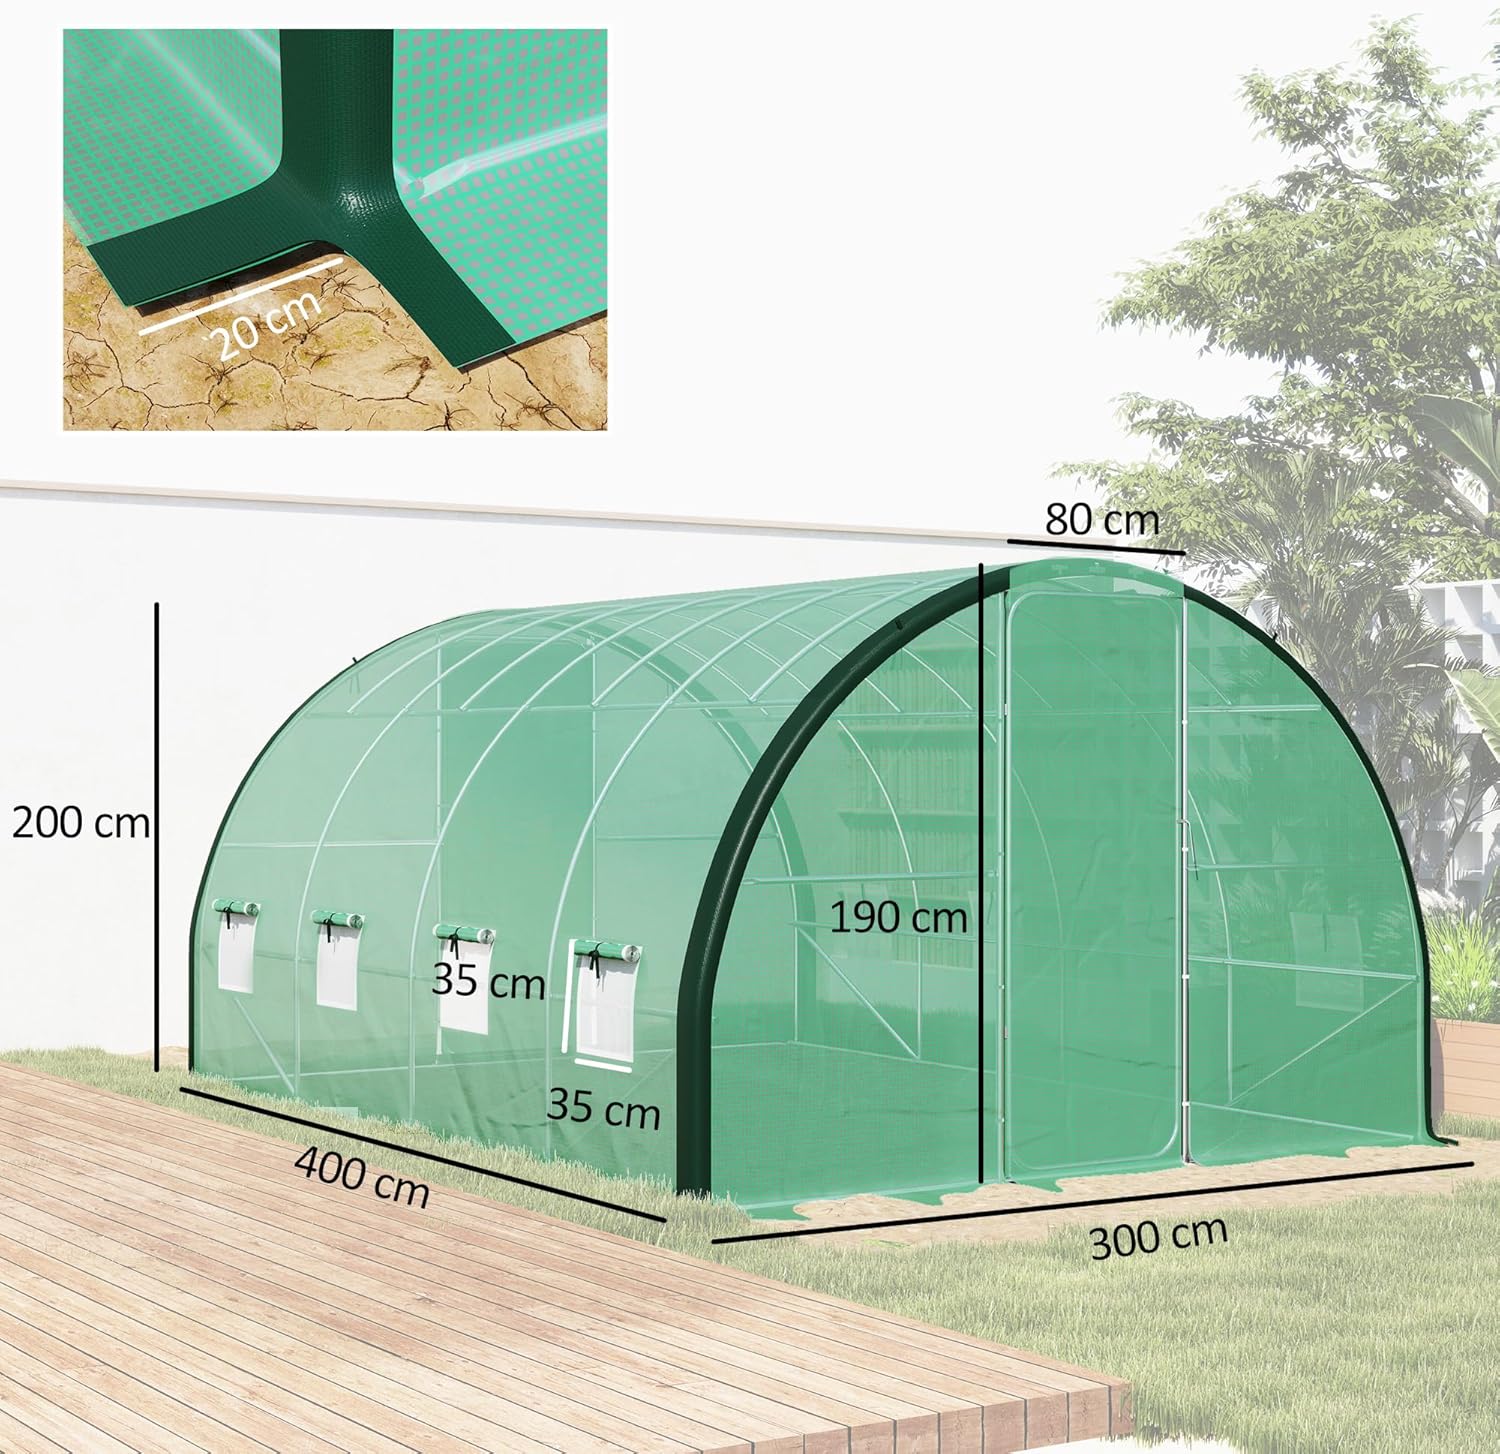
Image 7.1: Detailed dimensional diagram of the polytunnel greenhouse, showing overall length (400cm), width (300cm), height (200cm), door dimensions (80cm x 190cm), and window dimensions (35cm x 35cm).
| Caratteristica | Dettaglio |
|---|---|
| Dimensioni complessive | 400L x 300W x 200H cm (157.48"L x 118.11"W x 78.74"H) |
| Dimensioni della porta | 80L x 190A cm |
| Dimensioni del finestrino laterale | 35L x 35A cm |
| Larghezza del bordo estesa | 20 centimetri |
| Materiale del telaio | Galvanized Steel (25mm diameter tubes) |
| Materiale di copertura | 140gsm Polyethylene (PE), Polyester |
| Colore | Verde |
| Numero di porte | 2 (Incernierato) |
| Numero di Windows | 8 (Maglia) |
| Windproof Level (fully fixed) | Livello 6 |
| Peso dell'articolo | 35 kg (77 libbre) |
| Numero di modello | 84H-033V03GN |
8. Garanzia e supporto
Per informazioni sulla garanzia, consultare i termini e le condizioni forniti al momento dell'acquisto o contattare direttamente il venditore. Conservare la prova d'acquisto per eventuali reclami in garanzia.
If you encounter any issues during assembly or operation, or require replacement parts, please contact Outsunny customer support or the retailer from whom you purchased the product. Provide your model number (84H-033V03GN) and a detailed description of the issue to assist with prompt resolution.
Produttore: Venduto da MHSTAR