1. Prodotto finitoview
This manual provides instructions for the Fanttik F2 Master Mini Cordless Rotary Tool Kit and the Fanttik D2 PLUS Laser Level. These tools are designed for precision tasks and accurate leveling applications.

Image 1.1: The Fanttik F2 Master Mini Cordless Rotary Tool (left) and D2 PLUS Laser Level (right).
1.1 F2 Master Mini Cordless Rotary Tool
The F2 Master is a compact, cordless rotary tool featuring a brushless hollow cup motor for reduced noise and enhanced performance. It offers 5 adjustable speed settings for various precision tasks such as grinding, polishing, drilling, and engraving. The tool includes a Revostor Hub for organized accessory storage and a durable aluminum case with a pop-up mechanism for easy access.
1.2 D2 PLUS Laser Level
The D2 PLUS is a high-precision laser level utilizing advanced high-brightness green laser technology. It provides a projection range of up to 100 ft with an accuracy of 3/32 inches at 30 ft. It features independent or combined vertical and horizontal line projection, a wide-angle expansion for vertical lines, and a pulse mode for extended working range with an optional receiver.
2. Informazioni sulla sicurezza
Always observe the following safety precautions to prevent injury and damage to the product.
- Leggere tutte le istruzioni prima dell'uso.
- Wear appropriate personal protective equipment, such as safety glasses, when operating the rotary tool.
- Mantenere l'area di lavoro pulita e ben illuminata.
- Non utilizzare utensili elettrici in atmosfere esplosive, ad esempio in presenza di liquidi, gas o polveri infiammabili.
- Tenere lontani i bambini e gli astanti durante l'utilizzo di un elettroutensile.
- Conservare gli strumenti fuori dalla portata dei bambini.
2.1 Sicurezza laser
The D2 PLUS Laser Level is a Class II laser product. Observe the following precautions:
- ATTENZIONE: Non fissare direttamente il raggio laser.
- Non dirigere intenzionalmente il raggio laser verso persone o animali.
- Avoid exposing the eyes to direct or reflected laser beams.
- Non modificare il dispositivo laser.
- Utilizzare solo come descritto nel presente manuale.
3. Contenuto della confezione
Verifica che tutti gli articoli elencati di seguito siano inclusi nel tuo pacchetto:

Image 3.1: Contents of the D2 PLUS Laser Level package.
- Livella laser D2 PLUS
- Cavo USB-C
- Staffa magnetica
- Piastra bersaglio
- Borsa con coulisse
- Manuale d'uso
- F2 Master Mini Cordless Rotary Tool
- F2 Master Revostor Hub with 35 accessories (3/32" / 2.3mm)
- F2-M2 Magnetic Wrench
4. F2 Master Rotary Tool - Setup & Operation
4.1 Componenti Oltreview
- Rotary Tool Body: Main unit with motor and battery.
- Pinza: Holds the accessory bits.
- Speed Indicator Lights: Display current speed setting.
- Pulsante di accensione/velocità: Controls power and speed.
- Revostor Hub: Magnetic stand for organizing accessories.
- Aluminum Case: Protective case with pop-up mechanism.
4.2 Charging the Rotary Tool
The F2 Master is battery-powered. Ensure it is fully charged before first use.
- Connect the USB-C charging cable to the charging port on the rotary tool.
- Collegare l'altra estremità del cavo a un adattatore di alimentazione USB adatto (non incluso).
- The indicator lights will show charging status. Once fully charged, disconnect the cable.
4.3 Collegamento degli accessori
The Revostor Hub provides organized storage and easy access to various accessories.

Image 4.1: The Revostor Hub for organized accessory storage.
- Ensure the rotary tool is turned off.
- Svitare il dado della pinza.
- Insert the desired accessory bit (3/32" / 2.3mm shank) into the collet.
- Tighten the collet nut securely using the F2-M2 Magnetic Wrench to hold the bit in place. Do not overtighten.
4.4 Accensione/spegnimento e regolazione della velocità
The F2 Master features a brushless motor for efficient and quiet operation.

Image 4.2: The F2 Master operates quietly at 32 dB when idle.
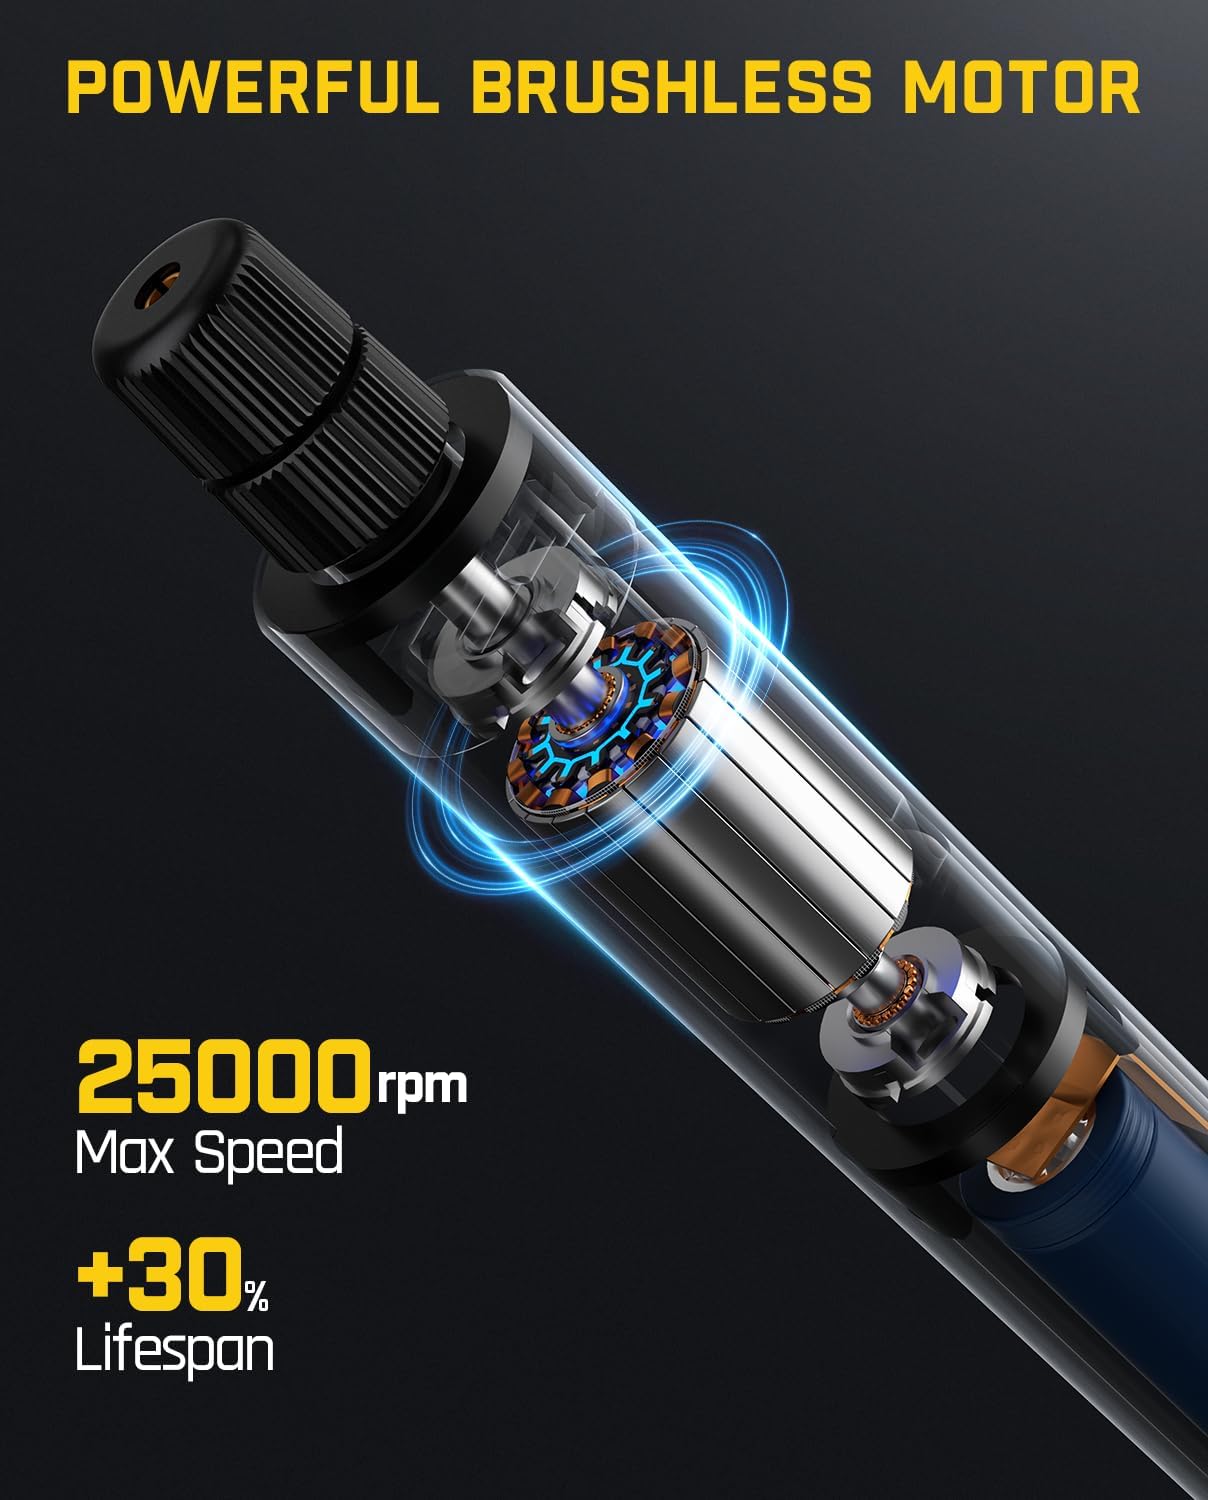
Image 4.3: The F2 Master's powerful brushless motor provides up to 25,000 RPM.
- Per accendere: Press and hold the Power/Speed button until the indicator lights illuminate. The tool will start at the lowest speed setting.
- Per regolare la velocità: Briefly press the Power/Speed button to cycle through the 5 available speed settings. The indicator lights will show the selected speed.
- Per spegnere: Press and hold the Power/Speed button until the indicator lights turn off.
5. D2 PLUS Laser Level - Setup & Operation
5.1 Componenti Oltreview
- Emettitori laser: Project horizontal and vertical green laser lines.
- Pannello di controllo: Pulsanti per accensione, selezione modalità e modalità a impulsi.
- Blocco del pendolo: Fissa il pendolo per la modalità manuale o per il trasporto.
- Indicatore della batteria: Visualizza la durata residua della batteria.
- Porta di ricarica USB-C: Per ricaricare la batteria interna.
5.2 Charging the Laser Level
The D2 PLUS has a 2600 mAh rechargeable battery, providing 7-14 hours of continuous use.

Image 5.1: The D2 PLUS Laser Level features a USB-C charging port.
- Connect the provided USB-C charging cable to the charging port on the side of the laser level.
- Collegare l'altra estremità del cavo a un adattatore di alimentazione USB adatto (non incluso).
- The battery indicator lights will show charging status. Disconnect once fully charged.
5.3 Accensione/spegnimento e selezione della modalità
The D2 PLUS uses an OSRAM green laser, which is four times brighter than traditional red lasers.

Image 5.2: The D2 PLUS utilizes a bright OSRAM green laser.

Image 5.3: The D2 PLUS offers three distinct line modes.

Image 5.4: Manual Mode (left) and Self-Leveling Mode (right) applications.
- Modalità autolivellante: Unlock the pendulum by sliding the pendulum lock switch to the 'unlocked' position. Press the power button to turn on the laser. The laser will self-level within 4 degrees. If the tilt exceeds 4 degrees, the laser will flash rapidly to indicate it is out of level. Press the power button to cycle through horizontal line, vertical line, or both.
- Modalità manuale: Lock the pendulum by sliding the pendulum lock switch to the 'locked' position. Press and hold the power button for 3 seconds to turn on the laser. The laser lines can now be projected at any angle without self-leveling. Press the power button to cycle through horizontal line, vertical line, or both.
- Modalità pulsazioni: In self-leveling mode, briefly press the pulse mode button (often indicated by a 'P' or wave icon) to activate pulse mode. This mode extends the working range up to 200 ft when used with a compatible laser receiver (not included), especially useful in bright environments.

Image 5.5: Pulse Mode extends the working range of the D2 PLUS Laser Level.
5.4 Montaggio del livello laser
The D2 PLUS can be mounted using its integrated magnetic bracket or a tripod.

Image 5.6: The D2 PLUS offers high precision, up to ±3/32 in at 30 ft.
- Staffa magnetica: Attach the magnetic bracket to metallic surfaces for stable positioning.
- Montaggio del treppiede: The laser level has a standard tripod thread (1/4"-20) on its base for mounting to a tripod (not included).
6. Manutenzione
Proper maintenance ensures the longevity and optimal performance of your tools.

Image 6.1: The D2 PLUS Laser Level is designed for durability against dust, water, and minor impacts.
- Pulizia: Utilizzare un morbido, damp cloth to clean the tool surfaces. Do not use abrasive cleaners or solvents. For the laser level, gently wipe the laser windows with a clean, lint-free cloth.
- Magazzinaggio: Store both tools in their original packaging or a protective case in a dry, cool place, away from direct sunlight and extreme temperatures. Ensure the pendulum lock on the laser level is engaged during storage and transport.
- Cura della batteria: For optimal battery life, charge the tools regularly, even if not in frequent use. Avoid fully discharging the batteries for extended periods.
- Ispezione: Periodically inspect the tools for any signs of damage, loose parts, or wear. Do not operate damaged tools.
7. Risoluzione Dei Problemi
Per i problemi più comuni e le relative soluzioni, fare riferimento alla tabella sottostante.
| Problema | Possibile causa | Soluzione |
|---|---|---|
| F2 Master does not turn on. | Batteria scarica. | Charge the rotary tool using the USB-C cable. |
| F2 Master accessory bit is loose. | Collet nut not tightened sufficiently. | Ensure the collet nut is securely tightened with the magnetic wrench. |
| D2 PLUS laser lines are flashing rapidly. | Laser level is out of its self-leveling range (>4 degrees). | Posizionare il livello laser su una superficie piana o regolarne la posizione finché non smette di lampeggiare. |
| D2 PLUS laser lines are dim or not visible outdoors. | Luce ambientale intensa. | Activate Pulse Mode and use a compatible laser receiver (not included). |
| D2 PLUS laser lines are not self-leveling. | Il blocco del pendolo è attivato (modalità manuale). | Slide the pendulum lock switch to the 'unlocked' position for Self-Leveling Mode. |
If you encounter issues not covered here, please contact Fanttik customer support.
8. Specifiche
8.1 Fanttik F2 Master Mini utensile rotante senza fili
| Caratteristica | Specificazione |
|---|---|
| Tipo di motore | Brushless Hollow Cup Motor |
| Massima velocità di rotazione | 25,000 giri al minuto |
| Impostazioni di velocità | 5 impostazioni regolabili |
| Noise Level (Idle) | 32 dB |
| Peso | 0.22 libbre |
| Accessory Shank Size | 3/32" / 2.3 mm |
| Fonte di alimentazione | Alimentato a batteria |
| Caratteristiche speciali | Portable, Cordless, Revostor Hub, Aluminum Case |
8.2 Fanttik D2 PLUS Laser Level
| Caratteristica | Specificazione |
|---|---|
| Tipo di laser | Green Laser (OSRAM) |
| Classificazione laser | Classe II, <1 mW |
| Gamma di proiezione | Fino a 100 piedi |
| Precisione | ±3/32 in at 30 ft |
| Gamma di autolivellamento | ±4 gradi |
| Vertical Line Angle | 130° |
| Capacità della batteria | 2600 mAh |
| Tempo di utilizzo continuo | 7-14 ore |
| Porta di ricarica | USB-C |
| Durata | Dust Resistance, Water Resistance, Resistant to fall from 1m |
9. Garanzia e supporto
Fanttik products are manufactured to high-quality standards. For warranty information or technical support, please refer to the warranty card included in your package or visit the official Fanttik websito. Quando contatti l'assistenza, tieni a portata di mano il numero del modello e la data di acquisto.
For further assistance, you may contact Fanttik customer service through their official channels.


