1. Introduzione
This manual provides essential information for the assembly, operation, and maintenance of your Home Centre Addison Shoe Cabinet with Drawers. Please read these instructions carefully before beginning assembly or use to ensure proper function and longevity of the product. Retain this manual for future reference.
2. Prodotto finitoview
The Home Centre Addison Shoe Cabinet is designed for organized shoe storage and entryway functionality. It features a 3-door design, including a central mirrored door, and two integrated drawers for additional storage. The cabinet is constructed from prelaminated engineered wood with a walnut finish.
- Capacità di archiviazione: Accommodates approximately 22 pairs of shoes across 12 fixed shelves.
- Spazio di archiviazione aggiuntivo: Two top drawers provide space for smaller items.
- Specchio integrato: A full-length mirror is integrated into the central door.
- Ventilazione: Mesh ventilation caps are included to promote air circulation within the shoe compartments.
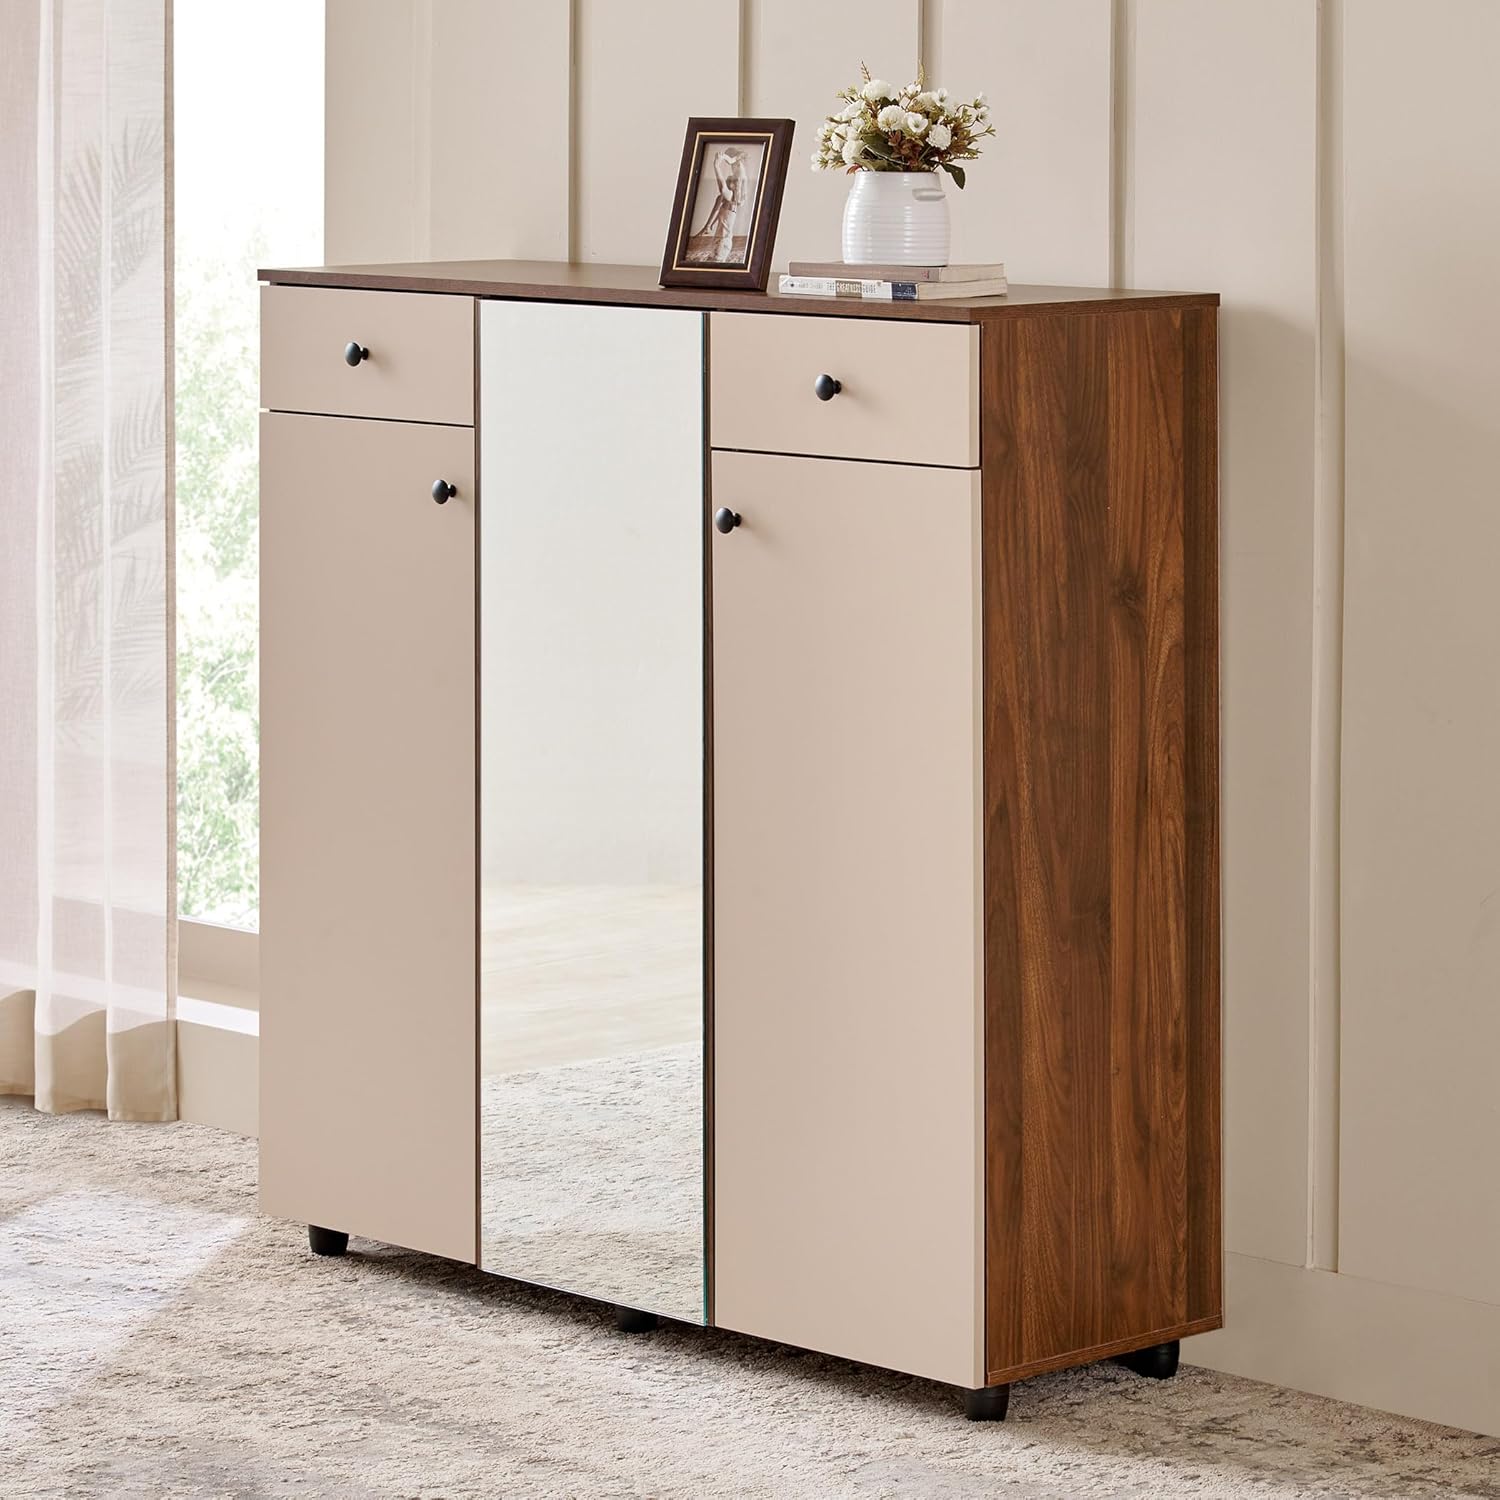
Figura 1: Davanti view of the Home Centre Addison Shoe Cabinet. This image displays the overall design, including the two side doors, the central mirrored door, and the two top drawers.

Figura 2: A clean front view of the Home Centre Addison Shoe Cabinet in its closed state, highlighting the walnut finish and the central mirror.
3. Informazioni sulla sicurezza
Durante il montaggio e l'uso, attenersi alle seguenti linee guida di sicurezza:
- Montaggio: Assicurarsi che tutti i componenti siano fissati saldamente secondo le istruzioni di montaggio. Parti allentate possono causare instabilità.
- Stabilità: For tall furniture, it is recommended to secure the cabinet to a wall using appropriate anti-tip hardware (not included unless specified in package contents) to prevent accidental tipping, especially in households with children or pets.
- Distribuzione del peso: Distribute weight evenly across shelves and drawers. Avoid placing excessively heavy items on the top surface or in a single compartment.
- Bambini e animali domestici: Keep children and pets away from the assembly area. Small parts can be a choking hazard. Do not allow children to climb on or play with the cabinet.
- Cura dello specchio: Handle the mirrored door with care to avoid breakage. Clean the mirror with a soft, lint-free cloth and a non-abrasive glass cleaner.
4. Contenuto della confezione
Before beginning assembly, verify that all components listed below are present and undamaged. If any parts are missing or damaged, contact Home Centre customer support.
- Pannelli del mobile (superiore, inferiore, laterali, posteriore)
- Door Panels (2 solid, 1 mirrored)
- Drawer Panels and Runners
- Fixed Shelves (12 for shoe compartments)
- Hardware Pack (Screws, dowels, hinges, drawer pulls, ventilation caps, etc.)
- Assembly Instructions (Separate document, if applicable)
5. Installazione e assemblaggio
The Home Centre Addison Shoe Cabinet requires assembly. Due to its size and complexity, carpenter assembly is recommended. If you choose to assemble it yourself, ensure you have the necessary tools and assistance.
5.1 Strumenti consigliati (non inclusi)
- Cacciavite (testa a croce)
- Martello
- Nastro di misurazione
- Livello
5.2 Fasi di assemblaggio (linee guida generali)
- Disimballare e organizzare: Carefully unpack all components and lay them out on a clean, soft surface to prevent scratches. Identify each part using the provided diagrams (if available).
- Montare il telaio di base: Connect the bottom panel to the side panels using the designated hardware.
- Installa scaffali: Insert the fixed shelves into their respective slots within the cabinet frame.
- Montare i cassetti: Construct the two drawers and attach the drawer runners. Install the drawers into the cabinet frame.
- Porte di collegamento: Secure the hinges to the door panels and then attach the doors to the cabinet frame. Adjust hinges as needed for proper alignment.
- Installare il pannello posteriore: Fasten the back panel to the cabinet frame.
- Ultimi ritocchi: Attach door and drawer pulls. Insert ventilation caps into the designated holes.
Note: Detailed, step-by-step assembly diagrams are typically included with the product hardware. Follow those specific instructions for precise assembly.

Figura 3: Detail of a door hinge. Proper installation and adjustment of hinges are crucial for door alignment and smooth operation.
6. Istruzioni per l'uso
6.1 Conservazione delle scarpe
Open the side doors to access the shoe compartments. Place shoes on the fixed shelves, ensuring they fit within the allocated space. The cabinet is designed to hold approximately 22 pairs of shoes. Utilize the mesh ventilation caps to maintain air circulation and freshness.

Figura 4: The shoe cabinet with its doors open, revealing multiple pairs of shoes neatly stored on the internal shelves. This illustrates the internal layout and capacity.
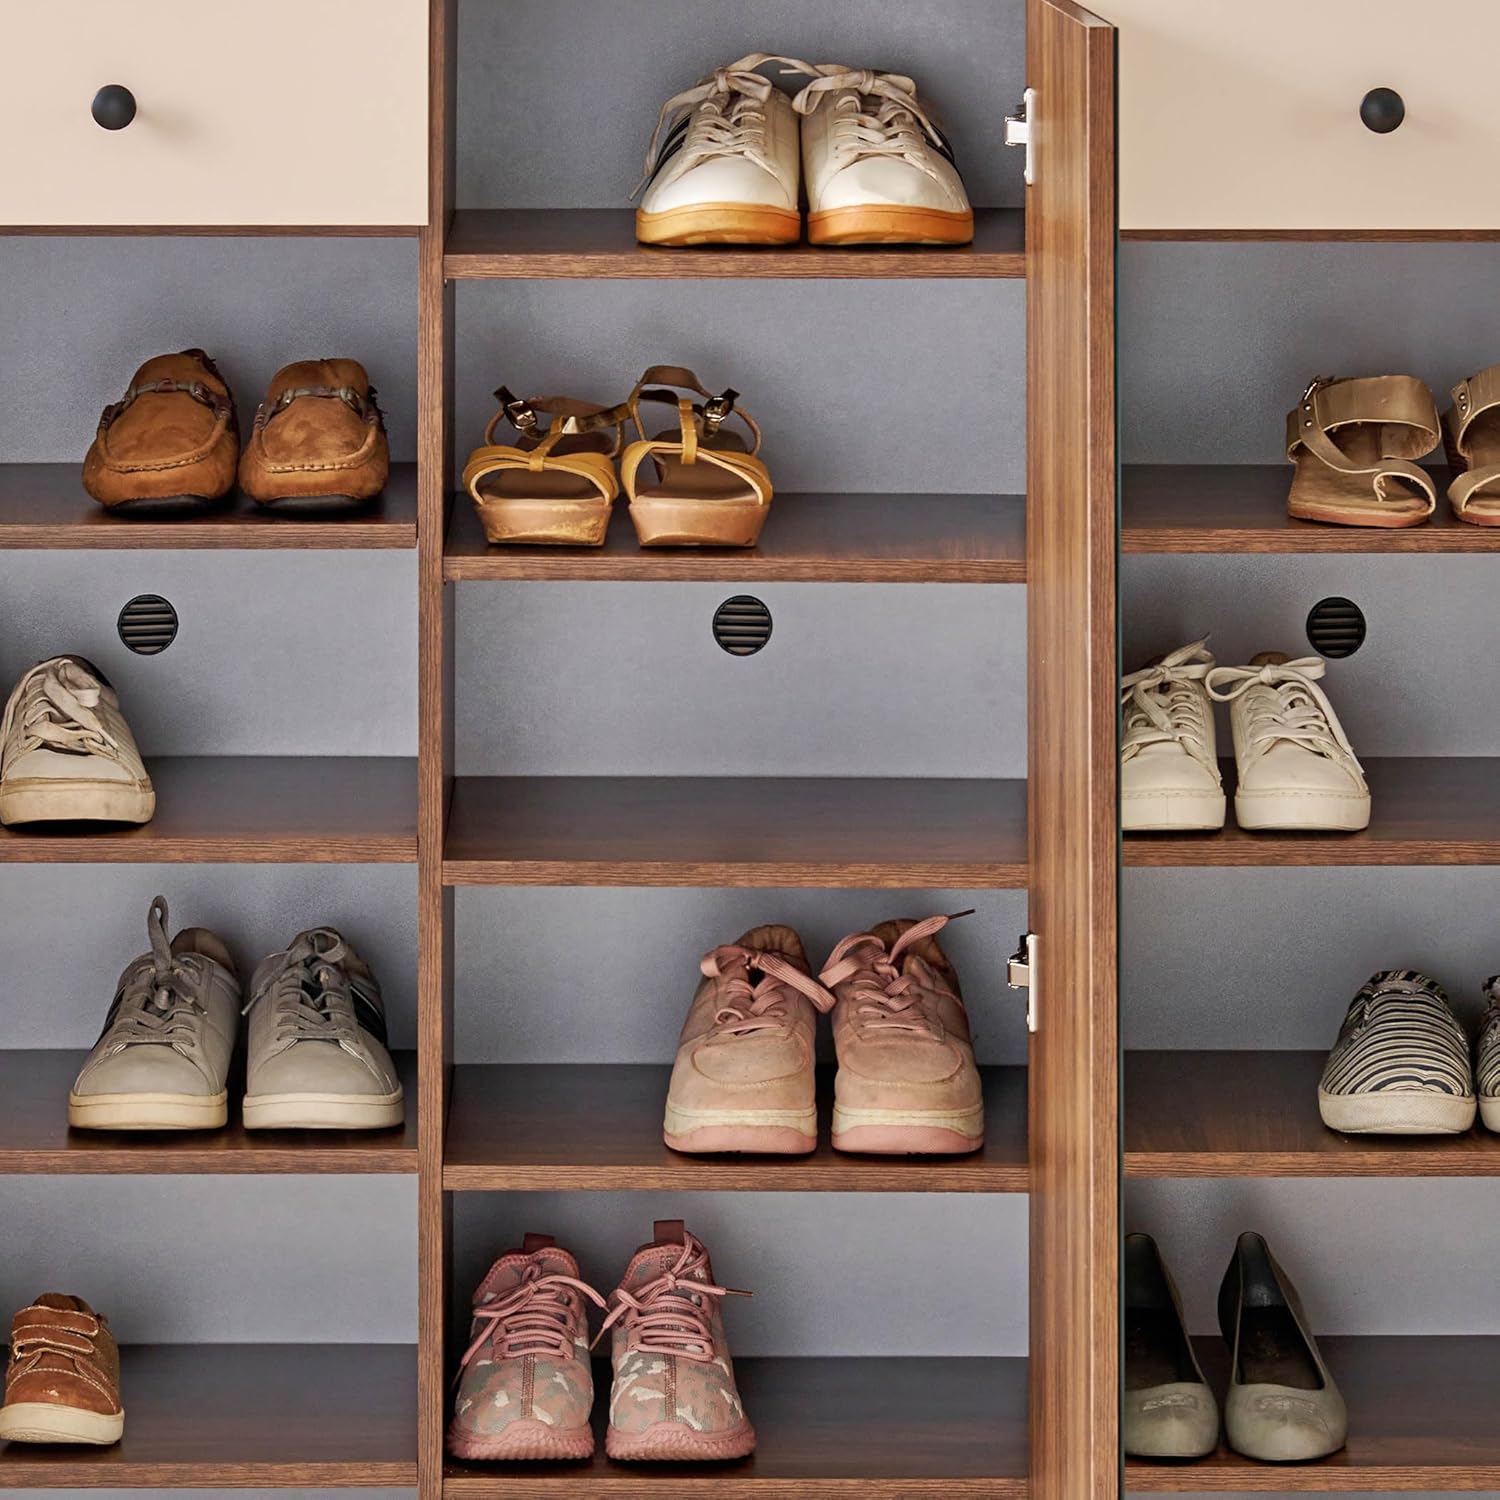
Figura 5: Un più vicino view of the shoe shelves, showing various types of footwear organized within the compartments. Note the ventilation holes at the back of each compartment.
6.2 Using Drawers
The two top drawers can be used to store smaller items such as shoe care products, keys, or other entryway essentials. Pull the drawer handles gently to open and push to close.
6.3 Utilizzo dello specchio
The central door features an integrated mirror. Use it for quick checks before leaving your home. Ensure the mirror is clean for optimal reflection.
7. Manutenzione e cura
- Pulizia: Pulisci le superfici del mobile con un panno morbido eamp panno. Evitare l'uso di detergenti abrasivi, prodotti chimici aggressivi o umidità eccessiva, poiché potrebbero danneggiare la finitura del legno ingegnerizzato.
- Spolverare: Spolverare regolarmente il mobile con un panno asciutto e morbido per evitare l'accumulo di polvere.
- Pulizia dello specchio: Pulisci lo specchio con un detergente per vetri e un panno privo di lanugine. Non spruzzare il detergente direttamente sullo specchio; applicalo prima sul panno.
- Controllo hardware: Controllare periodicamente tutte le viti e gli elementi di fissaggio per assicurarsi che siano ben serrati. Serrare nuovamente se necessario per mantenere la stabilità.
- Evitare la luce solare diretta: L'esposizione prolungata alla luce solare diretta può causare lo sbiadimento o la decolorazione della finitura del legno.
- Controllo dell'umidità: Mantenere una temperatura ambiente e un livello di umidità stabili per evitare deformazioni o crepe nel legno.
8. Risoluzione Dei Problemi
| Problema | Possibile causa | Soluzione |
|---|---|---|
| Il mobile è traballante o instabile. | Elementi di fissaggio allentati; pavimento irregolare. | Check and tighten all assembly screws. Ensure the cabinet is on a level surface; use shims if necessary. Consider securing to a wall. |
| Le porte non si chiudono correttamente o sono disallineate. | Le cerniere sono allentate o regolate in modo errato. | Adjust the screws on the hinges to align the doors. Refer to hinge adjustment guides if unfamiliar. Tighten hinge screws. |
| I cassetti si bloccano o non scorrono agevolmente. | Drawer runners are misaligned or dirty; overloaded drawer. | Check that drawer runners are correctly installed and free of debris. Lightly lubricate runners with silicone spray if needed. Reduce drawer contents. |
| Scratches or minor damage to surface. | Urto o abrasione accidentale. | For minor scratches, use a furniture repair marker or wax stick that matches the walnut finish. |
9. Specifiche
| Caratteristica | Dettaglio |
|---|---|
| Nome del modello | Addison |
| Marca | Centro Casa |
| Dimensioni del prodotto (P x L x A) | 40D x 120W x 120H centimetri |
| Materiale | Legno ingegnerizzato |
| Colore | Noce |
| Numero di porte | 3 (1 mirrored, 2 solid) |
| Numero di cassetti | 2 |
| Numero di ripiani | 15 (compresi gli scomparti interni) |
| Capacità della scarpa | Approximately 22 pairs |
| Peso dell'articolo | 15 kg |
| Assemblaggio richiesto | Yes (Carpenter Assembly Recommended) |
| Paese di origine | India |

Figura 6: Dimensionale view of the shoe cabinet, showing its height (120 cm), width (120 cm), and depth (40 cm) in relation to an average adult figure.
10. Garanzia e supporto
For warranty information, product support, or to report missing/damaged parts, please contact Home Centre customer service. Keep your purchase receipt and model information (Addison) handy when contacting support.
Visit the official Home Centre store for more information: Home Centre Store


