1. Introduzione
Thank you for choosing the Gree Aovia 12000 BTU Portable Air Conditioner. This manual provides essential information for the safe and efficient operation, installation, and maintenance of your new appliance. Please read it thoroughly before use and keep it for future reference.
This compact unit combines efficiency, technology, and modern design, offering a range of features for comfort and practicality:
- Design compatto: Occupies less space, ideal for any environment.
- Display digitale: Shows operation mode, temperature, and protection codes clearly and intuitively.
- Raffreddamento rapido: Ensures a cool environment in a short time.
- Deumidificazione: Improves air quality by removing excess humidity.
- 3 Fan Speed Options: Customize air distribution according to your needs.
- Dual Drain Outlet Design: Facilitates installation and management of condensed water.
- Basso livello di rumore: Operates quietly to avoid disturbance.
- Funzione timer: Program the unit to turn on and off at your convenience.
- Modalità risparmio: Ideal for peaceful sleep with automatic temperature adjustments.
- Protezione anticorrosione: Ensures greater product durability and resistance.
2. Istruzioni di sicurezza
Please read and follow these safety precautions carefully to prevent accidents and ensure optimal performance.
- Utilizzare sempre l'apparecchio su una superficie stabile e piana.
- Non ostruire le prese d'aria o le uscite. Mantenere almeno 20 cm (8 pollici) di spazio libero attorno all'unità.
- Assicurarsi che l'alimentazione corrisponda al voltage specificato sulla targhetta dei dati tecnici (127 V).
- Non utilizzare l'unità con le mani bagnate o in prossimità di acqua.
- Scollegare l'unità prima della pulizia o della manutenzione.
- Tenere bambini e animali domestici lontani dall'unità durante il funzionamento.
- Non inserire oggetti nelle prese d'aria.
- Se il cavo di alimentazione è danneggiato, deve essere sostituito dal produttore, da un suo agente di assistenza o da personale qualificato per evitare rischi.
3. Componenti del prodotto
3.1 Unità principale
The following images illustrate the main unit from different angles.

Figura 3.1: Davanti view of the Gree Aovia portable air conditioner, showing the air outlet louvers and Gree logo.

Figura 3.2: Fronte angolato view of the Gree Aovia portable air conditioner, highlighting the side air intake and front panel.
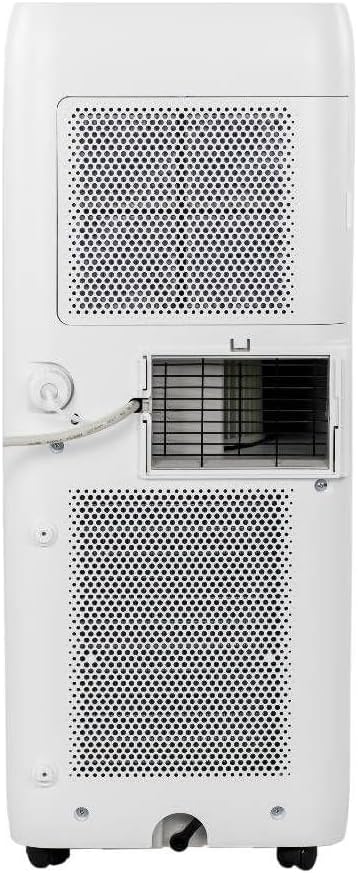
Figura 3.3: Posteriore view of the Gree Aovia portable air conditioner, showing the exhaust outlet, air filters, and power cord connection.
3.2 Pannello di controllo
The control panel is located on the top of the unit for easy access to all functions.

Figura 3.4: Close-up of the top control panel with digital display and buttons for Mode, Timer, Sleep, Fan, and temperature adjustment.
3.3 telecomando
The remote control allows convenient operation from a distance.

Figura 3.5: The remote control for the Gree Aovia portable air conditioner, featuring buttons for power, cool, dry, fan speed, and fan only.
3.4 Kit di installazione
The unit comes with an installation kit for easy setup.
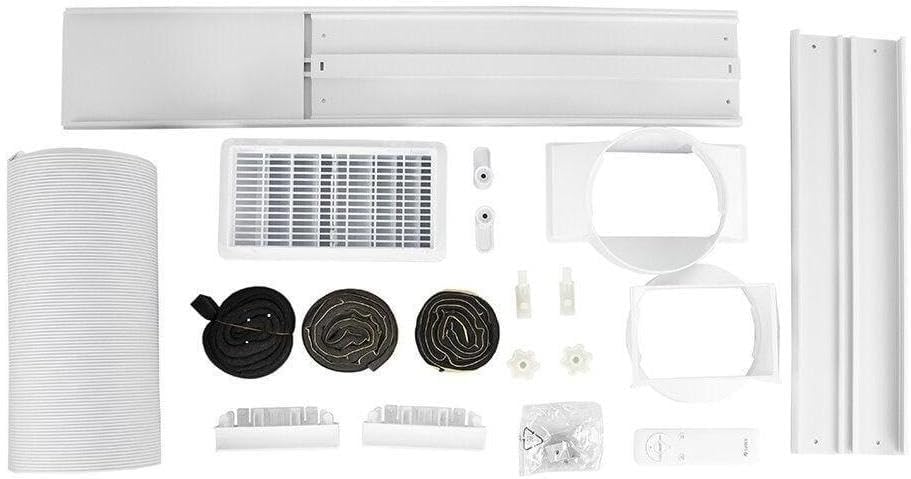
Figura 3.6: Contents of the installation kit, including the exhaust hose, window sealing plate, and various connectors.
4. Guida all'installazione
Per una corretta installazione del tuo condizionatore portatile, segui questi passaggi.
4.1 Disimballaggio
- Estrarre con cautela il condizionatore dall'imballaggio.
- Rimuovere tutto il materiale di imballaggio e assicurarsi che non manchi alcun componente.
- Conservare l'imballaggio per un eventuale stoccaggio o trasporto futuro.
4.2 Posizionamento
Scegli una posizione adatta per il tuo condizionatore d'aria.
- Place the unit on a firm, level surface to minimize noise and vibration.
- Assicurarsi che ci siano almeno 20 cm (8 pollici) di spazio attorno all'unità per un corretto flusso d'aria.
- Posizionare l'unità vicino a una finestra o all'apertura per il tubo di scarico.
4.3 Window Kit and Exhaust Hose Installation
The exhaust hose expels hot air outside, which is crucial for effective cooling.

Figura 4.1: Portable air conditioner positioned near a window with the exhaust hose connected to the window sealing plate.
- Collegare il connettore del tubo di scarico all'uscita dell'aria sul retro dell'unità.
- Assemble the window sealing plate and adjust it to fit your window opening.
- Connect the other end of the exhaust hose to the window sealing plate.
- Ensure the window is securely closed around the sealing plate to prevent hot air from re-entering the room.
4.4 Configurazione del drenaggio
The unit features a dual drain outlet for condensed water management.
- For continuous drainage (recommended in high humidity), connect a drain hose (not always included) to the continuous drain port and lead it to a floor drain or bucket.
- For manual drainage, the internal water tank will collect condensate. The unit will stop operating when the tank is full, and an indicator light will illuminate. Drain the water manually from the lower drain port.
5. Funzionamento del condizionatore d'aria
Learn how to use the various functions of your Gree Aovia portable air conditioner.
5.1 Accensione/spegnimento
- Premere il tasto ACCESO/SPENTO pulsante sul pannello di controllo o sul telecomando per accendere o spegnere l'unità.
5.2 Selezione della modalità
Premere il tasto MODALITÀ button on the control panel or remote control to cycle through the available modes:
- Modalità fredda: For cooling the room. Adjust temperature using the + E - pulsanti.
- Modalità ventola: Circulates air without cooling. Select fan speed using the VELOCITÀ DELLA VENTOLA pulsante.
- Modalità di asciugatura (deumidificazione): Riduce l'umidità nella stanza. In questa modalità, la velocità della ventola è solitamente fissa.
5.3 Regolazione della temperatura
- In Cool Mode, use the + or - buttons on the control panel or remote control to set your desired temperature.
5.4 Selezione della velocità della ventola
- Premere il tasto VELOCITÀ DELLA VENTOLA button to choose between Low, Medium, and High fan speeds.
5.5 Funzione timer
- Premere il tasto TIMER button to set a time for the unit to automatically turn on or off. Use the + E - pulsanti per regolare l'ora desiderata.
5.6 Modalità di sospensione
- Attivare SONNO mode for quiet operation and automatic temperature adjustments during sleep.
6. Manutenzione
Una manutenzione regolare garantisce la longevità e l'efficienza del tuo condizionatore d'aria.
6.1 Pulizia del filtro
The unit is equipped with anti-dust filters that should be cleaned regularly.
- Spegnere e scollegare l'unità prima della pulizia.
- Locate and remove the air filters from the back of the unit.
- Lavare i filtri con acqua tiepida e sapone. Risciacquare abbondantemente e lasciarli asciugare completamente all'aria prima di reinserirli.
- Pulire i filtri ogni due settimane o più frequentemente, a seconda dell'utilizzo e della qualità dell'aria.
6.2 Scarico dell'acqua
- If using manual drainage, drain the collected water when the 'Full Water' indicator illuminates. Place a shallow pan under the drain port and remove the drain plug.
- For continuous drainage, ensure the drain hose is free of kinks and properly positioned.
6.3 Conservazione
- Prima di riporre l'unità, assicurarsi che tutta l'acqua sia stata scaricata.
- Clean the filters and allow them to dry.
- Conservare l'unità in un luogo fresco e asciutto, preferibilmente nella sua confezione originale.
7. Risoluzione Dei Problemi
Se riscontri problemi con il tuo condizionatore d'aria, consulta i seguenti problemi comuni e le relative soluzioni.
| Problema | Possibile causa | Soluzione |
|---|---|---|
| L'unità non si accende | No power supply; Power cord not plugged in; Water tank full | Controllare la presa di corrente; Collegare il cavo di alimentazione; Svuotare il serbatoio dell'acqua |
| Non raffredda efficacemente | Windows/doors open; Air filter dirty; Exhaust hose not properly installed; Room too large | Close windows/doors; Clean air filter; Ensure exhaust hose is sealed; Use in appropriate room size |
| Perdita d'acqua | Drain plug loose; Unit not level; Continuous drain hose kinked | Secure drain plug; Place unit on a level surface; Straighten drain hose |
| Rumore insolito | Unità non livellata; ostruzione nella ventola; parti allentate | Ensure unit is level; Check for obstructions; Contact service if noise persists |
| Codici di errore sul display | Guasto interno specifico | Fare riferimento al codice di errore specifico nel manuale completo (se disponibile) oppure contattare l'assistenza clienti. |
8. Specifiche
Technical details for the Gree Aovia 12000 BTU Portable Air Conditioner.
- Nome del marchio: Verde
- Informazioni sul modello: GPC12AP-A6NNA1A (008483_01)
- Capacità di raffreddamento: Potenza nominale: 12000 BTU
- Tipo di refrigerante: R-32
- Voltage: 127 Volt
- Potenza in Watt: 1540 watt
- Consumo energetico annuo: 759 kilowattora all'anno
- Efficienza: A Rating
- Livello di rumore: 55 decibel
- Dimensioni del prodotto: 28.6P x 32L x 70A centimeters (28.6 x 32 x 70 cm)
- Peso: 22.5 chilogrammi
- Tipo di installazione: Portatile
- Caratteristiche speciali: Controllato a distanza
- Tipo di filtro: Antipolvere
- Tipo di pannello di controllo: Mechanical, Electronic
- Colore: Bianco
9. Garanzia e supporto
Per informazioni sulla garanzia, supporto tecnico o richieste di assistenza, consultare la scheda di garanzia inclusa con il prodotto o contattare il servizio clienti del produttore. Conservare la ricevuta d'acquisto come prova d'acquisto.


