1. Introduzione
The OMBAR N1 is a high-performance rear view mirror dash camera system designed to enhance driving safety and provide comprehensive video recording. It features dual cameras for front 4K and rear 2.5K recording, advanced driver-assistance systems (ADAS), blind spot detection (BSD), lane change assist (LCA), GPS tracking, parking monitoring, and Wi-Fi connectivity for easy file gestione.

Image 1.1: OMBAR N1 Mirror Dash Cam and companion mobile application interface.
2. Contenuto della confezione
Si prega di verificare che tutti gli articoli elencati di seguito siano inclusi nel pacco. Se alcuni articoli risultano mancanti o danneggiati, contattare l'assistenza clienti.

Image 2.1: All components included in the OMBAR N1 Mirror Dash Cam package.
- 1 x OMBAR N1 4K Mirror Dash Cam
- 1 telecamera posteriore da 2.5K con viti e supporto adesivo
- 1 cavo di alimentazione di tipo C da 12 piedi con caricabatteria per auto
- 1 cavo per fotocamera posteriore da 20 piedi
- 1 x antenna GPS esterna
- 1 scheda MicroSD da 64 GB
- 1 x pellicola protettiva antiriflesso
- 1 x OMBAR User Manual
- 5 x clip per cavi
- 4 x Cinghie
- 1 x Pry Tool
- 1 x salviette detergenti
3. Configurazione e installazione
3.1. Montaggio della Dash Cam
- Attach to Rear View Specchio: Secure the N1 Mirror Dash Cam over your existing rear view mirror using the provided straps. Ensure it is firmly attached and centered for optimal viewing.
- Adjust Front Camera Lens: The front camera lens can be adjusted to capture the desired field of view.
3.2. Installazione della telecamera posteriore
- Scegli la posizione di montaggio: Install the rear camera on the rear windshield or near the license plate. Ensure the view non è ostruito.
- Collegare il cavo della telecamera posteriore: Route the 20ft rear camera cable from the main dash cam unit to the rear camera. Connect the cable securely.
- Regola la telecamera posteriore View: The rear camera display can be adjusted for mirror flip and vertical flip settings to match your installation orientation.

Image 3.1: Adjustable rear camera display options for mirror and vertical flipping.
3.3. Collegamento di alimentazione e GPS
- Inserire la scheda MicroSD: Insert the provided 64GB MicroSD card into the designated slot on the dash cam.
- Collegare l'antenna GPS: Plug the external GPS antenna into the dash cam and mount it on the dashboard or windshield where it has a clear view del cielo.
- Collegamento elettrico: Connect the Type-C power cable to the dash cam and plug the car charger into your vehicle's 12V power outlet.
3.4. Applying Anti-Glare Protective Film
The anti-glare protective film helps minimize reflections and enhances contrast for improved visibility. Carefully apply the film to the dash cam screen, ensuring no air bubbles.

Image 3.2: The anti-glare protective film reduces reflections and improves screen clarity.
4. Istruzioni per l'uso
4.1. Funzionamento di base
- Accensione/spegnimento: The dash cam will automatically power on and begin recording when the vehicle starts, and power off when the ignition is turned off.
- Visualizzazione dello schermo: The 12-inch IPS display provides a wide field of view. Brightness, lens angle, and field of view can be adjusted via the touchscreen interface.

Image 4.1: Adjustable screen settings for optimal viewesperienza di acquisizione.
4.2. Modalità di registrazione
- Registrazione in loop: The dash cam records video in segments (1, 3, or 5 minutes). When the MicroSD card is full, the oldest unlocked recordings are automatically overwritten.
- Registrazione di emergenza: In case of a collision, the built-in G-sensor automatically locks the current video segment to prevent it from being overwritten. This can also be triggered manually or via voice command.

Image 4.2: Emergency recording methods ensure critical footage viene salvato.
4.3. Monitoraggio parcheggio
The 24-hour parking monitor provides surveillance when your vehicle is parked. This feature requires a hardwire kit (sold separately, ASIN: B0DQK1QW7ZM) for continuous power.

Image 4.3: The 24-hour parking monitor provides security for your vehicle.
4.4. Controllo vocale
The dash cam supports various voice commands for hands-free operation. Examples include "Take photo," "Start recording," "Turn on WiFi," "Turn off display," and "Show rear camera."

Image 4.4: Voice control allows for hands-free operation of the dash cam.
4.5. Controllo Wi-Fi e app
Connect the dash cam to your smartphone via 5.8GHz Wi-Fi using the OMBAR app. This allows for live viewing, downloading, and sharing of recorded footage. The Wi-Fi range is approximately 25ft (about 1.5 parking spaces) and does not support remote live view.

Image 4.5: The OMBAR app facilitates video management via 5.8GHz Wi-Fi.
5. Funzionalità avanzate
5.1. ADAS (Advanced Driver Assistance System)
The ADAS feature provides real-time alerts to help prevent accidents. This includes:
- Avviso di collisione frontale: Alerts when approaching a vehicle too quickly.
- Avviso di deviazione dalla corsia: Notifies if the vehicle drifts out of its lane.
- Avviso di collisione con pedoni: Detects pedestrians in the vehicle's path.
- Forward Vehicle Start Warning: Alerts when traffic ahead begins to move.
- Close Range Warning: Warns of objects in close proximity.
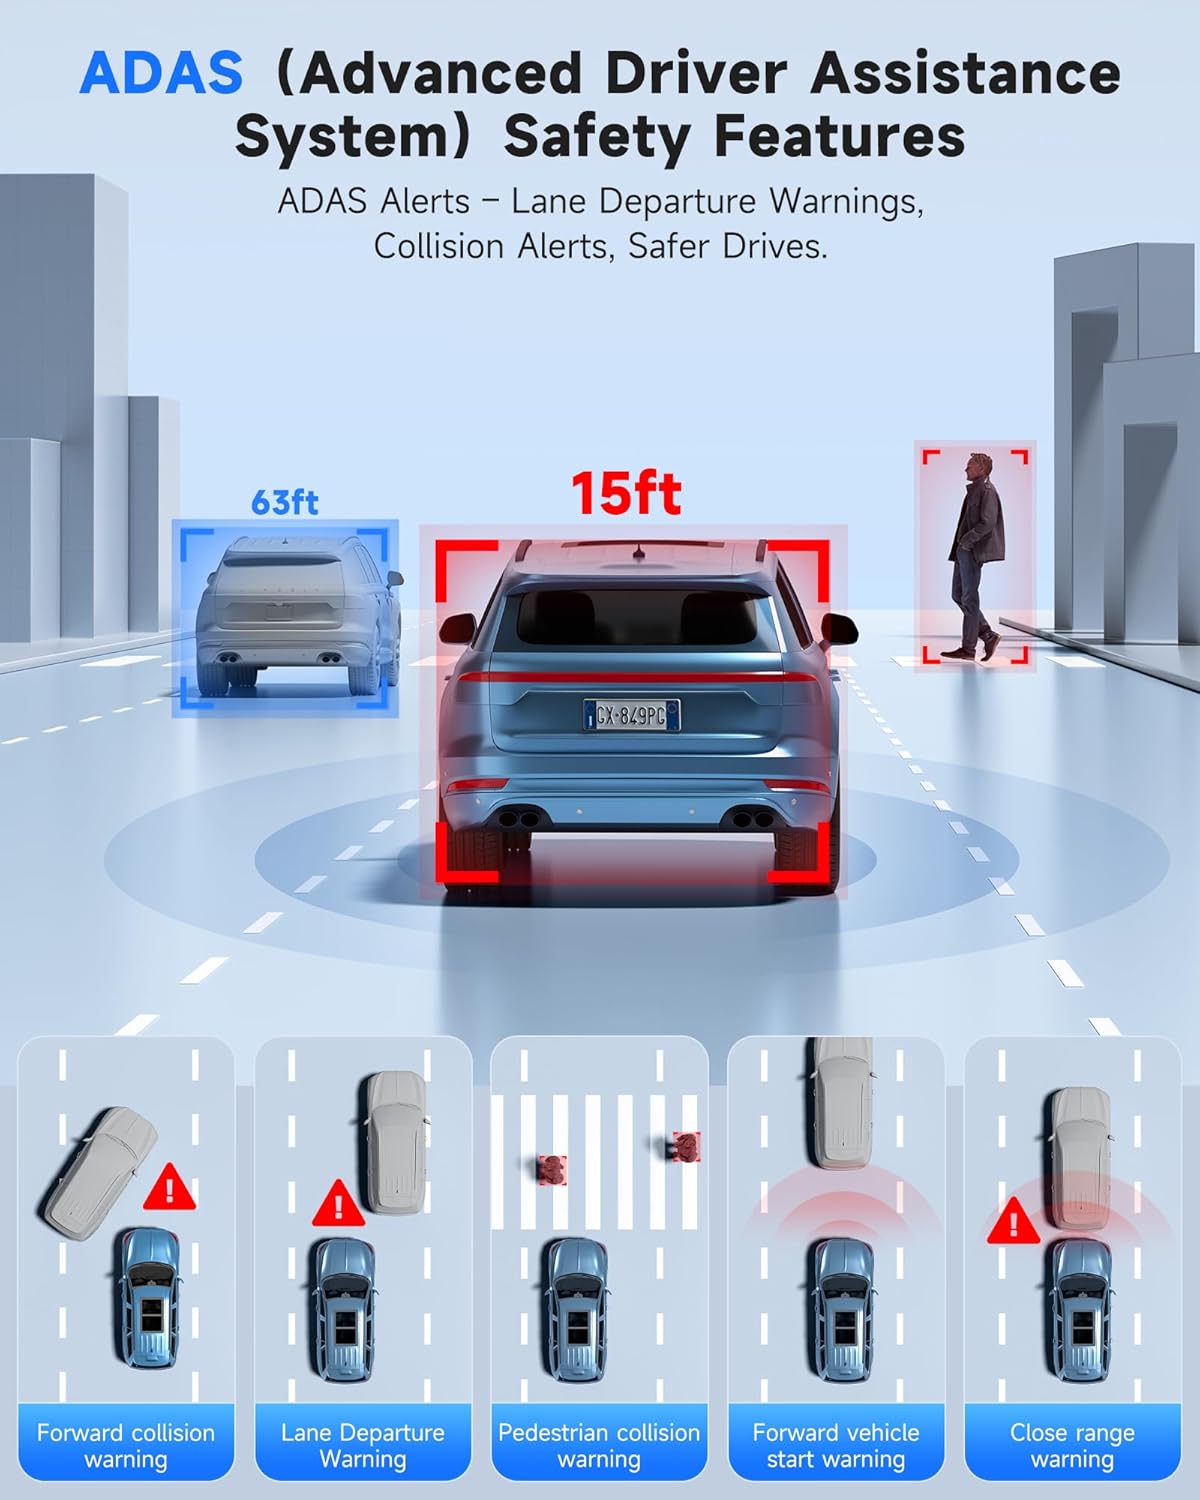
Image 5.1: ADAS provides multiple safety alerts for a safer driving experience.
5.2. BSD (Blind Spot Detection) & LCA (Lane Change Assist)
These features provide 360° protection by monitoring your vehicle's sides and rear for approaching vehicles.
- Blind Spot Detection: Alerts to vehicles in your blind spots.
- Assistenza al cambio di corsia: Warns if a lane change is unsafe due to approaching vehicles.

Image 5.2: BSD and LCA provide warnings for vehicles in blind spots and during lane changes.
5.3. Built-in GPS & Route Tracking
The integrated GPS module records your driving route, speed, and location data, which can be reviewed via the OMBAR app or dedicated PC software.

Image 5.3: GPS tracking records route and speed data for review.
5.4. Visione notturna
Advanced HDR technology and sensor capabilities ensure clear video recording even in low-light conditions, capturing details like license plates at night.

Image 5.4: Night vision capabilities provide clear footage in ambienti scarsamente illuminati.
6. Manutenzione
- Pulizia: Utilizzare un panno morbido e asciutto per pulire lo schermo e le lenti della dash cam. Evitare detergenti abrasivi.
- Cura della scheda MicroSD: Format the MicroSD card regularly (e.g., once a month) to ensure optimal performance and prevent data corruption. Use only high-quality MicroSD cards.
- Aggiornamenti del firmware: Check the OMBAR websito o app periodicamente per gli aggiornamenti del firmware, per garantire che la tua dash cam abbia le funzionalità e i miglioramenti più recenti.
7. Risoluzione Dei Problemi
| Problema | Possibile causa | Soluzione |
|---|---|---|
| La dash cam non si accende. | Nessuna alimentazione; cavo difettoso. | Check power cable connection to car charger and dash cam. Ensure car's 12V outlet is functional. |
| La registrazione si interrompe o si blocca. | MicroSD card full or corrupted; low-quality MicroSD card. | Format the MicroSD card. Replace with a high-speed, high-endurance MicroSD card if issues persist. |
| Segnale GPS non trovato. | Antenna GPS ostruita o scollegata. | Assicurarsi che l'antenna GPS sia montata con una superficie trasparente view of the sky and securely connected. |
| Problemi di connessione Wi-Fi. | Incorrect password; out of range. | Verify Wi-Fi password. Ensure device is within 25ft of the dash cam. |
| Lo schermo è troppo scuro/luminoso. | Impostazioni di luminosità. | Adjust screen brightness via the touchscreen settings. |
8. Specifiche
| Caratteristica | Dettaglio |
|---|---|
| Nome del modello | N1 |
| Risoluzione della fotocamera frontale | 4K (3840x2160) a 30 fps |
| Risoluzione della telecamera posteriore | 2.5K (2560x1440) a 30 fps |
| Display | Schermo tattile IPS da 12 pollici |
| Connettività | 5.8GHz Wi-Fi, USB, Memory SD Card |
| Caratteristiche speciali | Built-In WiFi, Built-In GPS, G-Sensor, ADAS, Blind Spot Detection, Lane Change Assist, Parking Monitor, Reverse Assist, Touch Screen, App Control, Voice Control, Loop Recording, Built-In Microphone, Built-In Speaker, Built-In Supercapacitor, HDR, Night Vision |
| Magazzinaggio | Supporta la scheda MicroSD (inclusa da 64 GB) |
| Temperatura di esercizio | Da -20°C a 176°C (da -28°F a 80°F) |
| Dimensioni del prodotto | 0.1 x 0.5 x 0.5 pollici |
| Peso dell'articolo | 2.38 libbre |
| Tipo di montaggio | Posterioreview Supporto per specchio |
| Tipo di servizio del veicolo | Autobus, auto, minivan, camion |

Image 8.1: The dash cam is designed for reliable operation in extreme temperatures.
9. Garanzia e supporto
- Garanzia: The OMBAR N1 Mirror Dash Cam comes with a 1-year manufacturer's warranty.
- Politica di ritorno: A 30-day return policy is applicable from the date of purchase.
- Assistenza clienti: For technical assistance or warranty claims, please contact OMBAR customer support at support@ombars.com. Support is typically available within 24 hours.


