Introduzione
The KGUSS xDuoo TA20 Plus is a desktop balanced tube headphone amplifier designed to deliver high-fidelity audio. It features a hybrid "Tube + Transistors" structure, utilizing two 12AU7 tubes for signal amplification in the pre-stage and high-quality transistors for a Class A buffer in the post-stage. This design aims to combine the delicate and soft vocal characteristics of tubes with the dynamic power and speed of musical instruments.
IL amplifier boasts comprehensive input and output interfaces, including two RCA and one XLR balanced input, along with 6.35mm unbalanced, 4.4mm balanced, and 4-pin balanced headphone outputs. Its fully balanced circuit design from input to output significantly enhances crosstalk, resolution, and signal-to-noise ratio (SNR), providing an unparalleled listening experience. The TA20 Plus is suitable for driving a wide range of headphones with impedances from 16Ω to 600Ω.

Image: The xDuoo TA20 Plus amplifier showcasing its design and highlighted features such as VU meter, balanced input/output, and tube rectification.
Istruzioni di installazione
- Collegamento elettrico: Collegare il cavo di alimentazione CA in dotazione al amplifier's power input and then to a suitable wall outlet (AC 110V or 220V, depending on your region).
- Connessione sorgente audio:
- Per Ingresso RCA, connect your audio source (e.g., CD player, DAC) to the RCA input jacks on the rear panel.
- Per Ingresso XLR bilanciato, connect your audio source to the XLR balanced input jack on the rear panel.
- Collegamento cuffie: Connect your headphones to one of the available output jacks on the front panel:
- Per 6.35mm unbalanced headphones, use the 6.35mm jack.
- Per 4.4mm balanced headphones, use the 4.4mm balanced jack.
- Per 4-pin XLR balanced headphones, use the 4-pin XLR balanced jack.
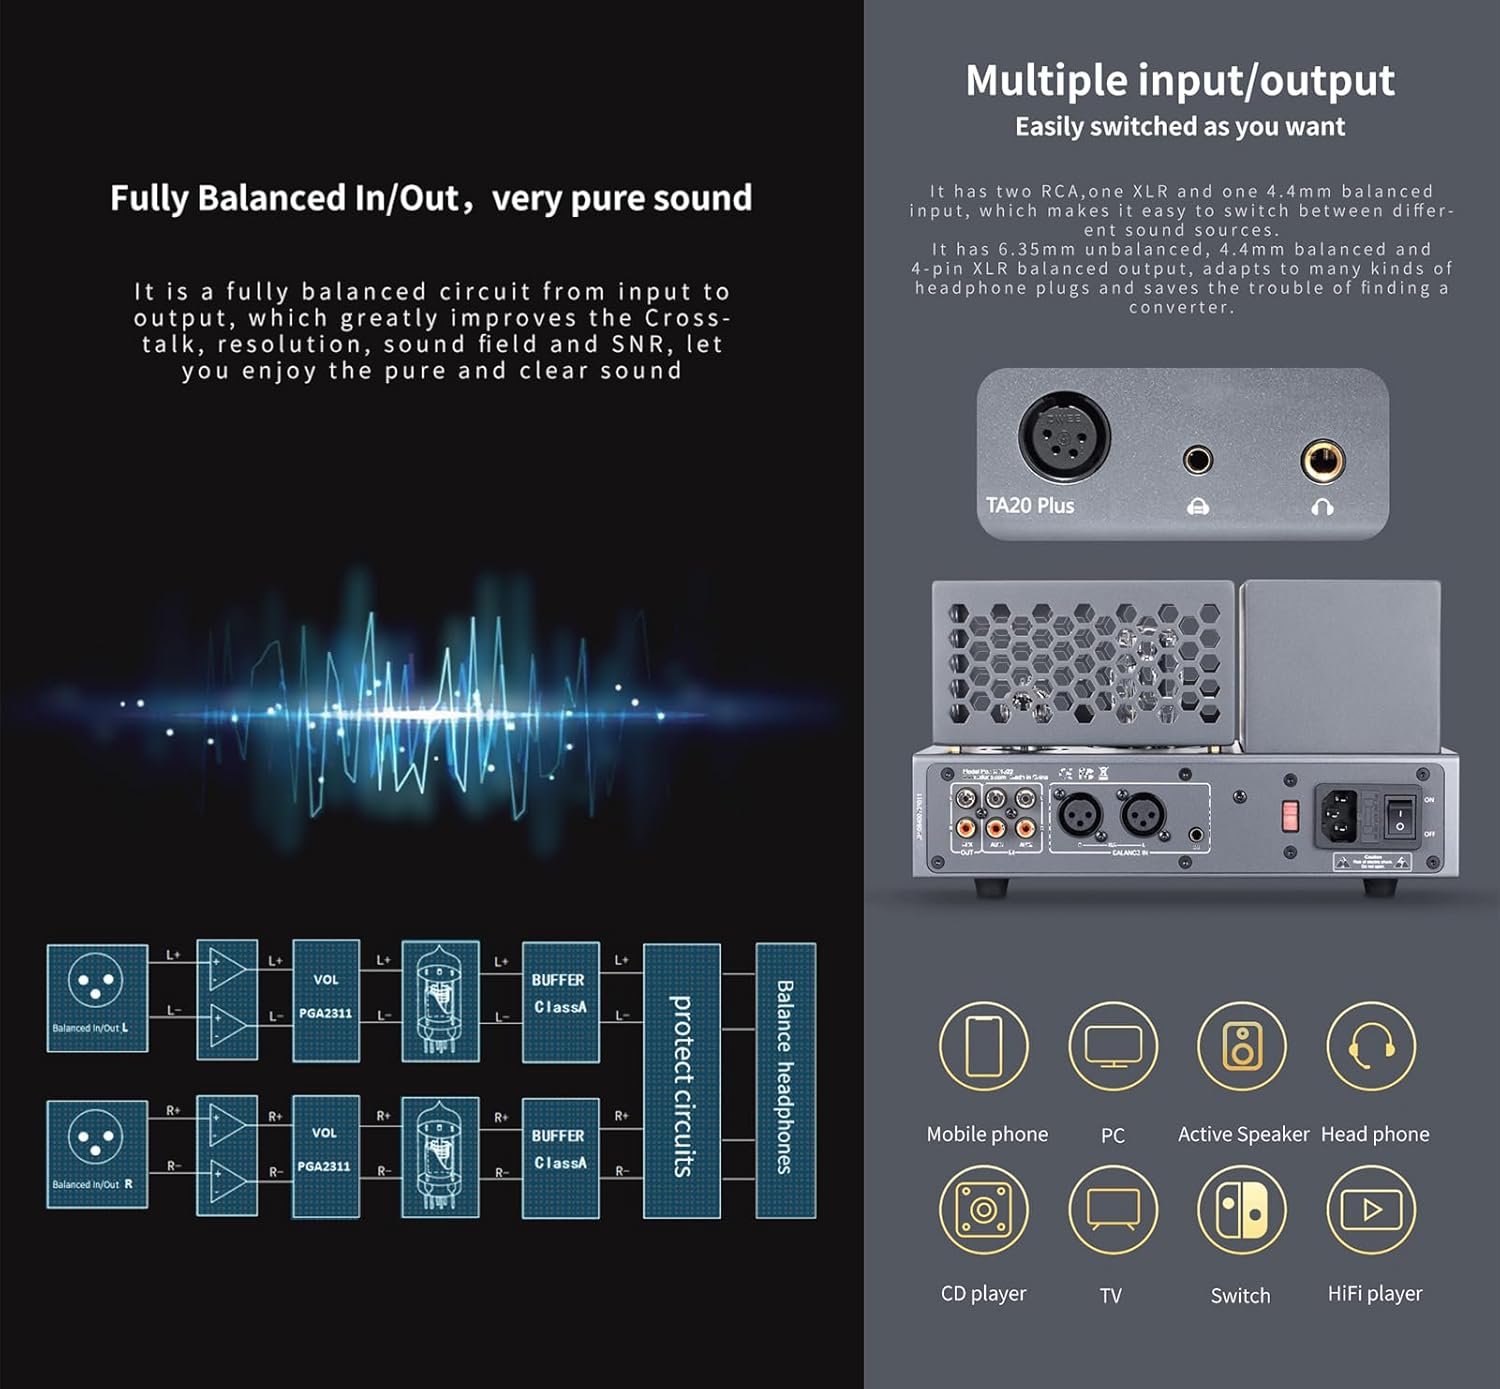
Immagine: dettagliata view del amplifier's front and rear panels, illustrating the various input and output options for audio sources and headphones.
Istruzioni per l'uso
- Accensione/spegnimento: Press the power button located on the front panel to turn the amplifier on or off. A built-in mute circuit prevents 'POP' noise during startup and ensures the tubes operate optimally.
- Regolazione del volume: Use the volume knob on the front panel to adjust the output level. The amplifier incorporates digital volume adjustment chips to maintain balanced left and right channels, even at low volumes.
- Misuratore VU: Observe the retro mechanical VU meter on the front panel, which displays the output level in real-time. The pointer will move in rhythm with the music.
- Riscaldamento del tubo: Allow a few moments after powering on for the tubes to warm up and stabilize for optimal sound performance.

Immagine: Un primo piano del amplifier's dynamic VU meter, indicating audio output levels.
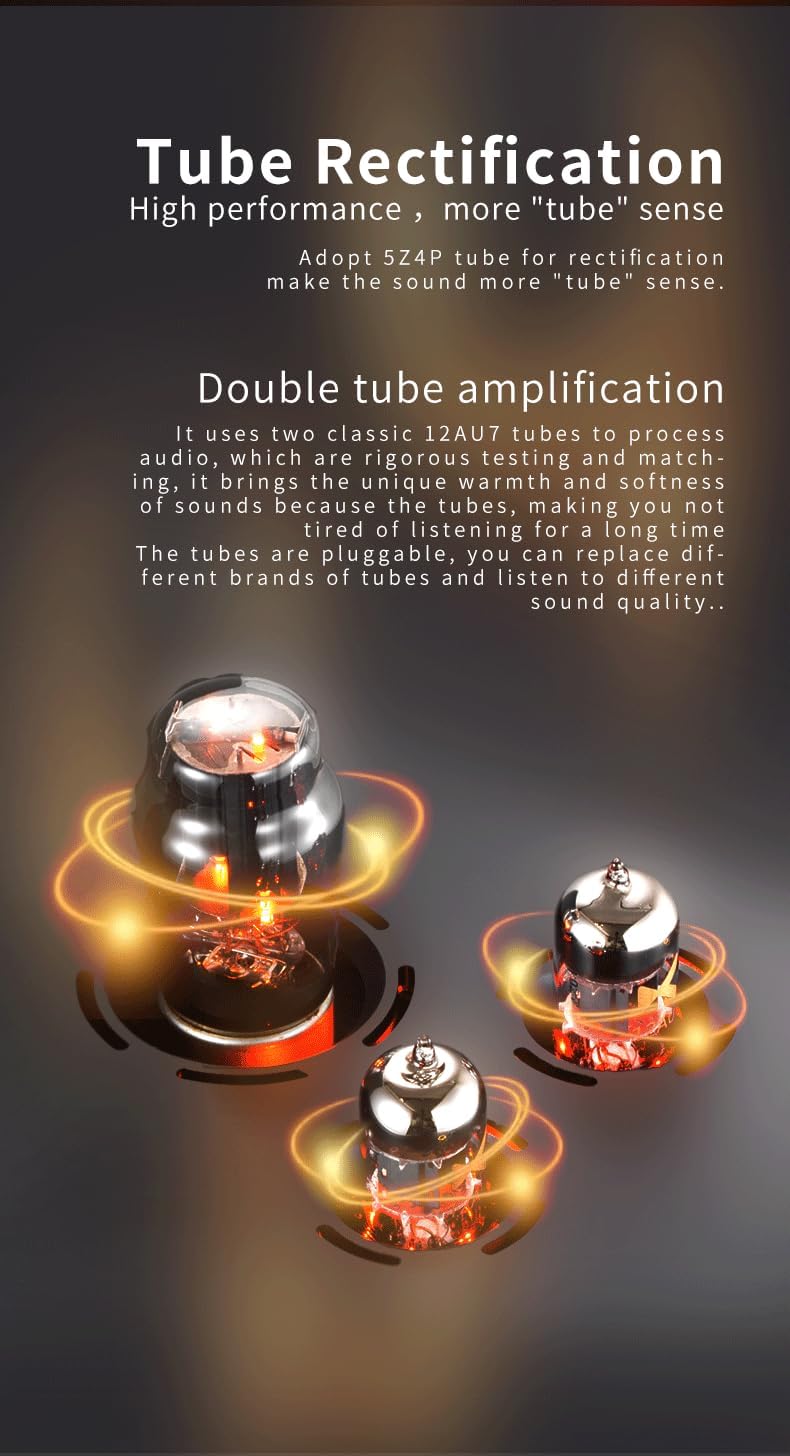
Image: The glowing 12AU7 amplification tubes and 5Z4P rectification tube, central to the amplifier's sound characteristics.
Manutenzione
- Pulizia: Pulisci regolarmente il amplifier's exterior with a soft, dry cloth. Avoid using liquid cleaners or abrasive materials, as they may damage the finish.
- Sostituzione del tubo: Il 12AU7 amplification tubes are pluggable, allowing for replacement. If you notice a degradation in sound quality or tube failure, consult a qualified technician or refer to specific tube replacement guidelines. Ensure the amplifier is powered off and unplugged before attempting any tube replacement. Only use compatible and matched tubes.
- Ventilazione: Assicurare il amplifier has adequate ventilation to prevent overheating. Do not block the ventilation grilles.
Risoluzione dei problemi
- Nessuna uscita audio:
- Controllare se il amplifier is powered on and the power indicator is lit.
- Verify all audio cables (input and headphone) are securely connected.
- Ensure the volume knob is not set to minimum.
- Confirm the audio source is active and playing.
- Suono distorto:
- Ridurre il livello del volume da entrambi i amplifier e la sorgente audio.
- Check if the headphone impedance is within the suitable range (16Ω~600Ω).
- Ispezionare i cavi audio per verificare che non siano danneggiati o che i collegamenti siano allentati.
- Consider if the tubes might need replacement if distortion persists and is not related to volume or connections.
- Problemi di alimentazione:
- If the unit does not power on, check the AC power cable connection and the wall outlet.
- Garantire il corretto voltage (110V or 220V) is supplied to the unit.
Specifiche
| Parametro | Valore |
|---|---|
| Fonte di alimentazione | CA 110 V (100-120 V) / 220 V (220-240 V) |
| Guadagno | +18 dB |
| 6.35mm Headphone Output Power | 2000 mW (carico 32Ω) |
| 6.35mm Frequency Response | Da 10 Hz a 80 kHz (± 0.5 dB) |
| 6.35mm Crosstalk | 74 dB |
| 6.35mm SNR | 113 dB |
| 6.35mm THD+N | 0.05% |
| 4.4mm/XLR Balanced Headphone Output Power | 2600 mW (carico 32Ω) |
| 4.4mm/XLR Frequency Response | Da 10 Hz a 80 kHz (± 0.5 dB) |
| 4.4mm/XLR Crosstalk | 95 dB |
| 4.4mm/XLR SNR | 113 dB |
| 4.4mm/XLR THD+N | 0.05% |
| Impedenza adatta per cuffie | 16Ω ~ 600Ω |
| Misurare | Dimensioni: 26 x 17.7 x 15.3 cm |
| Peso | 4.3 KG (9.48 libbre) |
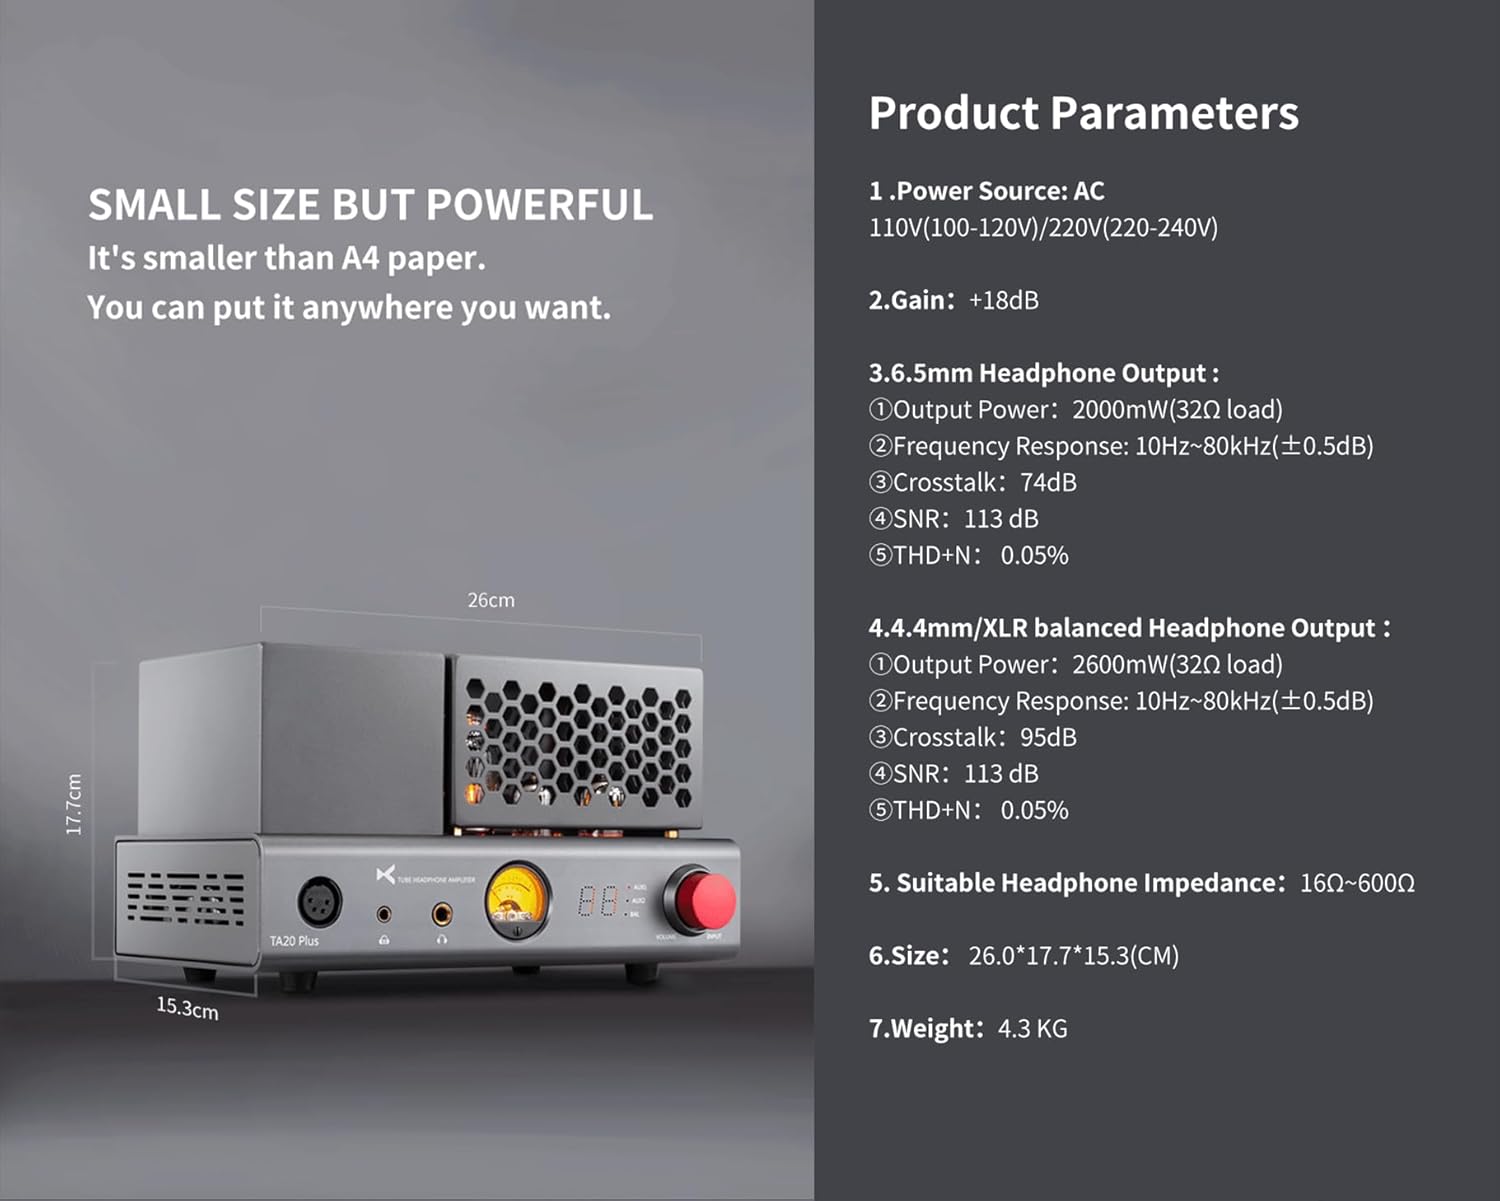
Immagine: rappresentazione visiva del amplifier's dimensions and a summary of its key technical specifications.
Garanzia e supporto
This product includes a Warranty Card. Please refer to the terms and conditions outlined on the card for details regarding warranty coverage and duration. Keep your purchase receipt as proof of purchase for any warranty claims.
For technical support, service, or further inquiries, please contact the manufacturer or your authorized dealer. Contact information can typically be found on the Warranty Card or the manufacturer's official websito.


