1. Introduzione
This manual provides essential information for setting up, operating, and maintaining your XIXIMENG M15 Retro Game Stick. Please read it thoroughly to ensure optimal performance and longevity of your device. The M15 Retro Game Stick is a compact gaming console designed to bring classic gaming experiences to your 4K Ultra HD TV, monitor, or projector.
2. Contenuto della confezione
Verifica che tutti gli articoli elencati di seguito siano inclusi nel tuo pacchetto:
- 1 x M15 Game Console (Game Stick)
- 2 x Gamepad wireless
- 1 x HD Cable (HDMI Extension Cable)
- 1 cavo di alimentazione (USB)
- Ricevitore USB 1 x
- 1 x TF Card (64GB, pre-installed in the game stick)
- 1 x Manuale utente

Figura 2.1: Contenuto della confezioneview
This image displays the M15 Game console, two wireless gamepads, an HD cable, a power cable, and a USB receiver, which are all included in the product package.
3. Istruzioni per l'installazione
Follow these steps to connect your M15 Retro Game Stick to your display device:
- Insert the TF Card: Ensure the 64GB TF card is already installed in the card slot of the game stick. Do not remove or format the SD card, as it contains games and system files.
- Collegare il ricevitore USB: Plug the 2.4GHz USB wireless receiver into the USB port on the game stick.
- Collegare il cavo di alimentazione: Connect the USB power cable to the game stick. The power supply should be 5V/1A or above.
- Connect to TV/Monitor: Plug the game stick (via the extended HDMI cable if needed) into an available HDMI input port on your TV, monitor, or projector.
- Accensione: Connect the USB power cable to a 5V/1A power source (e.g., a USB wall adapter, not included, or a TV USB port if it provides sufficient power).
- Seleziona sorgente di ingresso: On your display device, switch the input source to the corresponding HDMI channel where the game stick is connected. The game list screen should appear.
- Inserire le batterie del controller: Insert 2 AAA batteries (not included) into each wireless gamepad.

Figura 3.1: schema di collegamento
This diagram illustrates the step-by-step process of connecting the game stick to a television, including the game stick, USB cable, HD cable, and wireless controllers.
Video 3.1: Retro Game Console Overview
Questo video fornisce una breve panoramicaview of the retro game console, demonstrating its components and basic functionality.
4. Istruzioni per l'uso
4.1 Navigazione nel menu
Once connected and powered on, the main game selection menu will appear on your screen. Use the wireless controllers to navigate through the game list and emulator categories.
4.2 Selecting and Starting Games
Use the directional pad or left joystick on your controller to browse through the available games. Press the A button (or equivalent action button) to select a game and start playing.
4.3 Returning to the Main Menu
To exit a game and return to the main menu, simultaneously press the SELEZIONARE E INIZIO buttons on your controller.
4.4 Game Collections and Favorites
The console supports game collections. You can use the INIZIO button for three seconds to add or remove your favorite games from a dedicated collection for quick access.
4.5 controller wireless
The M15 comes with two 2.4GHz wireless controllers, allowing for two-player gaming. The wireless control range is up to 8 meters, providing flexibility and comfort during gameplay. These controllers require 2 AAA batteries each (not included).
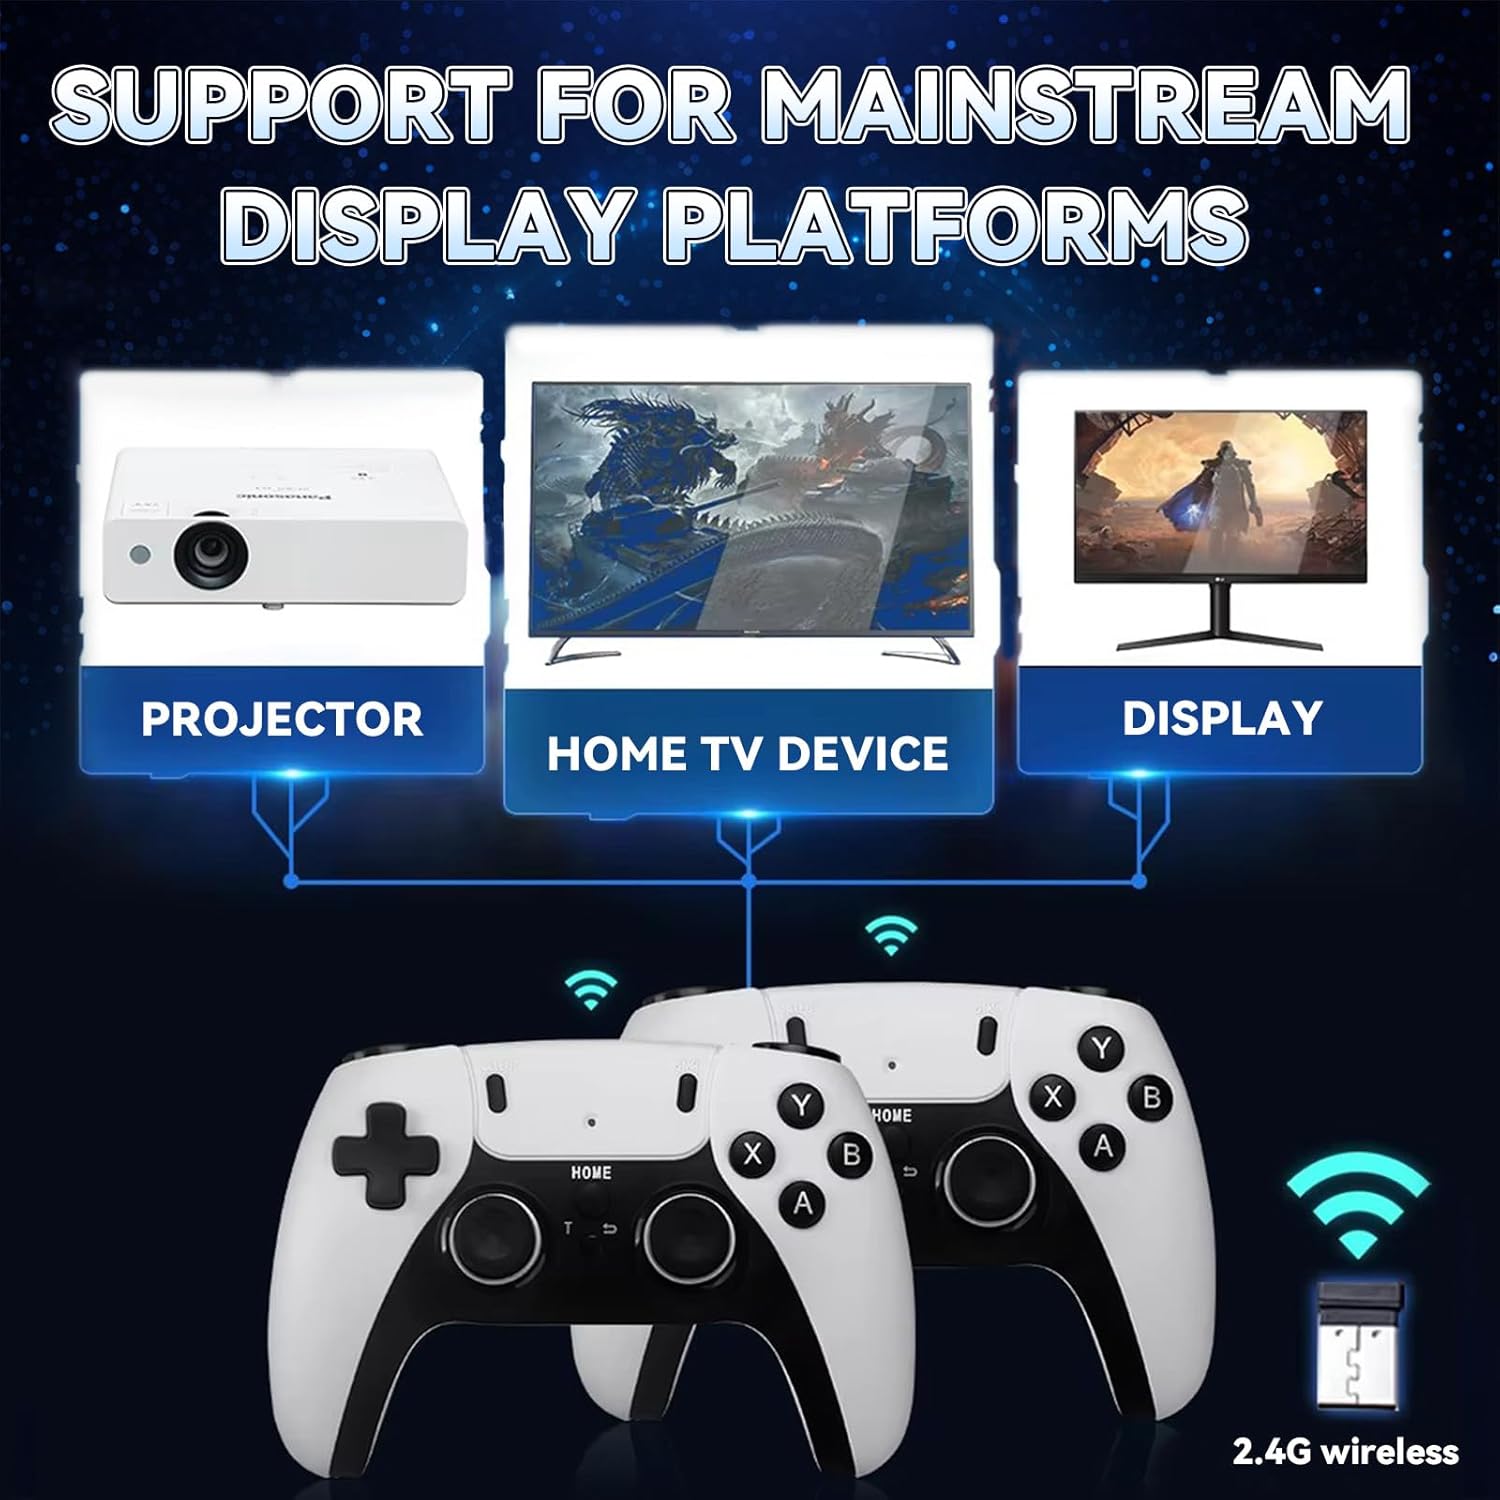
Figure 4.1: Wireless Game Controllers
This image shows the two wireless gamepads included with the M15 Retro Game Stick, highlighting their design and dual-player capability.
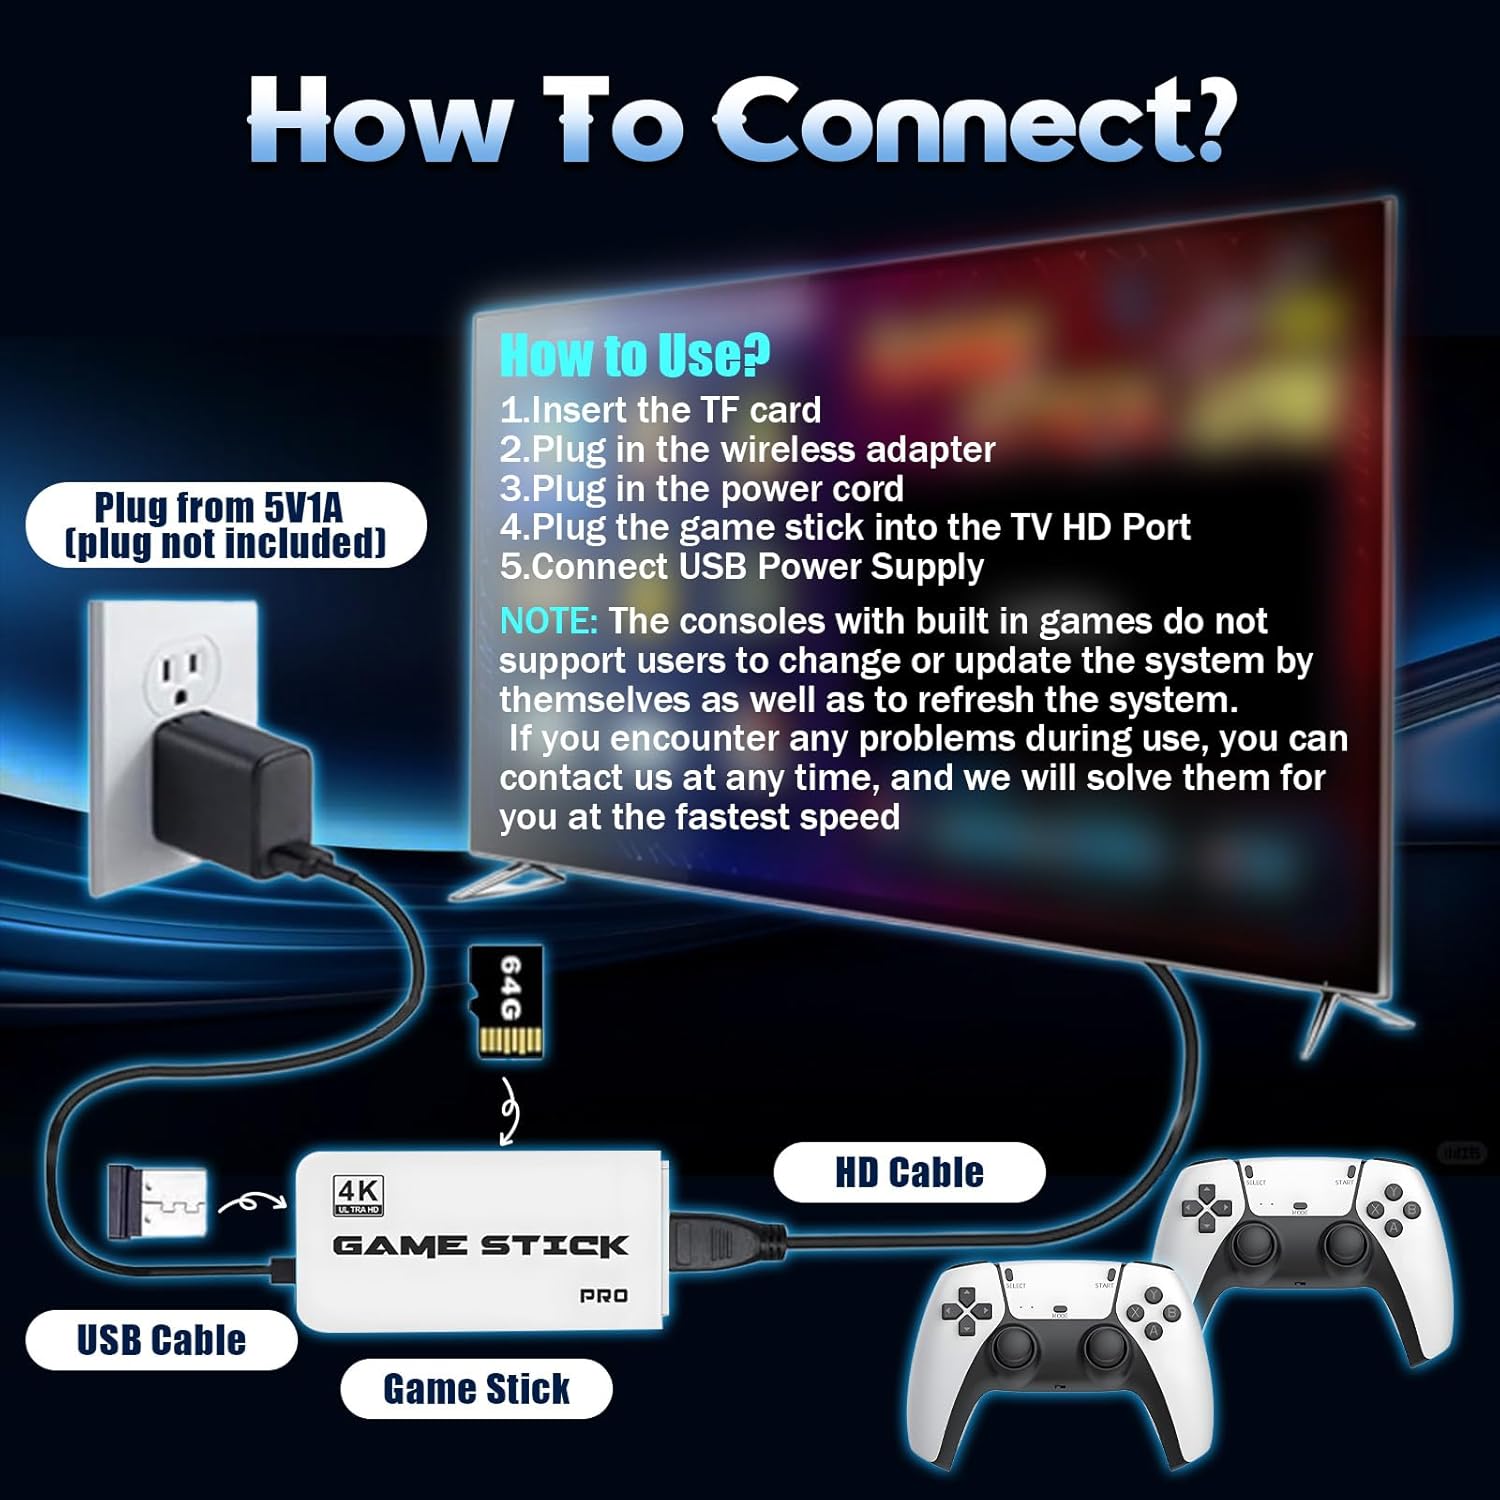
Figura 4.2: caratteristiche del controller
This image details the ergonomic design, comprehensive key controls, and sensitive joysticks of the wireless gamepads.
5. Display e connettività
The M15 Retro Game Stick supports 4K Ultra HD TV video output (1080p/720p), providing crisp and vibrant visuals. It is compatible with various devices that have an HDMI input port, including:
- TV
- Monitorare
- Computers (with HDMI input)
- Proiettori
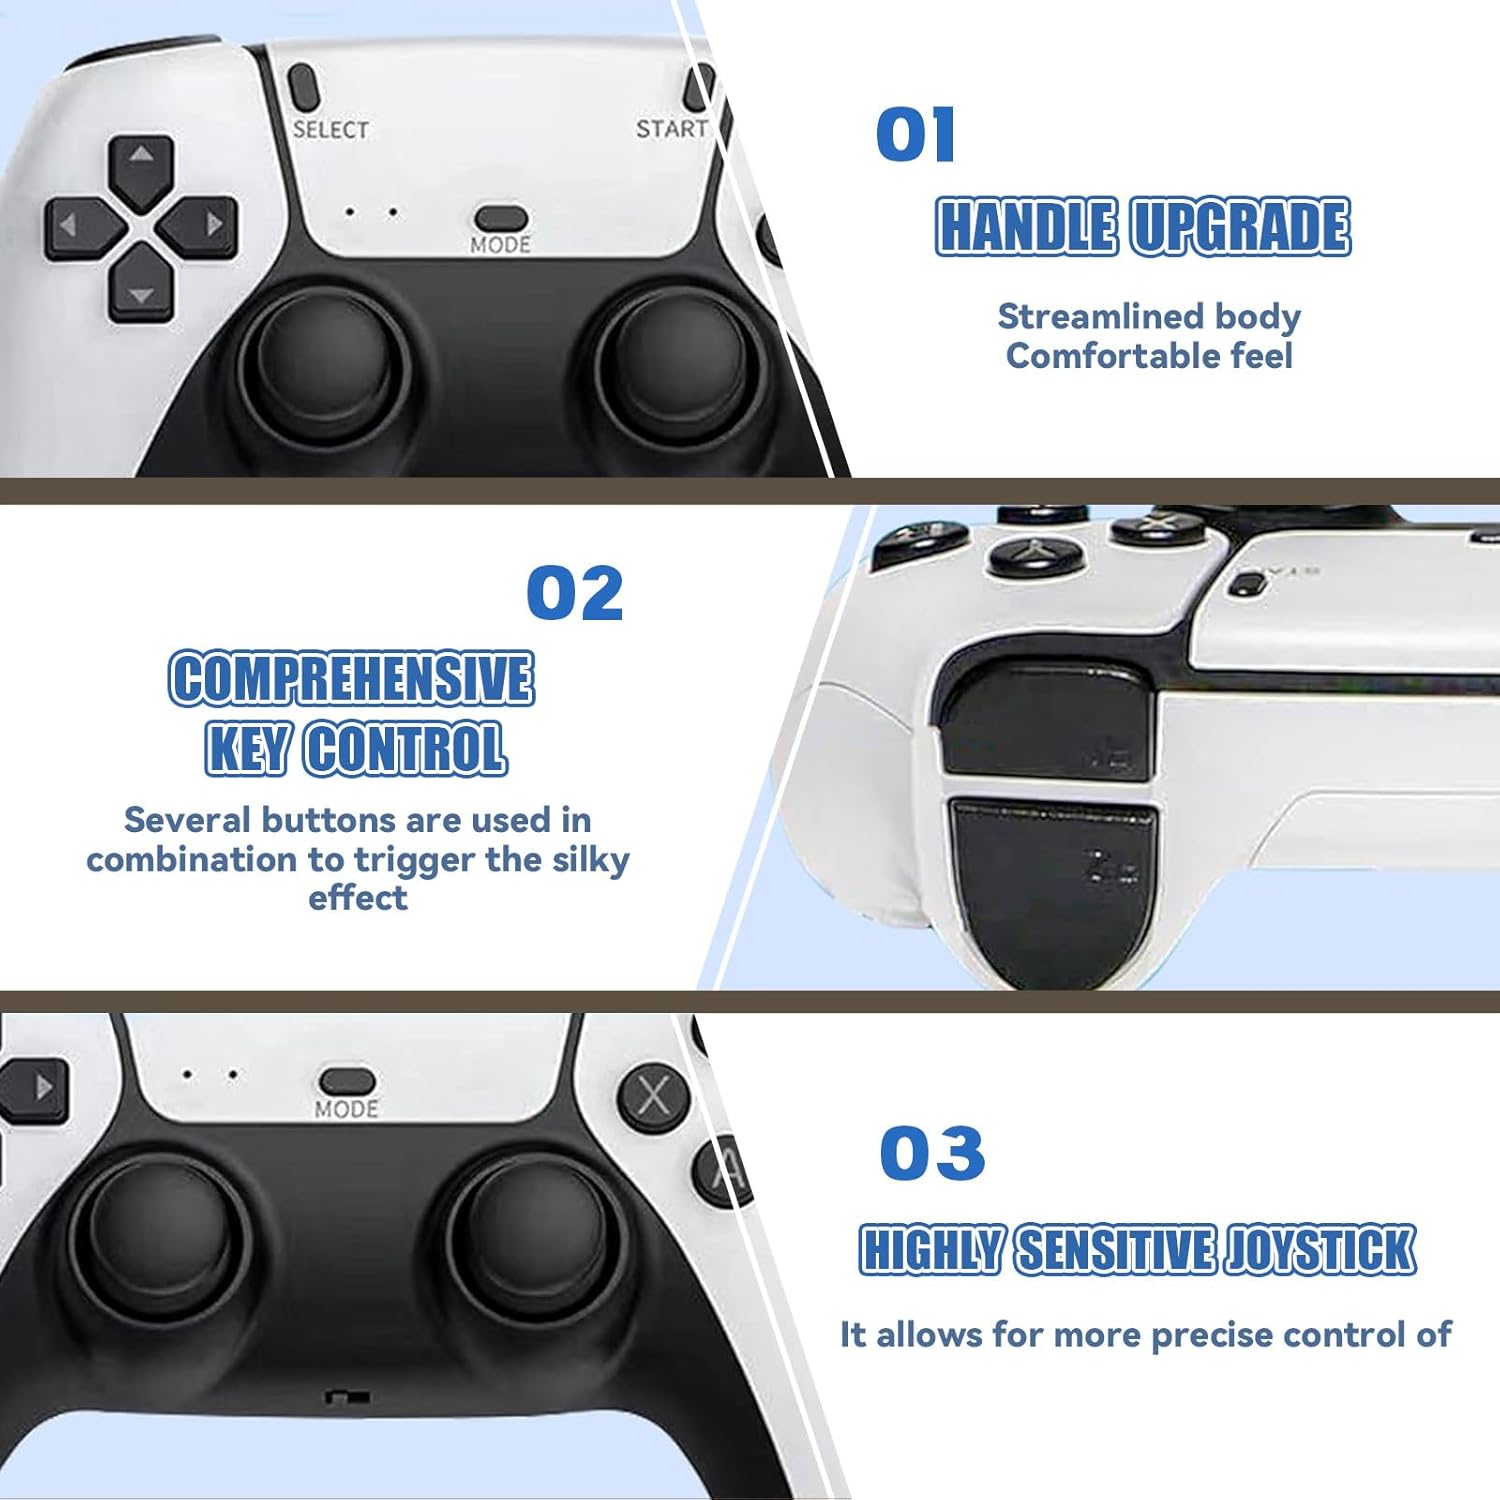
Figure 5.1: 4K HD TV Video Output
This image demonstrates the 4K HD video output capability of the game stick when connected to a television.

Figure 5.2: Support for Mainstream Display Platforms
This image highlights the game stick's compatibility with various display devices such as projectors, TVs, and monitors.
6. Manutenzione
Proper care ensures the longevity of your M15 Retro Game Stick:
- Gestione delle carte TF: Do not remove the TF card while the device is powered on. Avoid formatting the SD card, as it contains essential system files and games. If the card is damaged, the host may become unusable.
- Pulizia: Keep the console clean by using a soft, dry cloth. Avoid using harsh chemicals that may damage the screen or body of the console.
- Condizioni ambientali: Avoid exposing the console to extreme temperatures or direct sunlight for long periods, as this can affect performance and lifespan.
- Ricarica: When charging, use the original USB Type-C cable or a high-quality compatible cable to ensure safe and efficient charging.
7. Risoluzione Dei Problemi
In caso di problemi, fare riferimento ai seguenti problemi comuni e alle relative soluzioni:
- Nessuna visualizzazione sulla TV:
- Assicurati che il game stick sia collegato saldamente alla porta HDMI del televisore.
- Confirm the TV input source is set to the correct HDMI channel.
- Verify the USB power cable is connected to a 5V/1A power source. Insufficient power (e.g., from a TV USB port that doesn't provide enough current) can prevent display.
- Check if the TF card is properly inserted and not damaged.
- Il controller non risponde:
- Ensure fresh AAA batteries are correctly installed in the controllers.
- Verify the USB receiver is securely plugged into the game stick.
- Try unplugging and re-plugging the USB receiver.
- If the controller fails to connect, try resetting the controller or refer to the manufacturer for specific operation video.
- Game Lag or Performance Issues:
- Ensure the game stick has adequate ventilation to prevent overheating.
- Some larger or more complex games may experience minor performance variations due to emulation.
If you encounter any problems during use, please contact customer support for assistance. We aim to respond and solve issues within 12 hours.
8. Specifiche
| Caratteristica | Dettaglio |
|---|---|
| Numero di modello | Numero di modello: M15 |
| Capacità di archiviazione | 64GB TF Card (pre-installed) |
| Giochi precaricati | 30,000+ |
| Emulatori supportati | 23 tipi |
| Uscita video | 4K Ultra HD (1080p/720p) |
| Connettività | Cavo HDMI |
| Controllori | Dual 2.4GHz Wireless Gamepads |
| Batteria del controller | 2 x AAA batteries per controller (not included) |
| wireless Range | Fino a 8 metri |
| Potenza in ingresso | USB da 5 V/1 A |
| Dimensioni del prodotto | 6.5 x 4.7 x 4.3 pollici |
9. Informazioni sulla sicurezza
Si prega di osservare le seguenti linee guida di sicurezza:
- Avoid exposing the console to extreme temperatures or direct sunlight for long periods, as this may affect the performance and lifespan of the device.
- When charging, use the original USB Type-C cable or a high-quality compatible cable to ensure safe and efficient charging.
- Keep the console clean by using a soft, dry cloth. Avoid using harsh chemicals that may damage the screen or body of the console.
- Tenere fuori dalla portata dei bambini piccoli per evitare l'ingestione accidentale di piccole parti.
10. Garanzia e supporto
Your XIXIMENG M15 Retro Game Stick comes with a 1-month return service. If you are not satisfied, you may return the product for a refund within this period. Additionally, we offer a lifetime worry-free warranty. For any issues or support, please contact us. We are committed to responding and resolving problems within 12 hours.
Video 10.1: BELOPERA Retro Gamestick for Holiday (Preview)
This short video provides a quick look at the BELOPERA Retro Gamestick, showcasing its appearance and highlighting its suitability as a holiday gift.


