1. Introduzione
This instruction manual provides essential information for the safe and efficient operation, maintenance, and troubleshooting of your 3i P10 Ultra Robot Vacuum and Mop Combo. Please read this manual thoroughly before using the product and retain it for future reference.
2. Informazioni sulla sicurezza
Seguire sempre le precauzioni di sicurezza di base quando si utilizzano apparecchi elettrici per ridurre il rischio di incendi, scosse elettriche o lesioni. Questo apparecchio è destinato esclusivamente all'uso domestico.
- Non permettere ai bambini di utilizzare il robot. Sorvegliare i bambini e gli animali domestici quando il robot è in funzione.
- Garantire la potenza voltage corrisponde all'etichetta di classificazione sulla base di ricarica.
- Non utilizzare il robot su superfici bagnate o in aree con acqua stagnante.
- Remove loose cables, small objects, and fragile items from the cleaning path before operation.
- Do not use the robot to pick up large or sharp objects, flammable materials, or liquids.
- Only use manufacturer-specified accessories and replacement parts.
- Se il cavo di alimentazione è danneggiato, deve essere sostituito dal produttore o da un tecnico qualificato per evitare pericoli.
3. Prodotto finitoview
3.1 Componenti inclusi
Il pacchetto include i seguenti articoli:
- 1 x Robot aspirapolvere
- 1 x stazione base
- 2 x panni per mocio
- Spazzole laterali 2 x
- 1 soluzione detergente da 800 ml
- 1 base staccabile
- 1 x cavo di alimentazione
- 1 x Manuale utente
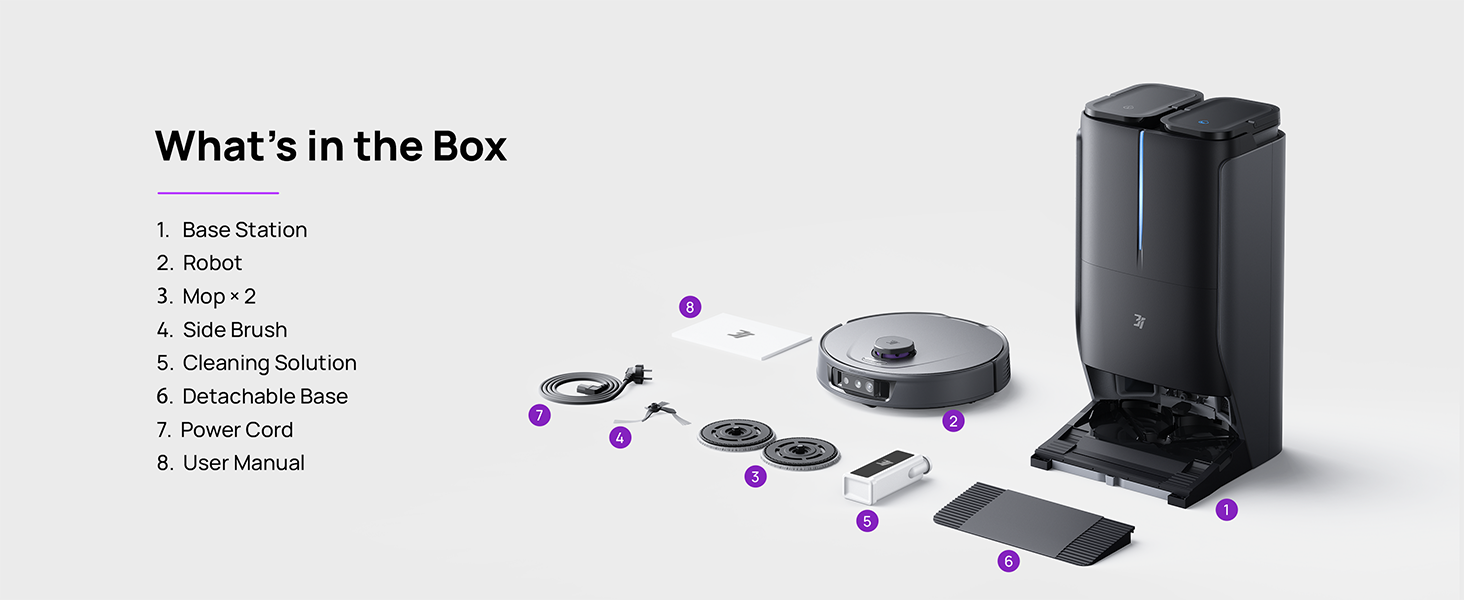
Figure 3.1: Contents of the 3i P10 Ultra package.
3.2 Caratteristiche del robot aspirapolvere
- UltraReach Mop: The auto-extending mop system cleans edges and corners thoroughly. Dual mops spin at 220 RPM for effective stain removal.
- Aspirazione 18,000 Pa: Provides powerful suction for deep cleaning on various floor types, including carpets and hard floors. Features smart carpet detection to boost suction and lift mops.
- All-in-One Automated Station: Offers automatic hot-water mop washing, hot air drying, solution adding, and hands-free dust collection for up to 70 days.
- Navigazione avanzata: Utilizes LiDAR for 3D mapping, dual 3D structured light, and an AI camera for obstacle avoidance, threshold crossing, and collision resistance.
- AI-Powered DirtScan: Identifies over 100 household objects and messes, adapting cleaning methods for optimal results, even in low light conditions.
- Gestione dei capelli: Equipped with anti-tangle brushes and a TangleCut blade to prevent hair from wrapping around components.
- Smart Route Planning: Learns home layouts for efficient cleaning routes. Supports scheduled cleaning, no-go zones, and app control. Compatible with Alexa and Google Assistant.
- Connettività Wi-Fi: Supports both 2.4G and 5G Wi-Fi networks.

Figura 3.2: in alto view of the 3i P10 Ultra Robot Vacuum.

Figure 3.3: The 3i P10 Ultra Base Station.
4. Impostazione
4.1 Disimballaggio e posizionamento
- Rimuovere con attenzione tutti i componenti dalla confezione.
- Choose a suitable location for the base station. Ensure it is placed against a wall, on a hard, level surface, with at least 0.5 meters (1.6 feet) of clear space on both sides and 1.5 meters (4.9 feet) in front. Avoid areas with direct sunlight or strong Wi-Fi interference.
- Collegare il cavo di alimentazione alla stazione base e inserirlo in una presa di corrente.
4.2 Preparazione del robot
- Install the side brushes by pressing them into their slots until they click.
- Attach the mop pads to the mop holders on the robot.
- Place the robot onto the base station to charge. Ensure the charging contacts align. The robot will announce its charging status.
4.3 Installazione e connessione dell'app
- Download the 3i app from your mobile device's app store (iOS or Android).
- Open the app and follow the on-screen instructions to create an account and add your 3i P10 Ultra robot.
- Durante il processo di associazione, assicurati che il telefono sia connesso a una rete Wi-Fi da 2.4 GHz o 5 GHz.
5. Istruzioni per l'uso
5.1 Pulizia iniziale e mappatura
For the first use, allow the robot to complete a full cleaning cycle to create a map of your home. This map is crucial for advanced features.

Figure 5.1: Precision 3D Mapping in the 3i App.
5.2 Avvio di un ciclo di pulizia
- Tramite Robot: Premere una volta il pulsante di accensione del robot per avviare o mettere in pausa la pulizia.
- Tramite App: Open the 3i app, select the desired cleaning mode (Vacuum, Mop, Vac & Mop, AI Auto, Custom), and tap 'Start'.
- Tramite controllo vocale: Use compatible voice assistants (Alexa, Google Assistant) with commands like "Hey Google, start vacuuming."

Figure 5.2: Using voice control to operate the 3i P10 Ultra.
5.3 Funzionalità dell'app
The 3i app provides extensive control and customization options:
- Impostazioni di pulizia: Schedule cleaning, select rooms, set no-go zones, customize carpet cleaning.
- Impostazioni mappa: View 3D maps, quick mapping, multi-floor maps, edit rooms and furniture.
- Station Settings: Customize dust collection, mop washing, auto-drying, and TangleCut.
- Altre impostazioni: Do Not Disturb mode, Smart Route Planning, Pet Recognition, Child Lock.
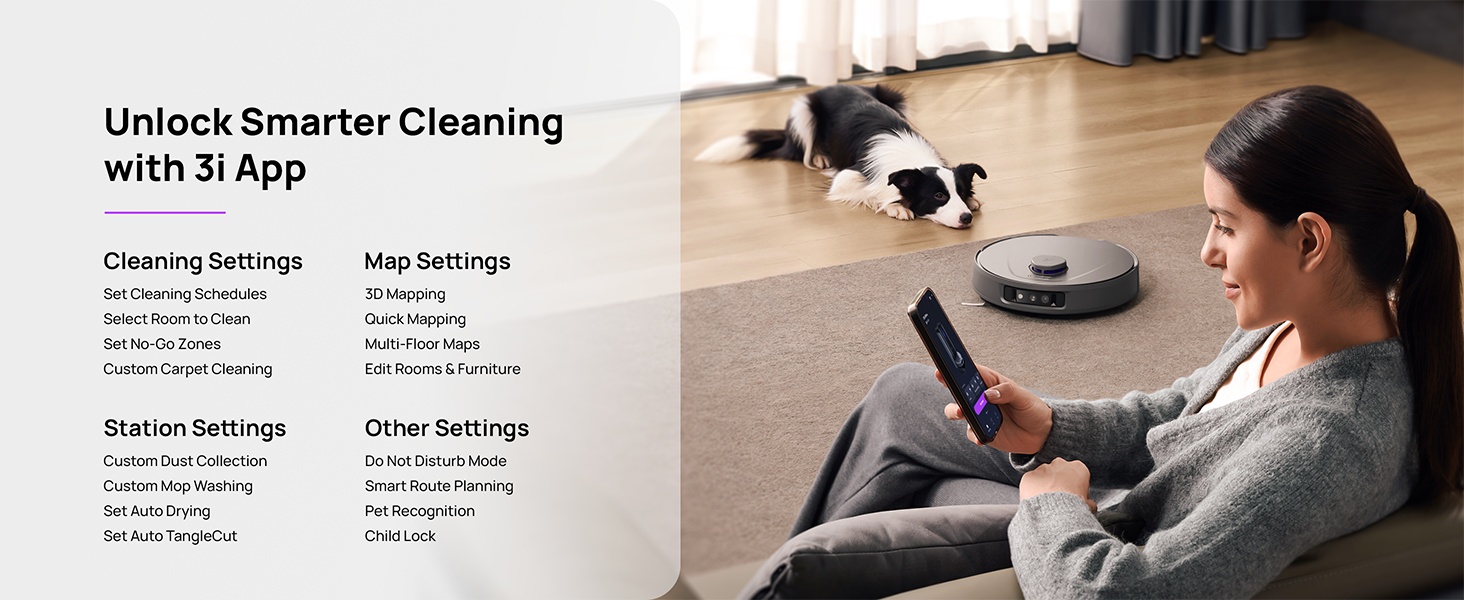
Figure 5.3: The 3i App interface for smart cleaning.
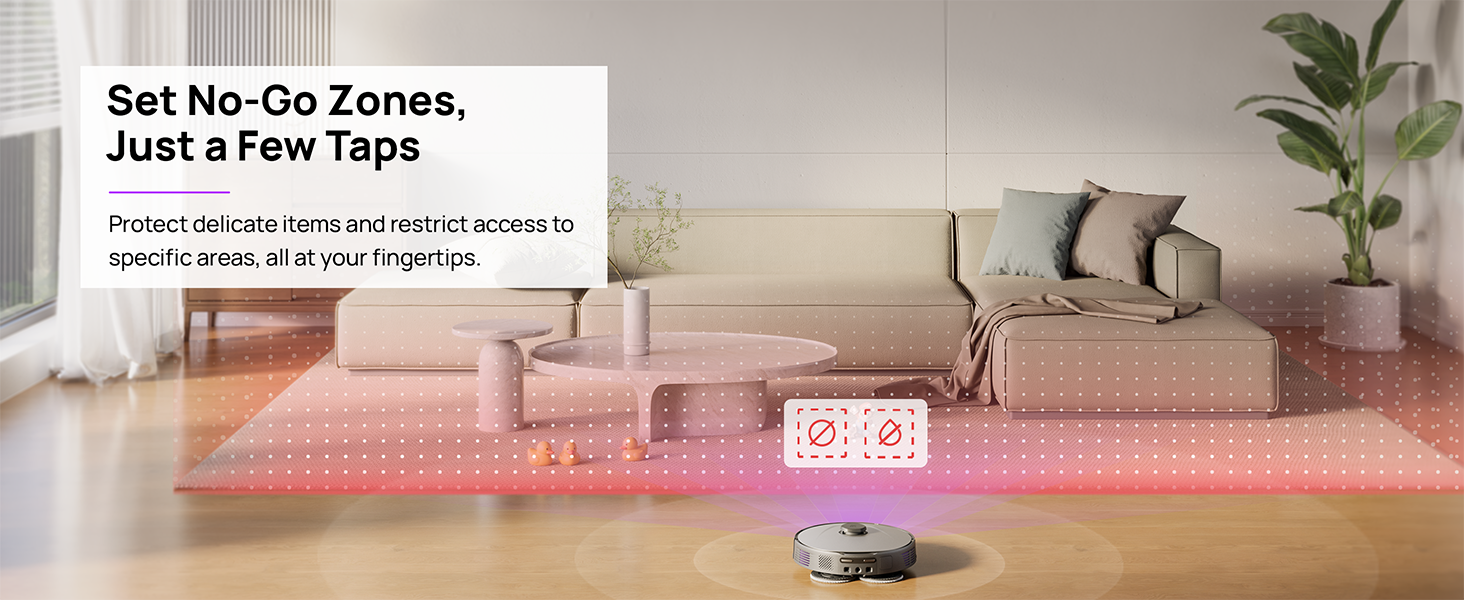
Figure 5.4: Setting No-Go Zones in the 3i App.
6. Manutenzione
Regular maintenance ensures optimal performance and extends the lifespan of your 3i P10 Ultra.
6.1 Manutenzione della stazione base
- Svuotamento del cestino: The base station automatically empties the robot's dustbin into a 3L bag. Replace the dust bag approximately every 70 days, or as indicated by the app.
- Lavaggio e asciugatura del mocio: The base station automatically washes mop pads with 140°F / 60°C hot water and dries them with hot air (131°F / 55°C) after each cleaning cycle. Ensure the clean and dirty water tanks are properly installed.
- Riempimento del serbatoio dell'acqua: The extra-large 4L clean water tank automatically refills the robot. Refill the clean water tank as needed. The base station also collects dirty water into a separate wastewater tank. Empty the wastewater tank regularly.
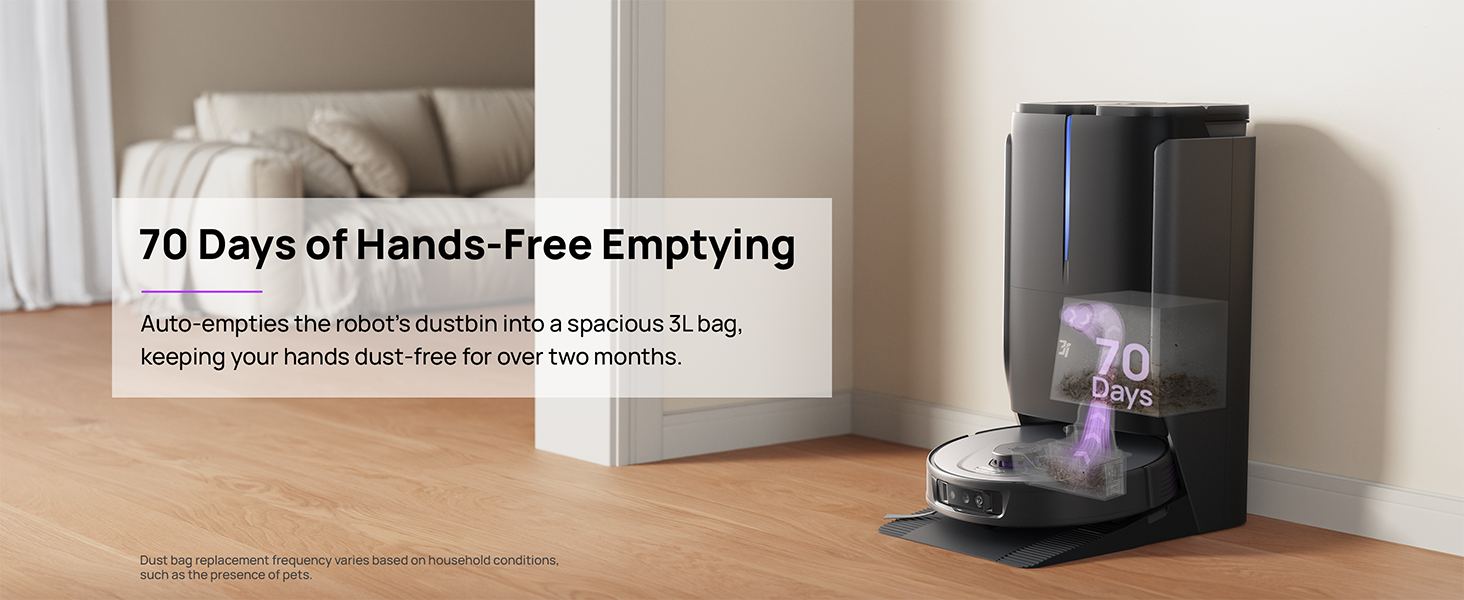
Figure 6.1: Automatic dustbin emptying at the base station.
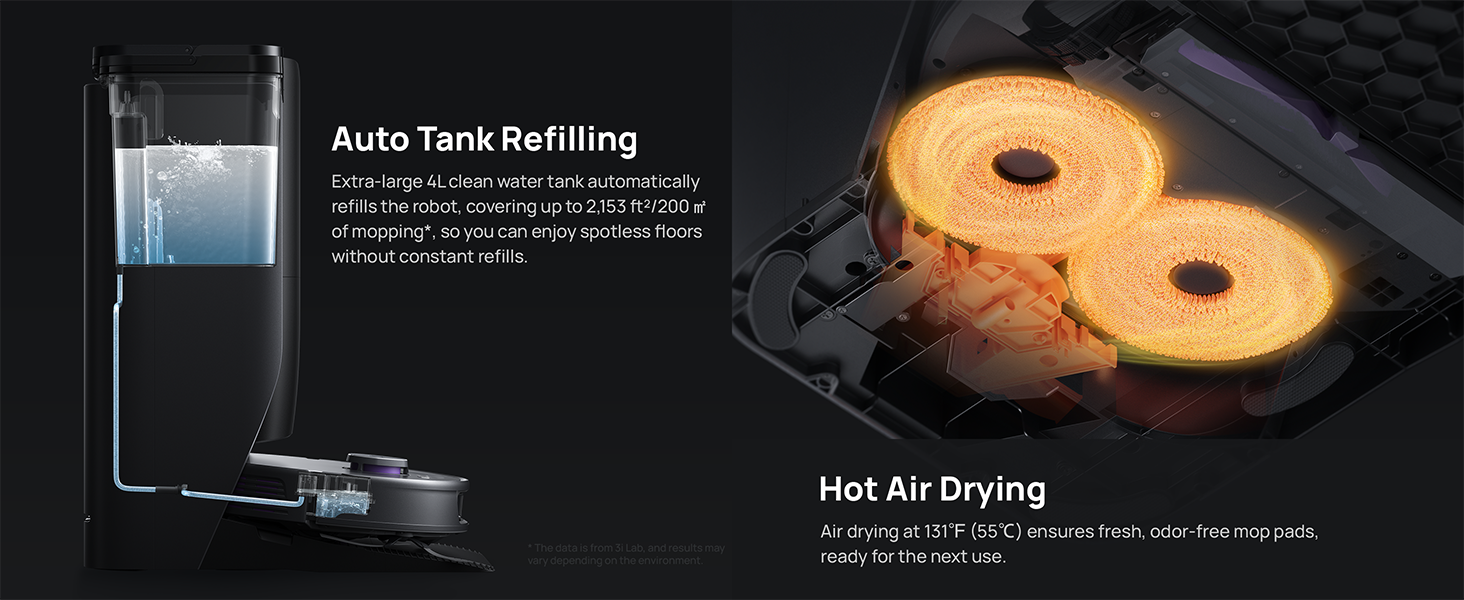
Figure 6.2: Auto tank refilling and hot air drying process.
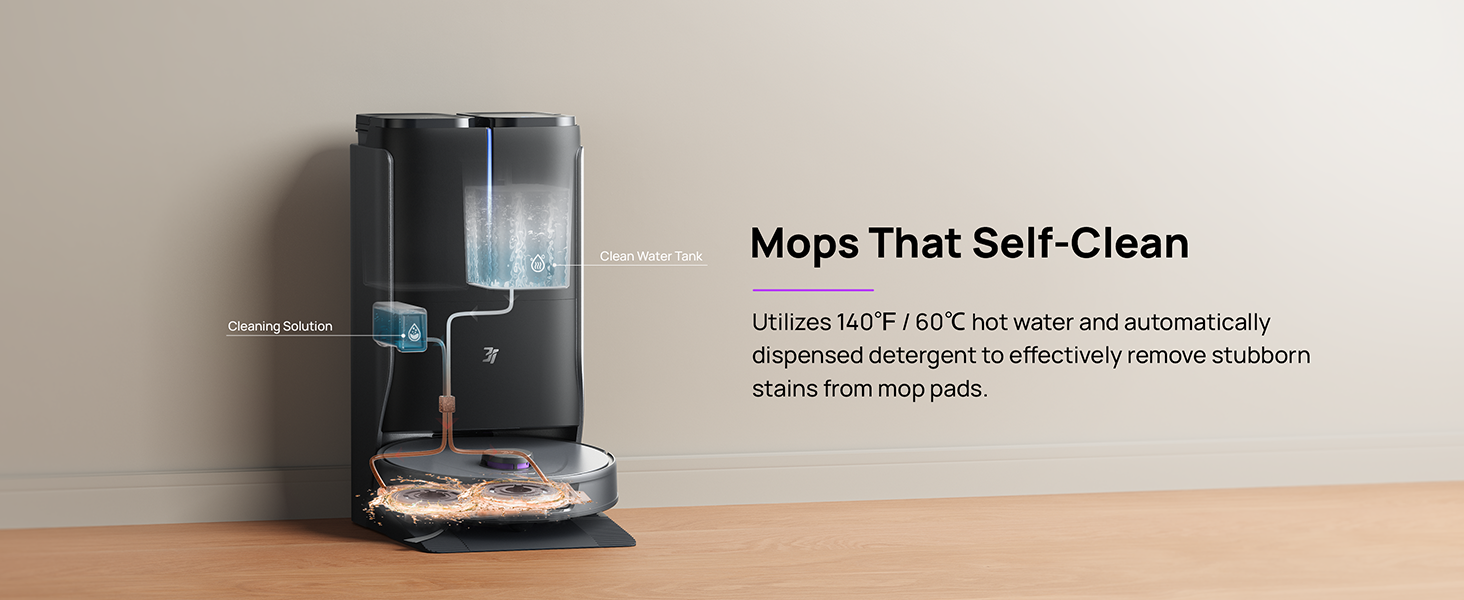
Figure 6.3: Mop self-cleaning function.
6.2 Manutenzione dei componenti del robot
- Spazzola principale: Regularly check the main brush for tangled hair or debris. Use the cleaning tool provided to remove any obstructions. The TangleCut blade helps prevent excessive tangling.
- Spazzole laterali: Inspect side brushes for wear or damage. Clean them periodically and replace if necessary.
- Panni per mocio: Although self-cleaned, inspect mop pads for excessive wear or stubborn stains. Replace them when their cleaning effectiveness diminishes.
- Filtro: The filter is washable. Remove and rinse it under running water. Allow it to air dry completely before reinstalling.
- Sensori: Wipe all sensors (LDS, anti-drop, wall-following, charging contacts) with a clean, dry cloth to ensure proper function.
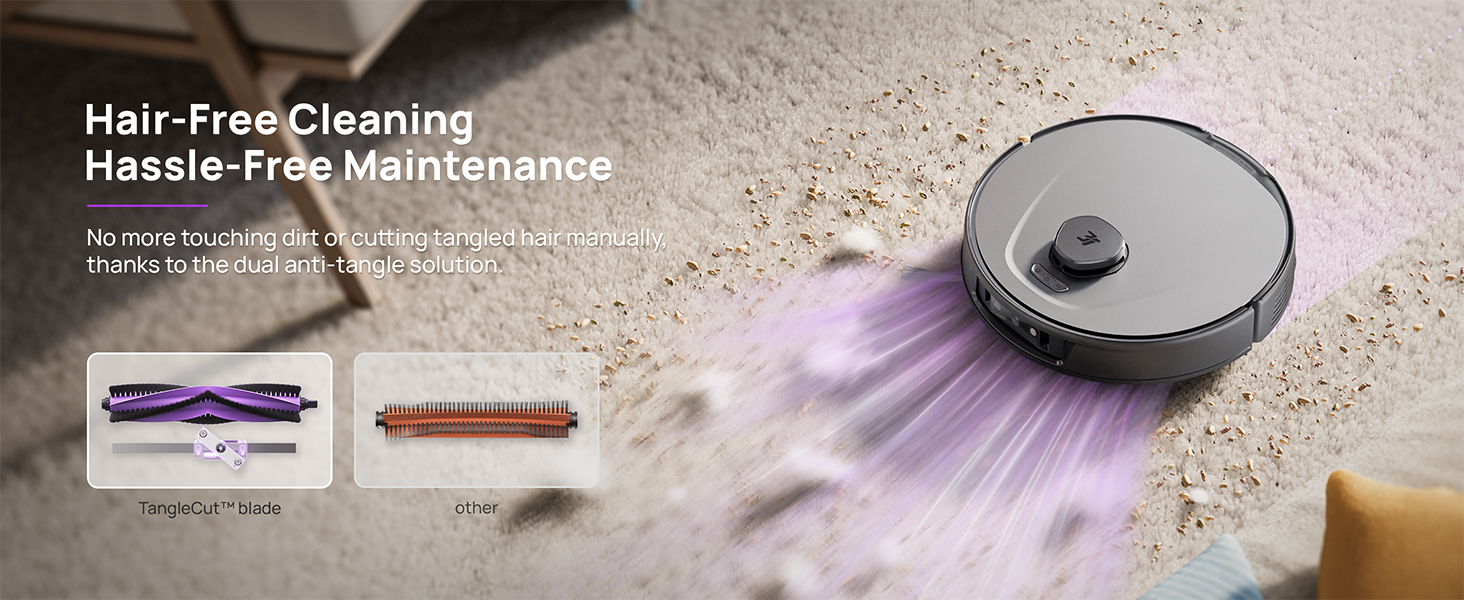
Figure 6.4: Hair-free cleaning with anti-tangle design.
7. Risoluzione Dei Problemi
If you encounter issues with your 3i P10 Ultra, refer to the following common problems and solutions:
| Problema | Possibile causa | Soluzione |
|---|---|---|
| Il robot non si accende. | Batteria scarica; il pulsante di accensione non è premuto correttamente. | Posizionare il robot sulla base di ricarica; tenere premuto il pulsante di accensione per 3 secondi. |
| Il robot non riesce a trovare la base di ricarica. | Dock is obstructed or too far; Poor Wi-Fi signal. | Ensure dock is in an open area; Check Wi-Fi connection. |
| Le prestazioni di pulizia sono scarse. | Cestino pieno; Spazzole aggrovigliate; Filtro intasato; Panni del mocio sporchi. | Empty dustbin; Clean brushes; Clean/replace filter; Clean/replace mop pads. |
| Il robot si blocca spesso. | Ostacoli sul pavimento; sensori sporchi. | Liberare il pavimento dagli ostacoli; pulire tutti i sensori. |
| Problemi di connessione all'app. | Password Wi-Fi errata; problemi con il router; robot offline. | Verify Wi-Fi password; Restart router; Restart robot; Re-pair device in app. |
For further assistance, please refer to the 3i app's help section or contact customer support.
8. Specifiche
| Caratteristica | Dettaglio |
|---|---|
| Marca | 3i |
| Nome del modello | Robot aspirapolvere 3i P10 Ultra |
| Dimensioni del prodotto (robot) | 13.78 cm L x 13.78 cm P x 3.94 cm A |
| Dimensioni del prodotto (stazione) | 12.2 cm L x 18.43 cm P x 23.39 cm A |
| Peso dell'articolo | 37.3 libbre |
| Durata della batteria | 180 minuti |
| Tipo di filtro | Lavabile |
| Raccomandazione di superficie | Moquette, Marmo, Legno, Piastrelle |
| Potenza di aspirazione | 18,000 anni |
| Sistema di navigazione | LDS LiDAR, Dual 3D Structured Light, AI Camera |
| Supporto Wi-Fi | 2.4G e 5G |

Figure 8.1: Dimensions of the 3i P10 Ultra Robot and Base Station.
9. Garanzia e supporto
For warranty information, please refer to the warranty card included with your product or visit the official 3i website. For technical support, troubleshooting beyond this manual, or to inquire about replacement parts, please contact 3i customer service through the contact information provided on their official website or within the 3i app.