1. Introduzione
This user manual provides detailed instructions for the BREGOO X70 5K Video Camera Camcorder. Please read this manual thoroughly before using the device to ensure proper operation and to maximize its performance. Keep this manual for future reference.
Prodotto finitoview
The BREGOO X70 is a versatile 5K UHD video camera camcorder designed for capturing high-quality videos and photos. It features a 64MP sensor, 270° rotatable touch screen, 16X digital zoom, IR night vision, and Wi-Fi connectivity, making it suitable for various recording scenarios including vlogging, events, and live streaming.

Image 1.1: BREGOO X70 5K Video Camera Camcorder with accessories.
2. Contenuto della confezione
Verifica che tutti gli articoli elencati di seguito siano inclusi nel pacco. Se alcuni articoli risultano mancanti o danneggiati, contatta l'assistenza clienti.
- BREGOO X70 5K Video Camera Camcorder
- Microfono esterno
- Treppiede da tavolo
- Maniglia pieghevole
- 2 batterie da 1800 mAh
- Cavo HD
- Cavo USB
- Copriobiettivo
- Paraluce
- Scheda SD da 32 GB
- Telecomando
- Manuale dell'utente (questo documento)
- Borsa fotografica
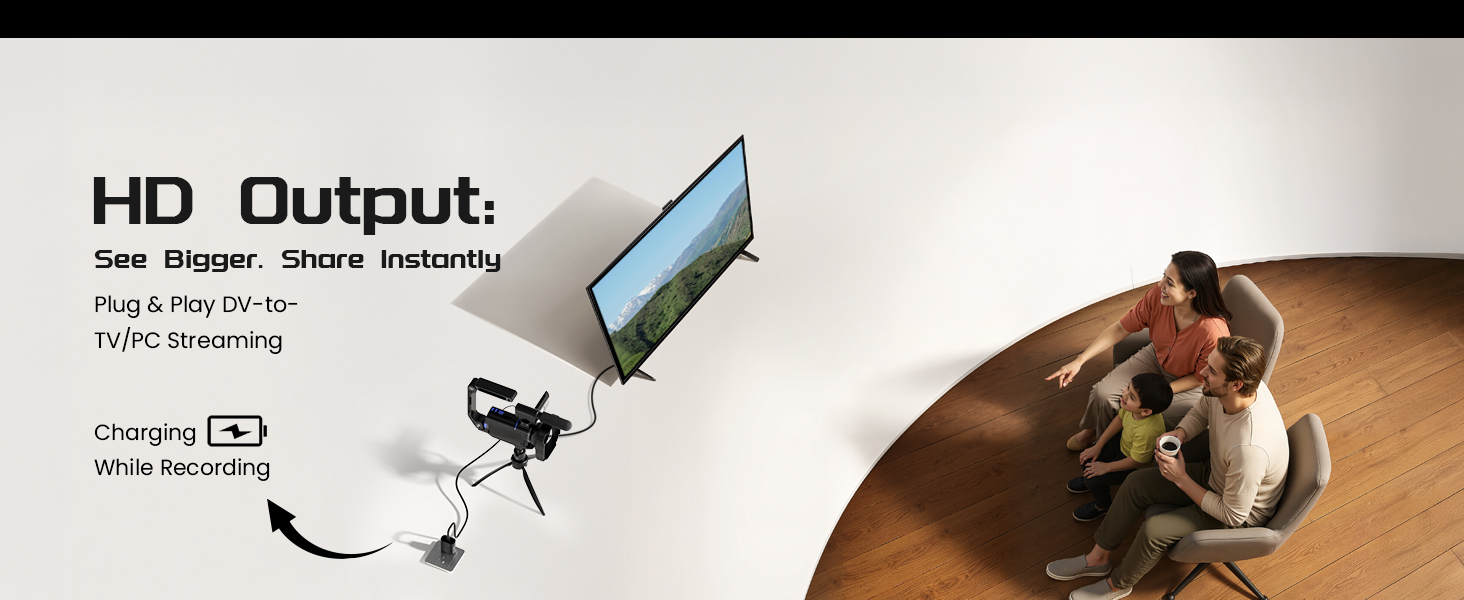
Image 2.1: All items included in the BREGOO X70 package.
3. Impostazione
3.1. Installazione della batteria
- Individuare il vano batteria sulla videocamera.
- Aprire il coperchio del vano batterie.
- Insert one of the provided 1800mAh batteries, ensuring correct polarity.
- Chiudere saldamente il coperchio del vano batterie.
- The remote control requires 1 AAA battery (included). Open its battery cover and insert the battery.
3.2. Installazione della scheda di memoria
The camcorder supports SD cards. A 32GB SD card is included.
- Individuare lo slot per la scheda SD sulla videocamera.
- Insert the 32GB SD card into the slot with the metal contacts facing the correct direction (refer to the diagram on the camera if available).
- Push the card gently until it clicks into place. To remove, push again until it springs out.
3.3. Fissaggio degli accessori
- Microfono esterno: Attach the external microphone to the hot shoe mount on top of the camcorder and connect its cable to the microphone input port.
- Treppiede da tavolo: Screw the desktop tripod into the 1/4-inch tripod mount at the bottom of the camcorder.
- Maniglia pieghevole: Attach the folding handle to the designated mounting points on the camcorder for improved grip and stability.
- Paraluce: Secure the lens hood to the front of the lens by aligning the grooves and twisting until it locks. This helps reduce glare.
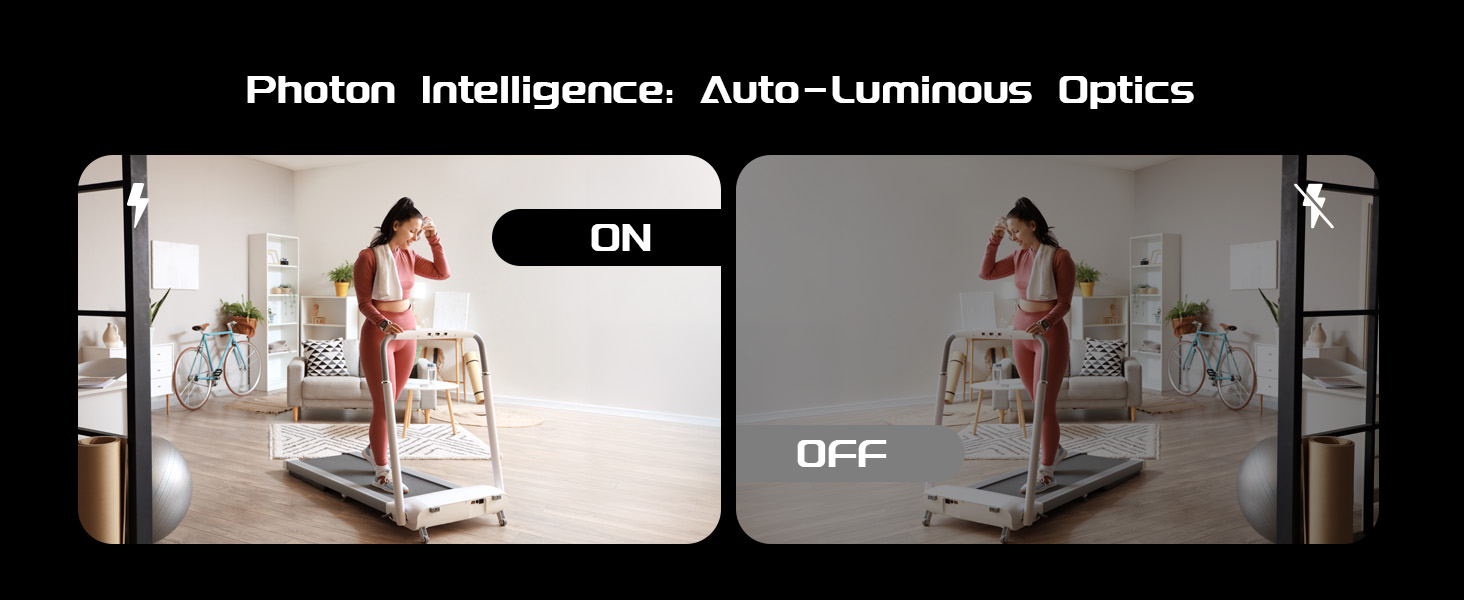
Image 3.1: Lens hood attached to the camcorder to reduce glare.
4. Istruzioni per l'uso
4.1. Accensione/spegnimento
To power on the camcorder, open the 3.0" IPS touch screen. To power off, close the screen or press and hold the power button (if available).
4.2. Using the 270° Rotatable Touch Screen
The 3.0" IPS touch screen can be rotated up to 270 degrees, allowing for flexible viewing angles, including selfies and low-angle shots. Navigate menus and settings by tapping or swiping on the screen.

Image 4.1: The camcorder's 270° rotatable touch screen.
4.3. Registrazione di video
The camcorder supports 5K/20fps and 4K/60fps video resolutions.
- Ensure the camcorder is in video mode.
- Frame your shot using the rotatable screen.
- Press the Record button to start recording. Press it again to stop.
Modalità di registrazione:
- Normale: Registrazione video standard.
- Lasso di tempo: Cattura fotogrammi a intervalli impostati per creare un video accelerato.
- Rallentatore: Records at a higher frame rate for slow-motion playback.
- Registrazione in loop: Registra continuamente, sovrascrivendo il foo più vecchiotage quando la scheda di memoria è piena.
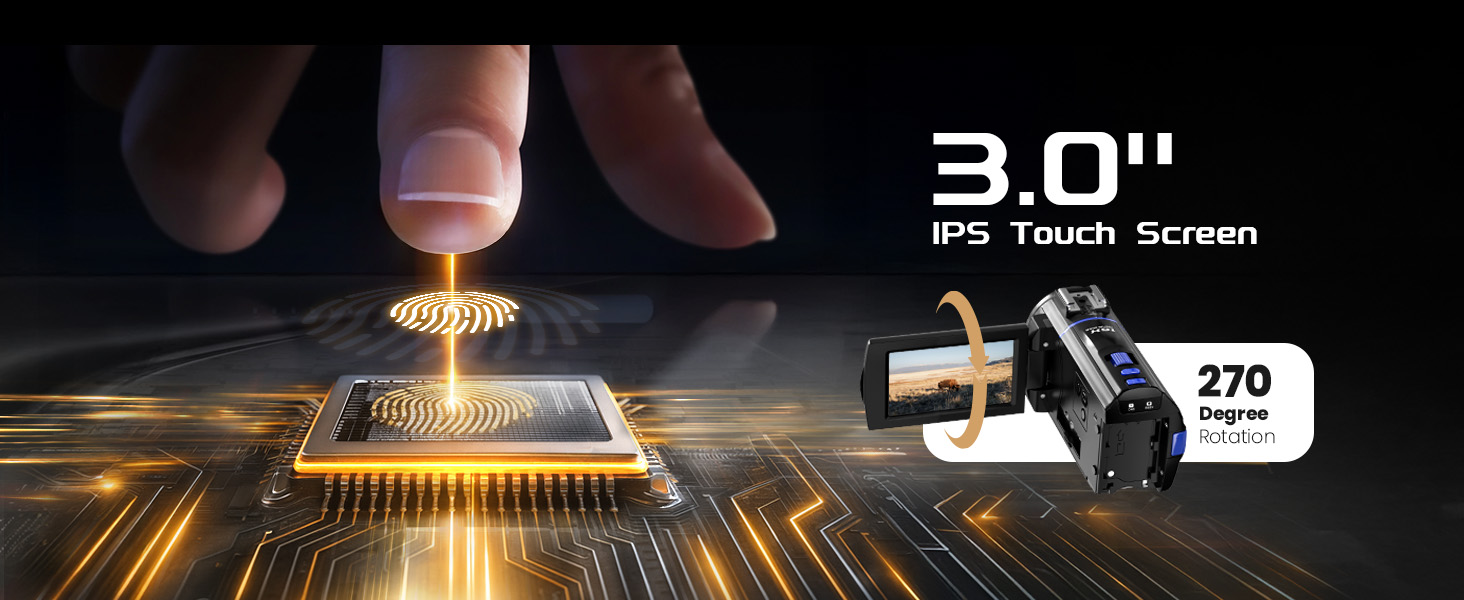
Image 4.2: Available video recording modes.
4.4. Scattare foto
The camcorder captures 64MP photos.
- Impostare la videocamera sulla modalità foto.
- Inquadra il tuo scatto.
- Premi il pulsante dell'otturatore per scattare una foto.
Modalità foto:
- Foto normale: Standard single photo capture.
- Foto a raffica: Scatta più foto in rapida successione.
- Foto automatica: Automatically takes photos.
- Timer Photo: Imposta un ritardo prima di scattare una foto.

Image 4.3: Available photo capture modes.
4.5. Funzione Zoom
The camcorder features 16X digital zoom. Use the zoom controls (usually a rocker switch) to zoom in or out during recording or photo capture.

Image 4.4: Digital zoom capabilities.
4.6. Visione notturna a infrarossi
Activate IR Night Vision mode to record in low-light or complete darkness. This feature uses infrared light to illuminate the scene, capturing monochrome footage.

Image 4.5: IR Night Vision in operation.
4.7. Connettività Wi-Fi
Connect the camcorder to your smartphone or tablet via Wi-Fi to control the camera remotely, transfer files, and share content instantly.
- Download the companion app (refer to the user manual for app name and download instructions).
- Enable Wi-Fi on the camcorder through the settings menu.
- Connect your mobile device to the camcorder's Wi-Fi network.
- Open the app to control the camcorder or transfer files.
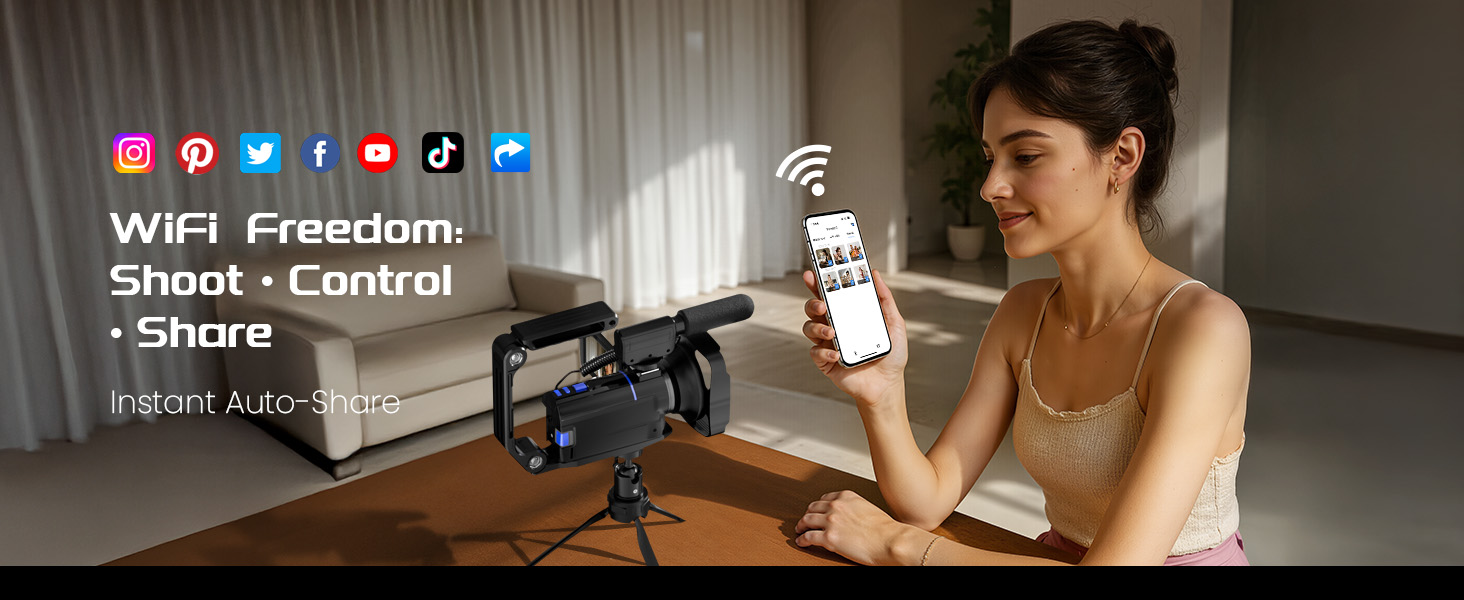
Image 4.6: Wi-Fi file trasferimento e controllo remoto.
4.8. WebFunzionalità della camma
La videocamera può essere utilizzata come webcam for video calls and live streaming.
- Collegare la videocamera al computer utilizzando il cavo USB in dotazione.
- Seleziona 'Web"Modalità cam" sullo schermo della videocamera (se richiesto).
- Il computer dovrebbe riconoscere la videocamera come webcam. Selezionalo nel tuo software di videoconferenza o streaming.
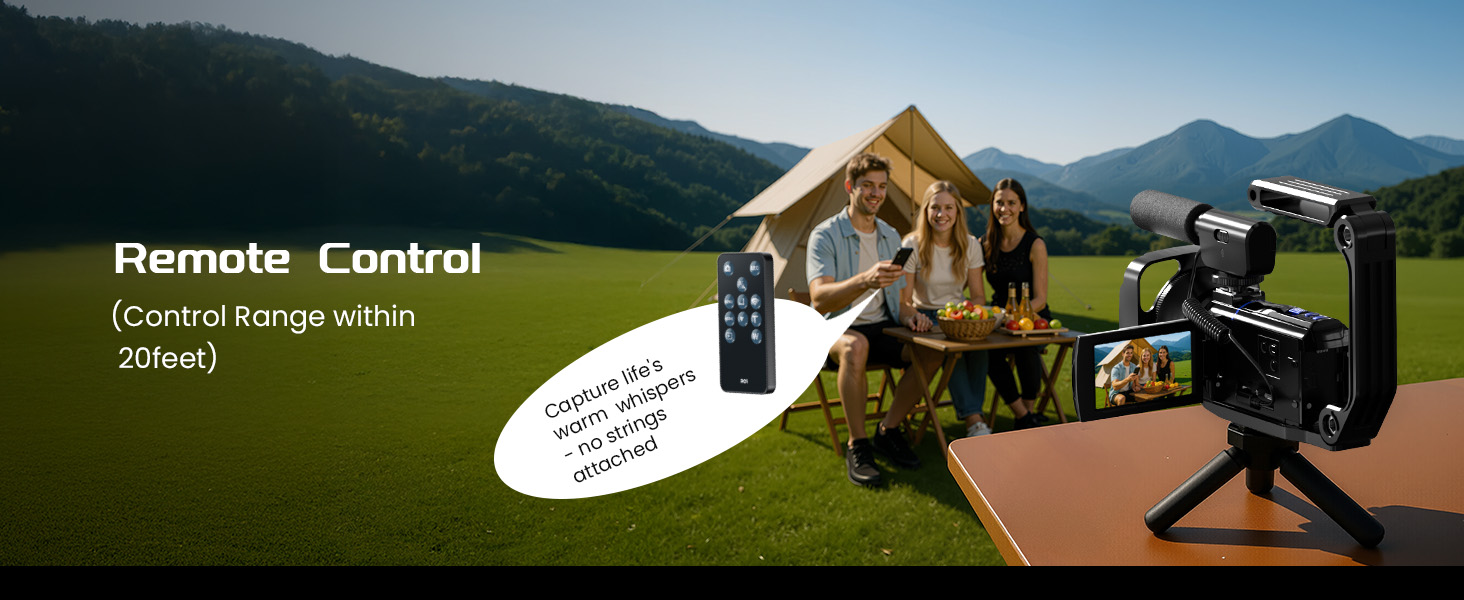
Image 4.7: Camcorder used as a webCamera.
4.9. Uscita HDMI
Connect the camcorder to a TV or monitor using the HD cable for direct playback or live viewsu uno schermo più grande.
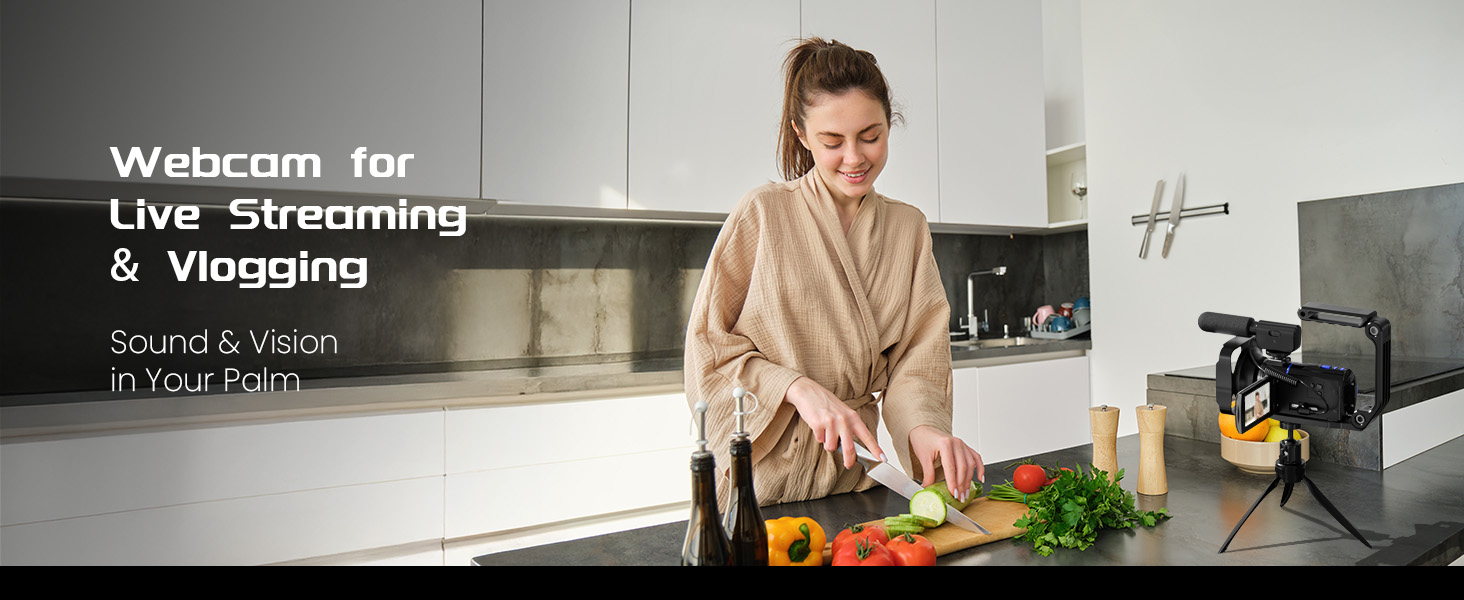
Image 4.8: HDMI output connection.
4.10. Altre caratteristiche
- Messa a fuoco manuale: The camcorder uses manual focus. For optimal sharpness, maintain a distance of over 0.6 meters (2 feet) from your subject during filming.
- Anti-agitazione: The built-in anti-shake feature helps stabilize footage, reducing blur from camera movement.
- Registrazione durante la ricarica: The camcorder supports recording while connected to a power source, extending recording time.
- Telecomando: Use the included remote control to operate the camcorder from a distance (control range within 20 feet).

Image 4.9: Using the remote control.
5. Manutenzione
5.1. Pulizia
- Lente: Utilizzare un panno morbido e privo di lanugine, specificamente progettato per gli obiettivi delle fotocamere. Evitare di toccare la superficie dell'obiettivo con le dita.
- Schermo: Gently wipe the touch screen with a microfiber cloth. For stubborn smudges, use a screen cleaner solution applied to the cloth, not directly to the screen.
- Corpo: Wipe the camcorder body with a dry, soft cloth. Do not use harsh chemicals or abrasive cleaners.
5.2. Cura della batteria
- Caricare completamente le batterie prima del primo utilizzo.
- Conservare le batterie in un luogo fresco e asciutto quando non vengono utilizzate.
- Non esporre le batterie a temperature estreme o alla luce solare diretta.
- If the camcorder will not be used for an extended period, remove the batteries.
5.3. Conservazione
When not in use, store the camcorder in its camera bag in a dry, dust-free environment away from direct sunlight and extreme temperatures.
6. Risoluzione Dei Problemi
- La fotocamera non si accende: Assicurarsi che le batterie siano completamente cariche e inserite correttamente. Provare a utilizzare la seconda batteria.
- Scarsa qualità dell'immagine/video: Check that the lens is clean. Ensure adequate lighting. Verify that the manual focus is correctly adjusted (subject should be over 0.6m away).
- Problemi di connessione Wi-Fi: Ensure Wi-Fi is enabled on the camcorder and your mobile device. Restart both devices and try reconnecting.
- Mac Incompatibility: Please note that this camcorder may be incompatible with Mac operating systems, which could affect file recognition and playback. For best results, use a Windows-based computer for file trasferimento e viewing.
- Telecomando non funzionante: Check the AAA battery in the remote control. Ensure there are no obstructions between the remote and the camcorder.
7. Specifiche
| Caratteristica | Specificazione |
|---|---|
| Marca | BREGOO |
| Numero di modello | X70 |
| Risoluzione di acquisizione video | 5K (20 fps), 4 K (60 fps) |
| Tecnologia del sensore fotografico | CMOS (64MP) |
| Dimensioni dello schermo | 3.0 Inches IPS Touch Screen, 270° Rotatable |
| Ingrandire | Zoom digitale 16X |
| Caratteristiche speciali | IR Night Vision, Anti-Shake, Time Lapse, Wi-Fi, Webcam, Recording While Charging |
| Tipo di memoria flash | Memory Card (32GB SD card included) |
| Formato di acquisizione video | MP4 |
| Formato audio supportato | MP4 |
| Tecnologia di connettività | USB, HDMI, Wi-Fi |
| Batterie | 2 x 1800mAh (for camera), 1 x AAA (for remote) |
| Peso dell'articolo | 2.51 libbre |
| Dimensioni del pacco | 10.63 x 6.42 x 4.13 pollici |
8. Supporto
For any questions, technical assistance, or support regarding your BREGOO X70 5K Video Camera Camcorder, please contact our customer service team. We are available to assist you.
Contact information is typically found on the product packaging or the official BREGOO websito.


