1. Introduzione
Thank you for choosing the Novodesk AZ5130 6-in-1 Automatic Vacuum Sealer Machine. This manual provides essential information for the safe and efficient operation, maintenance, and troubleshooting of your new appliance. Please read these instructions thoroughly before first use and retain them for future reference.

Image 1.1: The Novodesk AZ5130 Vacuum Sealer in operation, sealing food for preservation.
2. Importanti istruzioni di sicurezza
Quando si utilizzano apparecchi elettrici, è necessario adottare sempre le seguenti precauzioni di sicurezza di base per ridurre il rischio di incendi, scosse elettriche e lesioni alle persone, tra cui:
- Leggere tutte le istruzioni prima di utilizzare questo apparecchio.
- Do not operate the appliance with a damaged power cord or plug. If the cord or plug is damaged, contact customer support for assistance.
- Non immergere l'apparecchio, il cavo di alimentazione o la spina in acqua o altri liquidi.
- Questo apparecchio non è destinato all'uso da parte di persone (bambini compresi) con ridotte capacità fisiche, sensoriali o mentali, o prive di esperienza e conoscenza, a meno che non siano supervisionate o abbiano ricevuto istruzioni riguardanti l'uso dell'apparecchio da una persona responsabile della loro sicurezza.
- È necessaria un'attenta supervisione quando un elettrodomestico viene utilizzato da bambini o nelle loro vicinanze.
- Scollegare dalla presa quando non in uso e prima di pulire. Lasciare raffreddare prima di mettere o togliere parti e prima di pulire l'apparecchio.
- Non utilizzare accessori non consigliati dal produttore.
- Non utilizzare all'aperto.
- Non posizionare sopra o vicino a un fornello a gas o elettrico caldo, oppure in un forno caldo.
- Always ensure the lid is properly latched before operating.
- Use only vacuum sealer bags designed for vacuum sealing.
3. Contenuto della confezione
Carefully unpack your Novodesk AZ5130 Vacuum Sealer and check that all items are present and in good condition. If any items are missing or damaged, please contact customer support.
- 1 x Novodesk AZ5130 Vacuum Sealer Machine
- 1 x cavo di alimentazione
- 1 x Vacuum Hose (for external vacuuming)
- 2 x Sealing Foam Gaskets (replacement)
- 6 x Pre-cut Vacuum Bags (3.9" x 7.8")
- 6 x Pre-cut Vacuum Bags (7.8" x 11.8")

Image 3.1: All components included in the Novodesk AZ5130 Vacuum Sealer package.
4. Prodotto finitoview
Familiarize yourself with the various parts and functions of your vacuum sealer.

Image 4.1: Control panel and function buttons of the vacuum sealer.
Funzioni del pannello di controllo:
- Process Indicator Light: Illuminates to show operating status.
- Modalità a secco: For vacuum sealing dry foods like nuts and grains.
- Modalità umida: For vacuum sealing foods with a small amount of liquid.
- Funzione impulso: Allows manual control of the vacuum process, ideal for fragile foods.
- Seal Function: Seals bags without vacuuming.
- Pulsante di arresto: Arresta l'operazione in corso.
Image 4.2: Internal components of the vacuum sealer.
Componenti chiave:
- Camera sottovuoto: Area in cui l'aria viene espulsa dal sacco.
- Silicone Strip: Helps create a tight seal.
- Striscia sigillante: Heats to create the bag seal (4mm wide).
- Foam Seal Ring: Ensures proper vacuum.
- Cover Slaps: Prevents the vacuum bag from coming out of the vacuum chamber.
- External Sliding Cutter: Integrated cutter for custom bag sizes.
- External VAC Port: For connecting the vacuum hose to jars and containers.
5. Impostazione
Before first use, ensure the appliance is clean and dry. Place the vacuum sealer on a flat, stable surface.
Passaggi di configurazione iniziali:
- Connect the power cord to the appliance and then to a suitable electrical outlet.
- Prepare your vacuum bag with food, ensuring the open end is clean and dry. Leave at least 2-3 inches of space between the food and the top of the bag.
6. Istruzioni per l'uso
6.1. Basic Vacuum Sealing (Dry & Moist Modes)
Follow these steps for standard vacuum sealing of food bags:
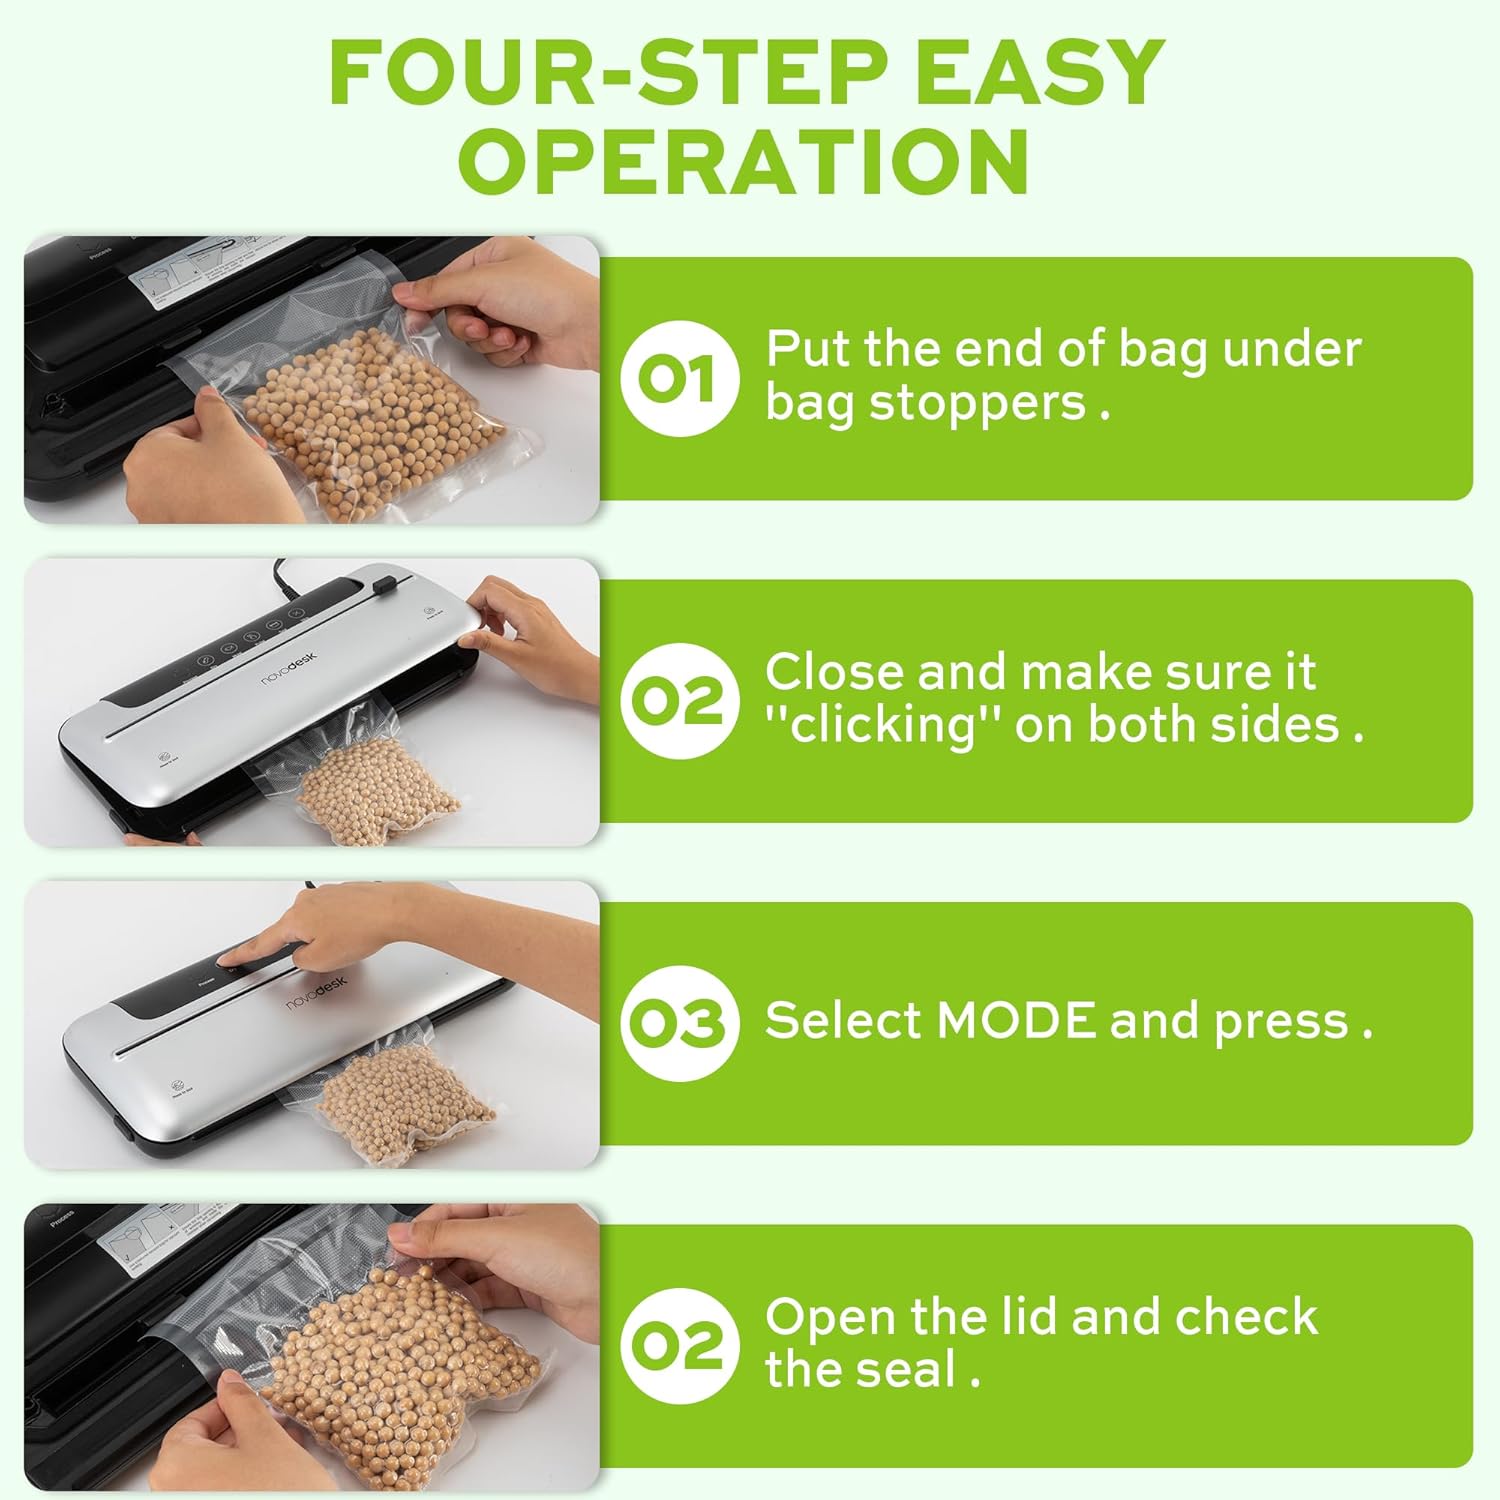
Image 6.1: Four-step easy operation for vacuum sealing.
- Preparare la borsa: Place the open end of the vacuum bag under the bag stoppers, ensuring it is flat and centered within the vacuum chamber.
- Chiudere il coperchio: Firmly close the lid of the vacuum sealer. Press down on both sides until you hear a "clicking" sound, indicating that the lid is securely latched.
- Seleziona modalità: Choose the appropriate mode for your food:
- Premere il tasto Asciutto button for dry foods.
- Premere il tasto Umido button for moist foods.
- Controlla il sigillo: Once the process is complete and the indicator light turns off, open the lid and remove the sealed bag. Inspect the seal to ensure it is airtight.
6.2. Funzione impulso
The Pulse function provides manual control over the vacuum process, which is ideal for delicate or fragile foods that could be crushed by full vacuum pressure.
- Follow steps 1 and 2 from "6.1. Basic Vacuum Sealing".
- Premere e tenere premuto il tasto Impulso button. The machine will begin to vacuum.
- Rilasciare il Impulso button when the desired vacuum level is reached.
- Premere il tasto Foca button to seal the bag.
- Aprire il coperchio ed estrarre il sacchetto sigillato.
6.3. Seal Only Function
Use the Seal function to create a seal without vacuuming, useful for making custom-sized bags from a roll or resealing snack bags.
- Posizionare l'estremità aperta del sacchetto sulla striscia sigillante.
- Close the lid firmly until it clicks.
- Premere il tasto Foca button. The machine will heat and seal the bag.
- Once the sealing process is complete, open the lid and remove the sealed bag.
6.4. External Vacuum Function (for Jars/Containers)
Your vacuum sealer includes an external vacuum hose for use with compatible vacuum-sealable jars, containers, and wine stoppers.

Image 6.2: Using the external vacuum system with various containers.
- Prepare your vacuum-sealable jar or container with food. Ensure the lid is properly placed.
- Insert one end of the vacuum hose into the external VAC port on the vacuum sealer.
- Insert the other end of the vacuum hose into the port on your vacuum-sealable jar or container.
- Close the lid of the vacuum sealer (no bag needed inside).
- Premere il tasto External VAC button (if available, otherwise use Dry/Moist mode to activate vacuum pump). The machine will begin to remove air from the container.
- Once the vacuum process is complete, remove the hose. The container should now be sealed.
6.5. Using the External Sliding Cutter
The integrated sliding cutter allows you to create custom-sized bags from a roll of vacuum sealer material.
- Place the vacuum bag roll across the cutting area.
- Slide the cutter blade across the bag material to achieve the desired length.
7. Manutenzione e pulizia
Una pulizia e una manutenzione regolari garantiranno la longevità e le prestazioni ottimali della vostra macchina per sottovuoto.
Istruzioni per la pulizia:
- Prima di pulire l'apparecchio, staccare sempre la spina.
- Pulire l'esterno della macchina con un panno morbido, damp panno. Non usare detergenti abrasivi o solventi.
- Pulire la camera a vuoto e l'area della striscia di tenuta con un pannoamp cloth. Ensure no food particles or liquids remain.
- The foam seal rings can be removed for cleaning if necessary. Wash with mild soap and water, rinse thoroughly, and allow to air dry completely before reinserting.
- Assicurarsi che tutte le parti siano completamente asciutte prima di riporre o utilizzare nuovamente l'apparecchio.
Magazzinaggio:
Store the vacuum sealer in a clean, dry place. For best results, store with the lid unlatched to prevent compression of the foam seal rings, which can affect sealing performance over time.
8. Risoluzione Dei Problemi
Se riscontri problemi con la tua macchina per il sottovuoto, fai riferimento ai seguenti problemi comuni e alle relative soluzioni:
| Problema | Possibile causa | Soluzione |
|---|---|---|
| La macchina non si accende. | Nessuna alimentazione elettrica. | Check if the power cord is securely plugged into the outlet and the machine. Test the outlet with another appliance. |
| La macchina aspira ma non sigilla. | Sealing strip or foam gasket is dirty/damaged. Bag is not positioned correctly. | Clean the sealing strip and foam gaskets. Ensure the bag is flat and centered over the sealing strip. Replace gaskets if damaged. |
| La macchina sigilla ma non aspira. | Lid not properly latched. Foam gaskets are dirty or worn. Bag has holes or is not suitable. | Ensure the lid is firmly closed and latched on both sides. Clean or replace foam gaskets. Use proper vacuum sealer bags and check for damage. |
| Il vuoto è debole o incostante. | Foam gaskets are dirty or worn. Too much liquid in the bag (for Dry mode). | Clean or replace foam gaskets. Use Moist mode for foods with liquid, or pre-freeze liquids. |
| Il sacchetto si scioglie durante la sigillatura. | Sealing time too long (unlikely for automatic models). | Ensure you are using appropriate vacuum sealer bags. If issue persists, contact customer support. |
If the problem persists after attempting these solutions, please contact Novodesk customer support for further assistance.
9. Specifiche
| Marca | Novodesk |
| Numero di modello | AZ5130 |
| Potenza / Wattage | 120 watt |
| Voltage | 120V |
| Materiale | Acrilonitrile Butadiene Stirene (ABS) |
| Peso dell'articolo | 980 g (2.16 libbre) |
| Colore | Argenteo |
| Modalità di funzionamento | Automatico |
| Potenza massima di aspirazione | 75KPa |
| Larghezza della striscia sigillante | 4mm |
10. Garanzia e supporto
Novodesk products are manufactured to high-quality standards. For information regarding warranty coverage, product support, or to purchase replacement parts, please refer to the warranty card included with your product or visit the official Novodesk website. If you have any questions or require assistance, please contact Novodesk customer service.

