1. Introduzione
This manual provides detailed instructions for the installation, setup, operation, and maintenance of your QttyElok F20-K WIFITY Wireless WiFi Tuya Fingerprint Access Controller. This device is designed to provide secure and convenient access control using multiple verification methods, including fingerprint, RFID card, password, and remote control via the Tuya Smart APP. Its waterproof design allows for both indoor and outdoor applications.

Image 1.1: QttyElok F20-K WIFITY Access Controller with mobile app interface.
2. Caratteristiche del prodotto
- Connettività intelligente: WiFi Tuya Smart APP support for remote unlocking, user management, and access record viewing.
- Dual Frequency Compatibility: Supports both 125KHz and 13.56MHz RFID cards, with a capacity for 100 fingerprints and 8000 RFID card users. Includes management card functionality for easy programming.
- Sicurezza avanzata: Multiple verification modes including Tuya APP, fingerprint, RFID card, password, and card plus password combinations. Operates independently without requiring a computer or software connection.
- Design impermeabile: IP68-rated construction suitable for both indoor and outdoor environments. Features a touch panel interface with a blue backlight for clear visibility in low-light conditions.
- Integrazione versatile: Equipped with WG26/34 Wiegand input/output interface, doorbell button connectivity, and adjustable door opening time from 1 to 99 seconds.
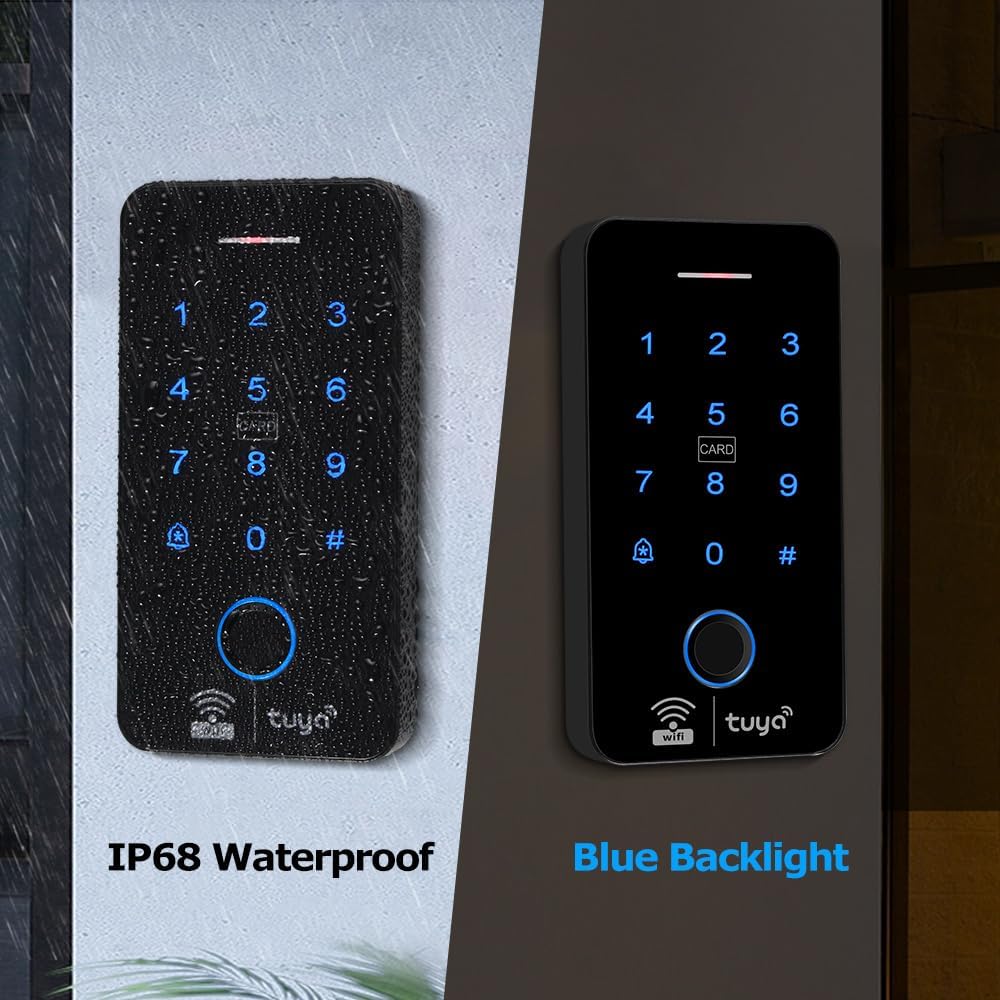
Image 2.1: IP68 waterproof rating and blue backlight for visibility.

Image 2.2: Features like fingerprint unlock, touch panel, and doorbell button.

Immagine 2.3: Passoview of multiple unlocking methods including Tuya App, fingerprint, RFID, and password.

Image 2.4: The access controller operating outdoors in rainy conditions, demonstrating its IP68 waterproof rating.
3. Contenuto della confezione
Si prega di verificare che tutti gli articoli siano presenti nel pacco:
- Access Controller (F20-K WIFITY)
- Keyfobs (RFID cards)
- Manuale d'uso
4. Specifiche
| Caratteristica | Dettaglio |
|---|---|
| Produttore | QingTianTongYun |
| Numero di parte | F20-K TY01 |
| Numero modello articolo | F20-K WIFITY |
| Colore | Nero |
| Materiale | Plastica |
| Peso dell'articolo | 8.8 once (0.25 chilogrammi) |
| Dimensioni del pacco | 5.51 x 2.76 x 0.79 pollici |
| Voltage | 12 Volt (CC) |
| Grado di impermeabilità | Grado di protezione IP68 |
| Frequenza RFID | 125KHz & 13.56MHz (Dual Frequency) |
| Capacità dell'utente | 100 Fingerprints, 8000 RFID Card Users |
| Connettività | WiFi, WG26/34 Wiegand I/O |

Image 4.1: Dimensions of the access controller.

Image 4.2: Diagram showing internal components and connection points.
5. Installazione
Before installation, ensure the power supply is disconnected. Mount the access controller at the desired location, ensuring it is within WiFi range for app functionality. Refer to the wiring diagram in Section 7 for proper electrical connections.
- Scegliere una posizione di montaggio adatta, tenendo conto dell'accessibilità e dei fattori ambientali.
- Securely mount the access controller to the wall or door frame using appropriate fasteners.
- Connect the power supply (12V DC) and other necessary components (electric lock, exit button, doorbell) according to the wiring diagram.
- Assicurarsi che tutti i collegamenti siano sicuri e isolati.
- Accendere il dispositivo.
6. Impostazione e configurazione
6.1 Tuya Smart APP Download and Connection
To utilize the smart features, download and install the Tuya Smart APP on your smartphone.
- Scan the QR code provided in the product packaging or search for "TuyaSmart" in your device's app store (App Store for iOS, Google Play Store for Android).
- Registrati o accedi al tuo account Tuya Smart.
- Add the device by selecting "Add Device" and following the on-screen instructions to connect the access controller to your WiFi network.

Image 6.1: Steps for downloading and connecting the Tuya Smart App.
6.2 Adding Users (Fingerprints, RFID Cards, Passwords)
Users can be added directly through the access controller's keypad or via the Tuya Smart APP.
- Tramite tastiera: Follow the programming instructions in the quick start guide to enter administrator mode and add new users (fingerprints, cards, or passwords).
- Via Tuya Smart APP:
- Open the Tuya Smart APP and select your access controller.
- Navigate to the "Member Manage" or "User Management" section.
- Select the option to add a new user and choose the desired verification method (fingerprint, card, or password).
- Follow the app's prompts to register the new user's credentials.

Image 6.2: Screenshots illustrating user management and settings within the Tuya Smart App.
7. Istruzioni per l'uso
7.1 Metodi di sblocco
- Impronta digitale: Posizionare il dito registrato sul sensore delle impronte digitali.
- Carta RFID: Presentare una tessera RFID registrata nell'area di lettura delle tessere.
- Password: Inserisci la password registrata sulla tastiera, seguita dal tasto '#'.
- APP Tuya Smart: Open the app, select the device, and tap the unlock button.
- Telecomando: If a remote control is paired, press the unlock button on the remote.

Image 7.1: Remote unlocking functionality through the Tuya Smart App.
7.2 Temporary Password Unlock
The system supports generating one-time or time-limited temporary passwords for guests or service personnel. This feature is managed through the Tuya Smart APP.
- In the Tuya Smart APP, navigate to the "Temporary Code" section.
- Generate a new temporary password, specifying its validity period or if it's a one-time use code.
- Share the generated code with the intended user.

Image 7.2: Illustration of generating and sharing a temporary password via the app.
7.3 Modalità normalmente aperta
For frequent entry and exit, the access controller can be configured to a "Normally Open" mode, keeping the door unlocked for a specified duration or indefinitely.
- Access the device settings in the Tuya Smart APP.
- Locate the "Door Keep Open" or "Normally Open Mode" setting.
- Configure the desired schedule or select "Forever" for continuous unlock.

Image 7.3: Setting the Normally Open mode for extended access.
8. Schema elettrico
The following diagram illustrates the standard wiring connections for the QttyElok F20-K WIFITY access controller with a power supply, electric lock, and exit button. Ensure all connections are made correctly to prevent damage to the device or connected components.

Image 8.1: Detailed wiring diagram for connecting the access controller to power, electric locks, and an exit button.
Chiave di cablaggio:
- Rosso: 12 V (ingresso alimentazione)
- Nero: GND (terra)
- Giallo: NO/PUSH (Normally Open for Exit Button)
- Grigio: COM (Common for Lock)
- Blu: NC (Normally Closed for Lock)
- Marrone: KEY (Keypad Input)
- Viola: BELL (Doorbell Output)
- Bianco: D1 (dati Wiegand 1)
- Verde: D0 (dati Wiegand 0)
9. Manutenzione
- Pulizia: Regularly wipe the keypad and fingerprint sensor with a soft, dry cloth. Avoid abrasive cleaners or solvents.
- Aggiornamenti del firmware: Check the Tuya Smart APP periodically for available firmware updates to ensure optimal performance and security.
- Alimentazione elettrica: Ensure a stable 12V DC power supply. Fluctuations can affect device operation.
- Condizioni ambientali: While waterproof, avoid prolonged submersion or exposure to extreme temperatures beyond specified operating ranges.
10. Risoluzione Dei Problemi
- Il dispositivo non risponde: Check power connections. Ensure the 12V DC power supply is active.
- Impronta digitale/scheda non riconosciuta: Ensure the fingerprint sensor or card reader is clean. Re-register the fingerprint or card if issues persist. Verify the card frequency matches the device's dual frequency support.
- Problemi di connettività dell'app: Check your WiFi network connection. Ensure the device is within WiFi range and correctly paired with the Tuya Smart APP. Restart the device and your router if necessary.
- Porta non sbloccata: Verify wiring to the electric lock. Check the door opening time setting in the app. Ensure the lock mechanism is not obstructed.
- Tastiera non reattiva: Ensure the touch panel is clean and dry. If the issue persists, a power cycle may be required.
11. Garanzia e supporto
For warranty information and technical support, please refer to the documentation included with your purchase or contact QttyElok customer service through the retailer where the product was purchased. Keep your proof of purchase for warranty claims.


