Introduzione
The GAMDIAS Aura GC10m V2 WH is a micro-tower computer case designed for Micro-ATX and Mini-ITX motherboards. It features a dual-chamber design, panoramic tempered glass panels, and comes equipped with three Addressable RGB (ARGB) fans to enhance system aesthetics and cooling. This manual provides essential information for the proper installation, operation, and maintenance of your computer case.
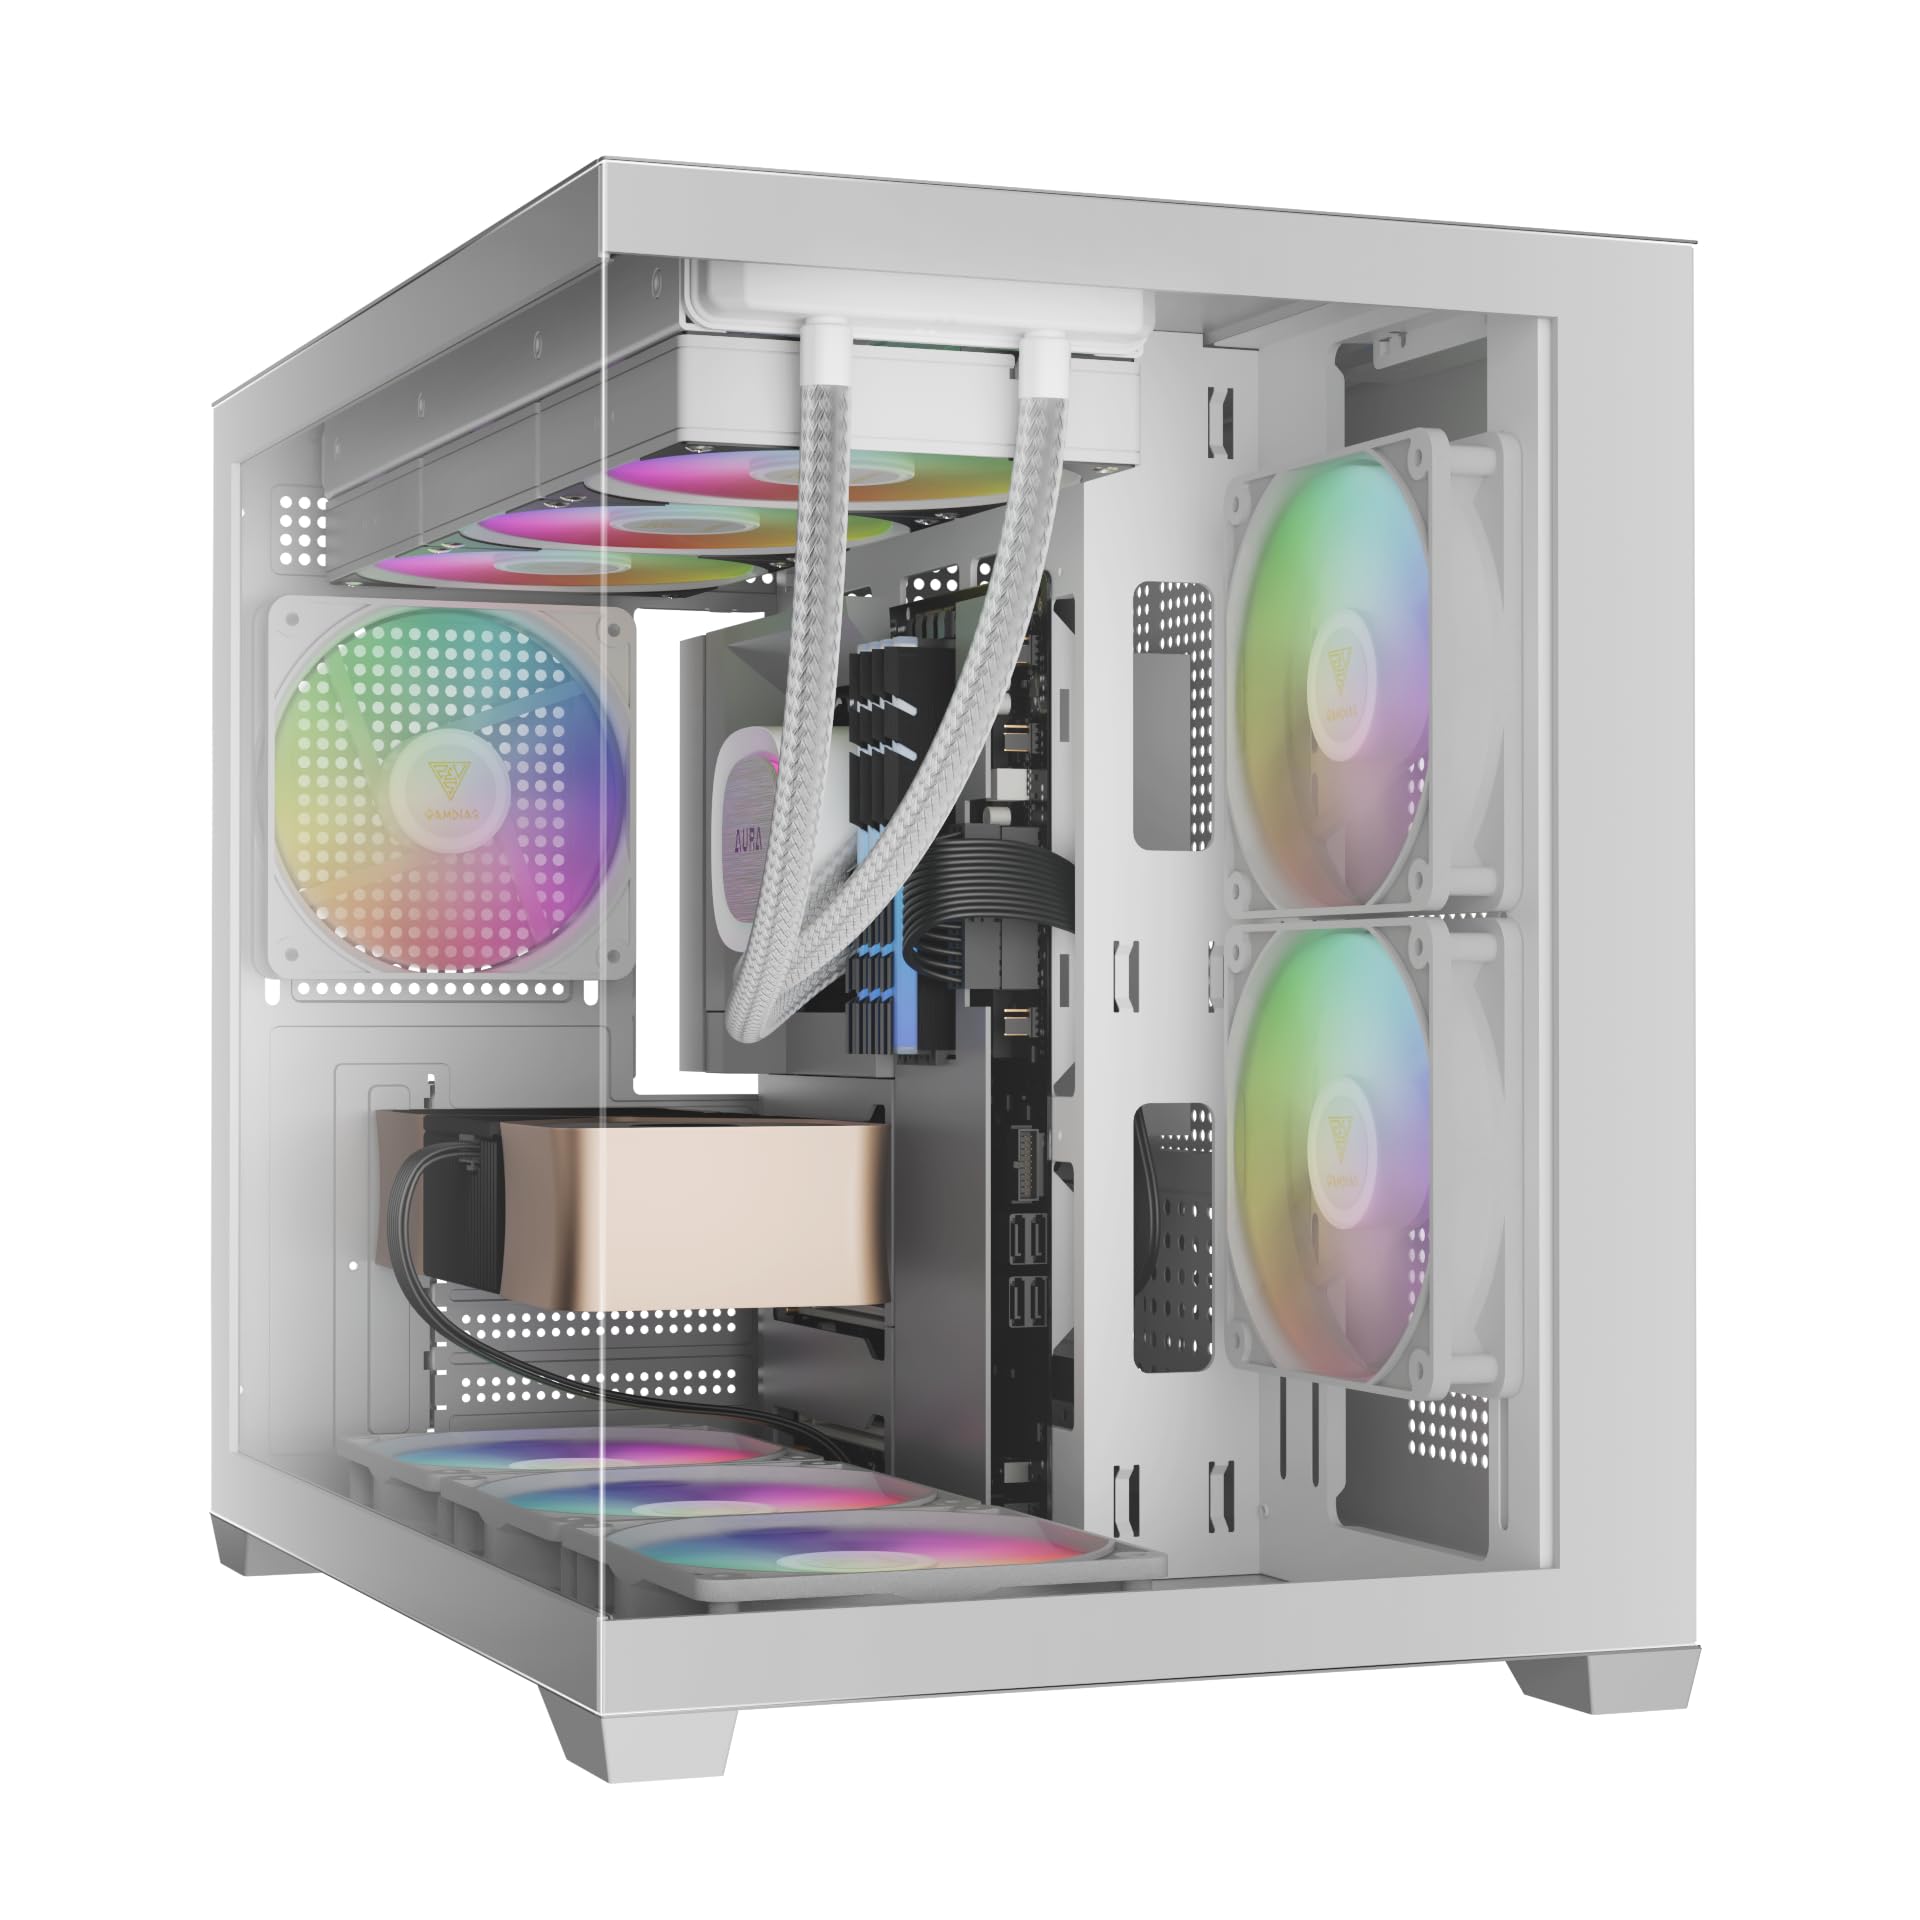
Immagine: Frontale view of the GAMDIAS Aura GC10m V2 WH Micro-Tower Computer Case, showcasingrazie ai suoi pannelli in vetro temperato e alle ventole ARGB preinstallate.
Configurazione e installazione
Prima di iniziare l'installazione, assicurati di avere a disposizione tutti i componenti e gli strumenti necessari. Consulta i manuali della scheda madre e dei componenti per istruzioni di installazione specifiche.
1. Preparazione del caso
Carefully remove the tempered glass side and front panels. These are typically secured with thumbscrews or a latch mechanism. Place them on a soft, flat surface to prevent scratches.

Immagine: Angolata view of the case with the tempered glass side panel removed, showing the internal structure and fan mounts.
2. Installazione della scheda madre
- Installare la schermatura I/O (se non è già fissata alla scheda madre) nell'apertura posteriore del case.
- Allineare la scheda madre Micro-ATX o Mini-ITX con i distanziatori all'interno del case.
- Fissare la scheda madre utilizzando le viti fornite.

Immagine: Interna view of the case, highlighting the motherboard tray area and fan mounting points.
3. Installazione dell'unità di alimentazione (PSU)
- Install your PSU into its designated compartment, typically at the rear bottom of the case.
- Fissare l'alimentatore con le viti dalla parte posteriore del case.
- Ensure the PSU fan faces the correct direction for optimal airflow (usually downwards if there's a vent, or upwards if not).

Image: Rear internal view of the case, showing the PSU mounting area and cable routing options.
4. Installazione dell'unità
- 3.5" / 2.5" Drive Bay (HDD Cage): Locate the HDD cage. Install one 3.5" HDD or one 2.5" SSD/HDD.
- 2.5" Drive Bays: The case supports three additional 2.5" SSDs/HDDs. Mount these drives to the designated brackets or locations within the case.
5. Installazione di ventole e radiatori
The case comes with three pre-installed ARGB fans (two side, one rear). Additional fans or radiators can be installed in the following locations:
- Superiore: Supports 3 x 120mm or 2 x 140mm fans; 360mm or 280mm radiators.
- Lato: Supports 2 x 120mm or 2 x 140mm fans; 240mm radiators. (Pre-installed 2 x 120mm ARGB fans)
- Metter il fondo a: Supporta 3 ventole da 120 mm o 2 ventole da 140 mm.
- Posteriore: Supports 1 x 120mm or 1 x 140mm fan; 120mm radiators. (Pre-installed 1 x 120mm ARGB fan)

Immagine: Interna view showing the pre-installed ARGB fans on the side and rear, illustrating fan placement.
6. Connecting Front I/O Ports and ARGB
Connect the following cables from the case to your motherboard:
- Porta USB 2.0: Connect the USB 2.0 header cable.
- Tipo-C: Connect the USB Type-C header cable (if your motherboard supports it).
- Audio HD: Connect the HD Audio header cable.
- Alimentazione/Reset/LED: Connect the front panel power, reset, HDD LED, and power LED cables according to your motherboard manual.
- ARGB Fans: Connect the ARGB fan cables to your motherboard's 5V ARGB header or to the integrated ARGB controller (if applicable). The case includes an LED Switch Button for controlling ARGB lighting if connected to the case's internal controller.

Immagine: in alto view of the case, showing the front I/O panel with USB ports and the LED switch button.
Operazione
Accensione
Once all components are installed and connected, close the side panels. Connect your monitor, keyboard, mouse, and power cable. Press the power button on the front panel of the case to start your system.
Controllo dell'illuminazione ARGB
Le ventole ARGB preinstallate possono essere controllate in due modi:
- Pulsante interruttore LED: If the ARGB fans are connected to the case's internal controller, press the dedicated LED Switch Button on the front I/O panel to cycle through various lighting effects and colors.
- Software della scheda madre: If the ARGB fans are connected directly to a compatible 5V ARGB header on your motherboard, you can control the lighting effects using your motherboard's proprietary RGB software (e.g., ASUS Aura Sync, MSI Mystic Light, Gigabyte RGB Fusion, ASRock Polychrome Sync).
Manutenzione
Una manutenzione regolare aiuta a garantire prestazioni ottimali e longevità dei componenti del computer.
- Filtri antipolvere: The case features removable dust filters (e.g., on the top and bottom). Periodically remove and clean these filters with compressed air or water (ensure they are completely dry before reinstallation).
- Pulizia della cassa: Utilizzare un morbido, damp cloth to clean the exterior surfaces of the case. For tempered glass panels, use a glass cleaner and a microfiber cloth. Avoid abrasive cleaners.
- Rimozione della polvere interna: Every few months, open the case and use compressed air to remove dust from internal components, especially fan blades and heatsinks.
Risoluzione dei problemi
Se riscontri problemi, prendi in considerazione le seguenti soluzioni comuni:
- Il sistema non si accende:
- Assicurarsi che l'alimentatore sia acceso e correttamente collegato alla presa a muro.
- Verificare che tutti i cavi di alimentazione (ATX a 24 pin, CPU, GPU, unità) siano collegati saldamente.
- Check that the front panel power button cable is correctly connected to the motherboard.
- Le ventole ARGB non si accendono/girano:
- Confirm ARGB cables are securely connected to a 5V ARGB header on the motherboard or the case's controller.
- Ensure fan power cables are connected to appropriate fan headers on the motherboard or PSU.
- If using motherboard software, verify it is installed and configured correctly.
- Porte I/O anteriori non funzionanti:
- Check that the USB and HD Audio cables from the front panel are correctly connected to their respective headers on the motherboard.
For persistent issues, consult your motherboard manual or contact GAMDIAS support.
Specifiche
| Modello | AURA GC10 V2 WH |
| Tipo di caso | Micro-Tower |
| Supporto per la scheda madre | Micro-ATX, Mini-ITX |
| Dimensioni (LxWxH) | Dimensioni: 42 x 29 x 37 cm |
| Peso | 5 kg |
| Alloggiamenti unità | 1 x 3.5" or 1 x 2.5" (HDD Cage), 3 x 2.5" |
| Porte I/O | 1 x Type-C, 1 x USB 2.0, 1 x HD Audio, 1 x LED Switch Button |
| Ventole preinstallate | 2 x 120 mm ARGB (laterali), 1 x 120 mm ARGB (posteriore) |
| Supporto per i fan |
|
| Supporto radiatore |
|
| Limite di altezza del dissipatore della CPU | 165mm |
| Limite di lunghezza VGA | 400mm |
| Limite di lunghezza dell'alimentatore | 160mm |
Informazioni sulla garanzia
For detailed warranty terms and conditions, please refer to the official GAMDIAS websito o la scheda di garanzia inclusa con il prodotto. Conservare la prova d'acquisto per eventuali reclami in garanzia.
Assistenza clienti
If you require further assistance or have questions regarding your GAMDIAS Aura GC10m V2 WH computer case, please contact GAMDIAS customer support.
- Produttore: GAMDIAS TAIWAN
- Indirizzo: No. 113, Jian 2nd Rd., Zhonghe, Dist., New Taipei City 235, Taiwan
- Importatore (India): Allway Distributions Pvt Ltd, No-49, H.B. Samajha Road, Baswangudi , Bengaluru- 560004
- Importer Contact (India): 8904307700
- Ufficiale Websito: www.gamdia.com (Si prega di controllare il sito ufficiale website for the most up-to-date support contact information and resources.)