1. Introduzione
Thank you for choosing the Voltcraft VC-CJS77 4-in-1 Jump Starter. This versatile device combines a powerful jump starter for vehicles, an air compressor for tires, a bright LED work light, and a portable power bank for charging electronic devices. This manual provides essential information for the safe and efficient operation, maintenance, and troubleshooting of your device. Please read it thoroughly before first use and keep it for future reference.
2. Istruzioni di sicurezza
Osservare sempre le seguenti precauzioni di sicurezza per evitare lesioni o danni al dispositivo e al veicolo:
- Leggere attentamente tutte le istruzioni prima dell'uso.
- Wear eye protection and protective gloves when operating the jump starter.
- Ensure adequate ventilation when jump-starting a vehicle.
- Do not smoke or allow sparks or flames near the battery or jump starter.
- Collegare il clamps to the correct polarity: ROSSO clamp to the positive (+) terminal, NERO clamp al terminale negativo (-) o al telaio del veicolo.
- Non permettere il rosso e il nero clampper toccarsi.
- Tenere il dispositivo lontano dalla portata dei bambini.
- Non esporre il dispositivo alla pioggia o a temperature estreme.
- Se il dispositivo diventa eccessivamente caldo durante l'uso, interromperne immediatamente l'uso.
- Non tentare di avviare una batteria congelata.
- Scollegare il clampdalla batteria del veicolo entro 30 secondi dall'avviamento del veicolo.
3. Contenuto della confezione
Verificare che tutti gli articoli siano presenti nel pacco:
- Voltcraft VC-CJS77 4-in-1 Jump Starter Unit
- Jump Starter Cables with Polar Clamps
- Tubo flessibile dell'aria per compressore
- 3 Valve Adapters (for various inflatables)
- Cavo da USB-C a USB-C (45 cm)
- USB-A to USB-C Cable (45 cm)
- Borsa portaoggetti
- Manuale d'uso
4. Prodotto finitoview
Familiarize yourself with the components of your Voltcraft VC-CJS77 unit.

Figura 4.1: Davanti view of the Voltcraft VC-CJS77 unit, displaying the digital screen with battery percentage, input/output indicators, and control buttons.
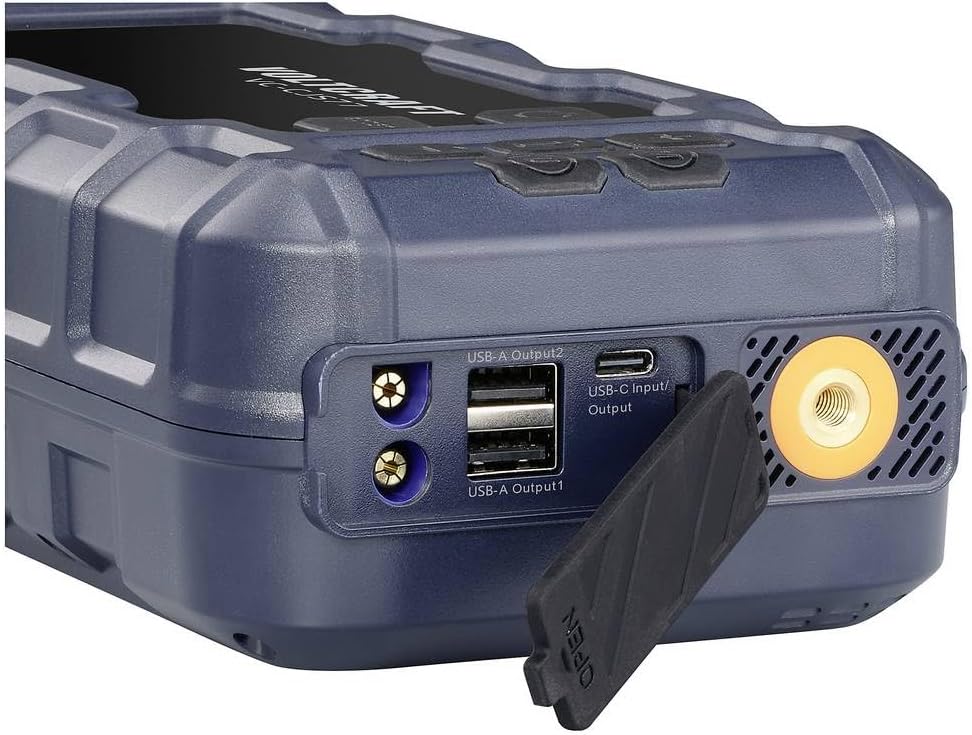
Figura 4.2: Lato view of the Voltcraft VC-CJS77, highlighting the various input and output ports for charging and power delivery, including USB-A and USB-C, and the dedicated jump starter port.
Componenti chiave:
- Display digitale: Shows battery level, output status, and compressor pressure.
- Pulsante di accensione: Accende/spegne l'unità.
- Pulsante BOOST: For emergency jump-starting when vehicle battery is extremely low.
- USB-A Output Ports (2x): Per caricare smartphone, tablet e altri dispositivi alimentati tramite USB.
- Porta di ingresso/uscita USB-C: For charging the jump starter unit and also for charging other devices.
- Porta di avviamento di emergenza: Connects to the jump starter cables.
- Porta del compressore d'aria: Connects to the air hose for inflation.
- Luce da lavoro a LED: Fornisce illuminazione con più modalità.
5. Configurazione e ricarica iniziale
Before using your Voltcraft VC-CJS77 for the first time, it is recommended to fully charge the unit.
5.1 Charging the Jump Starter Unit
- Connect the supplied USB-C to USB-C cable or USB-A to USB-C cable to the USB-C Input/Output port on the jump starter.
- Connect the other end of the cable to a suitable USB wall adapter (not included) or a powered USB port.
- Il display digitale mostrerà l'avanzamento della carica. Caricare finché il display non indica il 100%.
- Una volta caricata completamente, scollegare il cavo di ricarica.
For optimal performance and battery longevity, recharge the unit every 3-6 months, even if not in use.
6. Operating the Jump Starter
The Voltcraft VC-CJS77 is designed to jump-start 12V vehicles with petrol engines up to 8.0 liters and diesel engines up to 6.0 liters.
6.1 Avviamento di un veicolo con i cavi
- Assicurarsi che l'unità di avviamento di emergenza sia carica almeno al 75%.
- Spegnere il motore del veicolo e tutti gli accessori (luci, radio, ecc.).
- Connect the blue end of the jump starter cables to the jump starter port on the VC-CJS77 unit.
- Collegare il ROSSO positivo (+) clamp al terminale positivo (+) della batteria del veicolo.
- Collegare il NERO negativo (-) clamp to the negative (-) terminal of the vehicle's battery or a solid, unpainted metal part of the vehicle's chassis away from the battery.
- Once connected, the jump starter's display may show a voltage reading. If the vehicle battery is extremely low, press the AUMENTO button on the unit. Wait for the indicator to confirm it's ready.
- Avviare il motore del veicolo. Se non si avvia immediatamente, attendere 30 secondi prima di riprovare. Non avviare il motore per più di 3 secondi per tentativo.
- Una volta avviato il veicolo, scollegare immediatamente il NERO clamp prima, poi il ROSSO clamp dalla batteria del veicolo.
- Disconnect the jump starter cables from the VC-CJS77 unit.
Importante: Do not leave the jump starter connected to the vehicle battery for more than 30 seconds after the engine starts.
7. Funzionamento del compressore d'aria
The integrated air compressor can inflate tires and other inflatables up to a maximum pressure of 11 bar (approximately 160 PSI).
7.1 Inflating Tires or Inflatables
- Connect the air hose to the air compressor port on the VC-CJS77 unit.
- Attach the appropriate valve adapter to the air hose, if necessary, and then to the item you wish to inflate.
- Turn on the jump starter unit. The display will show the current pressure.
- Utilizzare i pulsanti '+' e '-' per impostare la pressione target desiderata (PSI, BAR, KPA, kg/cm²).
- Press the compressor start button (usually indicated by a tire icon) to begin inflation.
- Il compressore si arresterà automaticamente una volta raggiunta la pressione preimpostata.
- Disconnect the air hose from the item and the jump starter unit.
Nota: The compressor may become warm during extended use. Allow it to cool down if necessary.
8. Utilizzo della luce LED
The VC-CJS77 features a multi-mode LED work light for illumination in various situations.

Figura 8.1: The Voltcraft VC-CJS77 unit with its powerful LED flashlight activated, providing illumination.
8.1 Activating the LED Light
- Press and hold the LED light button (usually indicated by a light bulb icon) to turn on the light in its steady mode.
- Press the button again to cycle through the different modes: steady light, SOS signal, and strobe/flash.
- Press and hold the button again to turn off the LED light.
9. Utilizzo come Power Bank
The VC-CJS77 can also serve as a portable power bank to charge your electronic devices.
9.1 Ricarica di dispositivi esterni
- Collega il cavo di ricarica del tuo dispositivo a una delle porte di uscita USB-A o alla porta di ingresso/uscita USB-C dell'avviatore di emergenza.
- The jump starter will automatically begin charging your device. The display may show 'OUT' and the power output.
- Una volta completata la ricarica, scollegare il dispositivo.
The unit supports PD65W fast charging via the USB-C port, allowing for quick charging of compatible devices.
10. Manutenzione
Proper maintenance ensures the longevity and reliability of your Voltcraft VC-CJS77.
- Pulizia: Pulire l'unità con un panno morbido e asciutto. Non utilizzare prodotti chimici aggressivi o detergenti abrasivi.
- Magazzinaggio: Store the unit in a cool, dry place, away from direct sunlight and extreme temperatures. Use the provided storage bag for protection.
- Ricarica: Recharge the unit every 3-6 months to maintain battery health, even if it has not been used.
- Cura del cavo: Inspect jump starter cables and air hose for any damage before each use. Replace if frayed or damaged.
11. Risoluzione Dei Problemi
If you encounter issues with your Voltcraft VC-CJS77, refer to the following common problems and solutions:
| Problema | Possibile causa | Soluzione |
|---|---|---|
| Il veicolo non si avvia dopo l'avviamento di emergenza. | Bassa carica sull'avviatore di emergenza; codice erratoamp connection; vehicle battery completely dead; vehicle issue. | Assicurarsi che l'avviatore di emergenza sia completamente carico. Controllare clamp connections for correct polarity and secure contact. Try pressing the BOOST button. If still no start, the vehicle may have other mechanical issues. |
| Il compressore d'aria non si gonfia. | Air hose not securely connected; incorrect pressure setting; unit not powered on. | Check all connections. Ensure the unit is powered on and the target pressure is set correctly. |
| L'unità non si carica. | Faulty charging cable; faulty wall adapter; USB-C port issue. | Try a different USB-C cable and/or wall adapter. Ensure the cable is fully inserted into the port. |
| La luce LED non funziona. | Unit not powered on; low battery. | Ensure the unit is powered on and has sufficient charge. |
Se il problema persiste dopo aver provato queste soluzioni, contattare l'assistenza clienti.
12. Specifiche
Technical specifications for the Voltcraft VC-CJS77 Jump Starter:
- Modello: VC-CJS77 (Manufacturer Part Number: VC-16533725)
- Marca: VOLTCRAFT
- Capacità della batteria: 16000mAh (12V)
- Corrente di picco: 1200 A
- Compatibilità motore: Up to 8.0L Petrol, Up to 6.0L Diesel
- Ingresso/uscita USB-C: PD65W Fast Charging
- Uscita USB-A: 2x porte
- Air Compressor Max Pressure: 11 bar (approx. 160 PSI)
- Funzioni LED: Steady Light, SOS, Flash
- Dimensioni (L x P x A): Dimensioni: 23.5 x 6.7 x 11.5 cm
- Peso: 1.81 kg
13. Garanzia e supporto
Your Voltcraft VC-CJS77 Jump Starter is covered by a manufacturer's warranty. Please refer to the warranty card included in your package for specific terms and conditions.
For technical support, service, or warranty claims, please contact your retailer or the official Voltcraft customer service. Contact information can typically be found on the Voltcraft websito o sulla documentazione di acquisto.