Introduzione
This manual provides detailed instructions for the installation, operation, and maintenance of your OMBAR T2 Dash Cam. Please read this manual thoroughly before using the device to ensure proper functionality and safety. Keep this manual for future reference.
Contenuto della confezione
Verifica che tutti gli articoli elencati di seguito siano inclusi nel tuo pacchetto:
- OMBAR T2 Dash Cam (Front Camera) x1
- Telecamera posteriore x1
- Supporto GPS x1
- Type-C Cigarette Lighter Power Cable (11.5ft/3.5m) x1
- Cavo telecamera posteriore x1
- Scheda SD da 64 GB x1
- Car Wire Trim Tool x1
- 3M Adhesive Stickers x2
- Electrostatic Stickers x2
- Alcohol Prep Pads x2
- Manuale utente x1
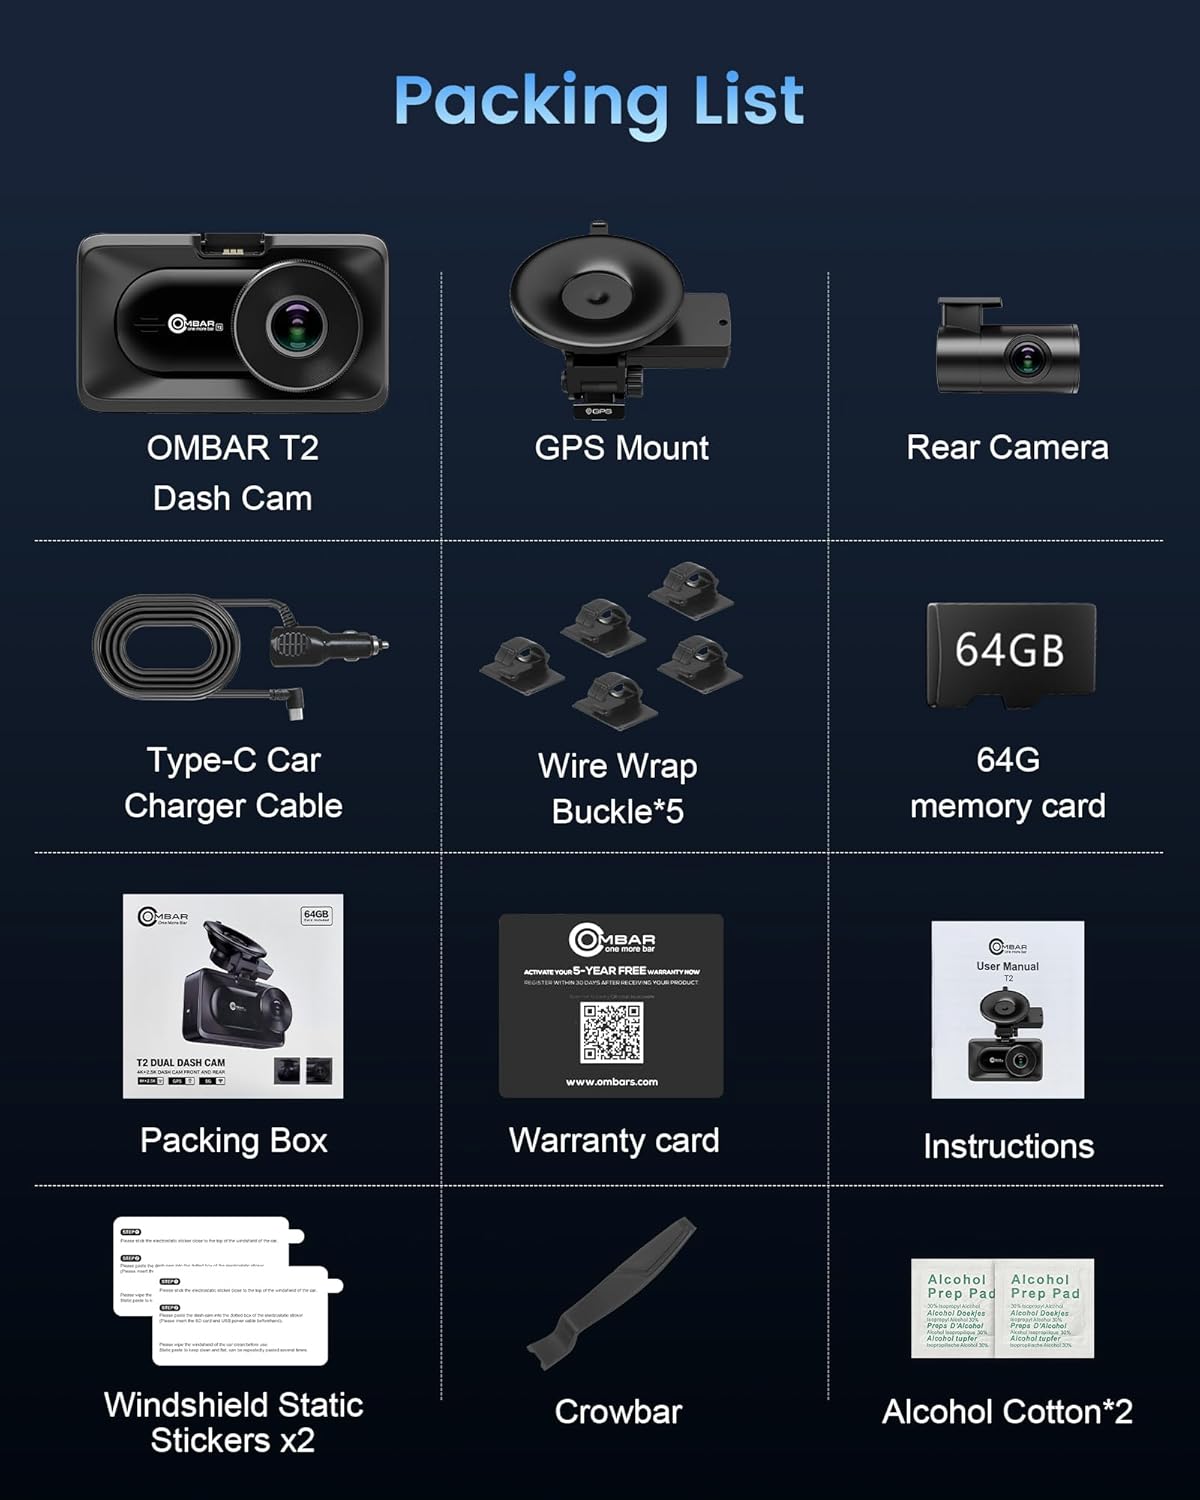
Image: All components included in the OMBAR T2 Dash Cam package, laid out neatly.
Prodotto finitoview
Front Camera Features:
- Display: 3.16-inch IPS Screen for clear viewing.
- Risoluzione: 4K Ultra HD (Front) and 2.5K (Rear) for high-quality video capture.
- Angolo ampio: 170° front and 150° rear lenses to cover multiple lanes and reduce blind spots.
- Visione notturna e HDR: F2.0 large aperture and Wide Dynamic Range (WDR) technology ensure clear video in low-light conditions.
- Connettività: Built-in 5G Wi-Fi for fast footage transfer to the RoadRec app.
- Posizione GPS: Built-in high-precision GPS for tracking speed and location data.
- Magazzinaggio: Supporta schede SD fino a 512 GB (scheda da 64 GB inclusa).
- Fonte di energia: Supercapacitor for enhanced durability and temperature resistance.
Componenti dell'unità principale:
The front dash cam unit includes the main lens, a 3.16-inch IPS display, control buttons, and ports for power, rear camera, and GPS mount.

Image: The OMBAR T2 Dash Cam main unit with its suction cup mount, the rear camera, and a smartphone displaying the RoadRec app interface.

Image: Visual representation of the 170-degree front camera and 140-degree rear camera coverage, showing a car from front and back perspectives on a road.

Image: A comparison showing the effectiveness of Super Night Vision and HDR technology in low-light conditions, making license plates and street signs clearer.
Guida all'installazione
1. Preparazione all'installazione:
- Clean the windshield area where the dash cam will be mounted using an alcohol prep pad. Ensure the surface is dry before proceeding.
- Apply an electrostatic sticker to the windshield first, then attach the suction cup mount to the sticker. This helps prevent residue on the windshield.
2. Install the Front Dash Cam:
- Attach the GPS mount to the main dash cam unit.
- Secure the suction cup mount firmly to the prepared area on your windshield. Ensure it is positioned to provide an unobstructed view della strada.
- Adjust the angle of the dash cam to capture the desired view.

Immagine: Primo piano view of the drip glue suction cup mount, highlighting its strong and durable attachment to the windshield, designed to withstand various temperatures.
3. Installare la telecamera posteriore:
- Mount the rear camera on the inside of your rear windshield, typically at the top center, using the provided adhesive sticker.
- Route the rear camera cable along the headliner and A-pillar, down to the front dash cam unit. Use the included wire trim tool to tuck the cable neatly under the trim.
- Connect the rear camera cable to the "REAR" port on the main dash cam unit.
4. Collegamento elettrico:
- Plug the Type-C cigarette lighter power cable into your vehicle's 12V power outlet.
- Connect the Type-C end of the power cable to the "USB" port on the dash cam's GPS mount.
- Ensure all cables are securely connected and neatly routed to avoid obstructing your view o interferire con i comandi del veicolo.

Image: Diagram illustrating the correct mounting positions for the front dash cam and rear camera, along with cable routing for power and rear camera connection.
Configurazione iniziale
1. Insert SD Card:
Insert the provided 64GB SD card into the dash cam's SD card slot. Ensure the card is inserted correctly until it clicks into place. The dash cam supports up to 512GB SD cards.
2. Accensione:
Once connected to power, the dash cam will automatically turn on and begin recording. If it does not, press the power button.
3. Format SD Card:
It is recommended to format the SD card within the dash cam's settings before first use and periodically thereafter to ensure optimal performance and prevent data corruption.
- Press the Menu button to access settings.
- Passare all'opzione "Formato".
- Confirm to format the SD card.
Funzionamento di base
1. Modalità di registrazione:
- Registrazione in loop: The dash cam continuously records video in short segments. When the SD card is full, the oldest unlocked filevengono sovrascritti.
- Sensore G (registrazione di emergenza): In the event of a sudden impact or collision, the built-in G-sensor automatically detects the event and locks the current video segment, preventing it from being overwritten.
- Monitoraggio del parcheggio: With the optional hardwire kit (sold separately), the dash cam can monitor your vehicle 24/7. It will automatically record if motion or impact is detected while parked.
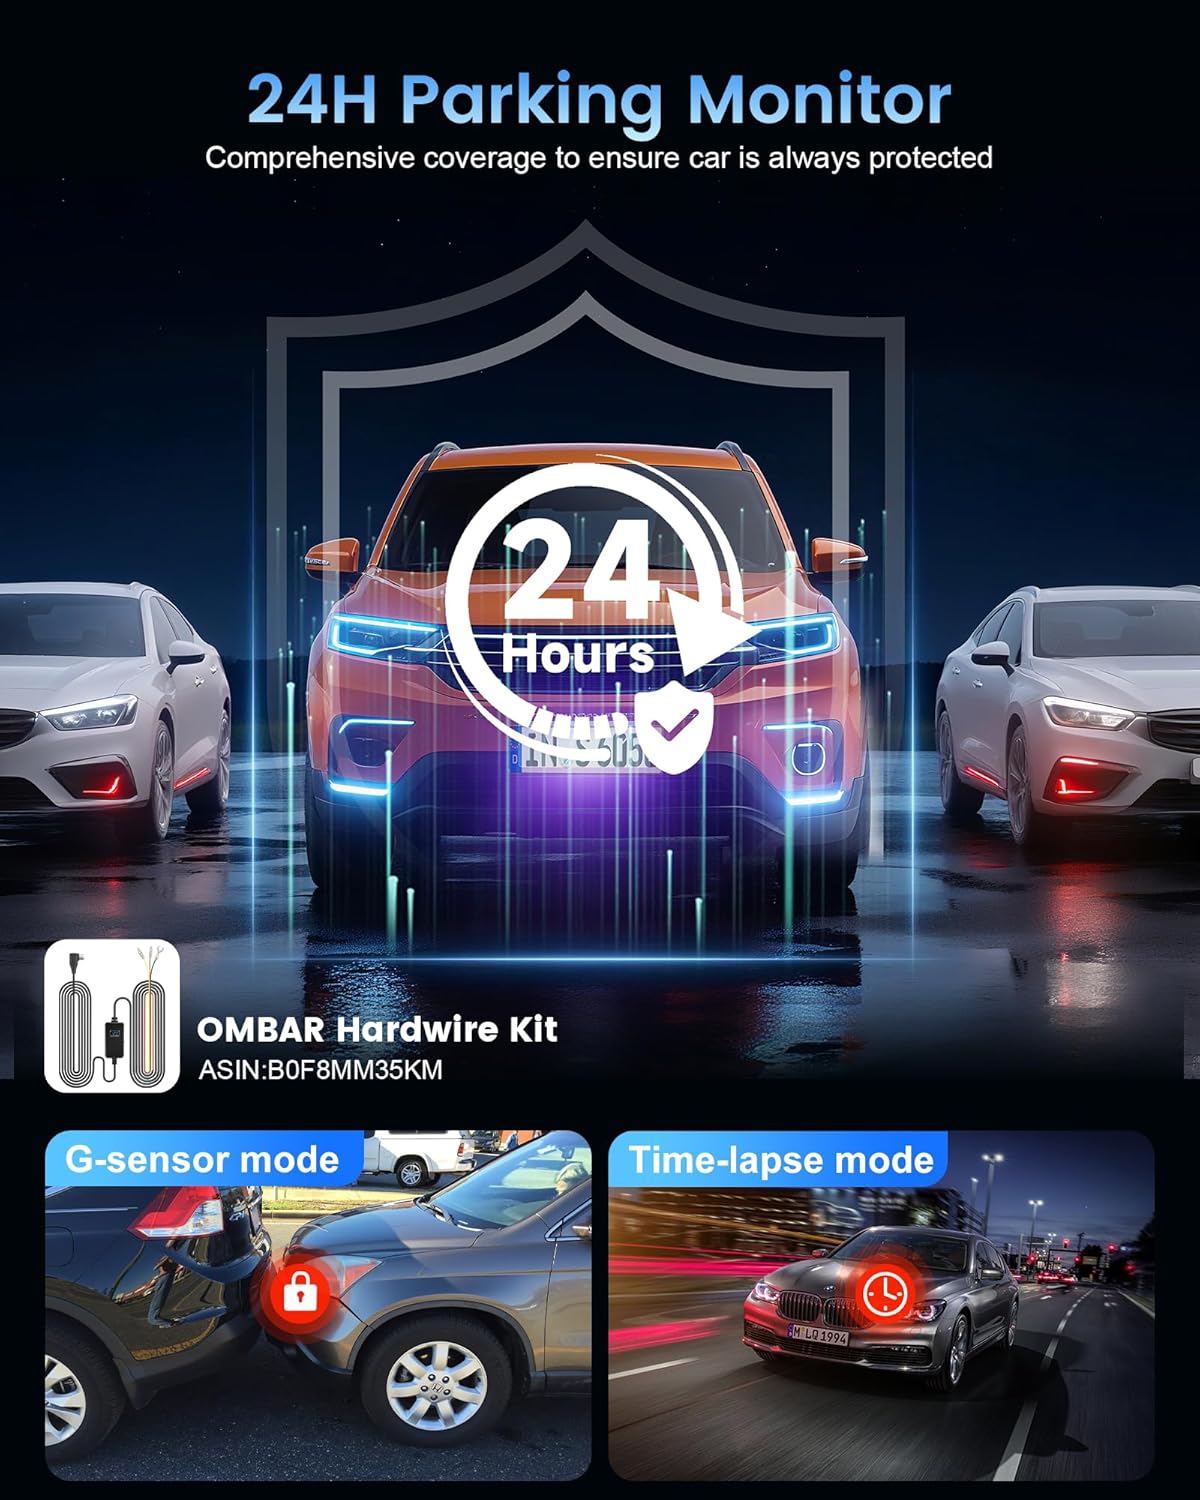
Image: Illustration of the 24-hour parking monitor feature, showing a car being bumped and the G-sensor activating to record the event. It also shows time-lapse parking mode.

Image: Visual explanation of the auto loop recording feature, demonstrating how older, unlocked videos are automatically overwritten to ensure continuous recording.
2. Riproduzione:
Videos can be played back directly on the dash cam's screen or by connecting to the RoadRec app via Wi-Fi.
- Press the Menu button and navigate to the Playback option.
- Select 'Front' or 'Rear' to view recordings from the respective cameras.
- Use the navigation buttons to select and play videos.
Wi-Fi & App Connection (RoadRec App)
The OMBAR T2 Dash Cam features 5G Wi-Fi for quick and easy connection to the RoadRec app on your smartphone (iOS/Android).
1. Download the RoadRec App:
Download the "RoadRec" app from the App Store (iOS) or Google Play Store (Android).

Image: Screenshot showing the RoadRec app icon and download options from Google Play and App Store, with a smartphone displaying the app interface.
2. Connect via Wi-Fi:
- On the dash cam, navigate to the Wi-Fi settings and enable 5G Wi-Fi. The SSID (e.g., DC-T2-YKGA) and password (e.g., 12345678) will be displayed.
- Sul tuo smartphone, vai alle impostazioni Wi-Fi e connettiti alla rete Wi-Fi della dash cam utilizzando l'SSID e la password forniti.
- Open the RoadRec app. The app will automatically connect to the dash cam, allowing you to view cibo vivotage, scaricare video e regolare le impostazioni.

Image: A smartphone connected to the dash cam via 5G Wi-Fi, showing the RoadRec app interface for real-time video viewing and faster downloading.
Funzionalità GPS
The built-in high-precision GPS module records your driving route, speed, and location data. This information can be viewed through the RoadRec app or a dedicated GPS player on your computer.
- The OMBAR T2 supports quad-mode GPS, compatible with GPS, BeiDou, Galileo, and GLONASS systems for enhanced accuracy.
- Download the free OMBAR GPS Player (Windows and Mac compatible) from the official websito a view GPS tracks on a map.

Image: A dash cam with GPS functionality, showing a map on a smartphone with a highlighted driving route and location pins, indicating high-precision GPS tracking.
Manutenzione
- Pulisci la lente: Per garantire una qualità video nitida, pulire regolarmente le lenti della fotocamera anteriore e posteriore con un panno morbido e privo di lanugine.
- Formatta scheda SD: Format the SD card monthly to maintain optimal recording performance and extend its lifespan.
- Aggiornamenti del firmware: Check the official OMBAR website or the RoadRec app for available firmware updates to ensure your dash cam has the latest features and improvements.
- Temperatura: The supercapacitor design allows the dash cam to operate in extreme temperatures (-4°F to 158°F). However, avoid prolonged exposure to direct sunlight when parked to prevent overheating.

Image: A visual representation of the dash cam's supercapacitor, highlighting its ability to withstand extreme temperatures from hot deserts (158°F) to cold snowy environments (-4°F).
Risoluzione dei problemi
| Problema | Possibile causa | Soluzione |
|---|---|---|
| La dash cam non si accende. | Nessuna alimentazione; collegamento allentato. | Check power cable connection; ensure vehicle's 12V outlet is working. |
| Video pippotage è sfocato o poco chiaro. | Pellicola protettiva sulla lente; lente sporca; messa a fuoco errata. | Remove protective film; clean lenses; ensure lens is not obstructed. |
| Problemi di connessione Wi-Fi. | Incorrect password; distance from dash cam; app issues. | Verify Wi-Fi password; ensure phone is close to dash cam; restart app and dash cam. |
| Errore scheda SD. | Card not formatted; faulty card; incompatible card. | Format SD card in dash cam; try a different high-speed (Class 10 or U3) SD card. |
| La modalità parcheggio non funziona. | No hardwire kit; incorrect settings. | Ensure hardwire kit is installed correctly; check parking mode settings in the menu. |
Specifiche
- Nome modello: OMBAR T2
- Risoluzione di acquisizione video: 4K Front, 2.5K Rear
- campo di View: 170 gradi (anteriore), 150 gradi (posteriore)
- Dimensioni dello schermo: IPS da 3.16 pollici
- Tecnologia di connettività: 5G Wi-Fi, APP, GPS
- Caratteristiche speciali: HDR, Night Vision, G-Sensor, Loop Recording, 24H Parking Mode, Supercapacitor
- Magazzinaggio: Supporta fino a 512 GB di scheda Micro SD (64 GB inclusi)
- Tipo di montaggio: Windshield Mount (Drip Glue Suction Cup)
- Fonte di energia: Type-C Car Charger Adapter
- Temperatura di esercizio: Da -4°C a 158°C (da -20°F a 70°F)
- Dimensioni del prodotto: 1 x 1 x 1 pollici (approssimativo)
- Peso dell'articolo: 1.3 libbre
Garanzia e supporto
OMBAR offers a 5-year free warranty for the T2 Dash Cam. To activate your warranty, register your product within 30 days of receiving it. Scan the QR code on the included warranty card or visit the official OMBAR website for registration and after-sales service.
For further assistance, please refer to the contact information provided in your user manual or on the official OMBAR websito.


