1. Introduzione
The AIYIMA T20 is a fully balanced tube preamplifier designed for high-fidelity audio systems. It features an ECC83/12AX7 tube design with a 180V high-voltage circuit, offering customizable sound through swappable vacuum tubes and op-amps. The unit supports both XLR and RCA inputs and outputs, and includes a 12V trigger for system integration.
Importante avviso di sicurezza:
The AIYIMA T20 requires a dedicated DC12V power adapter. Using incompatible or higher voltage power sources will cause permanent damage to the device. Always ensure the correct power adapter is used.
2. Contenuto della confezione
Prima di procedere con la configurazione, verificare che tutti gli elementi siano presenti nella confezione:
- 1 x AIYIMA T20 Tube Preamppiù vivace
- 2 x ECC83 Tubes
- 1 x alimentatore DC 12V
- 1 x Manuale utente
- 1 x Scheda di garanzia

Image: Contents of the AIYIMA T20 package, including the preamplifier unit, two ECC83 tubes, a DC 12V power adapter, a user manual, and a warranty card.
3. Impostazione
3.1 Identificazione dei componenti

Immagine: dettagliata view of the AIYIMA T20's front and rear panels, highlighting the infrared receiving window, input mode indicator light, ECC83 vacuum tubes, display screen, ON/OFF/Volume control knob, XLR outputs, RCA outputs, RCA inputs, XLR inputs, 12V trigger output, and DC12V power input.
- Pannello frontale: Infrared Receiving Window, Input Mode Indicator Light (Red: RCA / Blue: XLR), ECC83 Vacuum Tubes, Display Screen, ON/OFF/Volume Control Knob.
- Pannello posteriore: XLR-R/L Audio Out, RCA-R/L Audio Out, RCA-R/L Audio In, XLR-R/L Audio In, DAC Trigger Out, AMP Trigger Out, DC12V Power Input.
3.2 Installazione del tubo
The AIYIMA T20 comes with two ECC83 tubes. Carefully insert each tube into its designated socket on the top panel of the preamplifier. Ensure the pins align correctly with the socket holes and apply gentle, even pressure until the tube is fully seated. Avoid forcing the tubes to prevent damage to the pins or sockets.

Image: A hand carefully inserting an ECC83 vacuum tube into its socket on the AIYIMA T20 preamplifier, demonstrating the tube installation process.
3.3 Collegamenti audio
Connect your audio sources (e.g., CD player, streamer, DAC) to the appropriate input ports on the rear panel. Connect your amplifier or active speakers to the output ports.
- Ingressi XLR: For balanced audio sources. Connect XLR cables from your source to the XLR-R/L Audio In ports.
- Ingressi RCA: For unbalanced audio sources. Connect RCA cables from your source to the RCA-R/L Audio In ports.
- Uscite XLR: For balanced connection to an amplifier or active speakers. Connect XLR cables from the XLR-R/L Audio Out ports.
- Uscite RCA: For unbalanced connection to an amplifier or active speakers. Connect RCA cables from the RCA-R/L Audio Out ports.
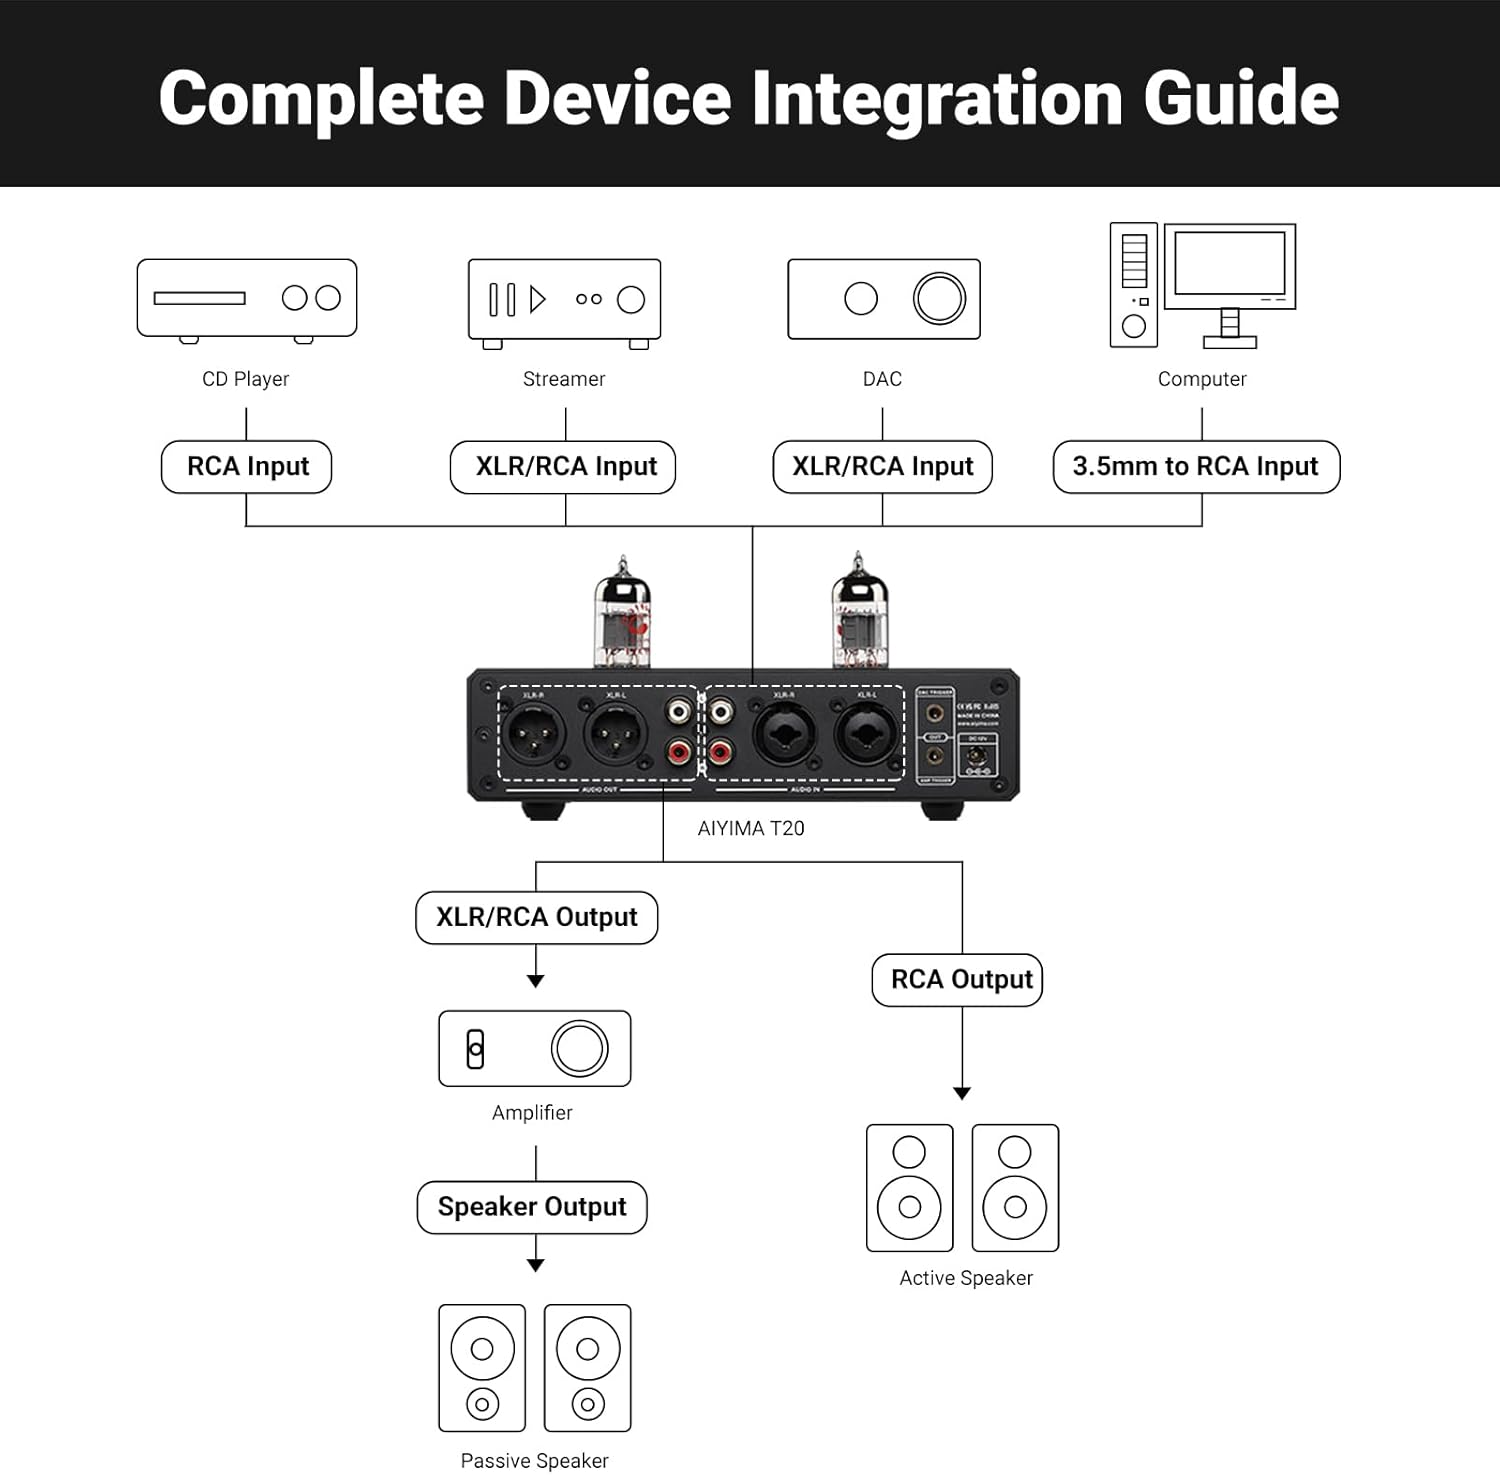
Image: A diagram illustrating various audio source connections (CD player, streamer, DAC, computer) to the AIYIMA T20's inputs, and its outputs connected to an amplifier for passive speakers or directly to active speakers.

Immagine: Primo piano views of the XLR output and input ports on the rear panel of the AIYIMA T20, showing the balanced connection options.
3.4 Collegamento di alimentazione
Connect the provided DC12V power adapter to the DC12V Power Input port on the rear panel of the T20, then plug the adapter into a wall outlet.

Image: A close-up of the DC12V power input port on the rear panel of the AIYIMA T20.
3.5 12V Trigger Integration
The 12V trigger allows for automated system control. Connect a 12V trigger cable from the T20's AMP TRIGGER OUT to a compatible power amplifier, or from a DAC's trigger output to the T20's DAC TRIGGER IN.

Image: A close-up of the 12V trigger input and output ports on the rear panel of the AIYIMA T20.
4. Istruzioni per l'uso
4.1 Accensione/spegnimento e controllo del volume
The large knob on the front panel serves multiple functions:
- Pressione breve: Accende il dispositivo.
- Premere a lungo: Spegne il dispositivo.
- Ruotare: Regola il livello del volume.
- Doppio click: Disattiva o riattiva l'audio.

Image: A close-up of the multi-functional volume control knob on the front panel of the AIYIMA T20.

Image: A close-up of the digital display screen on the AIYIMA T20, showing the current volume level.
4.2 Selezione della modalità di input
Press the 'MODE' button on the remote control or short press the volume knob to cycle through available input modes (RCA or XLR). The Input Mode Indicator Light on the front panel will illuminate red for RCA input and blue for XLR input.
4.3 Intelligent Soft-Start System
The T20 features a 20-second intelligent soft-start system. Upon powering on, the unit will undergo a warm-up sequence to optimize tube performance before audio output is enabled.
4.4 Funzioni del telecomando
Il telecomando incluso consente un comodo accesso a diverse funzioni:
- ACCESO SPENTO: Accendere o spegnere l'unità.
- Disattiva/riattiva: Disattiva o riattiva l'uscita audio.
- ON / OFF Display Screen: Toggles the display screen.
- MODE (Switch Input Mode): Scorre le sorgenti di input.
- Volume Reduction / Volume Plus: Regola il livello del volume.

Image: The remote control for the AIYIMA T20, showing buttons for power, mute, display toggle, input mode selection, and volume adjustment.
5. Manutenzione
5.1 Sostituzione del tubo
The ECC83 vacuum tubes are user-exchangeable, allowing for sound customization. To replace tubes, ensure the unit is powered off and disconnected from the power source. Carefully grasp the existing tube and gently pull it straight up from its socket. Insert the new compatible tube (e.g., 12AX7-S, 12AX7B, 7025, 12AX7) ensuring correct pin alignment before gently pushing it into place.
Image: A hand demonstrating the removal of a vacuum tube from the AIYIMA T20, illustrating the user-exchangeable tube feature.
5.2 Op-Amp Sostituzione
The T20 also supports swapping op-amps for further sound customization. This procedure requires technical knowledge and should only be performed by experienced users. Ensure the unit is powered off and disconnected. Carefully remove the top cover of the unit. Locate the op-amp sockets on the PCB. Use an IC extractor tool to gently remove the existing op-amps (e.g., LME49720, OPA1612) and insert compatible replacements, paying close attention to orientation.

Image: A close-up of a replaceable op-amp chip on the circuit board of the AIYIMA T20, indicating its modular design.
5.3 Pulizia
To clean the unit, power it off and disconnect it from the power source. Use a soft, dry cloth to wipe the exterior. Avoid using liquid cleaners or abrasive materials, as these may damage the finish or internal components.
6. Risoluzione Dei Problemi
| Problema | Possibile causa | Soluzione |
|---|---|---|
| Nessun potere | Power adapter not connected or faulty; incorrect power adapter used. | Ensure the DC12V power adapter is securely connected to both the unit and the power outlet. Verify that the correct DC12V adapter is being used. |
| Nessuna uscita audio | Incorrect input selected; cables not connected properly; volume too low; unit in mute mode. | Check input selection (RCA/XLR). Verify all audio cables are securely connected. Increase volume. Ensure unit is not muted (double-click volume knob or use remote). Allow 20 seconds for soft-start warm-up. |
| Suono distorto o rumoroso | Loose tube or op-amp; faulty cables; interference; incorrect source signal. | Ensure tubes and op-amps are properly seated. Check audio cables for damage or loose connections. Try different cables. Ensure source signal is clean. |
| Il telecomando non funziona | Batterie scariche o inserite in modo errato; ostruzione tra il telecomando e l'unità. | Replace remote control batteries. Ensure there is a clear line of sight to the infrared receiving window on the unit. |
7. Specifiche
| Caratteristica | Dettaglio |
|---|---|
| Modello | T20 |
| Tipo di tubo | ECC83 / 12AX7 (User Swappable) |
| Operazione-Amps | LME49720 & OPA1612 (User Swappable) |
| Ingressi | XLR (bilanciato), RCA (sbilanciato) |
| Risultati | XLR (bilanciato), RCA (sbilanciato) |
| Rapporto segnale / rumore (SNR) | ≥112 dB |
| Distorsione Armonica Totale + Rumore (THD + N) | 0.003% |
| Gamma dinamica (DR) | 109 dB |
| Risposta in frequenza | 20Hz-20kHz ± 0.2dB |
| Potenza in ingresso | DC12V |
| Dimensioni del prodotto (L x P x A) | 7.48 x 5.59 x 1.81 pollici (190 x 142 x 46 mm) |
| Peso dell'articolo | 2.2 libbre (1015 g) |
| Caratteristiche speciali | 180V ad alto volumetage Tube Core, 12V Trigger, Intelligent Soft-Start System, All-Metal Construction |
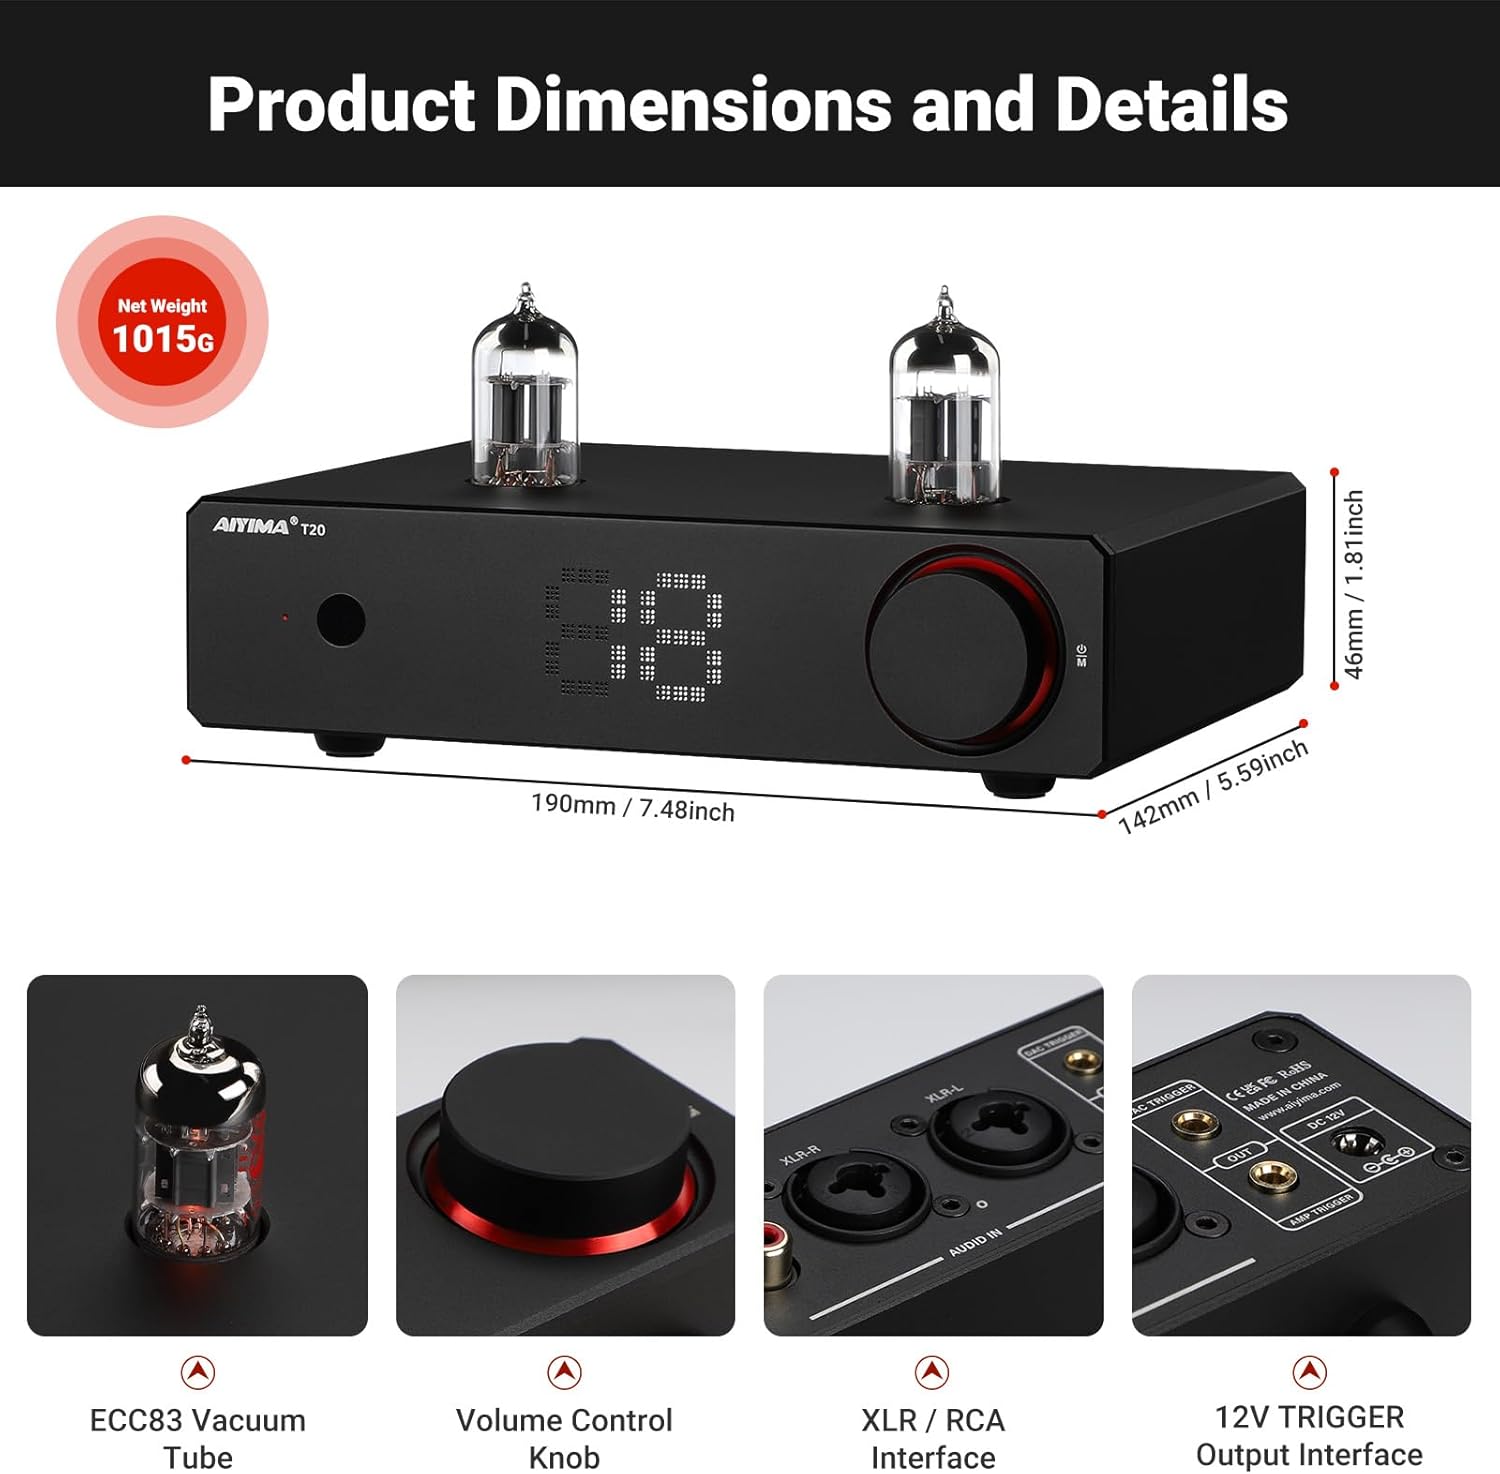
Image: Diagram showing the dimensions of the AIYIMA T20 preamplifier in millimeters and inches, along with its net weight.


Immagine: Views of the AIYIMA T20's internal components, including the high-quality gold-plated PCB board, German WIMA capacitors, Japanese Nikicon capacitors, Japanese NJW1195 Volume IC, and RCA gold-plated connectors.
8. Video di prodotto
AIYIMA T20 Fully Balanced Preamp Sopraview
Video: Un oltreview of the AIYIMA T20 Fully Balanced Preamplificatore, showcasinil suo design, le sue caratteristiche e la sua funzionalità.
Preamplificatore valvolare completamente bilanciato AIYIMA T20amp Caratteristiche
Video: A detailed look at the features of the AIYIMA T20 Fully Balanced Tube Preamplifier, including its tube design, connectivity options, and build quality.
9. Garanzia e supporto
The AIYIMA T20 includes a Warranty Card. Please refer to this card for detailed information regarding warranty coverage, terms, and conditions. For technical support, service inquiries, or further assistance, please contact AIYIMA customer service through their official channels or the retailer from whom the product was purchased.


