1. Introduzione
This manual provides detailed instructions for the installation, operation, maintenance, and troubleshooting of your Pisichen 27-Inch 2K 240Hz QHD Touch Screen Monitor. Please read this manual thoroughly before using the product to ensure proper setup and optimal performance. Keep this manual for future reference.
2. Informazioni sulla sicurezza
Per evitare danni al monitor e garantire la sicurezza dell'utente, osservare le seguenti precauzioni di sicurezza:
- Non esporre il monitor a pioggia, umidità o temperature estreme.
- Garantire un'adeguata ventilazione attorno al monitor per evitare il surriscaldamento.
- Utilizzare solo l'adattatore di alimentazione fornito con il monitor.
- Evitare di posizionare oggetti pesanti sul cavo di alimentazione o sul monitor.
- Scollegare il cavo di alimentazione dalla presa prima di pulire il monitor.
- Non tentare di smontare o riparare il monitor da soli. Per qualsiasi intervento di assistenza, rivolgersi a personale qualificato.
3. Contenuto della confezione
Verificare che tutti gli articoli siano presenti nel pacco:
- Pisichen 27-Inch 2K 240Hz QHD Touch Screen Monitor
- Supporto per monitor (base e collo)
- Adattatore di alimentazione
- Cavo HDMI
- Cavo DisplayPort (DP)
- Cavo USB-C
- USB-B Cable (for touchscreen functionality)
- Manuale d'uso
4. Prodotto finitoview
The Pisichen 27-Inch 2K 240Hz QHD Touch Screen Monitor is designed for high-performance visual and interactive experiences. Key features include:
- Display: 27-inch QHD (2560x1440) IPS panel for wide viewangolazioni e colori accurati.
- Frequenza di aggiornamento: 240Hz for ultra-smooth motion and reduced input lag.
- Schermo tattile: 10-point multi-touch support for intuitive interaction.
- Connettività: HDMI, DisplayPort, USB-C, and USB-B ports for versatile device connections.
- Sincronizzazione adattiva: Riduce lo screen tearing e lo stuttering per immagini fluide.
- Ergonomia: Features tilt adjustment for comfortable viewing.
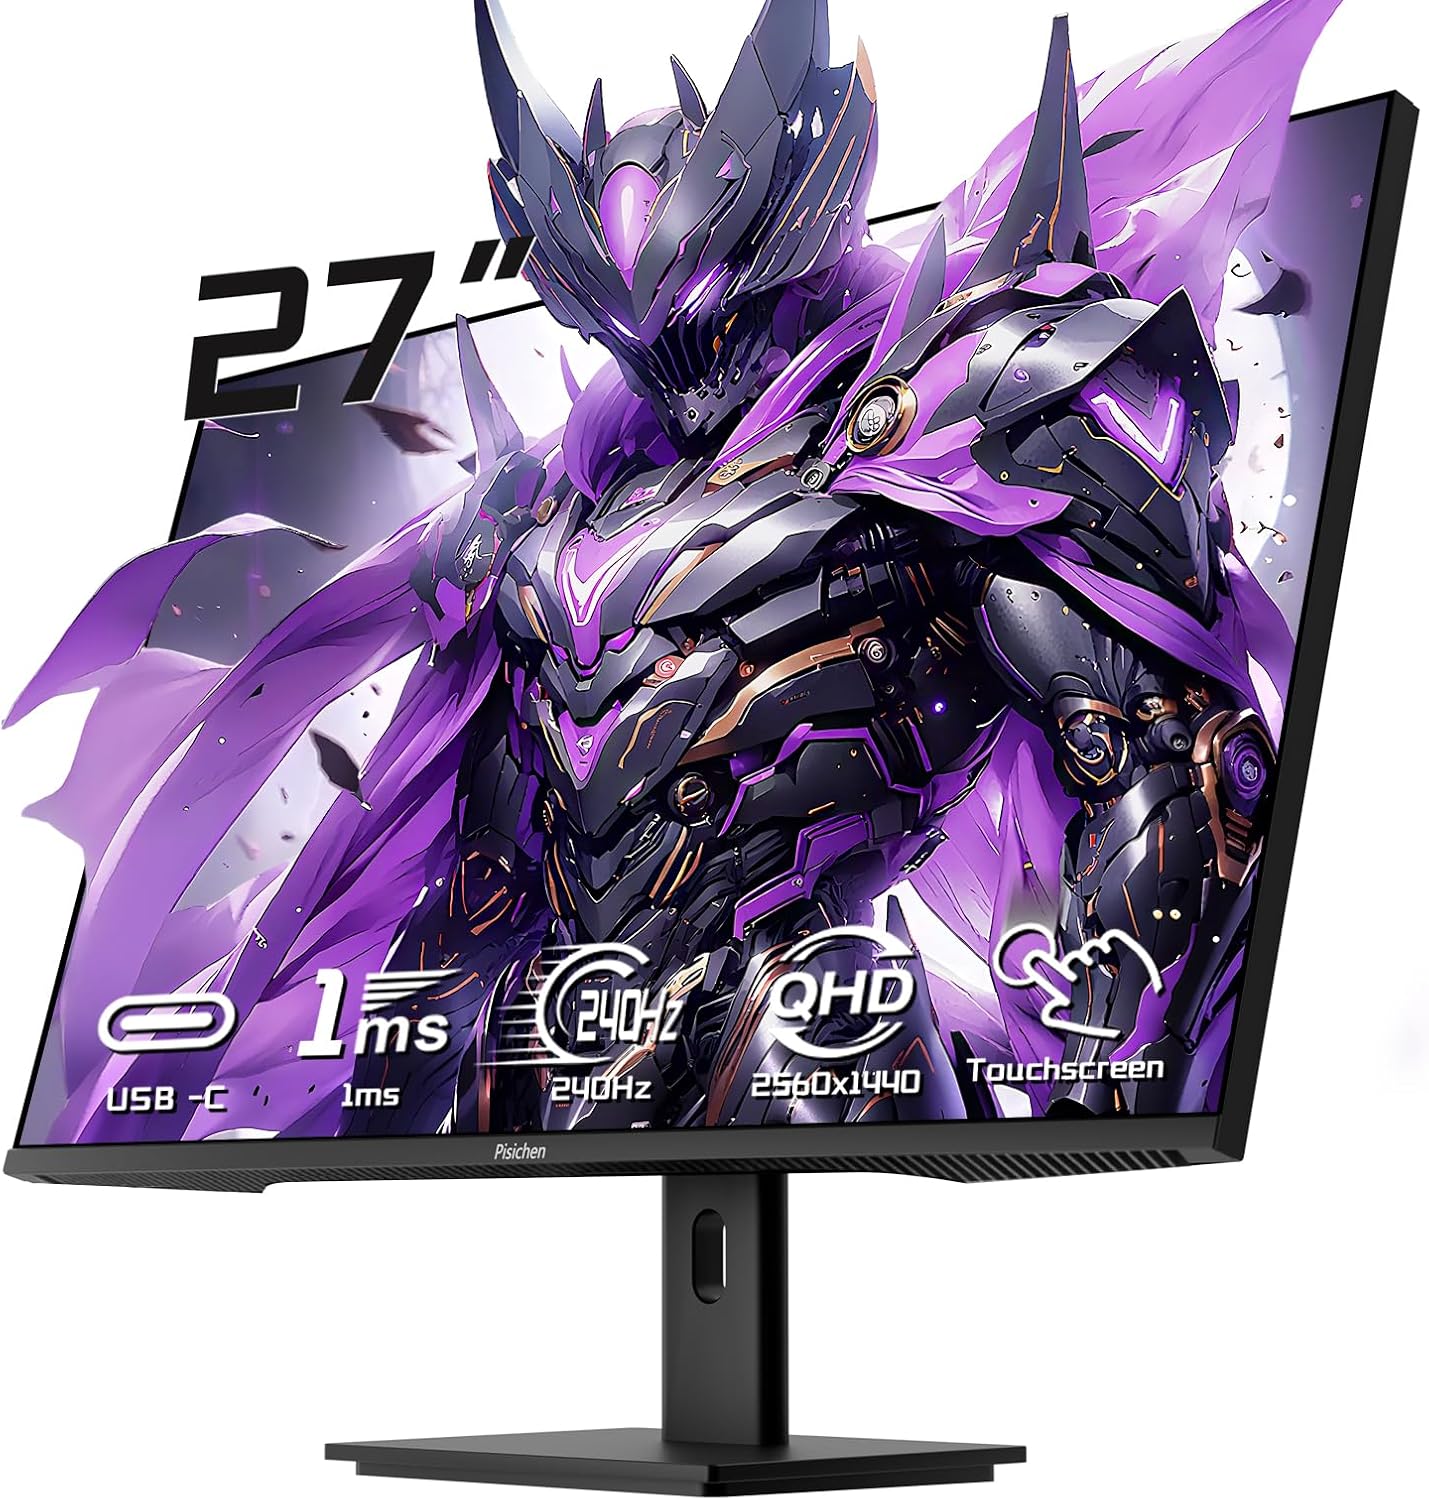
Figura 4.1: Fronte view of the Pisichen 27-Inch Touch Screen Monitor, highlighting its frameless design and key features like USB-C, 1ms response time, 240Hz refresh rate, QHD resolution, and touchscreen capability.
5. Istruzioni per l'installazione
5.1 Montaggio del supporto
- Estrarre con cautela il monitor e i componenti del supporto dalla confezione.
- Attach the stand neck to the monitor's rear mounting point.
- Fissare la base del supporto al collo del supporto utilizzando le viti fornite.
- Posizionare il monitor assemblato su una superficie stabile e piana.
5.2 Montaggio VESA (opzionale)
The monitor supports VESA mounting for wall or arm installation. Remove the stand if attached. Use compatible VESA mounting hardware (not included) according to the VESA standard for this monitor.

Figure 5.1: Illustration comparing VESA wall mounting and the standard monitor base setup, demonstrating space-saving benefits of VESA mounting.
5.3 Connessione a un dispositivo
The monitor offers multiple connection options. Choose the appropriate cable for your device.
- HDMI/DisplayPort: Connect one end of the HDMI or DisplayPort cable to your computer's graphics card and the other end to the corresponding port on the monitor.
- USB-C: For devices supporting video output via USB-C, connect the USB-C cable from your device to the monitor's USB-C port. This may also provide power and touch functionality depending on your device.
- USB-B (for Touchscreen Functionality): To enable the 10-point multi-touch feature, connect the USB-B cable from the monitor's USB-B port to an available USB-A port on your computer. This connection is crucial for touch input.
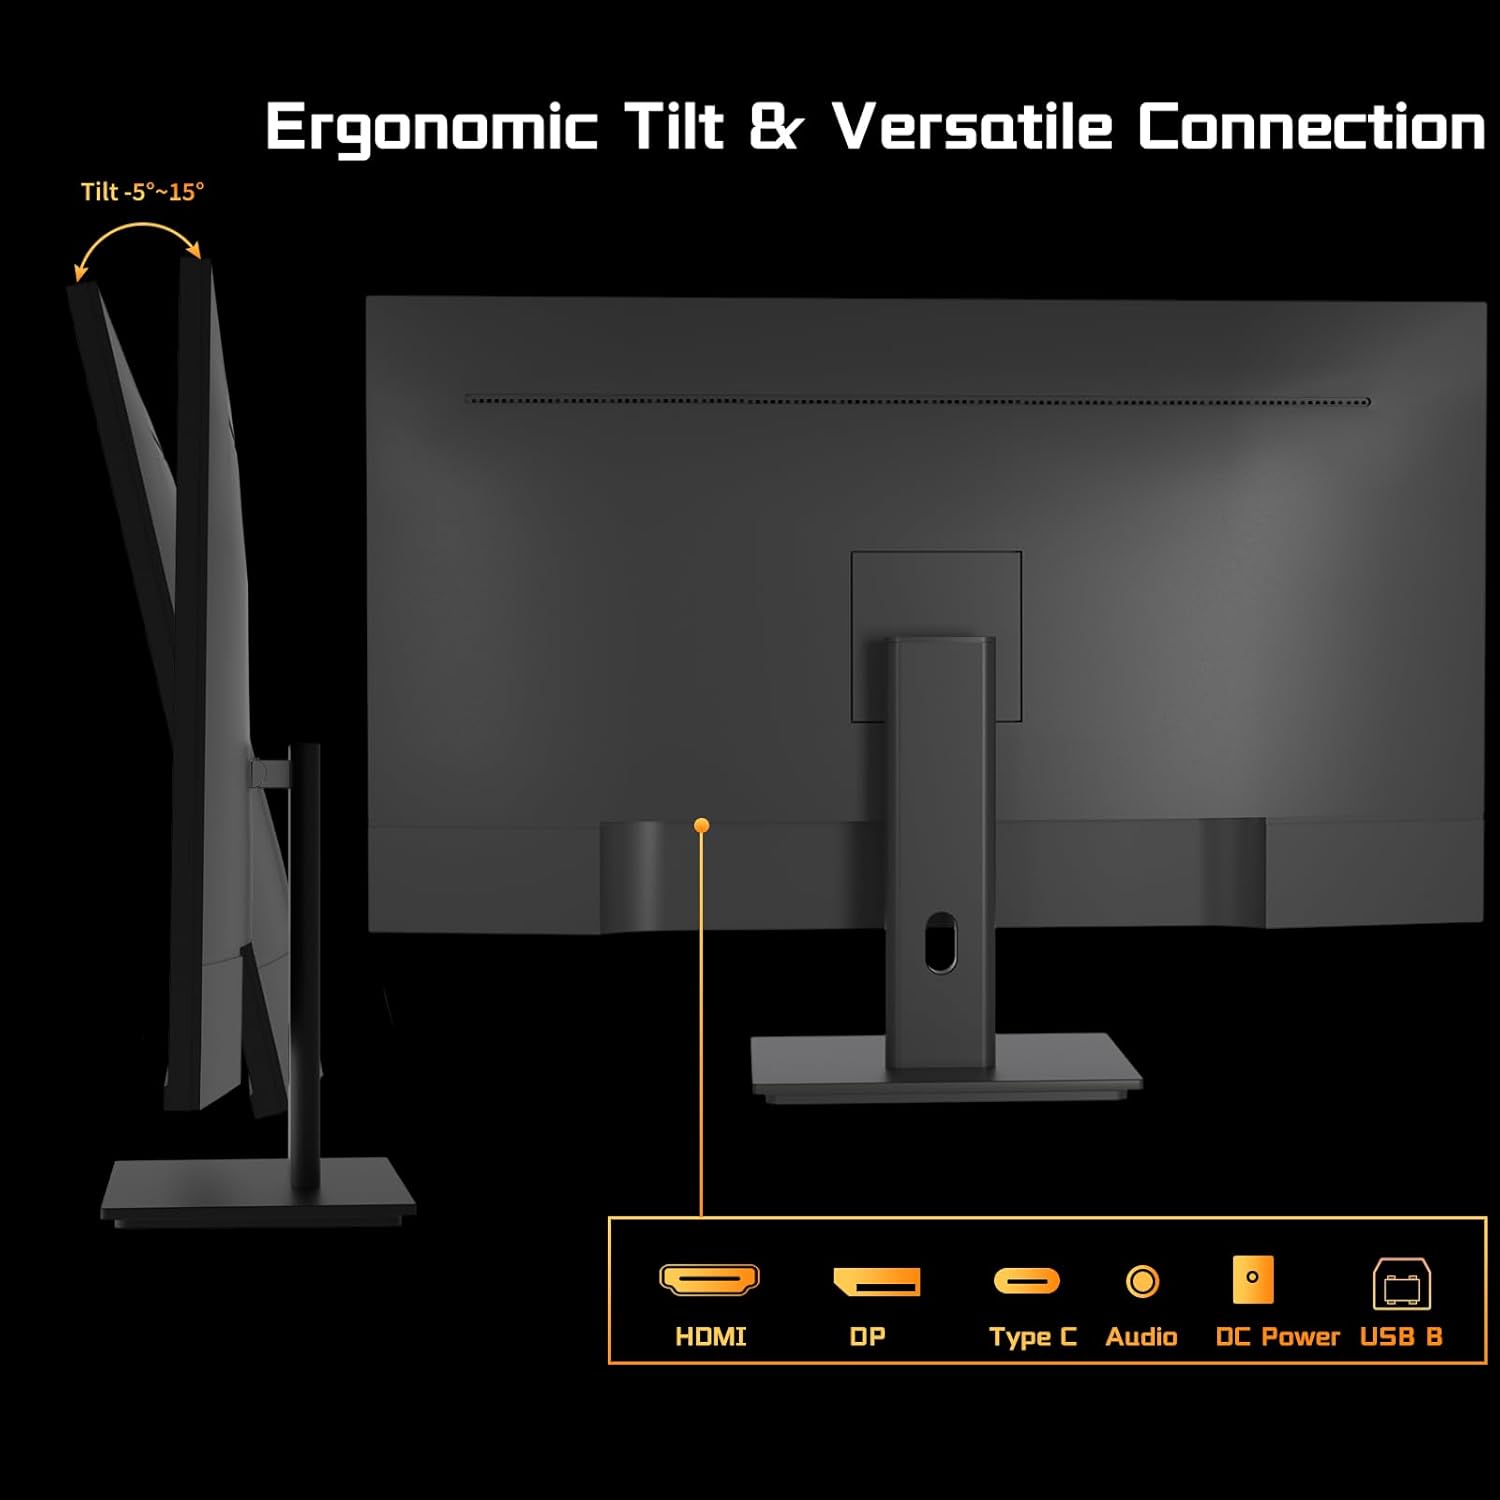
Figura 5.2: Posteriore view of the monitor showing available ports: HDMI, DisplayPort, USB-C, Audio Out, DC Power, and USB-B. The USB-B port is essential for touchscreen functionality.

Figure 5.3: Connection diagram illustrating how to connect the monitor as a second display (HDMI/DP) and as a touchscreen monitor (HDMI/DP + USB-B for touch signal).
5.4 Collegamento di alimentazione
Connect the power adapter to the monitor's DC power input, then plug the adapter into a power outlet.
5.5 Accensione iniziale
Press the power button on the monitor. The power indicator will illuminate, and the display will turn on. If no signal is detected, ensure all cables are securely connected and your computer is powered on.
6. Istruzioni per l'uso
6.1 Accensione/spegnimento
Premere il pulsante di accensione situato sul monitor per accenderlo o spegnerlo.
6.2 Menu di visualizzazione su schermo (OSD)
The OSD menu allows you to adjust various monitor settings. Use the buttons on the monitor (typically located on the back or bottom) to navigate the menu. Common settings include:
- Luminosità/Contrasto: Regola la luminosità del display.
- Impostazioni colore: Modifica la temperatura del colore, la gamma e la saturazione.
- Sorgente di input: Manually select HDMI, DisplayPort, or USB-C input.
- Modalità Immagine: Select predefined display modes (e.g., Standard, Game, Movie).
- Sincronizzazione adattiva: Enable or disable this feature for compatible graphics cards.
6.3 Funzionalità touchscreen
With the USB-B cable connected to your computer, the monitor functions as a 10-point multi-touch display. You can use gestures such as:
- Rubinetto: Equivale a un clic del mouse.
- Doppio tocco: Equivale a un doppio clic.
- Pizzica per ingrandire: Per ingrandire o ridurre la visualizzazione, usa due dita.
- Scorri: Navigate through content or scroll.
- Trascinare: Sposta gli elementi sullo schermo.

Figure 6.1: A user interacting with the monitor's touchscreen, demonstrating its application in business or productivity tasks.

Figure 6.2: Compatibility chart showing devices that support multi-touch (Laptops, Smartphones, Tablets, All-in-one PCs, Desktop Hosts) and devices where touch functionality is not supported (iPhone, iPad, Switch, Fire TV, PS3/4/5, Xbox, Steam Deck, and some Apple products like Mac mini).
6.4 Frequenza di aggiornamento e sincronizzazione adattiva
The monitor supports a 240Hz refresh rate. Ensure your computer's display settings are configured to utilize this refresh rate for the smoothest experience. Enable Adaptive Sync in the OSD menu and your graphics card settings to synchronize the monitor's refresh rate with your GPU's frame rate, reducing screen tearing.

Figure 6.3: Visual comparison demonstrating the smoothness of a 240Hz refresh rate compared to lower refresh rates, illustrating reduced lag and delay.
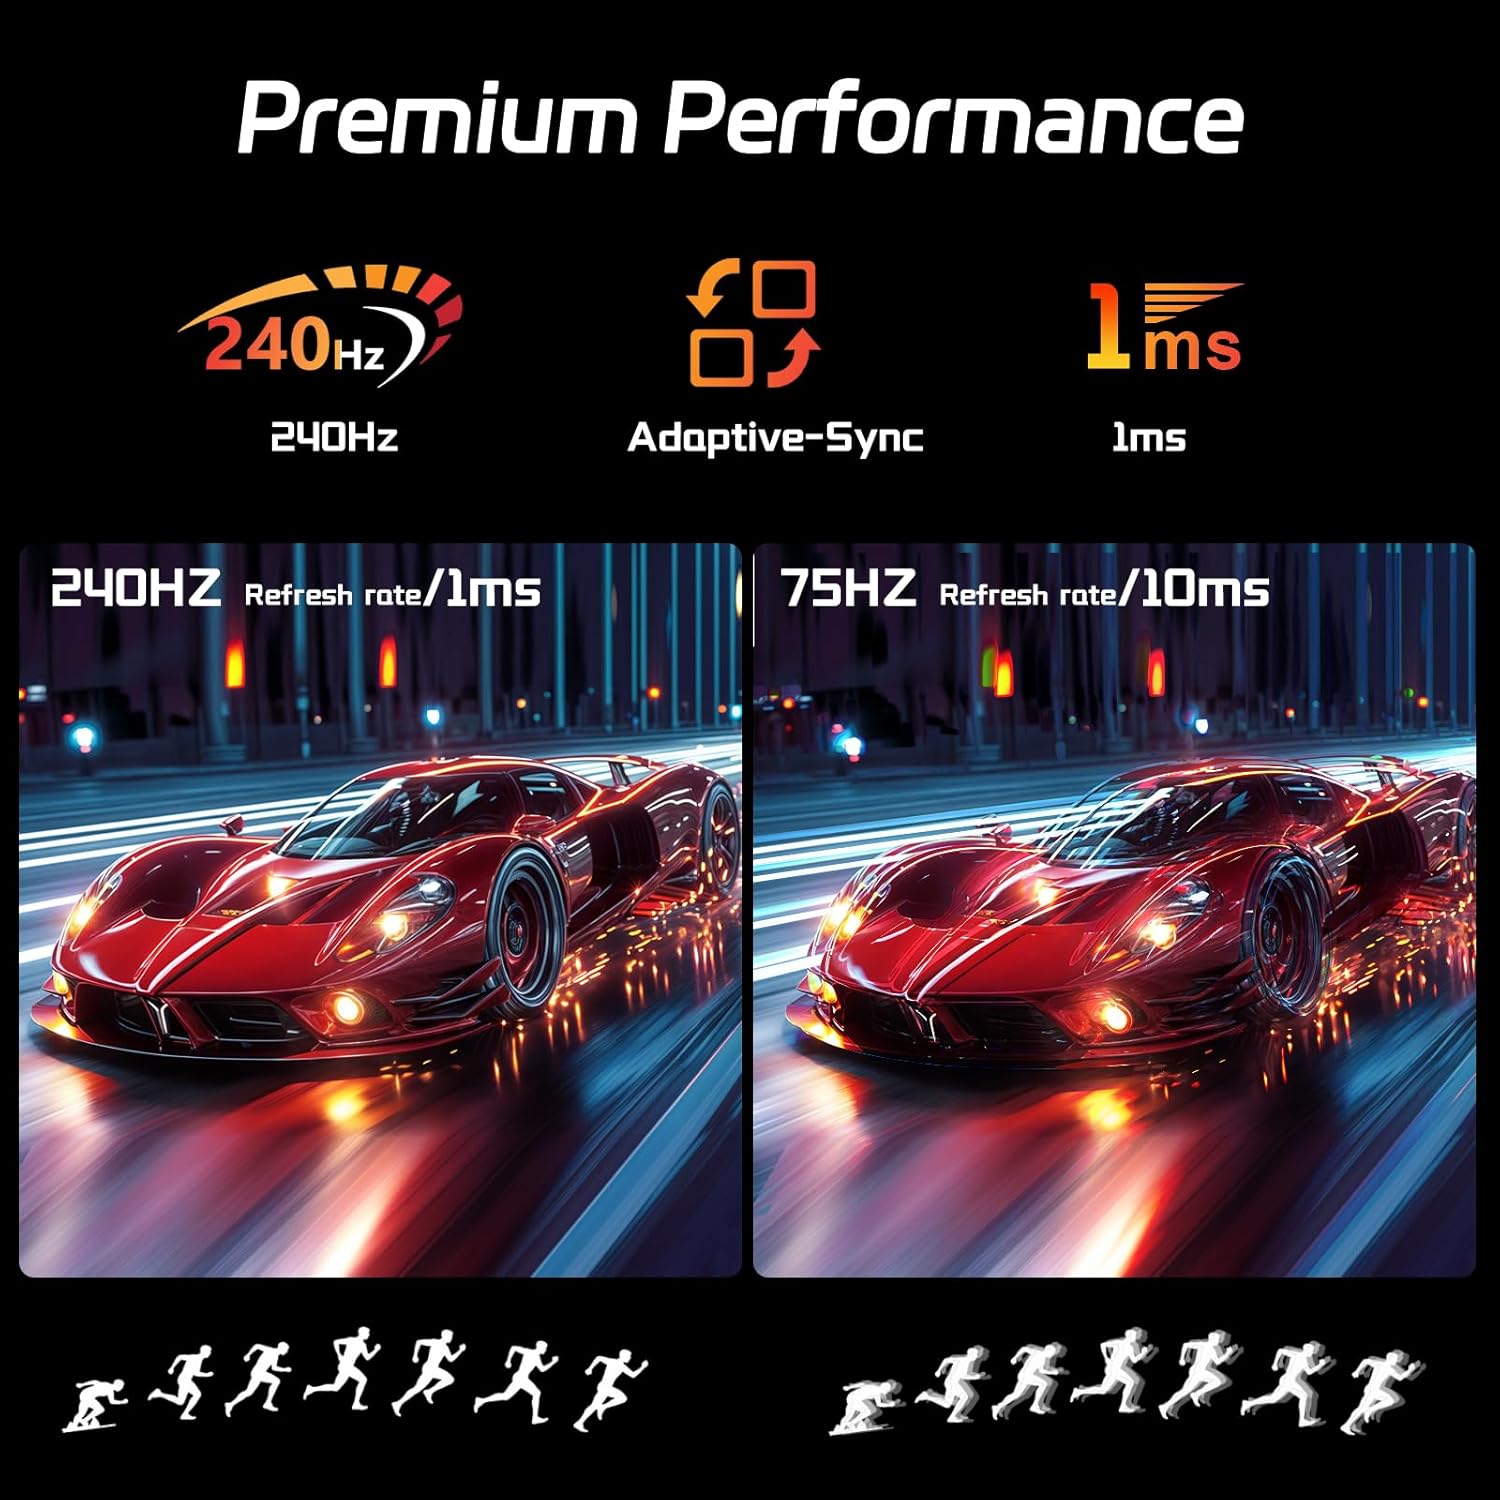
Figure 6.4: Illustration of premium performance features including 240Hz refresh rate, Adaptive-Sync, and 1ms response time, with a visual comparison of motion clarity at 240Hz versus 75Hz.
6.5 Eye-Friendly Technology
The monitor incorporates technology to reduce screen flicker and blue light emissions, aiming to minimize eye strain during prolonged use. These features can typically be adjusted or enabled through the OSD menu.

Figure 6.5: Visual representation of Eye-Friendly Technology, showing how it reduces screen flicker and blue light to enhance user comfort.
7. Manutenzione
- Pulizia dello schermo: Pulire delicatamente lo schermo con un panno morbido e privo di lanugine. Per i segni ostinati, strofinare leggermenteampImmergere il panno in acqua o in un detergente per schermi non abrasivo. Non spruzzare il detergente direttamente sullo schermo.
- Pulizia del Casing: Utilizzare un panno morbido e asciutto per pulire il monitor casing. Evitare l'uso di prodotti chimici aggressivi o materiali abrasivi.
- Magazzinaggio: Se si conserva il monitor per un periodo prolungato, scollegarlo dall'alimentazione, coprirlo per proteggerlo dalla polvere e riporlo in un luogo fresco e asciutto.
8. Risoluzione Dei Problemi
| Problema | Possibile causa | Soluzione |
|---|---|---|
| Nessuna immagine sullo schermo | Monitor non acceso; sorgente di ingresso errata; cavo video allentato. | Assicurarsi che il cavo di alimentazione sia collegato e che il monitor sia acceso. Selezionare la sorgente di ingresso corretta tramite OSD. Controllare i collegamenti dei cavi video. |
| Il touchscreen non risponde | USB-B cable not connected; incorrect driver; incompatible device. | Ensure USB-B cable is connected from monitor to computer. Check device compatibility. Calibrate touch input in OS settings if multiple touchscreens are present. |
| Immagine tremolante o distorta | Faulty video cable; incorrect resolution/refresh rate; graphics card issue. | Replace video cable. Adjust resolution/refresh rate in OS settings. Update graphics drivers. |
| Nessun suono dagli altoparlanti del monitor | Volume too low; audio output not selected; no audio signal via video cable. | Increase monitor volume. Ensure monitor is selected as audio output in OS. Check if video cable supports audio transmission. |
9. Specifiche
| Caratteristica | Dettaglio |
|---|---|
| Dimensioni dello schermo | 27 pollici |
| Risoluzione | 2560 x 1440 pixel (QHD Wide 1440p) |
| Frequenza di aggiornamento | 240 Hz |
| Tipo di pannello | Informazione pubblica |
| Schermo tattile | Multitouch a 10 punti |
| Proporzioni | 16:9 |
| Luminosità dell'immagine | 400 candele (cd/m²) |
| Connettività | HDMI, DisplayPort, USB-C, USB-B |
| Dimensioni del prodotto | 0.7 x 24 x 14.1 pollici |
| Peso dell'articolo | 13.52 libbre |
| Produttore | Shenzhen Konowa Electronics Co., LTD |
| Numero di modello | 27INTS-2K-240HZ |
10. Garanzia e supporto
This Pisichen monitor comes with a standard manufacturer's warranty. For specific warranty terms and conditions, please refer to the warranty card included in your package or visit the official Pisichen website. For technical support, troubleshooting assistance beyond this manual, or to inquire about warranty claims, please contact Pisichen customer service through their official channels.
Supporto online: Visit the Pisichen Store on Amazon


