Introduzione
This manual provides detailed instructions for the safe and efficient operation of your Xiaomi Portable Electric Air Compressor 2 Pro. Please read this manual thoroughly before using the product and retain it for future reference. This device is designed for inflating tires on cars, motorcycles, bicycles, and balls, offering a convenient and portable solution for maintaining optimal pressure.
Informazioni sulla sicurezza
Avvertimento: La mancata osservanza di queste istruzioni di sicurezza può provocare scosse elettriche, incendi o lesioni gravi.
- Tenere il dispositivo lontano dalla portata dei bambini.
- Non utilizzare il compressore in condizioni di umidità o in prossimità di liquidi o gas infiammabili.
- Ensure the air hose is securely connected to the valve before starting inflation.
- Do not over-inflate items. Always refer to the recommended pressure for the item being inflated. The auto shut-off feature helps prevent over-inflation.
- Evitare un funzionamento continuo prolungato per evitare il surriscaldamento. Lasciare raffreddare il dispositivo se diventa caldo.
- Per la ricarica utilizzare solo il cavo di ricarica fornito e un adattatore di alimentazione compatibile da 5 V/3 A.
- Non smontare o modificare il dispositivo. Contattare l'assistenza clienti per le riparazioni.
Contenuto della confezione
Verificare che tutti gli articoli siano presenti nel pacco:
- Compressore d'aria elettrico portatile Xiaomi 2 Pro
- Fast-connecting air valve
- High-pressure air hose extension
- Needle valve (for balls)
- Presta valve adapter (for some bicycle tires)
- Cavo di ricarica di tipo C
- Sacchetto portaoggetti

Figure 1: Included accessories with the air compressor.
Prodotto finitoview
The Xiaomi Portable Electric Air Compressor 2 Pro is a compact and powerful inflation device. It features a digital LED display, multiple preset modes, and a long-lasting rechargeable battery for convenient use.
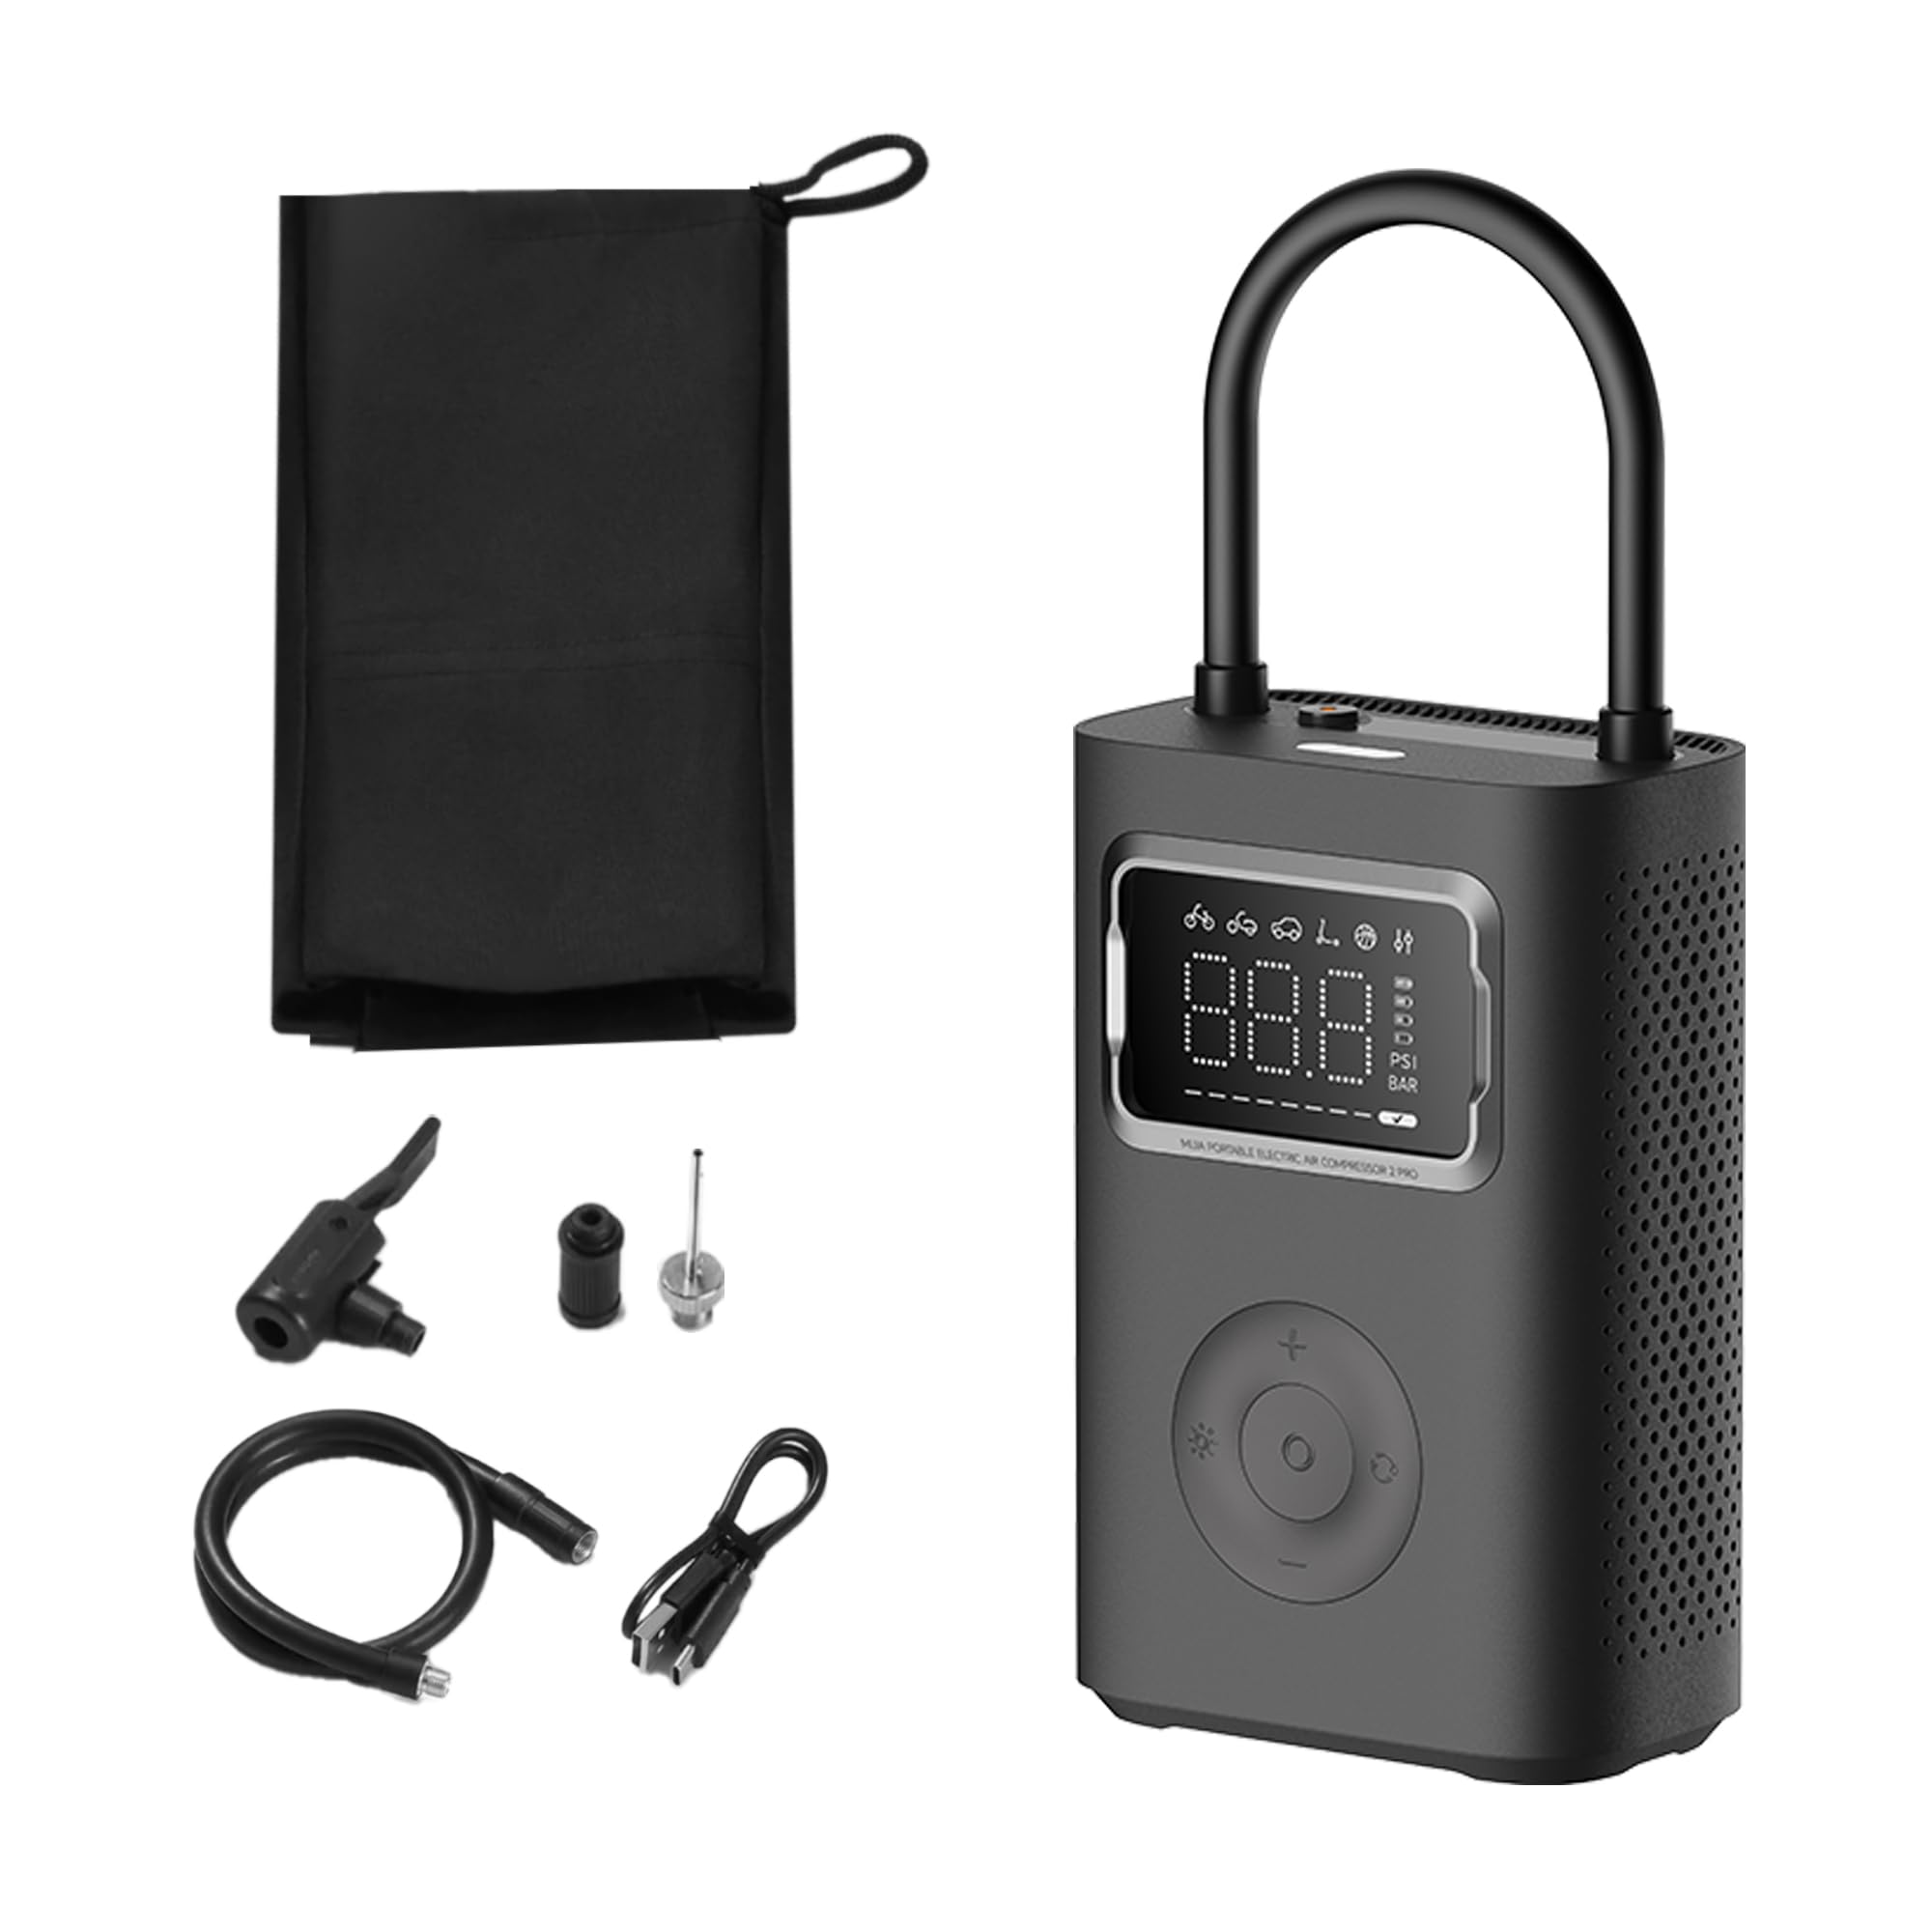
Figure 2: Xiaomi Portable Electric Air Compressor 2 Pro.
Caratteristiche principali:
- Pressione massima: Fino a 150 PSI per diverse esigenze di gonfiaggio.
- Display LED digitale: Fornisce letture della pressione in tempo reale e consente un'impostazione precisa della pressione.
- Spegnimento automatico: Arresta automaticamente il gonfiaggio una volta raggiunta la pressione preimpostata, impedendo il gonfiaggio eccessivo.
- Senza fili e ricaricabile: Powered by a 27 Watt-hour battery, offering portability and convenience.
- Molteplici modalità preimpostate: Includes modes for car, motorcycle, bicycle, electric scooter, and ball, along with a custom mode.
- Dual-Purpose LED Light: Features a white light for illumination and a red light for signaling.
- Compatto e leggero: Progettato per un facile stoccaggio e trasporto.

Figure 3: Product details showing 150 PSI capability, battery indicator, and hose lock.
Impostare
1. Ricarica iniziale
Before first use, fully charge the air compressor. Connect the provided Type-C charging cable to the charging port on the device and the other end to a 5V/3A USB power adapter (not included). The battery indicator on the display will show charging progress. A full charge typically takes approximately 3.5 hours.
2. Collegamento del tubo dell'aria
The air hose is stored by being locked into the device. To use, pull the air hose out of its storage slot. This action will automatically power on the device. Connect the appropriate valve adapter (Schrader, Presta, or needle valve) to the end of the air hose, depending on the item you intend to inflate.

Figure 4: Pulling the air hose from its slot to power on the device.
Istruzioni per l'uso
1. Accensione/Spegnimento
- Accensione: Pull the air hose out of its storage slot. The device will automatically power on and display the current pressure.
- Spegni: Push the air hose back into its storage slot. The device will automatically power off.
2. Comprensione del display
The large LED display shows the current pressure, selected mode, and battery level. You can switch between PSI and Bar units using the unit selection button.

Figure 5: Digital display showing mode icons and pressure.
3. Selecting Inflation Modes
Press the mode button to cycle through the 6 preset inflation modes:
- Modalità personalizzata: Default 35 PSI (adjustable 3-150 PSI / 0.2-10.3 Bar)
- Modalità bicicletta: Predefinito 45 PSI (regolabile 30-65 PSI)
- Modalità Moto: Default 2.4 Bar (adjustable 1.8-3.0 Bar)
- Modalità auto: Default 2.5 Bar (adjustable 1.8-3.5 Bar)
- Modalità monopattino elettrico: Predefinito 50 PSI (regolabile 45-60 PSI)
- Modalità palla: Predefinito 8 PSI (regolabile 4-16 PSI)

Figura 6: Oltreview of multiple preset inflation modes.
4. Adjusting Pressure Settings
After selecting a mode, use the '+' and '-' buttons to adjust the target pressure. The display will show the target pressure blinking. Once set, the value will stabilize.
5. Processo di inflazione
- Connect the air hose with the appropriate adapter securely to the valve stem of the item to be inflated.
- Il display mostrerà la pressione attuale dell'oggetto.
- Select the desired inflation mode and set the target pressure.
- Press the start button (usually the center button) to begin inflation.
- Il compressore si arresterà automaticamente una volta raggiunta la pressione desiderata.
- Scollegare il tubo dell'aria dallo stelo della valvola.

Figure 7: Auto pressure detection and inflation for a bicycle tire.
6. Utilizzo della luce LED
Press the light button to activate the LED light. It has two modes: a white light for illumination in dark environments and a red flashing light for emergency signaling.
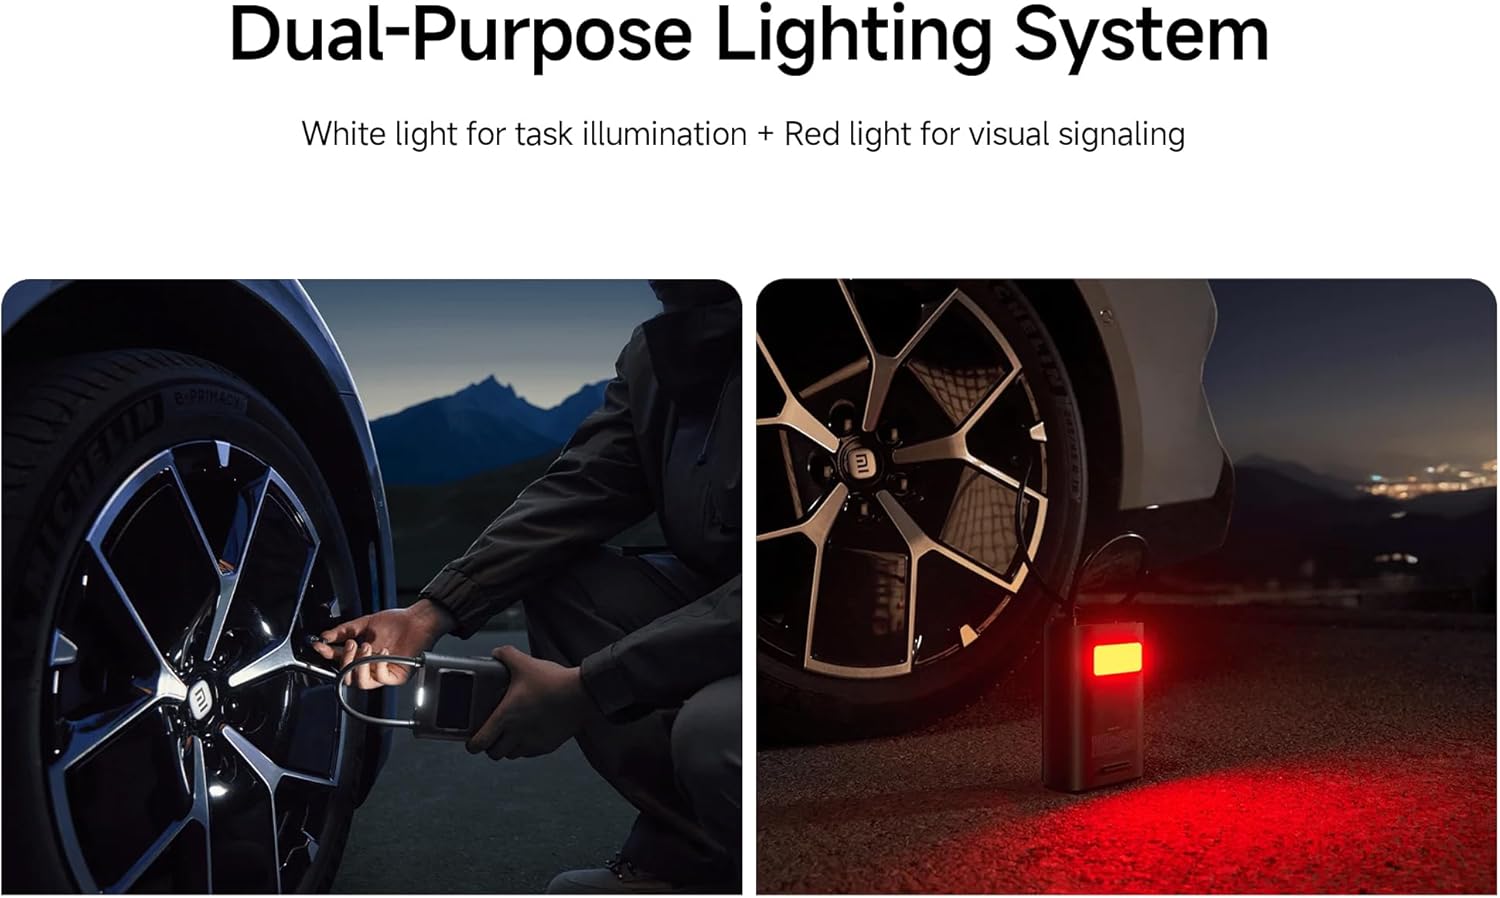
Figure 8: Dual-purpose lighting system in use (white for task, red for signaling).
Ricarica
The device is equipped with a 27 Watt-hour rechargeable battery. When the battery level is low, the battery indicator on the display will show a low charge. Connect the Type-C charging cable to recharge. The device can reinflate approximately 16 car tires (from 2.0 Bar to 2.5 Bar) on a full charge, or inflate up to 138 size 7 basketballs (from 0 PSI to 8 PSI).

Figure 9: Battery capacity and inflation performance exampmeno.
Manutenzione
- Pulizia: Pulire l'esterno del compressore con un panno morbido eamp stoffa. Non utilizzare prodotti chimici aggressivi o detergenti abrasivi.
- Magazzinaggio: Store the device in a cool, dry place, away from direct sunlight and extreme temperatures. Ensure the air hose is properly stowed to prevent damage.
- Cura della batteria: Per una durata ottimale della batteria, caricare il dispositivo almeno una volta ogni tre mesi se non lo si utilizza regolarmente.
Risoluzione dei problemi
| Problema | Possibile causa | Soluzione |
|---|---|---|
| Il dispositivo non si accende. | Battery is depleted; Air hose not fully pulled out. | Charge the device; Ensure the air hose is fully extended from its slot. |
| L'inflazione è lenta o inefficace. | Low battery; Air hose not securely connected; Incorrect pressure setting. | Recharge the device; Check all connections for leaks; Verify the target pressure. |
| Il dispositivo si arresta in modo imprevisto. | Target pressure reached (auto shut-off); Overheating; Low battery. | This is normal if target pressure is met; Allow device to cool down; Recharge the device. |
| Lettura della pressione imprecisa. | Collegamento allentato; errore del sensore. | Ensure the air hose is tightly connected to the valve; If problem persists, contact support. |
Specifiche
| Caratteristica | Dettaglio |
|---|---|
| Numero di modello | XM-MJCQB06QW-03 |
| Dimensioni | Dimensioni: 10.5 x 8 x 25.5 cm |
| Peso | 1.1 kg |
| Materiale | Plastica |
| Fonte di alimentazione | Alimentato a batteria |
| Voltage | 10.8 Volt |
| Cosatage | 27 Wattora |
| Ampera capacità | 3 Amps |
| Pressione massima | 150 bar |
| Lunghezza del tubo flessibile | 200 millimetri |
| Caratteristiche speciali | Automatic Shut-Off, Digital Display, LED Light, Lightweight |
| Usi consigliati | Tire Inflation (Car, Bike, Motorcycle, Electric Scooter), Ball Inflation, Toy Inflation |
Video ufficiali dei prodotti
Video 1: General product overview e dimostrazione delle caratteristiche principali.
Video 2: Demonstration of the compressor's portability and ease of use.
Video 3: Detailed look at the inflation process and digital display functionality.
Garanzia e supporto
For warranty information or technical support, please refer to the warranty card included with your product or contact the manufacturer directly through their official website. Ensure you have your product model number (XM-MJCQB06QW-03) and purchase details available when seeking support.