1. Informazioni importanti sulla sicurezza
Read all instructions carefully before installation and use. Failure to follow these instructions may result in electric shock, fire, or other hazards.
- Always disconnect power at the circuit breaker before servicing or cleaning the unit.
- L'installazione deve essere eseguita da un elettricista qualificato, nel rispetto di tutte le normative elettriche locali e nazionali.
- Non utilizzare questa ventola con alcun dispositivo di controllo della velocità a stato solido, a meno che non sia specificamente approvato per l'uso con questo modello.
- Garantire un'adeguata messa a terra per ridurre il rischio di scosse elettriche.
- Questa unità è progettata esclusivamente per l'uso di ventilazione generale. Non utilizzarla per aspirare materiali e vapori pericolosi o esplosivi.
2. Contenuto della confezione
Carefully unpack the fan and check for any shipping damage. Ensure all parts are present before discarding packaging materials. If any parts are missing or damaged, contact Akicon customer support.
Video: Akicon Bathroom Exhaust Fan Unboxing & Installation. This video demonstrates the unboxing process and shows the included components, as well as various installation methods.
- Exhaust Fan Housing
- Grille with LED Light and Humidity Sensor
- Telecomando
- Modello di ritaglio del muro a secco
- Hanger Bar/Suspension Brackets (for attic installation)
- Viti di montaggio
- Manuale di istruzioni
3. Specifiche
| Marca | Akicon |
| Nome del modello | Akicon HumiditySensorRGB |
| Capacità del flusso d'aria | 110 piedi cubi al minuto (CFM) |
| Livello di rumore | 1.5 Sones |
| Copertura della stanza | Fino a 100 mq. |
| Tipo di luce | LED (Dimmable, RGB, 3 Color Temperatures: 2700K/4000K/5000K, Nightlight) |
| Caratteristiche speciali | Humidity Sensor, RGB Light, Dimmable LED, Nightlight, Quiet Operation |
| Tipo di montaggio | Montaggio a soffitto |
| Fonte di alimentazione | AC |
| Dimensioni dell'alloggiamento | 9" x 9" x 7.7" |
| Light Cover Dimension | 12" x 12" |
| Apertura a soffitto | 9-1/4" (L) x 9-1/4" (W) |
| Diametro del condotto | Φ4" |
| Certificazioni | HVI, UL Listed |
4. Installazione
4.1 Controlli pre-installazione
Prima di iniziare l'installazione, accertarsi di quanto segue:
- Verify that your soffit or attic has sufficient space for the fan housing. The required opening size is 9-1/4" x 9-1/4" and a minimum soffit/attic height of 7-3/4".
- Togliere l'alimentazione elettrica all'area di installazione tramite l'interruttore automatico.

Immagine: Pre-installation diagram illustrating the necessary ceiling opening dimensions (9-1/4" x 9-1/4") and minimum attic/soffit height (7-3/4") for proper fan installation.
4.2 Ceiling Opening
- Use the provided drywall cutout template to mark the ceiling opening.
- Carefully cut the 9-1/4" x 9-1/4" opening in the ceiling.
4.3 Cablaggio
Connect the electrical wires according to the label on the wires. Ensure black wire connects to black, white to white, and ground to ground. A neutral wire is required for operation.

Immagine: Detailed wiring diagram showing connections for the fan, including ground, neutral, and live wires to a junction box. This diagram is crucial for correct electrical installation.
4.4 Opzioni di installazione
This fan supports multiple installation methods:
Option A: Bracket Attic Installation
This method is used when attic access is available and joists are present for mounting.
- Insert suspension brackets (CC) into the tabs on the fan housing and then slide suspension brackets (DD) into suspension brackets (CC).
- Screw the housing into the joists using appropriate screws.
- Tighten the screws until the fan housing is firmly secured to the brackets.
Option B: Bracket-Free Attic Installation
This method is used when attic access is available and the fan can be directly mounted to joists without additional brackets.
- Screw the fan housing directly into the joist using appropriate screws.
- Ensure the housing is securely fastened to prevent vibration.
Option C: No Attic Installation
This method is suitable when attic access is not available, allowing installation from below the ceiling.
- Remove the screws securing the motor to the housing, and unplug the wires connecting the motor to the housing.
- Remove the fan motor assembly from the housing.
- After connecting the ventilation duct, send the housing into the ceiling opening.
- Connect the wires correctly according to the label on the wires (black to black, white to white, ground to ground).
- Secure the housing to the joist from below.
- Reinstall the motor back into the housing and connect the plugs.
- Installa la griglia.
4.5 Installazione della griglia
Once the fan housing is secured and wired, install the grille:
- Connect the light and sensor wires from the grille to the corresponding connectors in the fan housing.
- Align the grille mounting springs with the slots in the fan housing.
- Push the grille firmly into place until it is flush with the ceiling.
5. Funzionamento
The Akicon Bathroom Exhaust Fan is operated using the included remote control. Ensure the remote has working batteries.
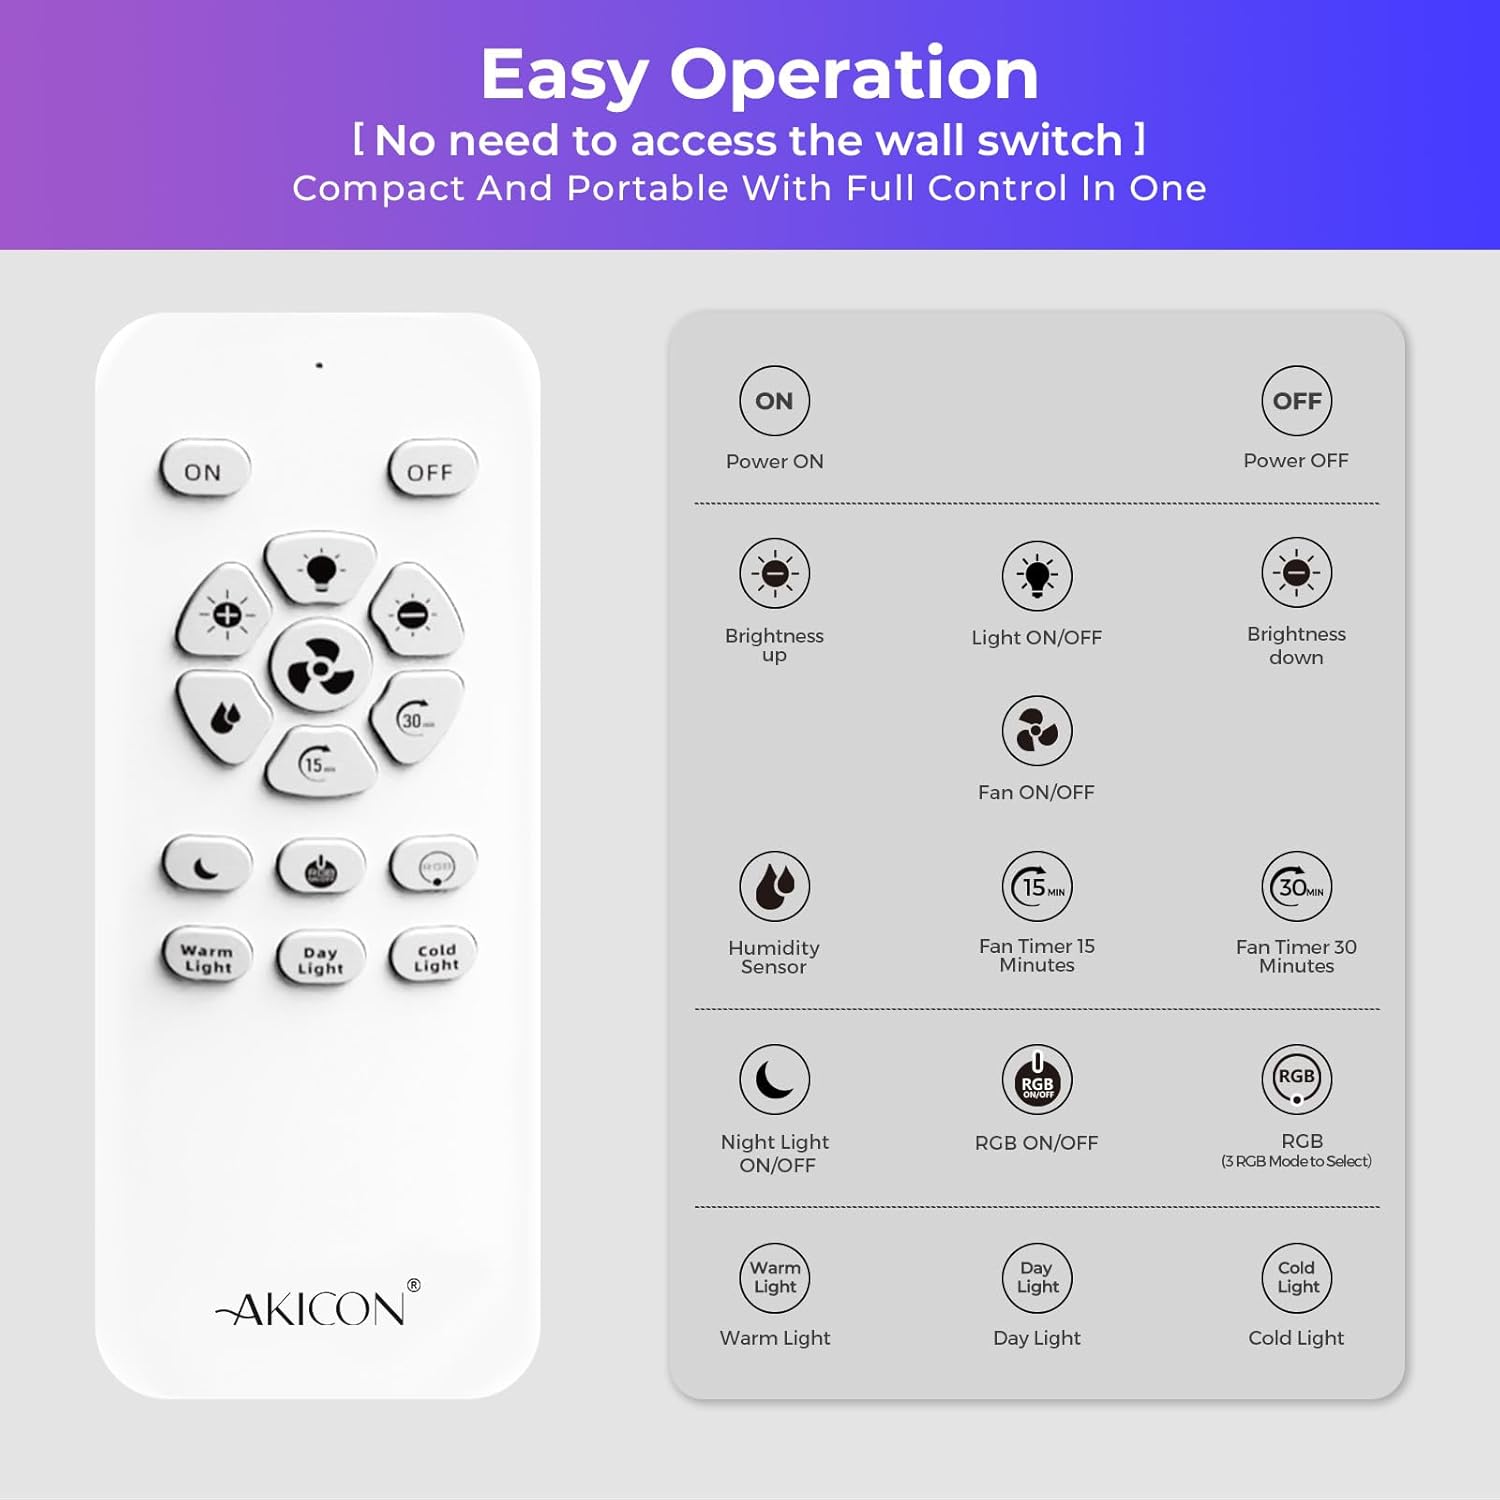
Immagine: Remote control layout with labeled buttons for power, brightness, light on/off, fan on/off, humidity sensor, fan timers (15/30 min), night light, RGB on/off, RGB mode switch, and color temperature selection (Warm, Day, Cold Light).
5.1 Funzioni di base
- Accensione/spegnimento: Press the 'ON' or 'OFF' button to turn the fan and light on or off.
- Ventola ON/OFF: Press the fan icon button to control the fan independently.
- Luce accesa/spenta: Press the light bulb icon button to control the light independently.
5.2 Sensore di umidità
The fan features an integrated humidity sensor for automatic operation.
- Attivazione: Press the 'Humidity Sensor' button on the remote. The blue indicator light on the fan will flash during humidity detection mode.
- Funzionamento automatico: When indoor humidity exceeds 60% RH, the blue light illuminates steadily, and the fan activates automatically to reduce moisture.
- Disattivazione: The fan will continue to operate until the humidity drops below 60% RH, then it will turn off.
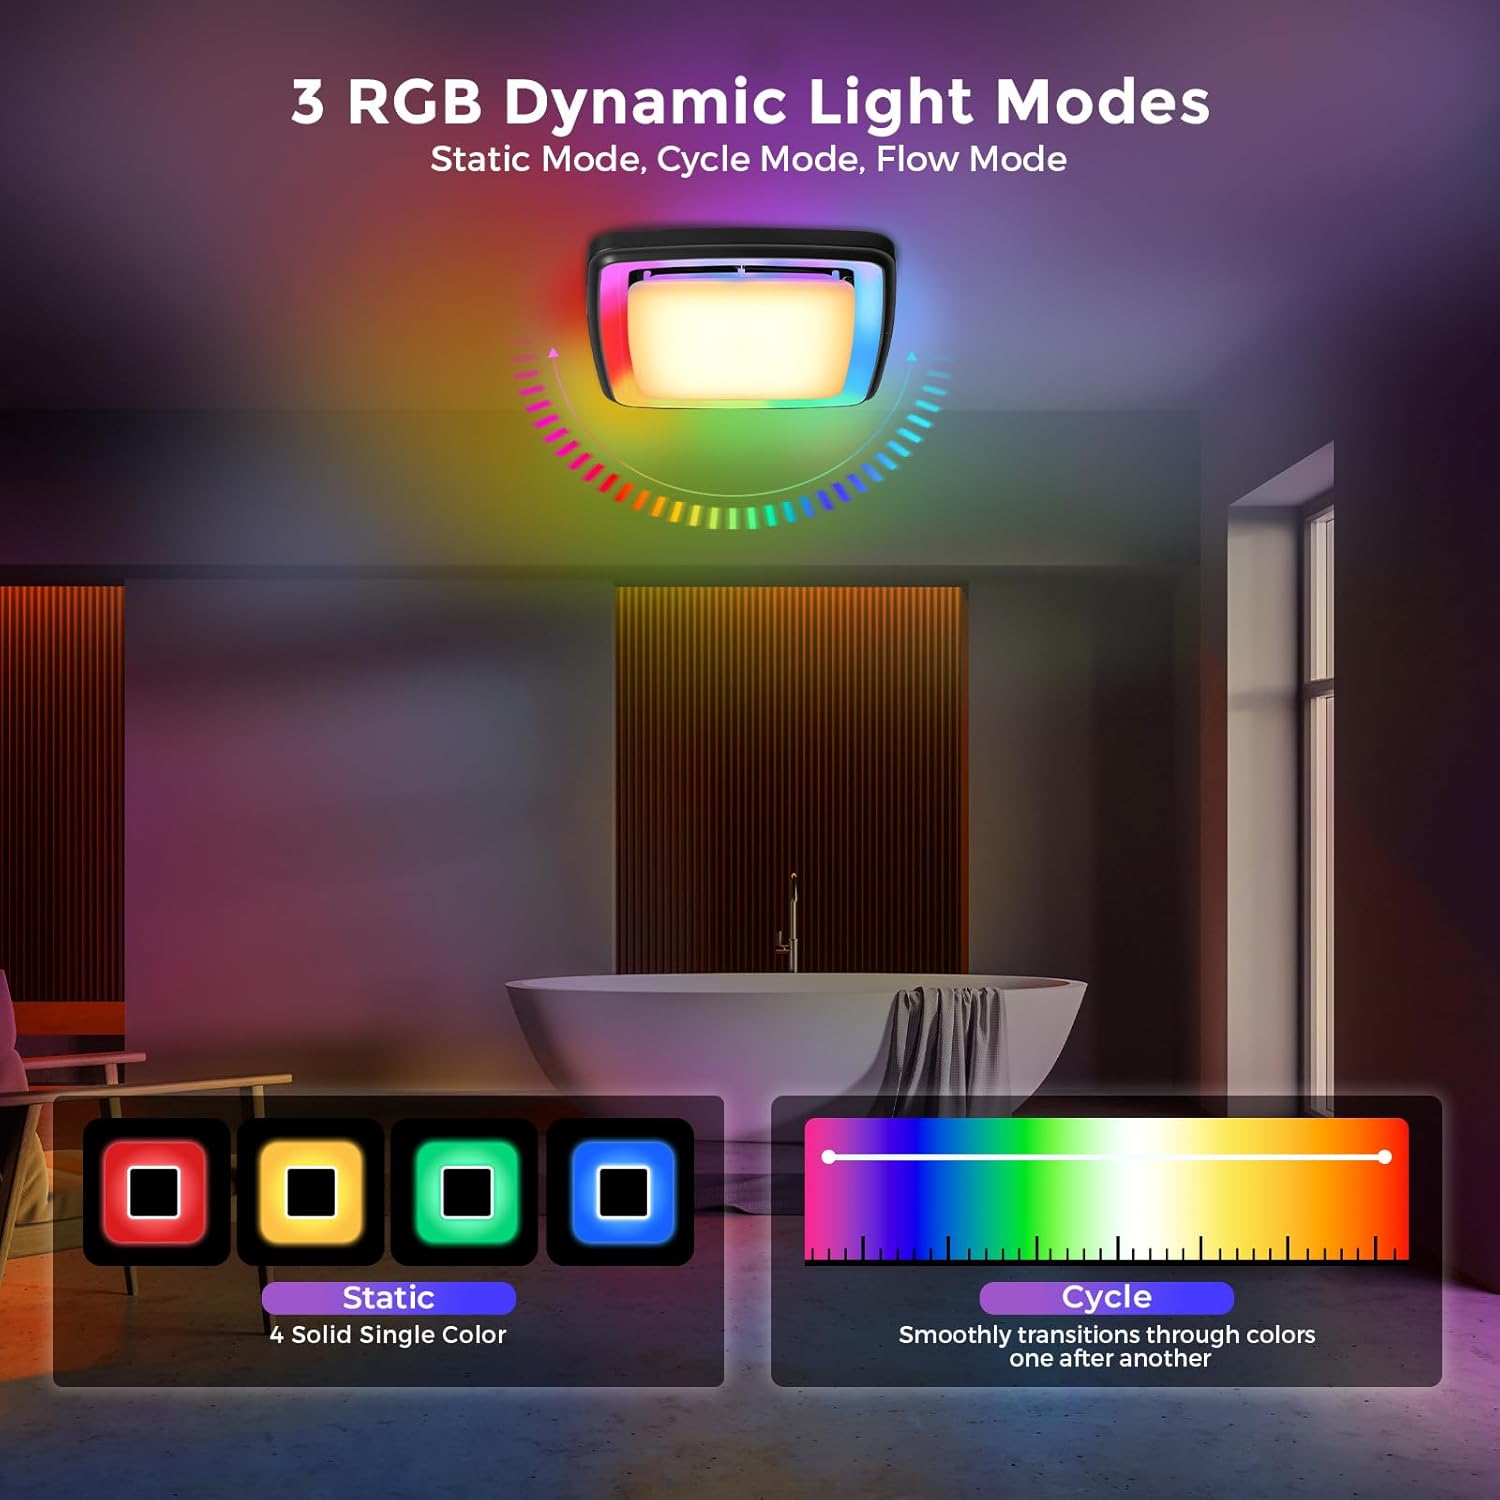
Immagine: Visual explanation of the humidity sensor's function. It shows the fan activating when humidity is above 60% RH and remaining off when below 60% RH, with air circulation arrows.
5.3 Funzioni di illuminazione
The fan includes versatile lighting options:
- LED dimmerabile: Adjust brightness using the '+' and '-' buttons.
- 3 temperature di colore: Select between 2700K (Warm Light), 4000K (Day Light), and 5000K (Cold Light) using the dedicated buttons.
- Illuminazione dinamica RGB: Press 'RGB ON/OFF' to activate. Use 'RGB Mode Switch' to cycle through Static, Cycle, and Flow modes.
- Luce notturna: Press the 'Night Light ON/OFF' button to activate a soft 3000K nightlight.

Immagine: Depiction of the three RGB dynamic light modes: Static (four solid single colors), Cycle (smooth transitions through colors), and Flow (flowing chase light effect). This image helps visualize the different lighting options.

Immagine: Visual representation of the 3 CCT (Correlated Color Temperature) dimmable LED light settings (3000K, 4000K, 5000K) and the night light feature, demonstrating the adjustable brightness and color options.
5.4 Funzione timer
Set the fan to operate for a specific duration:
- Timer di 15 minuti: Press the '15 min' button.
- Timer di 30 minuti: Press the '30 min' button.

Immagine: Illustration of the fan's timer function, showing the fan turning on and then automatically shutting off after a set period (15 or 30 minutes), useful for clearing steam after a shower.
6. Manutenzione
Una manutenzione regolare garantisce prestazioni ottimali e longevità della ventola di scarico.
6.1 Cleaning the Grille and Light Cover
- Scollegare l'alimentazione: Prima di pulire, spegnere sempre l'interruttore automatico.
- Rimuovere la griglia: Gently pull down the grille to disengage the mounting springs.
- Pulito: Wipe the grille and light cover with a soft, damp cloth. A mild, non-abrasive detergent can be used if necessary. Do not use harsh chemicals or abrasive cleaners.
- Asciutto: Ensure all parts are completely dry before reattaching.
- Reinstallare la griglia: Push the grille back into place until the springs engage securely.
6.2 Cleaning the Fan Motor and Housing
Periodically, the fan motor and housing may require cleaning to remove dust and debris.
- Scollegare l'alimentazione: Disattivare la corrente elettrica tramite l'interruttore automatico.
- Rimuovere la griglia: Rimuovere la griglia come descritto sopra.
- Motore di accesso: Depending on your installation type, you may need to carefully remove the motor assembly from the housing. Refer to the installation section for guidance on motor removal.
- Pulito: Use a vacuum cleaner with a brush attachment or a soft brush to remove dust from the fan blades, motor, and interior of the housing. Do not use water or liquids directly on electrical components.
- Rimontare: Reinstall the motor assembly and grille, ensuring all connections are secure.
- Ripristina alimentazione: Riaccendere l'alimentazione dall'interruttore automatico.
7. Risoluzione Dei Problemi
If you experience issues with your Akicon Bathroom Exhaust Fan, refer to the following troubleshooting guide:
| Problema | Possibile causa | Soluzione |
|---|---|---|
| La ventola non si accende |
|
|
| La luce non si accende |
|
|
| La ventola è rumorosa o vibra |
|
|
| Sensore di umidità non funzionante |
|
|
If the problem persists after trying these solutions, please contact Akicon customer support.
8. Garanzia e supporto
Akicon products are manufactured to high-quality standards and are warranted to be free from defects in materials and workmanship. For specific warranty details, duration, and terms, please refer to the warranty card included in your package or visit the official Akicon websito.
For technical assistance, troubleshooting not covered in this manual, or to report missing/damaged parts, please contact Akicon customer support:
- E-mail: Refer to warranty card or Akicon websito.
- Telefono: Refer to warranty card or Akicon websito.
- Websito: Akicon Official Store


