1. Introduzione
This manual provides essential information for the proper setup, operation, and maintenance of your Pisichen 24-inch 2K QHD 2560x1440 IPS Touchscreen Monitor. Please read this manual thoroughly before using the product to ensure optimal performance and safety.
The Pisichen 24-inch monitor features a 2K QHD (2560x1440) resolution IPS panel, a 100Hz refresh rate, and 10-point multi-touch functionality, designed for both productivity and entertainment.
2. Contenuto della confezione
Verifica che tutti gli articoli elencati di seguito siano presenti nella confezione del prodotto. Se alcuni articoli risultano mancanti o danneggiati, contatta l'assistenza clienti.
- Pisichen 24-inch 2K QHD Touchscreen Monitor
- Supporto per monitor (base e collo)
- Cavo DP
- Cavo HDMI
- USB B Touch Cable
- Cavo USB CC
- Adattatore di alimentazione CC
- Manuale dell'utente (questo documento)

Figura 2.1: Included accessories with the Pisichen 24-inch monitor.
3. Istruzioni per l'installazione
3.1. Assemblaggio del supporto del monitor
- Estrarre con cautela il monitor e i componenti del supporto dalla confezione.
- Attach the stand neck to the monitor panel. Ensure it clicks securely into place or is fastened with the provided screws.
- Attach the stand base to the stand neck. Tighten the thumb screw at the bottom of the base to secure it.
- Posizionare il monitor assemblato su una superficie stabile e piana.
3.2. Connessione a un dispositivo
The monitor offers multiple connectivity options. Choose the appropriate cable for your device.
- Connessione HDMI: Connect one end of the HDMI cable to the HDMI port on your computer or device and the other end to the HDMI port on the monitor.
- Connessione USB-C: Connect one end of the USB-C cable to a compatible USB-C port on your computer or device (which supports video output) and the other end to the USB-C port on the monitor. This connection can also provide power and data.
- Connessione DisplayPort (DP): Connect one end of the DP cable to the DisplayPort on your computer or device and the other end to the DP port on the monitor.
- USB B for Touch Function: For touch functionality with a PC, connect the included USB B Touch Cable from the USB-B port on the monitor to a standard USB-A port on your computer. This is essential for enabling touch input.

Figura 3.1: Universal connectivity options for the monitor.
3.3. Accensione
- Connect the DC Power Adapter to the power input port on the monitor.
- Collegare l'adattatore di corrente a una presa a muro.
- Press the power button on the monitor (location may vary, typically on the back or bottom right) to turn it on.
4. Istruzioni per l'uso
4.1. Funzionamento di base
- Accensione/spegnimento: Premere il pulsante di accensione per accendere o spegnere il monitor.
- Selezione della sorgente di ingresso: Use the monitor's OSD (On-Screen Display) menu buttons to select the desired input source (HDMI, USB-C, DP).
- Navigazione nel menu OSD: The monitor features physical buttons (usually on the back or bottom) to access and navigate the OSD menu. These buttons typically include Menu, Up, Down, and Exit/Select.
4.2. Funzionalità touch
The Pisichen monitor supports 10-point multi-touch input, allowing for intuitive interaction with your content. To enable touch functionality:
- Ensure the USB B Touch Cable is connected from the monitor's USB-B port to your computer's USB-A port.
- Your operating system should automatically detect the touch input device. No additional drivers are typically required for Windows.

Figura 4.1: Direct touch control on the monitor.
Touch Compatibility
The touch function is widely compatible with various devices. Refer to the compatibility chart below for optimal performance.

Figura 4.2: Touch compatibility for various devices.
Nota: Some devices, including certain gaming consoles (PS3/4/5, Xbox, Steam Deck) and mobile devices (iPhone, iPad, Switch, Fire TV), do not support the touch functionality of this monitor due to platform-specific restrictions.
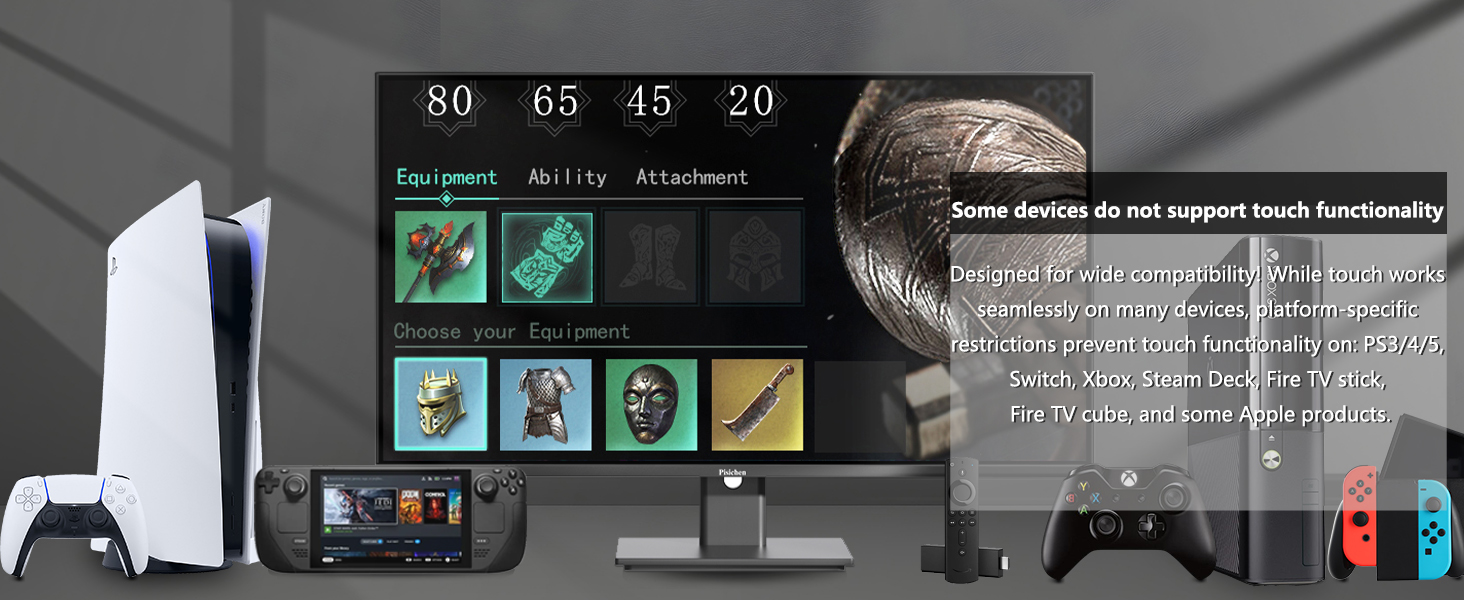
Figura 4.3: Devices where touch functionality is not supported.
5. Impostazioni display
Accedi al menu OSD per regolare varie impostazioni di visualizzazione per una visualizzazione ottimale viewing.
- Risoluzione: The monitor supports a native resolution of 2560x1440 (2K QHD). Ensure your device's display settings are configured to this resolution for the sharpest image.
- Frequenza di aggiornamento: The monitor operates at a 100Hz refresh rate, providing smoother visuals compared to standard 60Hz monitors.
- Luminosità e contrasto: Adjust these settings to suit your environment and personal preference. The monitor features 400 cd/m² brightness and a 1500:1 contrast ratio.
- Impostazioni colore: Fine-tune color temperature, gamma, and other color parameters. The IPS panel ensures wide viewangoli di ripresa e riproduzione accurata dei colori.
- Caratteristiche per il comfort degli occhi: The monitor includes Flicker-Free technology and Low Bluelight modes to reduce eye strain during extended use.

Figura 5.1: Visual comparison of 2K QHD vs. Full HD resolution.

Figura 5.2: IPS panel benefits: True Color, True Vision from Any Angle.

Figura 5.3: Advanced Eye-Comfort features.
6. Manutenzione
6.1. Pulizia del monitor
- Prima di procedere alla pulizia, spegnere sempre il monitor e scollegare il cavo di alimentazione.
- Utilizzare un panno morbido e privo di lanugine leggermente dampcon acqua o con un detergente per schermi delicato e non abrasivo.
- Pulire delicatamente lo schermo e le superfici esterne. Evitare di esercitare una pressione eccessiva.
- Non utilizzare alcol, detergenti a base di ammoniaca o materiali abrasivi, poiché potrebbero danneggiare la superficie dello schermo.
6.2. Conservazione
If storing the monitor for an extended period, ensure it is powered off, unplugged, and stored in a cool, dry place away from direct sunlight and extreme temperatures. Use the original packaging if available for best protection.
7. Risoluzione Dei Problemi
Se riscontri problemi con il monitor, fai riferimento ai seguenti passaggi comuni per la risoluzione dei problemi:
- Nessun potere: Ensure the power adapter is securely connected to both the monitor and a working power outlet. Check if the power indicator light on the monitor is on.
- Nessun segnale: Verify that the video cable (HDMI, USB-C, or DP) is securely connected to both the monitor and your source device. Ensure the correct input source is selected via the OSD menu.
- Funzionalità No Touch: Confirm that the USB B Touch Cable is properly connected from the monitor to your computer. Check your computer's device manager to see if the touch device is recognized.
- Schermo tremolante: Check the video cable connection. Try a different cable or input port. Ensure your graphics card drivers are up to date.
- Distorsione dell'immagine/Colori errati: Ripristina le impostazioni di fabbrica del monitor tramite il menu OSD. Regola luminosità, contrasto e colore.
Per problemi persistenti che non vengono risolti seguendo questi passaggi, contattare l'assistenza clienti.
8. Specifiche
| Caratteristica | Specificazione |
|---|---|
| Numero di modello | QHD-2k100hz-24INTS |
| Dimensioni dello schermo | 24 pollici |
| Risoluzione | 2560 x 1440 pixel (QHD Wide 1440p) |
| Proporzioni | 16:9 |
| Frequenza di aggiornamento | 100 Hz |
| Tempo di risposta | 3 millisecondo |
| Tipo di pannello | Informazione pubblica |
| Tocca Funzione | Multitouch a 10 punti |
| Luminosità dell'immagine | 400 candele (cd/m²) |
| Rapporto di contrasto | 1500:1 |
| Descrizione della superficie dello schermo | Lucido |
| Connettività | HDMI, USB-C, USB A, USB B (for Touch Function) |
| Porte USB totali | 2 (USB-C, USB-B) |
| Dimensioni del prodotto | 1.97 x 21.26 x 12.6 pollici |
| Peso dell'articolo | 10.08 libbre |
| Produttore | Shenzhen Konowa Electronics Co., LTD |
9. Garanzia e supporto
For warranty information, please refer to the warranty card included in your product packaging or visit the official Pisichen website. If you require technical assistance, troubleshooting, or have questions about your product, please contact Pisichen customer support through their official channels.
Conservare la prova d'acquisto per eventuali richieste di garanzia.


