1. Introduzione
The SenseCAP Solar Node P1-Pro is a solar-powered LoRa Meshtastic node designed for outdoor long-range wireless communication and GPS tracking. It offers a robust solution for off-grid and remote deployments, ensuring continuous power supply through its built-in solar panel and rechargeable battery.
Key features include seamless integration with the open-source Meshtastic project for reliable long-range communication, integrated GPS for accurate location tracking, and a weatherproof enclosure for durability in diverse outdoor conditions. Powered by the ESP32-S3 microcontroller, it provides efficient performance for IoT and mesh networking applications, with customization options available through Arduino, PlatformIO, or ESP-IDF environments.
2. Cosa c'è nella scatola
The SenseCAP Solar Node P1-Pro package includes the following components:
- SenseCAP Solar Node P1-Pro device
- 2dBi, 868-915MHz rubber rod antenna
- Universal joint bracket for angle adjustment
- Connettore staffa
- RF Cable: RP-SMA Male to RF-SMA Female, 300mm
- Hoop bracket
- Anello a cerchio
- USB-C cable for charging and data transfer
- Mounting screws and nuts
3. Impostazione
3.1. Unboxing e componentiview
Upon unboxing, familiarize yourself with the SenseCAP Solar Node P1-Pro and its accessories. The device is designed for easy assembly and deployment.

Figure 1: SenseCAP Solar Node P1-Pro highlighting long-term outdoor use, 9KM communication range, pole/wall mountability, and 5W+ battery dual power.
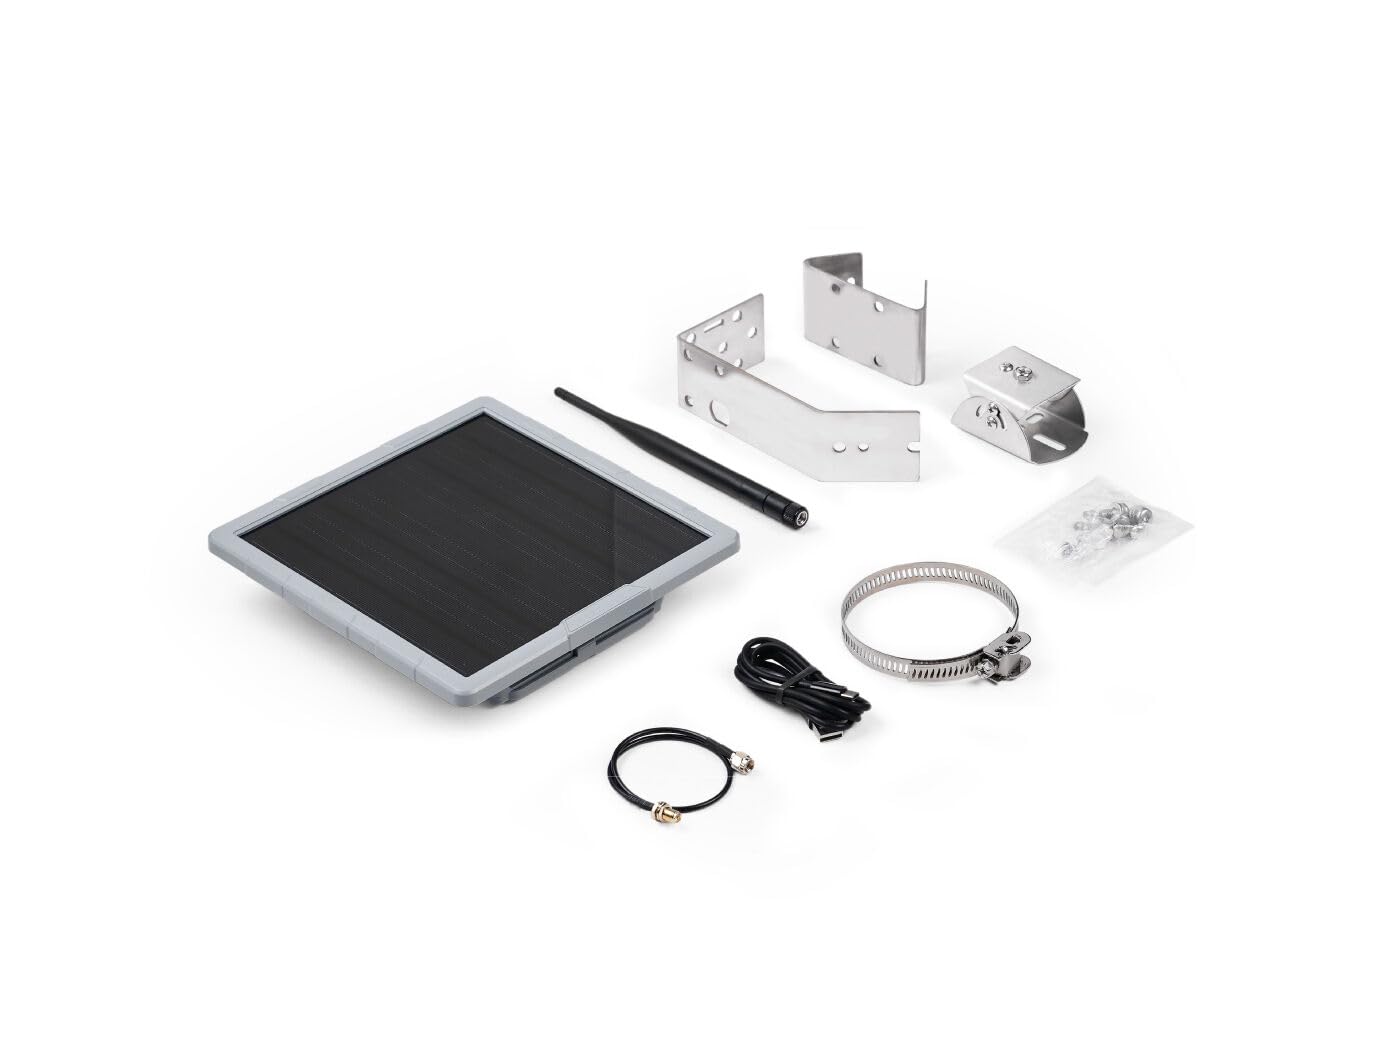
Figura 2: Fronte view of the SenseCAP Solar Node P1-Pro, showcasing its solar panel.
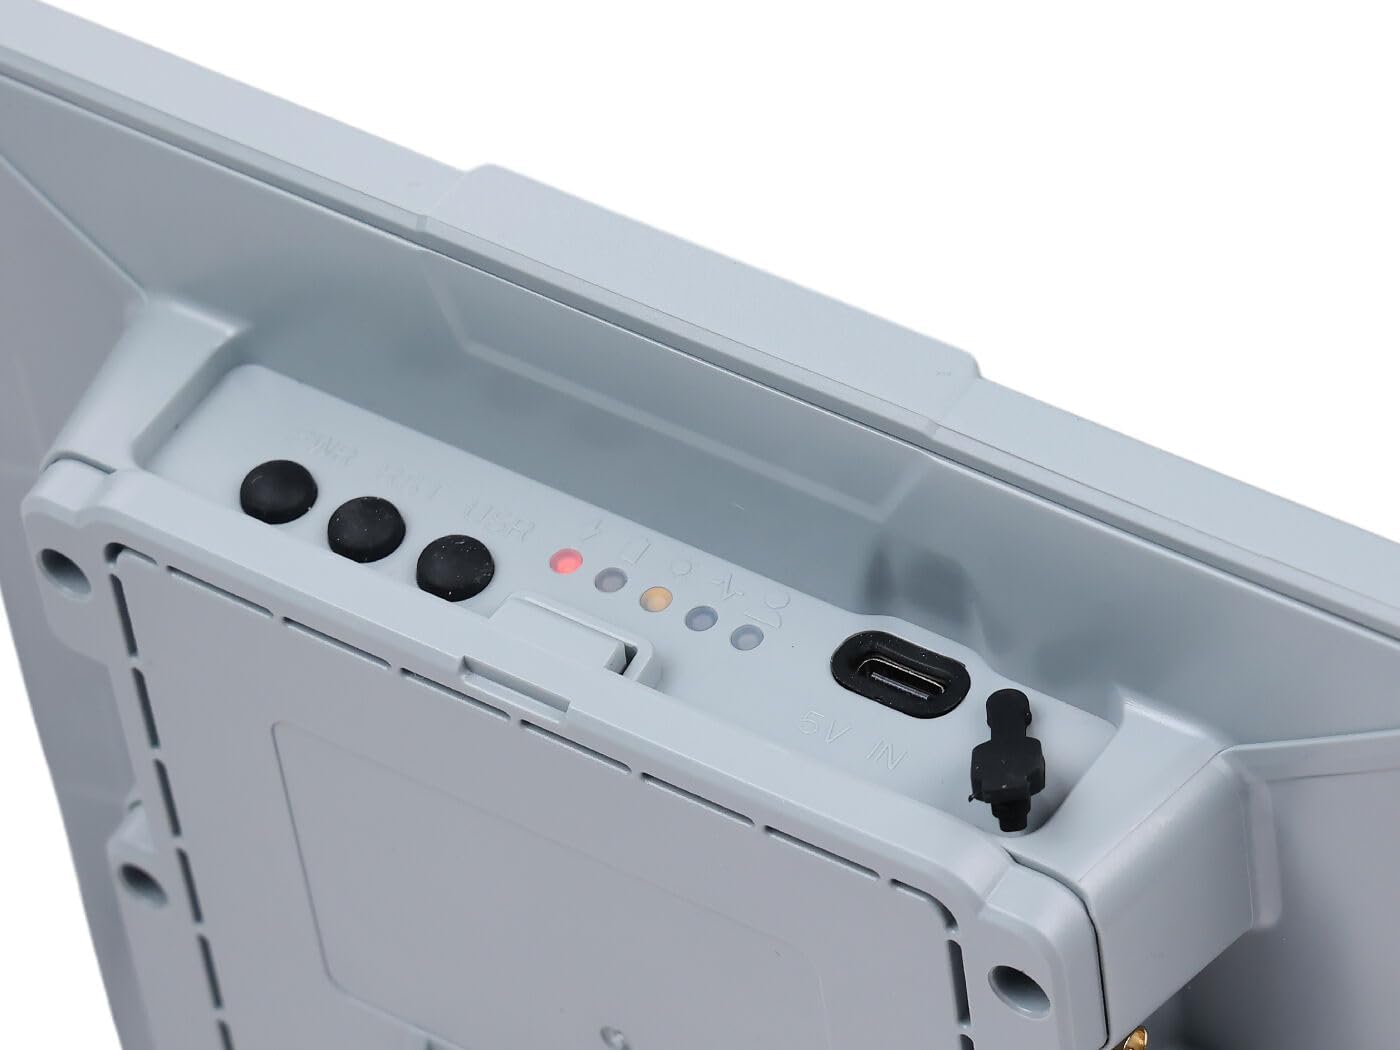
Figura 3: lato view of the SenseCAP Solar Node P1-Pro showing USB-C port, power button, reset button, and LED indicators.
Figure 4: Diagram illustrating the various accessories and interactive items of the SenseCAP Solar Node P1-Pro, including antenna, universal joint bracket, RF cable, hoop bracket, power switch, reset button, and LED indicators.
3.2. Assemblaggio hardware
Follow these steps to assemble the SenseCAP Solar Node P1-Pro for deployment:
- Attach the universal joint bracket to the back of the solar node using the provided screws. Ensure the small screw aligns with the bottom of the device where the USB-C port is located.
- Connect the RF cable to the antenna connector on the device.
- Attach the rubber rod antenna to the other end of the RF cable.
- Secure the hoop bracket and hoop ring to the universal joint bracket for pole mounting, if applicable.

Figura 5: Posteriore view of the SenseCAP Solar Node P1-Pro, showing the mounting screw points for bracket attachment.

Figure 6: Step-by-step visual guide for installing the SenseCAP Solar Node P1-Pro onto a pole, showing attachment of the RF cable and securing the device.
3.3. Power Activation
To activate the device for the first time or after replacing the battery, connect the provided USB-C cable to the device's USB-C port and a power source. This will activate the battery protection circuit and initiate charging, indicated by the red LED. Once activated, the device can be powered on using the power button.
3.4. Aggiornamento del firmware
It is recommended to keep your device's firmware updated to ensure optimal performance and access to the latest features. Firmware updates can typically be performed via a web flasher tool by connecting the device to a computer.
Video 1: Instructions on how to flash firmware for the Wio Tracker L1 Pro, which uses a similar process for the SenseCAP Solar Node P1-Pro.
3.5. App Connection and Device Pairing
To utilize the full capabilities of your SenseCAP Solar Node P1-Pro, connect it to the Meshtastic application on your smartphone via Bluetooth. Ensure your device is powered on and within Bluetooth range.
Video 2: Demonstration of device pairing with the Meshtastic application and basic communication features.
4. Istruzioni per l'uso
4.1. Accensione/spegnimento
To power on the device, press the power button once. The blue LED will light up for 1 second to indicate successful startup. To power off, press and hold the power button for 5 seconds; the blue LED will light up for 1 second to indicate successful shutdown.
4.2. Meshtastic Communication
Once connected to the Meshtastic app, you can send and receive messages, track locations, and manage your mesh network. The device supports long-range LoRa communication, ideal for off-grid scenarios.
4.3. Tracciamento GPS
The integrated GPS module allows for accurate location tracking. Your device's position can be shared within the Meshtastic network, enhancing situational awareness for outdoor activities or remote deployments.
5. Manutenzione
5.1. Sostituzione della batteria
To replace the internal battery, use a Button-top 18650 battery. Ensure the device is powered off before attempting battery replacement. After replacement, connect the USB-C cable to activate the new battery.
5.2. Pulizia e cura
The SenseCAP Solar Node P1-Pro features a weatherproof enclosure. Periodically clean the solar panel and device exterior with a soft, damp cloth to ensure optimal solar charging efficiency and prevent debris buildup. Avoid using harsh chemicals or abrasive materials.
6. Risoluzione Dei Problemi
- Il dispositivo non si accende: Ensure the battery is properly installed and activated by connecting the USB-C cable. Check for any physical damage to the power button or USB-C port.
- Nessuna connessione all'app: Verify Bluetooth is enabled on your smartphone and the SenseCAP device. Ensure the device is within range and try restarting both the device and the Meshtastic application. Check the device's LED indicators for status.
- Nessun segnale GPS: Ensure the device has a clear line of sight to the sky. GPS performance can be affected by obstructions or indoor environments.
- Problemi di comunicazione: Confirm that all devices in your mesh network are configured to the same LoRa region and frequency band. Check antenna connections for tightness.
- Errore di aggiornamento del firmware: Refer to the firmware flashing video (Video 1) for detailed steps. Ensure a stable USB connection and follow the DFU mode instructions carefully.
7. Specifiche
| Caratteristica | Dettaglio |
|---|---|
| Dimensioni del prodotto | 9.05 x 2.75 x 11.81 pollici (9.05"L x 2.75"W x 11.81"H) |
| Peso dell'articolo | 3.32 libbre |
| Produttore | studio visto |
| Numero modello articolo | 114993633-FA |
| Antenna | LoRa, GPS |
| Colore | Grigio |
| Numero di canali | 1 |
| Portata massima | 31496 metri |
8. Garanzia e supporto
For warranty information and technical support, please contact Seeed Studio directly through their official websito o tramite i canali di assistenza clienti. Conservare la ricevuta d'acquisto per eventuali reclami in garanzia.
Additional resources and community support for Meshtastic-compatible devices can often be found on the Meshtastic project websito e forum.


