1. Prodotto finitoview
The Yottamaster HSD10-US is a versatile 2-bay RAID enclosure and docking station designed to expand storage and connectivity for Mac mini M4, PCs, and laptops. It offers a hybrid storage solution supporting both 2.5"/3.5" SATA HDDs/SSDs and M.2 NVMe SSDs, alongside a comprehensive connectivity hub.
Caratteristiche principali:
- Hybrid Storage Architecture: Supports two SATA HDD/SSD drives (up to 24TB each) and one M.2 NVMe SSD (up to 8TB) for a total capacity of 56TB.
- Trasferimento dati ad alta velocità: Utilizes USB 3.2 Gen 2 interface for up to 10Gbps data transfer rates, compatible with both NVMe and SATA M.2 (NGFF) SSDs.
- Integrated Connectivity Hub: Features one USB-A (10Gbps) port, three USB 2.0 ports, and independent UHS-I TF/SD 3.0 card readers.
- Configurable RAID Modes: Offers RAID 0, RAID 1, JBOD, and individual disk modes for flexible data management.
- Gestione termica ottimizzata: Brushed aluminum chassis with an active low-noise fan and ventilation ports ensures stable operation.

Figura 1: The Yottamaster HSD10-US 2-Bay RAID Enclosure, illustrating the insertion of a 3.5-inch HDD into one of the bays. The top cover is removed, and the side panel for the NVMe SSD slot is visible.
2. Configurazione e installazione
2.1 Contenuto della confezione
Prima dell'installazione, verificare che tutti i componenti siano presenti:
- Yottamaster HSD10-US Mini Tower
- Scatola di imballaggio
- Manuale d'uso
- Heatsink Kit (for M.2 SSD)
- Cavo da USB-C a USB-C
- Adattatore di alimentazione CC 12V5A
- Cacciavite e viti
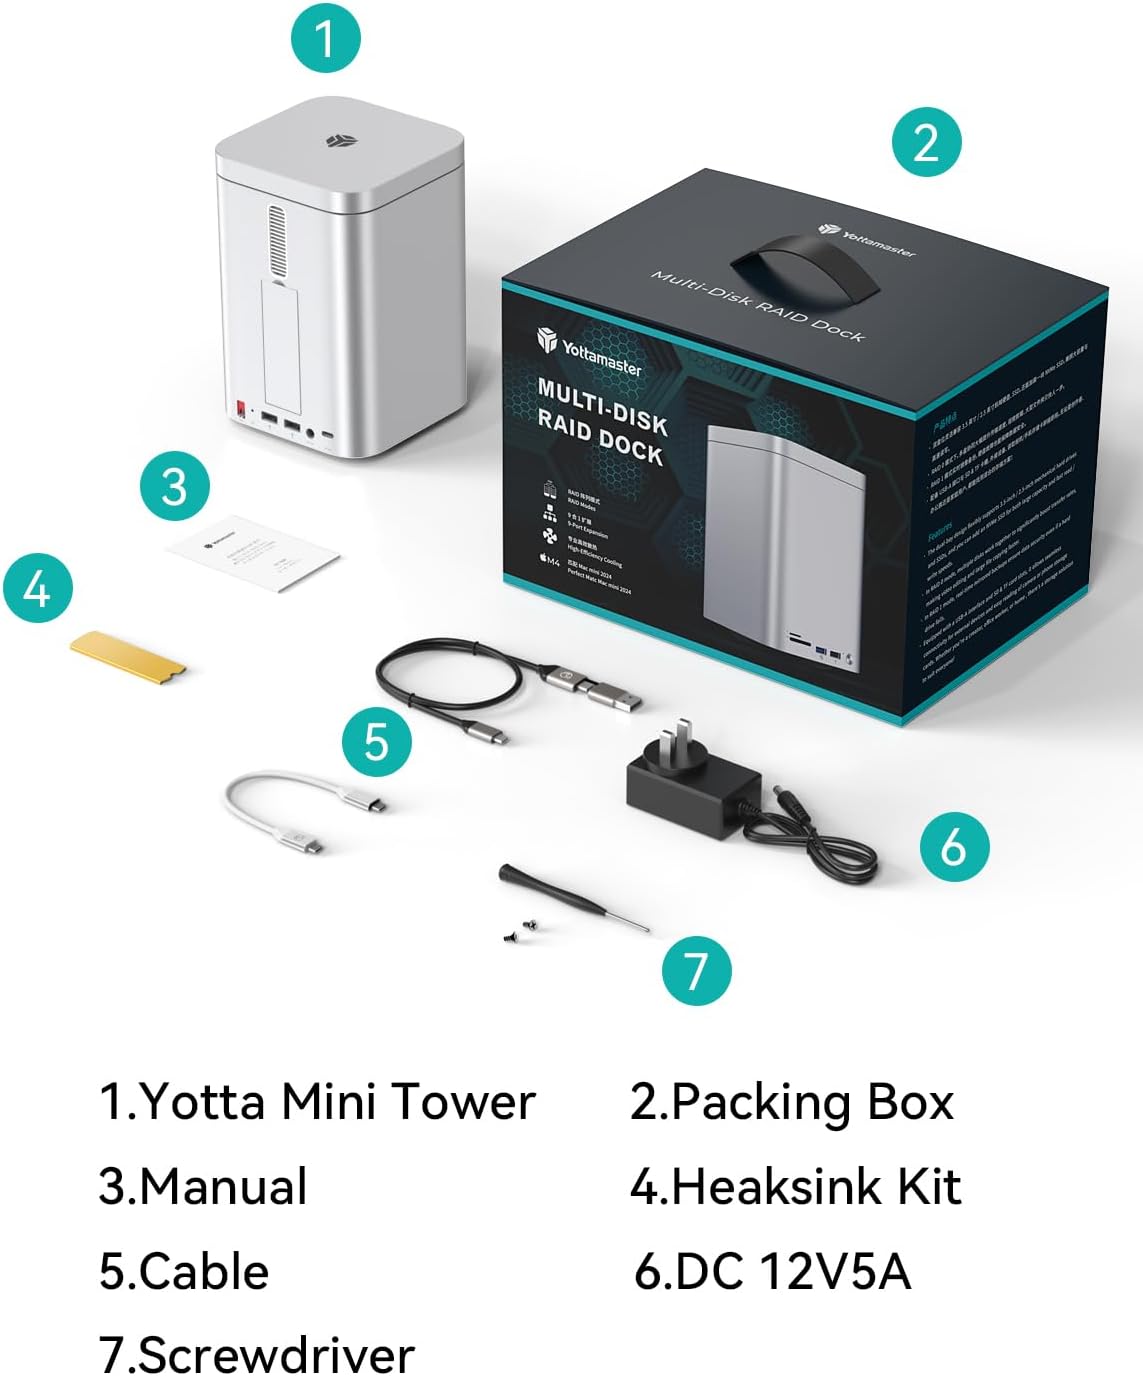
Figura 2: Illustration of the Yottamaster HSD10-US package contents, including the enclosure, cables, power adapter, and tools.
2.2 Installing 2.5"/3.5" SATA HDDs/SSDs
- Gently remove the top magnetic cover of the enclosure.
- Pull out the drive trays from the front bays.
- For 3.5" HDDs: Snap the drive into the tray using the side pins. No screws are typically needed for tool-free installation.
- For 2.5" SSDs/HDDs: Secure the drive to the tray using the provided screws through the bottom mounting holes.
- Slide the loaded drive tray back into the enclosure until it clicks securely into place.
- Se applicabile, ripetere l'operazione per la seconda unità.
1 video: Demonstration of installing 2.5-inch and 3.5-inch drives into the enclosure's bays. This video shows the process of securing drives within the trays and inserting them into the unit.
2.3 Installing M.2 NVMe SSD
- Locate the NVMe SSD slot on the side of the enclosure and open its magnetic cover.
- Inserire l'SSD M.2 NVMe nello slot tenendolo obliquamente.
- Gently press down the SSD and secure it with the provided rubber plug or screw, depending on the design.
- Apply the thermal pad and heatsink (if provided) to the M.2 SSD for optimal heat dissipation.
- Close the magnetic cover.
2 video: A short video demonstrating the installation of an M.2 NVMe SSD into the dedicated slot of the Yottamaster HSD10 enclosure.
2.4 Connessione al dispositivo host
- Connect the provided DC 12V5A power adapter to the enclosure's DC IN port and plug it into a power outlet.
- Use the supplied USB-C to USB-C cable to connect the enclosure's "PC IN" port to your Mac mini, PC, or laptop.
- Power on the enclosure using the ON/OFF switch.
- Your operating system should detect the new storage devices. You may need to initialize and format the drives before use (refer to your OS documentation).

Figura 3: Dettagliato view of the Yottamaster HSD10-US ports, including TF/SD card slots, USB 3.2 (10Gbps), USB 2.0, Power Button, RAID Key, USB 2.0 x 2, DC (12V5A), and PC IN (USB-C).
3. Istruzioni per l'uso
3.1 Configurazione RAID
The HSD10-US supports multiple RAID modes for the two SATA drives. The RAID mode is selected using the physical DIP switches located on the rear of the unit. Important Note: The physical RAID mode selector switches on this unit operate in a reverse order (from bottom to top). Users must verify the selected mode against the indicator panel prior to finalizing the configuration to ensure data integrity and prevent unintended data loss.
| Modalità RAID | Descrizione | Switch Setting (Bottom to Top) |
|---|---|---|
| PM (Port Multiplier) | Each drive appears as an independent disk. | UP-UP |
| RAID 0 (striping) | Combines drives for maximum performance and capacity, but offers no data redundancy. | SU-GIÙ |
| RAID 1 (specchio) | Mirrors data across both drives for data redundancy. Capacity is limited to the smallest drive. | DOWN-UP |
| JBOD (Just a Bunch Of Disks) | Combines drives into a single large volume without performance or redundancy benefits. | DOWN-DOWN |
After setting the DIP switches, press and hold the "SET" button for 5 seconds while the power is on to apply the new RAID configuration. All data on the drives will be erased during RAID configuration. Back up important data before proceeding.

Figura 4: Visual guide to the RAID mode DIP switch settings and their corresponding functions for the Yottamaster HSD10-US.
3.2 Data Transfer and Connectivity
The enclosure supports high-speed data transfer up to 10Gbps via its USB 3.2 Gen 2 interface. Utilize the front-facing USB-A (10Gbps) port for fast peripheral connections, and the three USB 2.0 ports for standard peripherals like keyboards and mice. The integrated SD/TF card readers allow for convenient data import from memory cards.

Figura 5: The Yottamaster HSD10-US connected to a monitor, demonstrating its 10Gbps data transmission speed for various applications.
4. Manutenzione
- Pulizia: Utilizzare un panno morbido e asciutto per pulire l'esterno dell'involucro. Evitare detergenti liquidi o materiali abrasivi.
- Ventilazione: Ensure that the ventilation ports on the top and bottom panels are not obstructed to maintain optimal airflow and prevent overheating.
- Stato di salute dell'unità: Regularly check the health of your installed drives using your operating system's disk utility tools.
- Aggiornamenti del firmware: Check the Yottamaster official website periodically for any firmware updates for your HSD10-US model.

Figura 6: Un interno view of the Yottamaster HSD10-US, highlighting its cooling fan, bottom air duct, and aluminum alloy housing designed for strong heat dissipation.
5. Risoluzione Dei Problemi
- Unità non rilevate:
- Assicurarsi che l'adattatore di alimentazione sia collegato saldamente e che l'alloggiamento sia acceso.
- Verify the USB-C cable is correctly connected to both the enclosure and the host device.
- Check if the drives are properly seated in their trays/slots.
- For new drives, ensure they are initialized and formatted by your operating system.
- If using RAID, confirm the DIP switches are set correctly and the configuration has been applied by pressing the SET button.
- Velocità di trasferimento dati lente:
- Ensure your host device's USB port supports USB 3.2 Gen 2 (10Gbps) for optimal performance.
- Verify the USB-C cable used is rated for 10Gbps data transfer.
- Performance can be limited by the speed of the slowest drive in a RAID 0 or JBOD setup.
- Surriscaldamento dell'involucro:
- Ensure adequate ventilation around the enclosure. Do not block air vents.
- Confirm the internal cooling fan is operating.
6. Specifiche
| Caratteristica | Dettaglio |
|---|---|
| Marca | Maestro Yotta |
| Numero di modello | HSD10-US |
| Serie | Numero di modello: HSD10 |
| Capacità di archiviazione | Up to 56 TB (2x 24TB SATA HDD/SSD + 1x 8TB M.2 NVMe SSD) |
| Tipi di unità compatibili | 2.5"/3.5" SATA HDD/SSD, M.2 NVMe SSD (2230/2242/2260/2280) |
| Interfaccia Hardware | USB 3.2 di prima generazione (2 Gbps) |
| Velocità di trasferimento dati | 10 Gigabit al secondo |
| Modalità RAID | RAID 0, RAID 1, JBOD, PM (Individual Disk) |
| Porte di connettività | 1x USB-A (10Gbps), 3x USB 2.0, 1x SD Card Reader, 1x TF Card Reader, 1x USB-C (PC IN) |
| Dispositivi compatibili | Mac Mini, Desktop PC, Laptop |
| Materiale | Alloy Steel (Aluminum Chassis) |
| Peso dell'articolo | 3.96 libbre |
| Dimensioni del pacco | 10.63 x 7.87 x 7.09 pollici |

Figura 7: Visual representation of the Yottamaster HSD10-US's compatibility with 2.5-inch/3.5-inch SSD/HDD and various M.2 NVMe SSD form factors.
7. Garanzia e supporto
For warranty information and technical support, please refer to the official Yottamaster websito o contattare direttamente il servizio clienti. Il prodotto è in genere coperto dalla garanzia standard del produttore. Conservare la ricevuta d'acquisto per eventuali reclami in garanzia.
Politica di ritorno: The standard return policy is 30 days for refund/replacement.
Produttore: Maestro Yotta
Negozio ufficiale: Yottamaster Store on Amazon


