1. Introduzione
Thank you for choosing the Electrolux EW9H39A 9 Kg Heat Pump Dryer. This manual provides essential information for the safe and efficient use of your appliance. Please read it thoroughly before installation and operation, and keep it for future reference.
This heat pump dryer is designed for domestic use, offering efficient drying with a 9 kg capacity and advanced Inverter technology for optimal performance and energy savings.
2. Informazioni sulla sicurezza
Sicurezza generale:
- Leggere tutte le istruzioni prima di utilizzare l'apparecchio.
- Tenere i materiali di imballaggio fuori dalla portata dei bambini.
- Questo apparecchio non è destinato all'uso da parte di persone (bambini compresi) con ridotte capacità fisiche, sensoriali o mentali, o prive di esperienza e conoscenza, a meno che non siano supervisionate o abbiano ricevuto istruzioni riguardanti l'uso dell'apparecchio da una persona responsabile della loro sicurezza.
- I bambini devono essere sorvegliati per assicurarsi che non giochino con l'apparecchio.
- Non permettere ai bambini di giocare con l'apparecchio.
Sicurezza dell'installazione:
- Assicurarsi che l'apparecchio sia installato su una superficie solida e piana.
- Do not install the appliance behind a lockable door, a sliding door or a door with a hinge on the opposite side to that of the tumble dryer, in such a way that a full opening of the tumble dryer door is restricted.
- The appliance must be connected to an earthed power supply.
- Do not use an extension cord or multiple socket adapter.
- Assicurare un'adeguata ventilazione attorno all'apparecchio per evitare il surriscaldamento.
- The ambient temperature for operation should be between 5 °C and 35 °C.
Sicurezza operativa:
- Non asciugare mai capi non lavati nell'asciugatrice.
- Gli articoli sporchi di sostanze quali olio da cucina, acetone, alcol, benzina, cherosene, smacchiatori, trementina, cere e prodotti per rimuovere la cera devono essere lavati in acqua calda con una quantità extra di detersivo prima di essere asciugati nell'asciugatrice.
- Togliere dalle tasche tutti gli oggetti come accendini e fiammiferi.
- Non fermare l'asciugatrice prima della fine del ciclo di asciugatura, a meno che tutti i capi non vengano rapidamente rimossi e stesi in modo da dissipare il calore.
- Pulire il filtro anti-pelucchi dopo ogni ciclo.
- Empty the water container after every cycle.
3. Prodotto finitoview
The Electrolux EW9H39A is a freestanding, front-loading heat pump dryer with a 9 kg capacity. It features an intuitive control knob and a built-in display for easy program selection and monitoring.
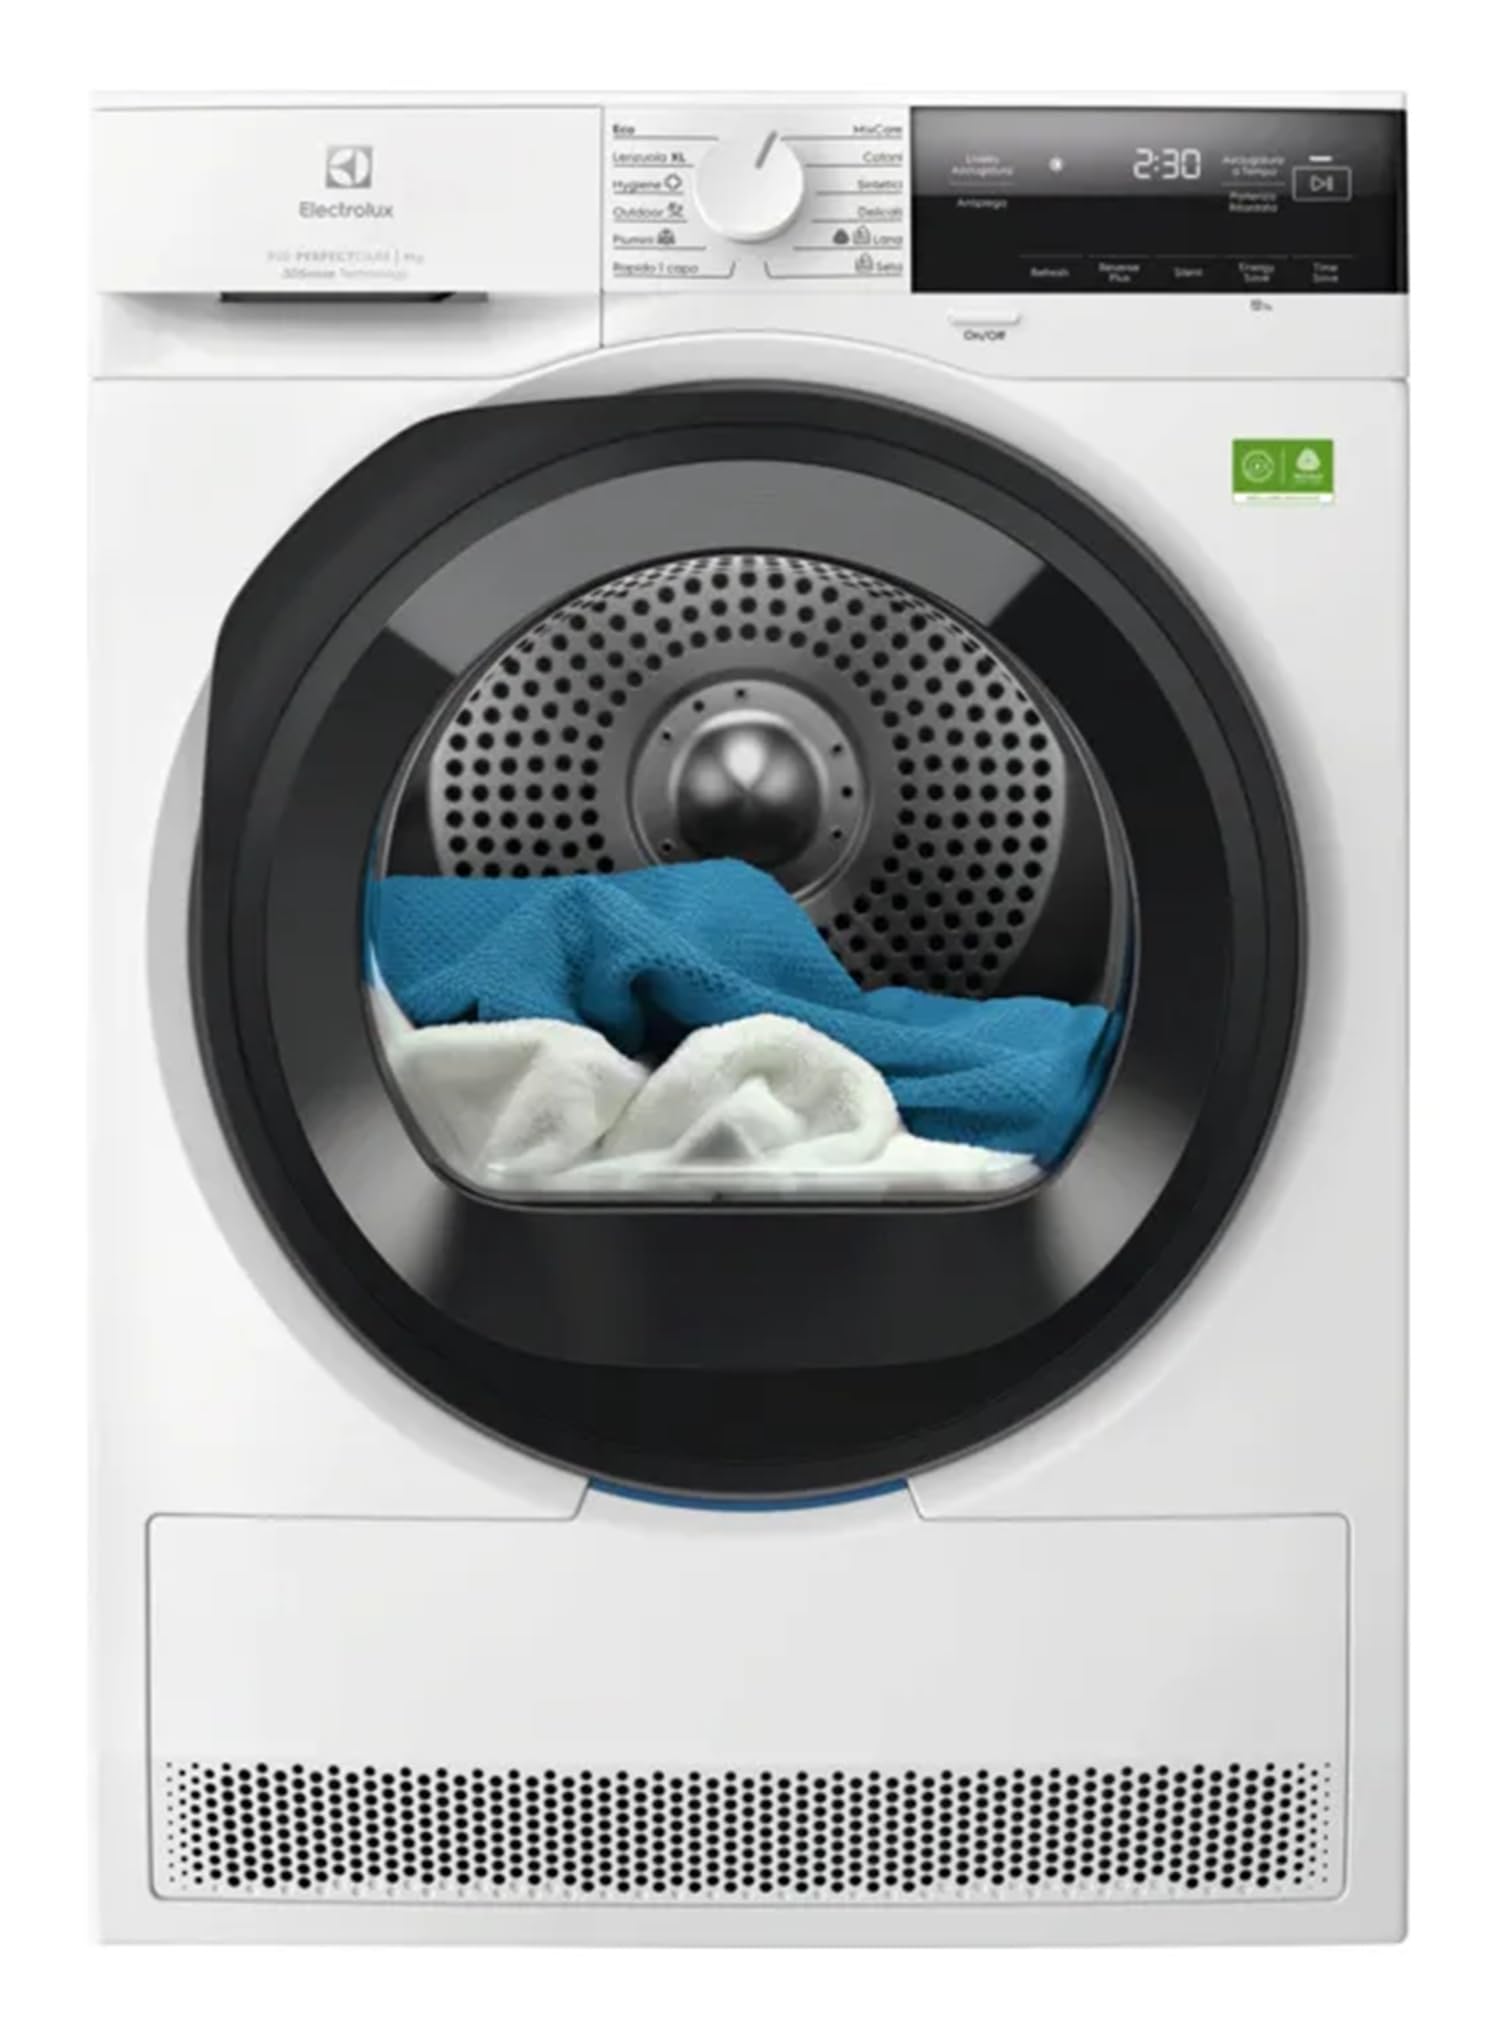
Figura 1: Davanti view of the Electrolux EW9H39A Heat Pump Dryer. This image shows the control panel with a central knob, the display, and the large black door for loading laundry.
Caratteristiche principali:
- Tecnologia della pompa di calore: Asciugatura efficiente dal punto di vista energetico a temperature più basse.
- Capacità 9 kg: Suitable for large loads.
- Tecnologia Inverter: Ensures quiet operation and durability.
- 12 programmi di asciugatura: Including Cotton, Delicates/Silk, Duvet, Eco, Hygiene/Allergy Care, Mix, Outdoor/Sport, Quick, Refresh, Silent, Synthetic, Timed, and Wool.
- Funzione antipiega: Reduces wrinkles for easier ironing (90 min cycle).
- Internal Drum Light: For better visibility when loading and unloading.
- Blocco bambini: Impedisce modifiche accidentali alle impostazioni.
- Piedini regolabili: Per un'installazione stabile su superfici irregolari.
Pannello di controllo:
Il pannello di controllo è in genere composto da:
- Manopola di selezione del programma: To choose the desired drying program.
- Display: Shows program status, remaining time, and error codes.
- Pulsanti funzione: For options like delayed start, anti-crease, or half load.
- Pulsante Avvio/Pausa: Per iniziare o interrompere temporaneamente un ciclo.
- Pulsante On/Off: To power the appliance.
4. Configurazione e installazione
Proper installation is crucial for the safe and efficient operation of your dryer. If in doubt, consult a qualified technician.
4.1 Disimballaggio
- Carefully remove all packaging materials, including polystyrene blocks and any protective film.
- Controllare l'apparecchio per eventuali danni causati dal trasporto. Segnalare immediatamente eventuali danni al rivenditore.
- Assicurarsi che tutti gli accessori siano presenti.
4.2 Posizionamento
- Place the dryer on a solid, level floor.
- Ensure there is sufficient space around the appliance for ventilation. Do not block the ventilation openings.
- Avoid installing the dryer in rooms where the temperature can fall below 5 °C or rise above 35 °C.
- The door hinge is on the right side. Ensure this orientation is suitable for your space.
4.3 Livellamento
- Use a spirit level to check if the appliance is perfectly level.
- Adjust the adjustable feet at the bottom of the dryer by turning them clockwise or anti-clockwise until the appliance is stable and level.
4.4 Collegamento elettrico
- Collegare l'apparecchio a una presa di corrente correttamente messa a terra.
- The power supply should be 230 V AC, 50 Hz.
- Do not use multi-plugs or extension cables.
- Ensure the plug is accessible after installation.
4.5 Drain Hose Installation (if applicable)
Your dryer collects condensed water in a container. For continuous drainage, you can connect a drain hose (if provided or purchased separately) to a suitable drain point. Refer to the specific instructions in the full manual for this procedure.
5. Istruzioni per l'uso
Follow these steps for optimal drying results and to prolong the life of your appliance.
5.1 Preparazione del bucato
- Suddividere il bucato in base al tipo di tessuto e al livello di asciugatura desiderato.
- Controllare le etichette di manutenzione per le istruzioni di asciugatura.
- Chiudere cerniere, ganci e chiusure per evitare danni.
- Rimuovere eventuali oggetti estranei dalle tasche.
- Do not overload the dryer; respect the 9 kg capacity.
5.2 Caricamento dell'asciugatrice
- Open the door and load the laundry into the drum.
- Ensure items are not tangled.
- Chiudere bene la porta finché non scatta in posizione.
5.3 Selezione di un programma
- Press the On/Off button to power on the dryer.
- Turn the Program Selector Knob to choose the appropriate drying program (e.g., Cotton, Synthetics, Delicates, Wool). The selected program will be shown on the display.
- Available programs include: Cotone (Cotton), Delicati/Seta (Delicates/Silk), Piumino/piumone (Duvet), Eco, Igiene/Allergy Care (Hygiene/Allergy Care), Mix, Outdoor/sport, Rapido (Quick), Refresh, Silent, Sintetico (Synthetic), Programmato (Timed), Lana (Wool).
5.4 Adjusting Options (if needed)
- Use the function buttons to select additional options such as:
- Partenza ritardata: To postpone the start of the cycle.
- Anti piega: To reduce wrinkles at the end of the cycle.
- Mezzo carico: For smaller loads to save energy.
5.5 Avvio del ciclo
- Premere il pulsante Avvio/Pausa per avviare il ciclo di asciugatura.
- Il display mostrerà il tempo rimanente stimato.
5.6 Fine del ciclo
- L'asciugatrice segnalerà la fine del ciclo.
- Open the door and remove the dry laundry.
- Clean the lint filter and empty the water container after every use.
- Premere il pulsante On/Off per spegnere l'apparecchio.
6. Manutenzione e pulizia
Una manutenzione regolare garantisce prestazioni ottimali e prolunga la durata dell'asciugatrice.
6.1 Pulizia del filtro anti-pelucchi
- The lint filter must be cleaned after every drying cycle.
- Open the dryer door. The filter is usually located inside the door opening or at the bottom of the drum.
- Remove the filter and gently brush off any accumulated lint.
- Se necessario, sciacquare il filtro sotto l'acqua corrente e assicurarsi che sia completamente asciutto prima di reinserirlo.
6.2 Svuotamento del contenitore dell'acqua
- The water container collects condensed water and should be emptied after every cycle.
- Pull out the water container, usually located at the top left of the control panel.
- Pour the water into a sink.
- Spingere il contenitore nella sua posizione originale finché non scatta.
6.3 Pulizia del condensatore
- Il condensatore deve essere pulito periodicamente (ad esempio, ogni pochi mesi o secondo le indicazioni dell'apparecchio).
- Refer to the full instruction manual for detailed steps on how to access and clean the condenser unit. This typically involves opening a lower panel and rinsing the condenser fins.
- Ensure the condenser is dry before reassembling.
6.4 Pulizia del cestello e dell'esterno
- Pulisci l'interno del tamburo con un pannoamp panno se necessario.
- Pulire le superfici esterne con un panno morbido eamp panno. Non usare detergenti abrasivi o solventi.
7. Risoluzione Dei Problemi
Prima di contattare il servizio clienti, verifica i seguenti problemi comuni e le relative soluzioni:
| Problema | Possibile causa | Soluzione |
|---|---|---|
| L'asciugatrice non si avvia. | Nessuna alimentazione; Sportello non chiuso correttamente; Programma non selezionato; Pulsante di avvio non premuto. | Controllare la spina di alimentazione e il fusibile; Assicurarsi che lo sportello sia ben chiuso; Selezionare un programma; Premere il pulsante Avvio/Pausa. |
| I risultati dell'asciugatura non sono soddisfacenti. | Lint filter blocked; Water container full; Condenser dirty; Incorrect program selected; Overloaded. | Clean lint filter; Empty water container; Clean condenser; Select appropriate program; Reduce load size. |
| Dryer stops during cycle. | Water container full; Power outage; Overheating. | Empty water container; Check power supply; Clean filters and condenser to prevent overheating. |
| Rumore insolito. | Corpi estranei nel cestello; apparecchio non in piano. | Check drum for loose items; Adjust adjustable feet to level the dryer. |
| Il display mostra un codice di errore. | Rilevato un guasto specifico. | Refer to the full user manual for a list of error codes and their solutions, or contact customer service. |
8. Specifiche tecniche
| Caratteristica | Specificazione |
|---|---|
| Modello | EW9H39A |
| Marca | Elettrolux |
| Posizionamento dell'apparecchio | Libera installazione |
| Tipo di caricamento | Caricamento frontale |
| Sistema di essiccazione | Pompa di calore |
| Capacità | 9 kg |
| Classe di efficienza energetica | A (scala da A a G) |
| Classe di efficienza di condensazione | A |
| Consumo energetico (100 cicli) | 79 kWh |
| Consumo energetico (per ciclo) | 1.84 kWh |
| Classe di emissione acustica | A |
| Livello di rumore | 60 dB |
| Durata del ciclo | 255 minuto |
| Volume del tamburo | 118 L |
| Tecnologia inverter | SÌ |
| Tipo di controllo | Manopola |
| Display | SÌ |
| Cerniera della porta | Giusto |
| Luce del tamburo interna | SÌ |
| Blocco bambini | SÌ |
| Piedini regolabili | SÌ |
| Refrigerante | R290 |
| Min. Temperatura ambiente | 5 °C |
| Max. Temperatura ambiente | 35 °C |
| Collegamento di potenza | 900 L |
| Ingresso CA Voltage | 230 Volt |
| Frequenza di ingresso CA | Frequenza 50 Hz |
| Dimensioni (A x L x P) | Dimensioni: 850 mm x 596 mm x 636 mm |
| Peso | 52.8 kg |
9. Garanzia e supporto
Garanzia:
Your Electrolux EW9H39A dryer comes with a manufacturer's warranty. The terms and conditions of the warranty are detailed in the separate warranty document provided with your appliance. Please retain your proof of purchase for any warranty claims.
Assistenza clienti:
For technical assistance, spare parts, or service requests, please contact Electrolux customer service. You can find contact information on the official Electrolux website or in the warranty booklet. When contacting support, please have your model number (EW9H39A) and serial number ready.
You can visit the official Electrolux store for more information: Negozio Electrolux


