1. Introduzione
The Olvy 2-in-1 Jump Starter and Power Bank (Model QS001) is a versatile and essential device designed to provide reliable emergency starting power for a wide range of 12V vehicles, including cars, trucks, motorcycles, SUVs, vans, and heavy-duty engines. Beyond its powerful jump-starting capability, it also functions as a high-capacity portable power bank and a multi-mode LED flashlight, making it an indispensable tool for any driver.
Engineered for performance in extreme conditions, this device operates effectively in temperatures ranging from -20°C to +60°C. It incorporates 9 layers of intelligent protection to ensure maximum safety and peace of mind during use.

Image: The Olvy Jump Starter is designed to operate reliably in extreme temperatures, from -20°C to +60°C, ensuring functionality in diverse climates.
2. Caratteristiche del prodotto
- Potente avviatore di emergenza: Delivers up to 1500A peak current to start 12V diesel and gasoline vehicles, including cars, trucks, motorcycles, SUVs, vans, and heavy-duty engines.
- Sicuro e affidabile: Equipped with 9 levels of intelligent protection, including reverse polarity, short circuit, overcurrent, overload, over-temperature, and over-discharge protection.
- Funzionamento in tutte le condizioni atmosferiche: Designed to function in extreme conditions from -20°C to +60°C, ensuring reliable starts in cold or hot climates.
- Multi-functional Emergency Light: Integrated LED flashlight with 3 modes: bright light, strobe, and SOS signal for roadside safety and emergencies.
- Banca di alimentazione portatile: Dual USB and Type-C outputs with 8,000 mAh / 10,000 mAh capacity for charging smartphones, tablets, and other electronic devices on the go.

Image: The Olvy Jump Starter is suitable for a wide range of 12V vehicles, including sedans, motorcycles, SUVs, and even heavy-duty engines.
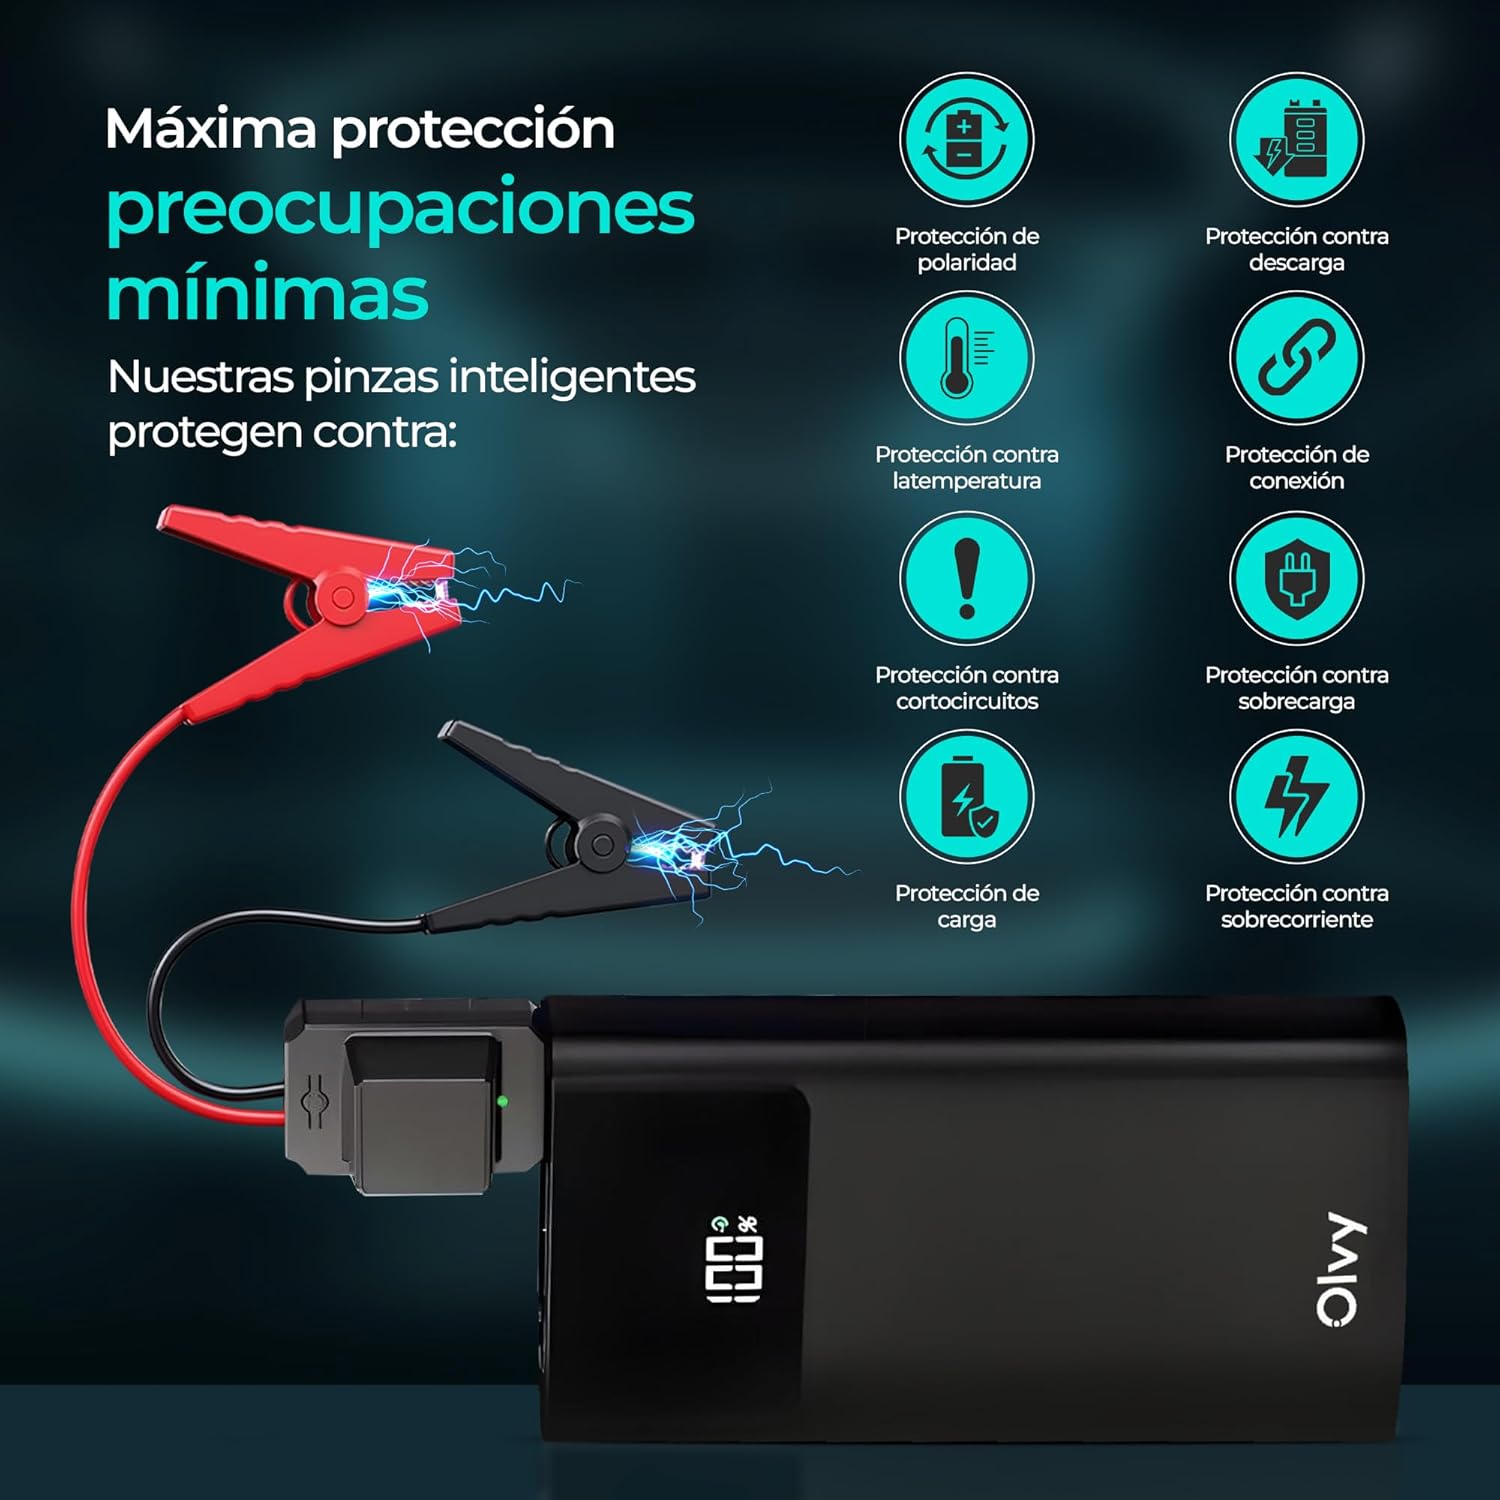
Image: The device features multiple intelligent protections, such as polarity protection, discharge protection, temperature protection, connection protection, short-circuit protection, overload protection, charge protection, and overcurrent protection.

Image: This compact and portable jump starter provides 1500A peak current and includes smart cables for safe and efficient operation.
3. Impostazione
3.1. Contenuto della confezione
Prima del primo utilizzo, assicurarsi che tutti gli articoli siano presenti nella confezione:
- 1x Olvy Jump Starter and Power Bank
- 1x Smart Battery Clamps
- Cavo di ricarica USB 1x
- Borsa di stoccaggio 1x
- 1x Manuale utente

Image: The complete package includes the Olvy 2-in-1 Jump Starter, smart battery clamps, a USB charging cable, a storage bag, and a user manual.
3.2. Ricarica iniziale
Fully charge the Olvy Jump Starter before its first use. Connect the provided USB charging cable to the device's Type-C input port and a suitable USB power adapter (not included). The LCD screen will display the charging progress. Disconnect once fully charged.
4. Istruzioni per l'uso
4.1. Avviamento di emergenza di un veicolo
- Assicurarsi che l'avviatore di emergenza sia sufficientemente carico (si consiglia almeno il 50%).
- Collega la batteria intelligente clamps to the jump starter's dedicated port.
- Attaccare il rosso (+) clamp al terminale positivo della batteria del veicolo.
- Attaccare il nero (-) clamp to the negative terminal of the vehicle's battery. Ensure a secure connection. The smart clamps will indicate a correct connection (e.g., a green light).
- Avviare il motore del veicolo.
- Una volta avviato il motore, rimuovere immediatamente la chiave intelligenteampdalla batteria del veicolo, quindi scollegarli dall'avviatore di emergenza.

Image: Simple 4-step process for jump starting: 1. Connect the smart clamps to the jump starter. 2. Clamp to the car battery. 3. Start the car. 4. Disconnect the clamps.
4.2. Utilizzo come power bank portatile
The Olvy Jump Starter can charge your electronic devices:
- Connect your device's USB or Type-C charging cable to the corresponding output port on the jump starter.
- L'avviatore di emergenza inizierà automaticamente a caricare il tuo dispositivo.
- Monitor the charging status on your device and the jump starter's LCD screen.

Image: The device doubles as a power bank with Type-C and USB outputs, offering 8,000 mAh capacity to charge mobile devices.
4.3. Utilizzo della torcia a LED
La torcia LED integrata offre tre modalità per diverse situazioni:
- Luce intensa: Press and hold the flashlight button to turn on the bright light.
- Modalità strobo: Press the button again to switch to strobe mode for increased visibility.
- Segnale SOS: Press the button a third time for the SOS signal, useful in emergencies.
- Tenere premuto il pulsante per spegnere la torcia.
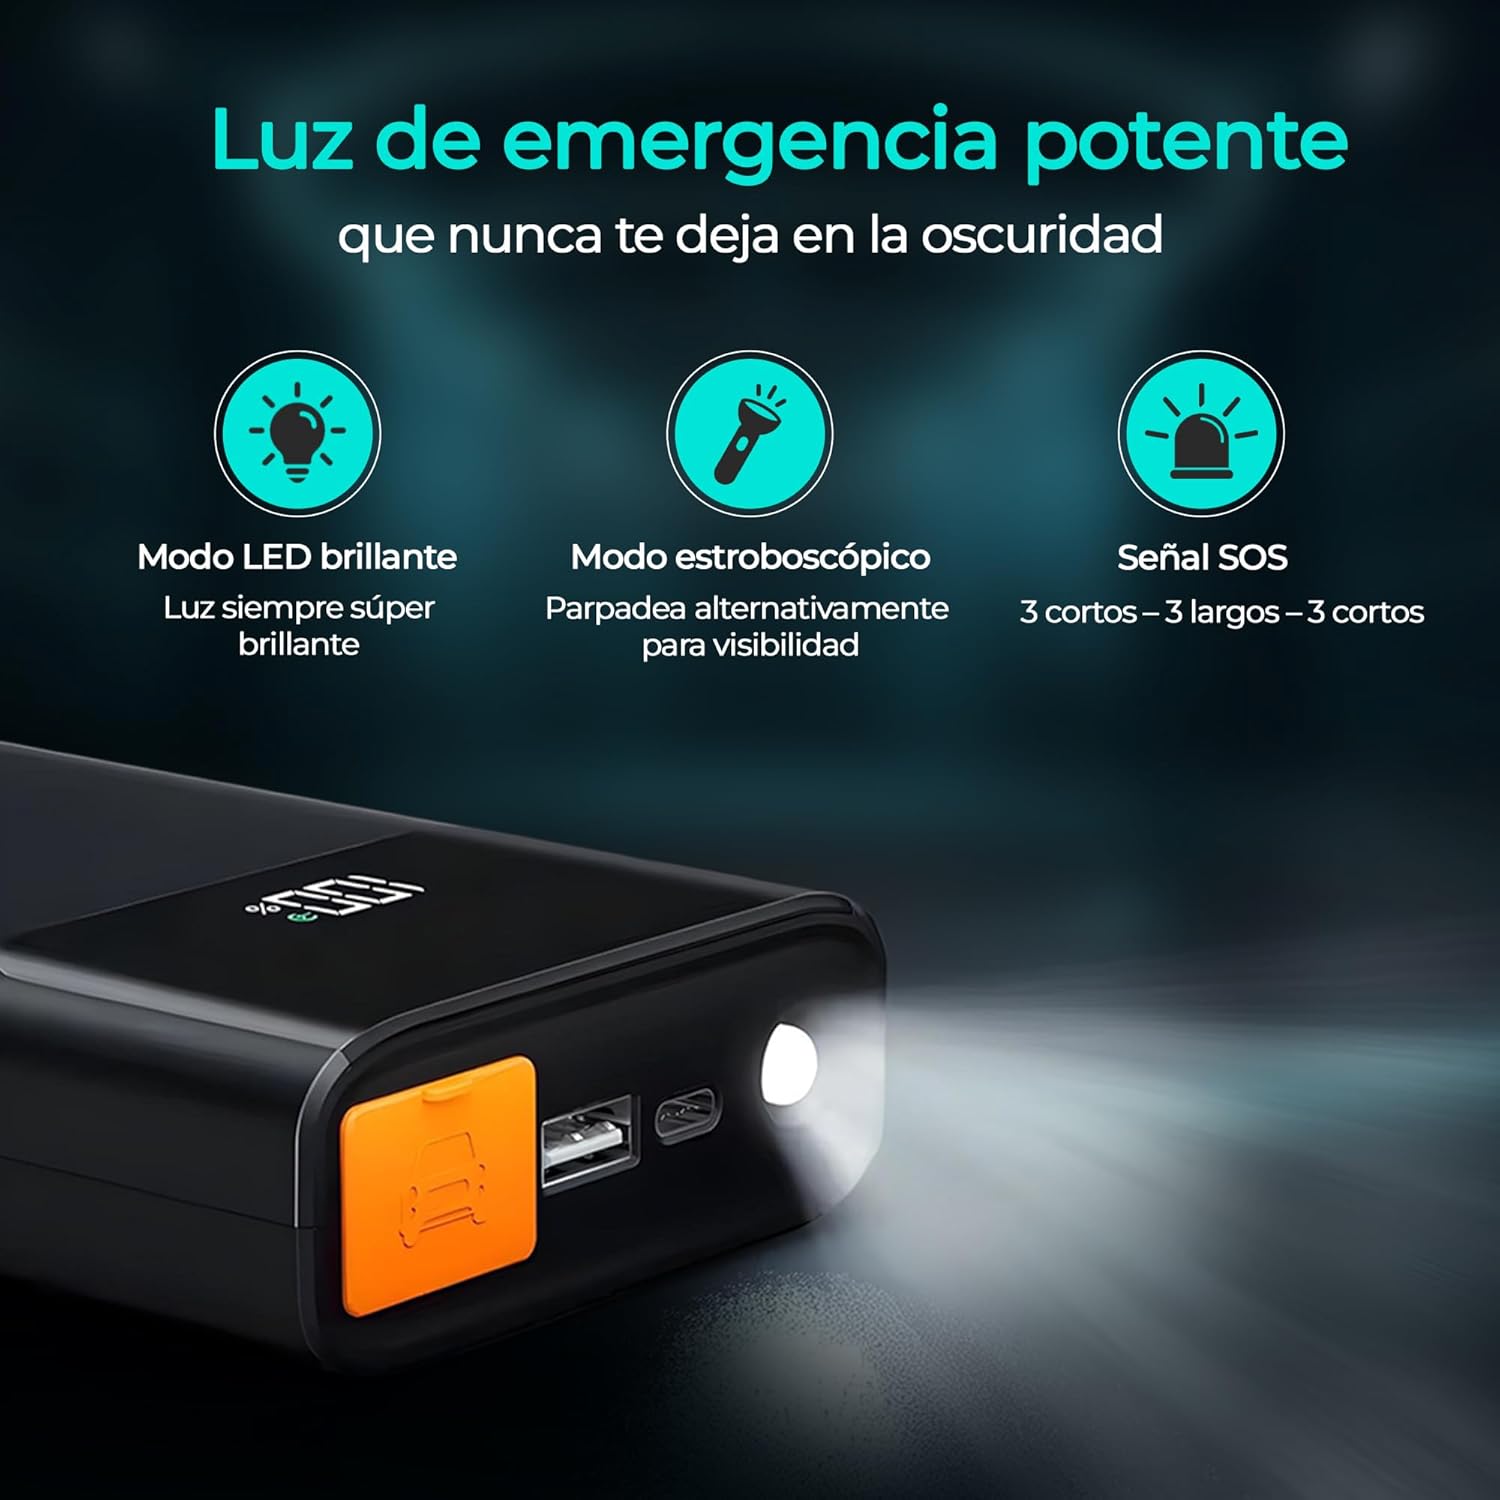
Image: The powerful emergency light features a super bright LED mode, an alternating strobe mode for visibility, and an SOS signal (3 short, 3 long, 3 short flashes).
5. Informazioni sulla sicurezza
Si prega di leggere attentamente tutte le avvertenze e le istruzioni di sicurezza prima di utilizzare questo prodotto. Il mancato rispetto di queste istruzioni può causare scosse elettriche, incendi e/o lesioni gravi.
- Non cortocircuitare lo smart clamps.
- Non esporre il prodotto alla pioggia o all'umidità.
- Non smontare il prodotto. Per qualsiasi intervento di assistenza, rivolgersi a personale qualificato.
- Tenere fuori dalla portata dei bambini.
- Utilizzare solo lo smart cl fornitoampe cavo di ricarica.
- Ensure proper polarity when connecting to a vehicle battery (red to positive, black to negative). The smart clamps have built-in reverse polarity protection.
- Non avviare una batteria congelata.
- Non utilizzare l'avviatore di emergenza se i cavi o i clampsono danneggiati.
- Rimuovi il clamps from the vehicle battery immediately after the engine starts.
6. Manutenzione
- Conservare l'avviatore di emergenza in un luogo fresco e asciutto, lontano dalla luce solare diretta e da temperature estreme.
- Ricaricare il dispositivo ogni 3-6 mesi, anche se non lo si utilizza, per preservare la salute della batteria.
- Pulire l'esterno con un panno morbido, damp stoffa. Non utilizzare prodotti chimici aggressivi o materiali abrasivi.
- Mantieni la classe intelligenteampè pulito e privo di corrosione.
7. Risoluzione Dei Problemi
7.1. Il dispositivo non si accende
- Assicurarsi che il dispositivo sia carico. Ricaricare se il livello della batteria è basso.
- Tieni premuto il pulsante di accensione per alcuni secondi per assicurarti che non si tratti di una pressione rapida.
7.2. Vehicle Not Starting
- Controllare che la smart clamps are securely connected to the vehicle battery terminals with correct polarity.
- Assicurarsi che l'avviatore di emergenza abbia una carica sufficiente.
- The vehicle battery might be severely discharged or damaged. Consult a professional mechanic.
- Se la smart clamps indicate an error (e.g., red light), refer to the smart clamp's specific error codes in the full user manual.
7.3. Dispositivo non in carica
- Ensure the USB charging cable is properly connected to both the device and the power adapter.
- Try a different USB power adapter or charging cable.
8. Specifiche
| Marca | Olvy |
| Modello | QS001 |
| Corrente di picco | 1500 Amperi |
| Capacità della batteria | 8000 mAh (10000 mAh variant also mentioned) |
| Composizione delle celle della batteria | Ioni di litio |
| Voltage | 12 Volt (CC) |
| Temperatura di esercizio | da -20°C a +60°C |
| Dimensioni | Dimensioni: 19 x 12.7 x 9 cm |
| Peso | 1.5 kg |
| Uscita USB | SÌ |
| Uscita di tipo C | SÌ |
9. Garanzia e supporto
For detailed warranty information and customer support, please refer to the warranty card included in your product package or visit the official Olvy websito. Conservare la ricevuta d'acquisto come prova d'acquisto per eventuali reclami in garanzia.


