1. Introduzione
Grazie per l'acquistoasing the Goeco 54W Dimmable Rectangular LED Ceiling Light. This manual provides essential information for the safe installation, operation, and maintenance of your new lighting fixture. Please read this manual thoroughly before installation and keep it for future reference.
2. Istruzioni di sicurezza
AVVERTIMENTO: To prevent electric shock, fire, or personal injury, always turn off the power at the main circuit breaker before installing, servicing, or cleaning the fixture.
- L'installazione deve essere eseguita da un elettricista qualificato, nel rispetto delle normative elettriche locali.
- Garantire la fornitura voltage è compatibile con i requisiti dell'apparecchio (220-240 V).
- Non modificare in alcun modo l'apparecchio.
- Tenere i materiali infiammabili lontano dall'apparecchio di illuminazione.
- Non guardare direttamente la sorgente luminosa a LED quando è accesa.
- Questo prodotto è progettato esclusivamente per uso interno.
3. Contenuto della confezione
Verify that all components are present and undamaged before installation. If any parts are missing or damaged, contact your retailer.
- Goeco 54W Dimmable Rectangular LED Ceiling Light (1 unit)
- Telecomando (1 unità)
- Hardware di montaggio (viti, tasselli)
- Manuale dell'utente (questo documento)
4. Specifiche
| Caratteristica | Specificazione |
|---|---|
| Modello | B0G2V6VT13 |
| Energia | 54W |
| Voltage | 220-240 V |
| Flusso luminoso | 6075 milioni di lire |
| Dimmerabile | Yes (5%-100% brightness) |
| Temperatura del colore | 3000K-6500K (da bianco caldo a bianco freddo) |
| Materiale | Alluminio, Acrilico |
| Area di illuminazione | 10-25 mq |
| Dimensioni (L x P x A) | Dimensioni: 62 cm x 40 cm x 9.5 cm |
| Stile | Moderno |
| Utilizzo | Solo per uso interno |
| Classe di efficienza energetica | E |
Per informazioni dettagliate sull'energia, fare riferimento al database EPREL dell'UE: https://eprel.ec.europa.eu/qr/2541348
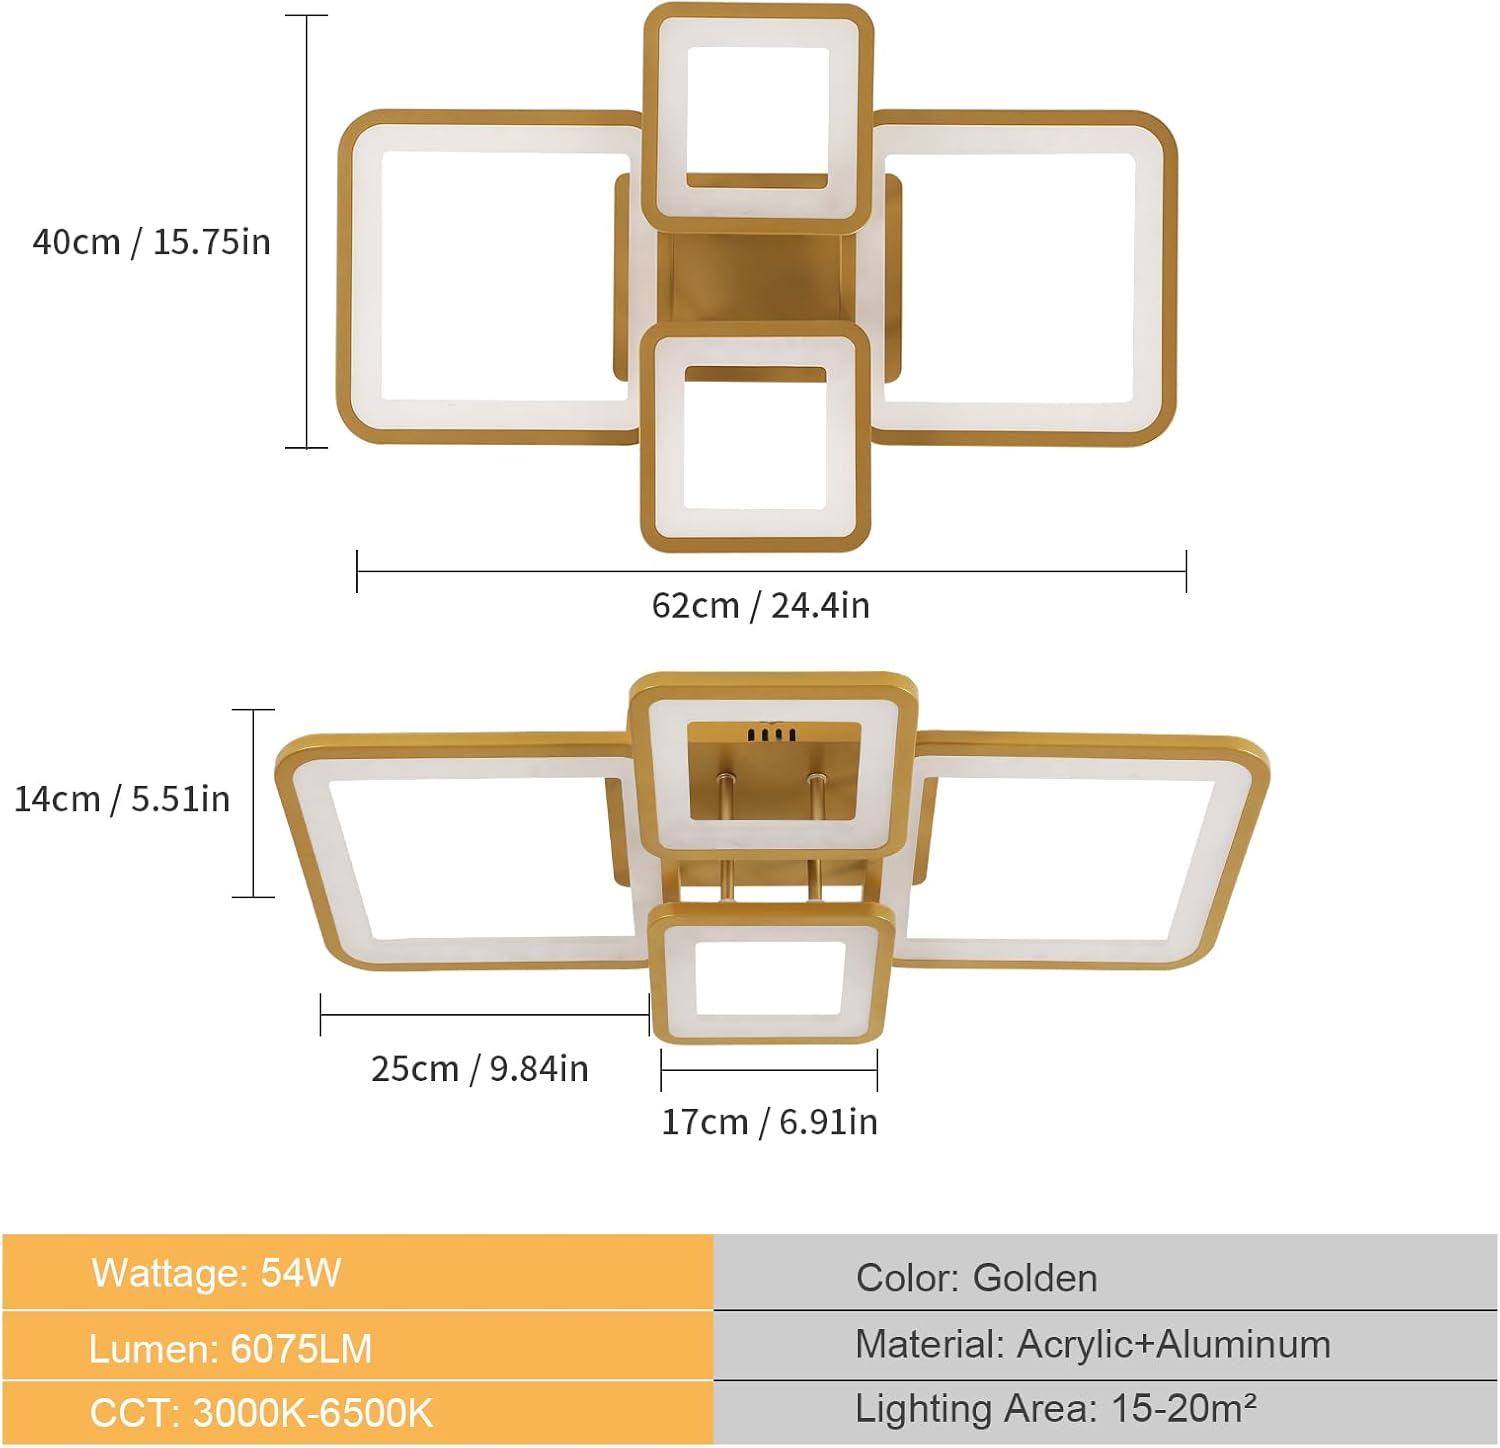
Figure 1: Product Dimensions. The light measures 62cm in length and 40cm in width.

Figura 2: Etichetta di efficienza energetica.
5. Istruzioni per l'installazione
Prima di iniziare: Ensure the power supply is turned off at the circuit breaker. Gather necessary tools (screwdriver, drill, wire strippers, etc.).
- Preparare la superficie di montaggio: Mark the drilling points on the ceiling according to the fixture's mounting bracket.
- Installare la staffa di montaggio: Drill holes and insert wall anchors if necessary. Secure the mounting bracket to the ceiling using the provided screws.
- Collegamento elettrico: Connect the household electrical wires to the fixture's wires. Ensure proper polarity (Live to Live, Neutral to Neutral, Ground to Ground). Use appropriate wire connectors.
- Fissare il dispositivo: Carefully lift the light fixture and attach it to the mounting bracket, ensuring all wires are tucked safely inside the canopy. Secure the fixture with the retaining screws.
- Ripristina alimentazione: Riattivare la corrente tramite l'interruttore automatico.

Figure 3: Product Components. The light features an aluminum body, acrylic lampshade, and integrated LED chips.
6. Istruzioni per l'uso
This ceiling light is operated using the included remote control. Ensure the remote control has working batteries installed.
- Accensione/spegnimento: Premere il tasto ACCESO/SPENTO pulsante per accendere o spegnere la luce.
- Regolazione della luminosità: Utilizzare il Luminosità su (+) E Luminosità giù (-) pulsanti per regolare l'intensità luminosa dal 5% al 100%.
- Regolazione della temperatura del colore: Utilizzare il Bianco caldo (WW) E Bianco freddo (CW) buttons or the dedicated color temperature slider on the remote to change the color temperature between 3000K (warm white) and 6500K (cool white).
- Funzione di memoria: The fixture retains the last brightness and color temperature settings when turned off and on again.

Figure 4: Remote Control and Color Temperature Adjustment. Adjust brightness and color from warm to cool white.
7. Manutenzione
- Pulizia: Scollegare l'alimentazione prima della pulizia. Pulire l'apparecchio con un panno morbido, asciutto o leggermente asciutto.amp panno. Non usare detergenti abrasivi o solventi.
- LED: La sorgente luminosa a LED integrata è progettata per un utilizzo a lungo termine e non è sostituibile dall'utente.
- Telecomando: Replace batteries as needed (typically 2x AAA, not specified but common).
8. Risoluzione Dei Problemi
| Problema | Possibile causa | Soluzione |
|---|---|---|
| La luce non si accende. | Nessuna alimentazione; cavi allentati; batteria del telecomando scarica. | Controllare l'interruttore automatico. Verificare i collegamenti elettrici. Sostituire le batterie del telecomando. |
| La luce tremola o si attenua inaspettatamente. | Unstable power supply; loose wiring; remote control interference. | Check power supply stability. Re-check wiring. Ensure no obstructions between remote and fixture. |
| Il telecomando non risponde. | Dead batteries; remote out of range; pairing issue. | Replace remote batteries. Ensure remote is within operating range. Refer to remote pairing instructions (if applicable, not provided). |
9. Informazioni sulla garanzia
Goeco products are manufactured to high-quality standards. This product comes with a standard manufacturer's warranty against defects in materials and workmanship. Please retain your proof of purchase for warranty claims. For specific warranty terms and conditions, refer to the documentation provided at the time of purchase or contact Goeco customer support.
10. Assistenza clienti
If you encounter any issues or have questions regarding your Goeco LED Ceiling Light, please contact our customer support team. You can find contact information on the Goeco brand store page on Amazon or through your purchase documentation.
Goeco Brand Store: https://www.amazon.es/stores/Goeco/page/768D64BE-EA27-40D8-B777-DD90BF3E57F4


